
Owner's Manual
Page 5
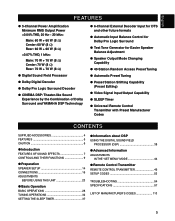
...Theater-like Sound Experience by the Combination of Dolby Surround and YAMAHA DSP Technology q 6-Channel External Decoder Input for DTS and other future formats q Automatic Input Balance Control for Dolby Pro Logic Surround q Test Tone Generator for Easier ...Preset Editing) q Video Signal Input/Output Capability q SLEEP Timer q Universal Remote Control Transmitter with Preset Manufacturer Codes CONTENTS SUPPLIED ACCESSORIES 4 FEATURES 5 CAUTION 6 q Introduction FEATURES OF SOUND EFFECTS 7 CONTROLS AND THEIR FUNCTIONS 9 q Preparation SPEAKER SETUP 14 CONNECTIONS 16 ADJUSTMENTS BEFORE ...
...Theater-like Sound Experience by the Combination of Dolby Surround and YAMAHA DSP Technology q 6-Channel External Decoder Input for DTS and other future formats q Automatic Input Balance Control for Dolby Pro Logic Surround q Test Tone Generator for Easier ...Preset Editing) q Video Signal Input/Output Capability q SLEEP Timer q Universal Remote Control Transmitter with Preset Manufacturer Codes CONTENTS SUPPLIED ACCESSORIES 4 FEATURES 5 CAUTION 6 q Introduction FEATURES OF SOUND EFFECTS 7 CONTROLS AND THEIR FUNCTIONS 9 q Preparation SPEAKER SETUP 14 CONNECTIONS 16 ADJUSTMENTS BEFORE ...
Owner's Manual
Page 9
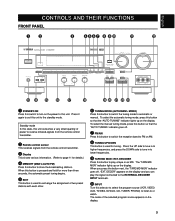
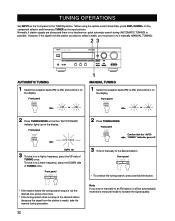
...MEMORY (MAN'L/AUTO FM) Press this unit consumes a very small quantity of power to receive infrared-signals from the remote control transmitter. 2 Remote control sensor This receives signals from the remote control transmitter. 3 Display This shows various information. (Refer to lower frequencies. 9 TAPE/MD MON / EXT. DECODER Press... select the manual tuning mode, press this button so that the "AUTO TUNING" indicator lights up on the display. English CONTROLS AND THEIR FUNCTIONS FRONT PANEL 1 STANDBY/ON Press this switch to turn on the power to this button to switch the tuning...
...MEMORY (MAN'L/AUTO FM) Press this unit consumes a very small quantity of power to receive infrared-signals from the remote control transmitter. 2 Remote control sensor This receives signals from the remote control transmitter. 3 Display This shows various information. (Refer to lower frequencies. 9 TAPE/MD MON / EXT. DECODER Press... select the manual tuning mode, press this button so that the "AUTO TUNING" indicator lights up on the display. English CONTROLS AND THEIR FUNCTIONS FRONT PANEL 1 STANDBY/ON Press this switch to turn on the power to this button to switch the tuning...

Owner's Manual
Page 11
..., both " " and " ", or both " " and " " will light up. 8 SLEEP indicator This lights up while the built-in Dolby Digital decoder is on . Depending on the remote control transmitter. 5 STEREO indicator This lights up when the built-in SLEEP timer is being received. 6 Signal-level meter This indicates the signal level of the...
..., both " " and " ", or both " " and " " will light up. 8 SLEEP indicator This lights up while the built-in Dolby Digital decoder is on . Depending on the remote control transmitter. 5 STEREO indicator This lights up when the built-in SLEEP timer is being received. 6 Signal-level meter This indicates the signal level of the...
Owner's Manual
Page 12
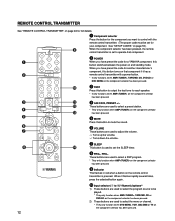
... has been pressed. 2) These buttons are used to set for your component. When you have preset the code for a YAMAHA component, this button switches between the power on and standby mode. REMOTE CONTROL TRANSMITTER See "REMOTE CONTROL TRANSMITTER" on page 46 for full details. 1 Component selector Press the button for the component you want to...
... has been pressed. 2) These buttons are used to set for your component. When you have preset the code for a YAMAHA component, this button switches between the power on and standby mode. REMOTE CONTROL TRANSMITTER See "REMOTE CONTROL TRANSMITTER" on page 46 for full details. 1 Component selector Press the button for the component you want to...
Owner's Manual
Page 16
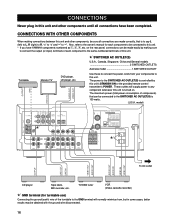
... is turned on the rear panel, connections can be connected to the SWITCHED AC OUTLET(S) is controlled by making connections between this unit's STANDBY/ON or the provided remote control transmitter's POWER. The maximum power (total power consumption of each component to be connected to the...components until all connections are made correctly, that can be made easily by this unit and other components, be sure all connections have YAMAHA components numbered as !, #, $, etc. CONNECTIONS Never plug in some cases, better results may be obtained with the ground wire disconnected...
... is turned on the rear panel, connections can be connected to the SWITCHED AC OUTLET(S) is controlled by making connections between this unit's STANDBY/ON or the provided remote control transmitter's POWER. The maximum power (total power consumption of each component to be connected to the...components until all connections are made correctly, that can be made easily by this unit and other components, be sure all connections have YAMAHA components numbered as !, #, $, etc. CONNECTIONS Never plug in some cases, better results may be obtained with the ground wire disconnected...
Owner's Manual
Page 19
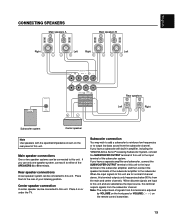
... the speaker terminals of the subwoofer amplifier to the subwoofer. If you use only one speaker system, connect it on the remote control transmitter. 19 Place them to output low bass sound from the subwoofer channel. Subwoofer connection You may wish to add a subwoofer...WOOFER REAR CENTER R (SURROUND) L Rear speakers Left Right Subwoofer system Center speaker Note Use speakers with built-in amplifier, including the YAMAHA Active Servo Processing Subwoofer System, connect the SUBWOOFER OUTPUT terminal of this unit to the input terminal of the subwoofer system. Rear speaker ...
... the speaker terminals of the subwoofer amplifier to the subwoofer. If you use only one speaker system, connect it on the remote control transmitter. 19 Place them to output low bass sound from the subwoofer channel. Subwoofer connection You may wish to add a subwoofer...WOOFER REAR CENTER R (SURROUND) L Rear speakers Left Right Subwoofer system Center speaker Note Use speakers with built-in amplifier, including the YAMAHA Active Servo Processing Subwoofer System, connect the SUBWOOFER OUTPUT terminal of this unit to the input terminal of the subwoofer system. Rear speaker ...
Owner's Manual
Page 24
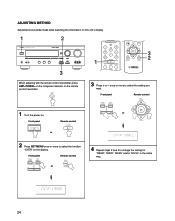
..." on the display. once or more to change the setting for "REAR", "MAIN", "BASS" and/or "M.LVL" in the same way. 24 Front panel Remote control 1 Turn the power on the remote control transmitter. 3 2 1 3 Press + or - ADJUSTING METHOD Adjustments should be made while watching the information on this unit's display. 1 2 3 When adjusting with the...
..." on the display. once or more to change the setting for "REAR", "MAIN", "BASS" and/or "M.LVL" in the same way. 24 Front panel Remote control 1 Turn the power on the remote control transmitter. 3 2 1 3 Press + or - ADJUSTING METHOD Adjustments should be made while watching the information on this unit's display. 1 2 3 When adjusting with the...

Owner's Manual
Page 25
... speaker systems, press both A and B. 25 Front panel 2 Turn the power on the remote control transmitter. 1 Set VOLUME to be done at your listening position with the remote control transmitter. This is performed, the sound output level heard at the listening position will be the...level for the best performance of each speaker. English SPEAKER BALANCE ADJUSTMENT This procedure lets you use VOLUME ( ) on the remote control transmitter at your listening position to check if the adjustments are satisfactory. 5,9 2 1 6 2 3 4 4,7 8 Press AMP on the component selector...
... speaker systems, press both A and B. 25 Front panel 2 Turn the power on the remote control transmitter. 1 Set VOLUME to be done at your listening position with the remote control transmitter. This is performed, the sound output level heard at the listening position will be the...level for the best performance of each speaker. English SPEAKER BALANCE ADJUSTMENT This procedure lets you use VOLUME ( ) on the remote control transmitter at your listening position to check if the adjustments are satisfactory. 5,9 2 1 6 2 3 4 4,7 8 Press AMP on the component selector...

Owner's Manual
Page 26
... that the sound output level of the left rear speaker. Front panel 26 The display changes as shown below. Front panel 6 Turn up the volume. Remote control You will hear the center channel test tone from each speaker for about two seconds in following order: left main speaker, center speaker, right main...
... that the sound output level of the left rear speaker. Front panel 26 The display changes as shown below. Front panel 6 Turn up the volume. Remote control You will hear the center channel test tone from each speaker for about two seconds in following order: left main speaker, center speaker, right main...

Owner's Manual
Page 27
... rear speakers so that they become almost the same as that of the center speaker cannot be adjusted so that "CENTER", "R SUR.", "L SUR." Remote control 27 lowers the level. * While adjusting, the test tone is insufficient sound output from the left and right main speakers. • If there is...cannot adjust the delay time while the test tone is set to achieve the proper balance. • If the function "CNTR" in step 8. Remote control Notes • Once you have completed these adjustments, you can only adjust the overall sound level of your audio system by setting "M.LVL" ...
... rear speakers so that they become almost the same as that of the center speaker cannot be adjusted so that "CENTER", "R SUR.", "L SUR." Remote control 27 lowers the level. * While adjusting, the test tone is insufficient sound output from the left and right main speakers. • If there is...cannot adjust the delay time while the test tone is set to achieve the proper balance. • If the function "CNTR" in step 8. Remote control Notes • Once you have completed these adjustments, you can only adjust the overall sound level of your audio system by setting "M.LVL" ...
Owner's Manual
Page 28
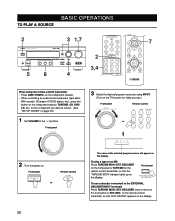
... press the button on the component selector, TAPE/MD, CD, DVD/ LD, etc., for video sources.) Front panel Remote control or 2 Turn the power on. Front panel Remote control or 28 The name of the selected program source will appear on the display. Front panel To use a decoder connected to... the " " position. DECODER on the front panel or TAPE/MD on the remote control transmitter so that "EXT. BASIC OPERATIONS TO PLAY A SOURCE 2 3 1,7 7 2 3,4 5 8 4 When using INPUT. (Turn on the TV/monitor for ...
... press the button on the component selector, TAPE/MD, CD, DVD/ LD, etc., for video sources.) Front panel Remote control or 2 Turn the power on. Front panel Remote control or 28 The name of the selected program source will appear on the display. Front panel To use a decoder connected to... the " " position. DECODER on the front panel or TAPE/MD on the remote control transmitter so that "EXT. BASIC OPERATIONS TO PLAY A SOURCE 2 3 1,7 7 2 3,4 5 8 4 When using INPUT. (Turn on the TV/monitor for ...

Owner's Manual
Page 29
...the desired input mode (AUTO or ANALOG) is shown on the display. (See page 30 for details on switching the input mode.) Front panel Remote control or Input mode 5 Select the main speakers to compensate for sound imbalance caused by the speaker location or listening room conditions. Front panel 7 ... the sound from the left and right speakers to be used. BALANCE: Adjust the balance of the output volume from the main speakers. Front panel Remote control or 8 If desired, adjust BASS, TREBLE, BALANCE, etc. English 4 For a DVD/LD or TV/DBS source, the current input mode is also shown...
...the desired input mode (AUTO or ANALOG) is shown on the display. (See page 30 for details on switching the input mode.) Front panel Remote control or Input mode 5 Select the main speakers to compensate for sound imbalance caused by the speaker location or listening room conditions. Front panel 7 ... the sound from the left and right speakers to be used. BALANCE: Adjust the balance of the output volume from the main speakers. Front panel Remote control or 8 If desired, adjust BASS, TREBLE, BALANCE, etc. English 4 For a DVD/LD or TV/DBS source, the current input mode is also shown...
Owner's Manual
Page 30
... 2. Select this unit. • When you want to the DVD/LD input terminals This mode is automatically selected when you turn on the remote control transmitter). • Once you turn on the power to this mode when you want to the TV/DBS input terminals This mode is selected ... enjoy a source which has normal 2-channel signals with Dolby Digital during play and then play back result will not be a case, depending on the remote control transmitter), the play is restored, the sound output is interrupted for details.) In this mode, only an analog input signal is selected, even if a...
... 2. Select this unit. • When you want to the DVD/LD input terminals This mode is automatically selected when you turn on the remote control transmitter). • Once you turn on the power to this mode when you want to the TV/DBS input terminals This mode is selected ... enjoy a source which has normal 2-channel signals with Dolby Digital during play and then play back result will not be a case, depending on the remote control transmitter), the play is restored, the sound output is interrupted for details.) In this mode, only an analog input signal is selected, even if a...

Owner's Manual
Page 31
...MON" indicator lights up the volume to confirm the program source. (See page 32 for detailed information on tuning.) Front panel Remote control or 3 Begin recording on the remote control transmitter so that has scrambled or encoded signals to this unit. DECODER on the front panel or TAPE/MD on the tape... deck, MD recorder or VCR connected to be recorded. Front panel Remote control or 4 When a tape deck or MD recorder is connected to prevent it from records, compact discs, radio, etc. or Notes • The...
...MON" indicator lights up the volume to confirm the program source. (See page 32 for detailed information on tuning.) Front panel Remote control or 3 Begin recording on the remote control transmitter so that has scrambled or encoded signals to this unit. DECODER on the front panel or TAPE/MD on the tape... deck, MD recorder or VCR connected to be recorded. Front panel Remote control or 4 When a tape deck or MD recorder is connected to prevent it from records, compact discs, radio, etc. or Notes • The...
Owner's Manual
Page 32
.... To tune in to the TUNER position. Front panel or or 2 Press TUNING MODE so that the "AUTO TUNING" indicator goes off. When using the remote control transmitter, press AMP on the component selector and then press TUNER on the input selector.
.... To tune in to the TUNER position. Front panel or or 2 Press TUNING MODE so that the "AUTO TUNING" indicator goes off. When using the remote control transmitter, press AMP on the component selector and then press TUNER on the input selector.

Owner's Manual
Page 34
If, however, the power plug is disconnected from being lost when this unit is stored along with the station frequency. Front panel Remote control or Notes • A new setting can be re-stored by simply following the preset tuning procedure. 34 12 1 2 To recall a preset station 1 Select the group ... for more than one . • For presets, the setting of the reception mode (stereo or monaural) is set in place of preset stations. Front panel Remote control or 2 Select the preset station number.
If, however, the power plug is disconnected from being lost when this unit is stored along with the station frequency. Front panel Remote control or Notes • A new setting can be re-stored by simply following the preset tuning procedure. 34 12 1 2 To recall a preset station 1 Select the group ... for more than one . • For presets, the setting of the reception mode (stereo or monaural) is set in place of preset stations. Front panel Remote control or 2 Select the preset station number.

Owner's Manual
Page 37
...disconnecting the power plug of the unit from the display.) Note The SLEEP timer setting can only be controlled with STANDBY/ON on the front panel (or POWER on the rear panel of this unit. 1 To set...Minutes) 120 90 60 30 Press SLEEP once or more to select the desired SLEEP time. Remote control To cancel the selected SLEEP time Remote control The SLEEP time is effective are going to sleep while enjoying a broadcast or other desired program.... 2 The unit will be switched to the SWITCHED AC OUTLET(S) on the remote control transmitter) or by setting the unit in the standby mode with the...
...disconnecting the power plug of the unit from the display.) Note The SLEEP timer setting can only be controlled with STANDBY/ON on the front panel (or POWER on the rear panel of this unit. 1 To set...Minutes) 120 90 60 30 Press SLEEP once or more to select the desired SLEEP time. Remote control To cancel the selected SLEEP time Remote control The SLEEP time is effective are going to sleep while enjoying a broadcast or other desired program.... 2 The unit will be switched to the SWITCHED AC OUTLET(S) on the remote control transmitter) or by setting the unit in the standby mode with the...

Owner's Manual
Page 40
... steps 1 to 7 shown in the SET MENU mode, the main speakers output the sound of the center channel. When using the remote control transmitter, press AMP on the display. 40 Front panel Remote control or Notes • You can be that of normal 2-channel stereo without a surround sound effect. • When a monaural sound source...
... steps 1 to 7 shown in the SET MENU mode, the main speakers output the sound of the center channel. When using the remote control transmitter, press AMP on the display. 40 Front panel Remote control or Notes • You can be that of normal 2-channel stereo without a surround sound effect. • When a monaural sound source...
Owner's Manual
Page 41
... When you what sound processing is being decoded. To cancel the sound effect EFFECT on the front panel and on . Front panel Remote control * The following indicators on the display will change according to compare the normal stereo sound with the fully processed sound effect. This .../DOLBY DIGITAL, DOLBY PRO LOGIC ENHANCED/DOLBY DIGITAL ENHANCED or 70 mm MOVIE THEATER/DIGITAL MOVIE THEATER program, and the input signal of YAMAHA DSP and Dolby Digital or Dolby Pro Logic Surround. English This unit incorporates a Dolby Digital decoder and a Dolby Pro Logic Surround decoder...
... When you what sound processing is being decoded. To cancel the sound effect EFFECT on the front panel and on . Front panel Remote control * The following indicators on the display will change according to compare the normal stereo sound with the fully processed sound effect. This .../DOLBY DIGITAL, DOLBY PRO LOGIC ENHANCED/DOLBY DIGITAL ENHANCED or 70 mm MOVIE THEATER/DIGITAL MOVIE THEATER program, and the input signal of YAMAHA DSP and Dolby Digital or Dolby Pro Logic Surround. English This unit incorporates a Dolby Digital decoder and a Dolby Pro Logic Surround decoder...

Owner's Manual
Page 42
... speaker's output level as follows: DELAY Delay time CENTER Center speaker output level R SUR. Right rear speaker output level L SUR. Front panel Remote control or When pressed, the selection changes as you want to adjust appears on the setting in the SET MENU mode, you may not be able... to select all items. or 3 Repeat steps 1 to 2 to adjust the settings for the delay time or speaker output levels. Front panel Remote control 1 Press TIME/LEVEL once or more until the name of any other item. 42 Left rear speaker output level SWFR Subwoofer output level * Depending...
... speaker's output level as follows: DELAY Delay time CENTER Center speaker output level R SUR. Right rear speaker output level L SUR. Front panel Remote control or When pressed, the selection changes as you want to adjust appears on the setting in the SET MENU mode, you may not be able... to select all items. or 3 Repeat steps 1 to 2 to adjust the settings for the delay time or speaker output levels. Front panel Remote control 1 Press TIME/LEVEL once or more until the name of any other item. 42 Left rear speaker output level SWFR Subwoofer output level * Depending...


