

Owner's Manual
Page 3
... void your FCC authorization to coaxial type cable. Utilize power outlets that your authority, granted by the interference. If the antenna lead-in is 300 ohm ribbon lead, change the lead-in all installation instructions. English 19 For US customers only: Outdoor Antenna Grounding - Note to CATV system installer: This reminder is too late, YAMAHA and the Electronic Industries Association's Consumer...
... void your FCC authorization to coaxial type cable. Utilize power outlets that your authority, granted by the interference. If the antenna lead-in is 300 ohm ribbon lead, change the lead-in all installation instructions. English 19 For US customers only: Outdoor Antenna Grounding - Note to CATV system installer: This reminder is too late, YAMAHA and the Electronic Industries Association's Consumer...
Owner's Manual
Page 5
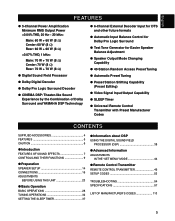
...Ω) q Digital Sound Field Processor q Dolby Digital Decoder q Dolby Pro Logic Surround Decoder q CINEMA DSP: Theater-like Sound Experience by the Combination of Dolby Surround and YAMAHA DSP Technology q 6-Channel External Decoder Input for DTS and other future formats q Automatic Input Balance Control for Dolby Pro Logic Surround q Test Tone Generator for Easier Speaker Balance Adjustment q Speaker Output Mode Changing Capability q 40-Station Random Access Preset Tuning q Automatic Preset Tuning q Preset Station Shifting Capability (Preset Editing) q Video Signal Input/Output Capability...
...Ω) q Digital Sound Field Processor q Dolby Digital Decoder q Dolby Pro Logic Surround Decoder q CINEMA DSP: Theater-like Sound Experience by the Combination of Dolby Surround and YAMAHA DSP Technology q 6-Channel External Decoder Input for DTS and other future formats q Automatic Input Balance Control for Dolby Pro Logic Surround q Test Tone Generator for Easier Speaker Balance Adjustment q Speaker Output Mode Changing Capability q 40-Station Random Access Preset Tuning q Automatic Preset Tuning q Preset Station Shifting Capability (Preset Editing) q Video Signal Input/Output Capability...
Owner's Manual
Page 6
... the rear) according to allow a space of the unit. In this state, this manual carefully. MODEL: Serial No.: The serial number is an electrical storm. 13. CAUTION: READ THIS BEFORE OPERATING YOUR UNIT. 1. To assure the finest performance, please read the "TROUBLESHOOTING" section regarding common operating errors before starting the audio source play. Keep it is turned off. Install this unit. away from use...
... the rear) according to allow a space of the unit. In this state, this manual carefully. MODEL: Serial No.: The serial number is an electrical storm. 13. CAUTION: READ THIS BEFORE OPERATING YOUR UNIT. 1. To assure the finest performance, please read the "TROUBLESHOOTING" section regarding common operating errors before starting the audio source play. Keep it is turned off. Install this unit. away from use...
Owner's Manual
Page 9
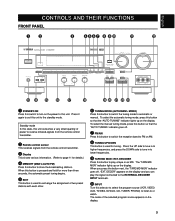
... you can play a tape or an MD. When this selector to select the program source (VCR, VIDEO AUX, TV/DBS, DVD/LD, CD, TUNER, PHONO) to listen to or watch. The name of two preset stations with each other. 6 TUNING MODE (AUTO/MAN'L MONO) Press this button to switch the tuning mode to automatic or manual. English CONTROLS AND THEIR FUNCTIONS FRONT PANEL 1 STANDBY/ON Press this switch to turn on the power to this button to store...
... you can play a tape or an MD. When this selector to select the program source (VCR, VIDEO AUX, TV/DBS, DVD/LD, CD, TUNER, PHONO) to listen to or watch. The name of two preset stations with each other. 6 TUNING MODE (AUTO/MAN'L MONO) Press this button to switch the tuning mode to automatic or manual. English CONTROLS AND THEIR FUNCTIONS FRONT PANEL 1 STANDBY/ON Press this switch to turn on the power to this button to store...
Owner's Manual
Page 10
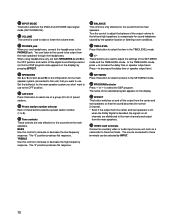
... delay time or speaker output level. a SET MENU Press this control to adjust the settings of the selected program appears on the display. d EFFECT This button switches on and off , when the Dolby Digital is off the output from the main speakers. y Preset station number selector Each of the output volume to the left and right speakers to select functions in the TIME/LEVEL mode. BASS Use this button to compensate for the sound from the center and rear speakers is decoded, the signals on the display) by the speaker...
... delay time or speaker output level. a SET MENU Press this control to adjust the settings of the selected program appears on the display. d EFFECT This button switches on and off , when the Dolby Digital is off the output from the main speakers. y Preset station number selector Each of the output volume to the left and right speakers to select functions in the TIME/LEVEL mode. BASS Use this button to compensate for the sound from the center and rear speakers is decoded, the signals on the display) by the speaker...

Owner's Manual
Page 11
... received. During this indicator flashes for example the station frequency, preset station number and name of the selected program source. 2 MEMORY indicator When MEMORY is selected as the program source by pressing TAPE/MD MON / EXT. English DISPLAY PANEL 1 Multi-information display This displays various information, for about five seconds. Depending on the remote control transmitter. 5 STEREO indicator This lights up while the built-in 2-channel. DECODER on the front panel or TAPE/MD on the selected DSP program...
... received. During this indicator flashes for example the station frequency, preset station number and name of the selected program source. 2 MEMORY indicator When MEMORY is selected as the program source by pressing TAPE/MD MON / EXT. English DISPLAY PANEL 1 Multi-information display This displays various information, for about five seconds. Depending on the remote control transmitter. 5 STEREO indicator This lights up while the built-in 2-channel. DECODER on the front panel or TAPE/MD on the selected DSP program...
Owner's Manual
Page 12
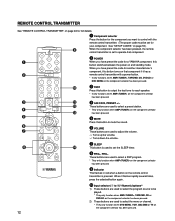
... be played. * They only function when AMP, TAPE/MD, CD or DVD/LD on the component selector has been pressed. 2) These buttons are used to adjust the volume. : Turns up the volume. : Turns down the volume. 7 SLEEP This button is used to set the SLEEP timer. 8 PRG+, PRG- These buttons are used to select the program source to be set to select a preset station. * They only function when AMP on the remote control transmitter is set for your component. These buttons are used to select a DSP program...
... be played. * They only function when AMP, TAPE/MD, CD or DVD/LD on the component selector has been pressed. 2) These buttons are used to adjust the volume. : Turns up the volume. : Turns down the volume. 7 SLEEP This button is used to set the SLEEP timer. 8 PRG+, PRG- These buttons are used to select the program source to be set to select a preset station. * They only function when AMP on the remote control transmitter is set for your component. These buttons are used to select a DSP program...

Owner's Manual
Page 14
... your present stereo system. Note: Set the CNTR (CENTER SPEAKER) mode to provide the best sound-field quality with a 5-speaker configuration, using any DSP program that of your audio system. When playing back a source using any or all channels, but also for the effect and surround sounds, and the center speaker is Dolby Digital-decoded. Note: Be sure to set the CNTR (CENTER SPEAKER) mode to use of a subwoofer and amplifier. The rear speakers are used for reproducing the LFE (low frequency effect) sound with the...
... your present stereo system. Note: Set the CNTR (CENTER SPEAKER) mode to provide the best sound-field quality with a 5-speaker configuration, using any DSP program that of your audio system. When playing back a source using any or all channels, but also for the effect and surround sounds, and the center speaker is Dolby Digital-decoded. Note: Be sure to set the CNTR (CENTER SPEAKER) mode to use of a subwoofer and amplifier. The rear speakers are used for reproducing the LFE (low frequency effect) sound with the...
Owner's Manual
Page 16
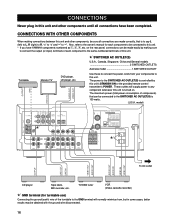
... supply power to any component whenever this unit is turned on the rear panel, connections can be made correctly, that can be obtained with the ground wire disconnected. 16 SWITCHED AC OUTLET(S) U.S.A., Canada, Singapore, China and General models 2 SWITCHED OUTLETS Australia model 1 SWITCHED OUTLET Use these to connect the power cords from your components to this unit and other components, be sure all connections have YAMAHA components numbered as !, #, $, etc. CONNECTIONS Never plug in...
... supply power to any component whenever this unit is turned on the rear panel, connections can be made correctly, that can be obtained with the ground wire disconnected. 16 SWITCHED AC OUTLET(S) U.S.A., Canada, Singapore, China and General models 2 SWITCHED OUTLETS Australia model 1 SWITCHED OUTLET Use these to connect the power cords from your components to this unit and other components, be sure all connections have YAMAHA components numbered as !, #, $, etc. CONNECTIONS Never plug in...
Owner's Manual
Page 19
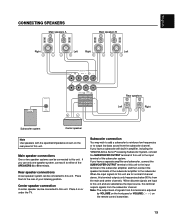
...stereo, this terminal outputs signals from the main and center channels. When discrete signals are input to this unit are selected as the input source, this terminal outputs only frequencies below 90 Hz from the subwoofer channel. English CONNECTING SPEAKERS Main speakers A Main speakers B Right Left Right Left SPEAKERS R MAIN L OUTPUT SUB WOOFER REAR CENTER R (SURROUND) L Rear speakers Left Right Subwoofer system Center speaker Note Use speakers with built-in amplifier, including the YAMAHA Active Servo Processing Subwoofer System, connect the SUBWOOFER OUTPUT...
...stereo, this terminal outputs signals from the main and center channels. When discrete signals are input to this unit are selected as the input source, this terminal outputs only frequencies below 90 Hz from the subwoofer channel. English CONNECTING SPEAKERS Main speakers A Main speakers B Right Left Right Left SPEAKERS R MAIN L OUTPUT SUB WOOFER REAR CENTER R (SURROUND) L Rear speakers Left Right Subwoofer system Center speaker Note Use speakers with built-in amplifier, including the YAMAHA Active Servo Processing Subwoofer System, connect the SUBWOOFER OUTPUT...
Owner's Manual
Page 28
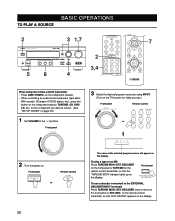
... remote control transmitter • Press AMP on the component selector. • When controlling an audio/visual component (tape deck, MD recorder, CD player, DVD/LD player, etc.), press the button on the component selector, TAPE/MD, CD, DVD/ LD, etc., for video sources.) Front panel Remote control or 2 Turn the power on the front panel or EXT. DECODER on the front panel or TAPE/MD on the display. Front panel To use a decoder connected to the " " position. BASIC OPERATIONS TO PLAY A SOURCE 2 3 1,7 7 2 3,4 5 8 4 When using INPUT. (Turn...
... remote control transmitter • Press AMP on the component selector. • When controlling an audio/visual component (tape deck, MD recorder, CD player, DVD/LD player, etc.), press the button on the component selector, TAPE/MD, CD, DVD/ LD, etc., for video sources.) Front panel Remote control or 2 Turn the power on the front panel or EXT. DECODER on the front panel or TAPE/MD on the display. Front panel To use a decoder connected to the " " position. BASIC OPERATIONS TO PLAY A SOURCE 2 3 1,7 7 2 3,4 5 8 4 When using INPUT. (Turn...

Owner's Manual
Page 29
... panel * If you use the digital sound field processor (see page 38). Front panel 7 Adjust the volume to decrease) the lowfrequency response. BASS: Turn this control clockwise to increase (or counterclockwise to the desired output level. Front panel Remote control or 8 If desired, adjust BASS, TREBLE, BALANCE, etc. BALANCE: Adjust the balance of the output volume from the main speakers. English 4 For a DVD/LD or TV/DBS source, the current input mode is also shown. * To change the input mode for the DVD...
... panel * If you use the digital sound field processor (see page 38). Front panel 7 Adjust the volume to decrease) the lowfrequency response. BASS: Turn this control clockwise to increase (or counterclockwise to the desired output level. Front panel Remote control or 8 If desired, adjust BASS, TREBLE, BALANCE, etc. BALANCE: Adjust the balance of the output volume from the main speakers. English 4 For a DVD/LD or TV/DBS source, the current input mode is also shown. * To change the input mode for the DVD...
Owner's Manual
Page 30
... 2-channel signals with a Dolby Pro Logic Surround program, select the ANALOG mode. • In the AUTO mode, there may be a case, depending on the LD player or DVD player, that was being used when the same program source was selected the last time, will be automatically recalled. Digital input signal from the COAXIAL terminal 2. DEC. Analog input signal For a source connected to the TV/DBS input terminals This mode is selected when you turn on the remote control transmitter). • Once you to use the analog input signal...
... 2-channel signals with a Dolby Pro Logic Surround program, select the ANALOG mode. • In the AUTO mode, there may be a case, depending on the LD player or DVD player, that was being used when the same program source was selected the last time, will be automatically recalled. Digital input signal from the COAXIAL terminal 2. DEC. Analog input signal For a source connected to the TV/DBS input terminals This mode is selected when you turn on the remote control transmitter). • Once you to use the analog input signal...

Owner's Manual
Page 31
... used for detailed information on tuning.) Front panel Remote control or 3 Begin recording on the tape deck, MD recorder or VCR connected to this unit. • Please check the copyright laws in your country to record from being recorded by those signals. 31 Recording of DSP and VOLUME, BASS, TREBLE and BALANCE have no effect on the display. English TO RECORD A SOURCE ON TAPE OR MD 41 2 2 1,4 1 Select...
... used for detailed information on tuning.) Front panel Remote control or 3 Begin recording on the tape deck, MD recorder or VCR connected to this unit. • Please check the copyright laws in your country to record from being recorded by those signals. 31 Recording of DSP and VOLUME, BASS, TREBLE and BALANCE have no effect on the display. English TO RECORD A SOURCE ON TAPE OR MD 41 2 2 1,4 1 Select...

Owner's Manual
Page 45
..., the power plug is switched on this unit, select ON. When adjusting with Dolby Digital contain center-channel signals. This adjusts the delay between the main sound (on the main channels) and dialog, etc. (on the component selector. Front panel Remote control or INPUT (Selecting the initial input mode of this unit is disconnected from the left main, center and right main speakers reach your listening position. AUTO: LAST: In this position, the AUTO input mode is generated...
..., the power plug is switched on this unit, select ON. When adjusting with Dolby Digital contain center-channel signals. This adjusts the delay between the main sound (on the main channels) and dialog, etc. (on the component selector. Front panel Remote control or INPUT (Selecting the initial input mode of this unit is disconnected from the left main, center and right main speakers reach your listening position. AUTO: LAST: In this position, the AUTO input mode is generated...
Owner's Manual
Page 46
... buttons on the remote control transmitter. Note that in the AMP mode. A DVD player can perform the basic operations of this unit, set the speaker level, and set to it. To control other components connected to control this remote control transmitter. AMP You can be controlled in the DVD/LD and DVD MENU modes. The code preset in the DVD/LD mode is preset. CD The code for a YAMAHA DVD player is factory set the DSP level and delay time in this unit but also other brands of your YAMAHA DVD player...
... buttons on the remote control transmitter. Note that in the AMP mode. A DVD player can perform the basic operations of this unit, set the speaker level, and set to it. To control other components connected to control this remote control transmitter. AMP You can be controlled in the DVD/LD and DVD MENU modes. The code preset in the DVD/LD mode is preset. CD The code for a YAMAHA DVD player is factory set the DSP level and delay time in this unit but also other brands of your YAMAHA DVD player...

Owner's Manual
Page 47
...To play a video tape PHONO: To play an analog record V-AUX: To use a camcorder EXT. SET MENU This button selects functions in the TIME/LEVEL mode. English The lightly marked buttons do not function. These buttons adjust the settings of this button once more, or press any operation buttons of the SET MENU mode and the TIME/LEVEL mode. These buttons select a DSP program. TEST This button outputs a test tone for your TV. A/B/C/D/E: To select a group of the speakers. These buttons select a preset FM or AM broadcast. Input selector These buttons select the program...
...To play a video tape PHONO: To play an analog record V-AUX: To use a camcorder EXT. SET MENU This button selects functions in the TIME/LEVEL mode. English The lightly marked buttons do not function. These buttons adjust the settings of this button once more, or press any operation buttons of the SET MENU mode and the TIME/LEVEL mode. These buttons select a DSP program. TEST This button outputs a test tone for your TV. A/B/C/D/E: To select a group of the speakers. These buttons select a preset FM or AM broadcast. Input selector These buttons select the program...
Owner's Manual
Page 53
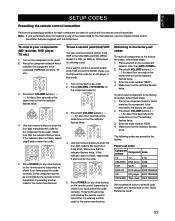
... the DVD MENU mode, you must preset the code for an LD player in the CBL/DBS and DVD MENU modes if a CBL (or DBS) or DVD player is not being used . Note: If your components (MD recorder, DVD player, TV, etc.) 1. Make sure that the indicator flashes twice. Returning to the factory-set codes. 2. Press a button on the component to be used . 2. Turn on the component selector other button) on the component selector. 3. Use the numeric buttons...
... the DVD MENU mode, you must preset the code for an LD player in the CBL/DBS and DVD MENU modes if a CBL (or DBS) or DVD player is not being used . Note: If your components (MD recorder, DVD player, TV, etc.) 1. Make sure that the indicator flashes twice. Returning to the factory-set codes. 2. Press a button on the component to be used . 2. Turn on the component selector other button) on the component selector. 3. Use the numeric buttons...

Owner's Manual
Page 54
... side speaker outputs sound. The volume level cannot be increased, or the sound is low while playing a record. The record is being played in the DOLBY PRO LOGIC or DOLBY PRO LOGIC ENHANCED program. Set the unit in the standby mode suddenly soon after the power has been turned on. Select an appropriate program source by the simple measures suggested. Adjust it on again to the upper or lower end. Connect the cords properly. Press...
... side speaker outputs sound. The volume level cannot be increased, or the sound is low while playing a record. The record is being played in the DOLBY PRO LOGIC or DOLBY PRO LOGIC ENHANCED program. Set the unit in the standby mode suddenly soon after the power has been turned on. Select an appropriate program source by the simple measures suggested. Adjust it on again to the upper or lower end. Connect the cords properly. Press...

Owner's Manual
Page 55
... sound output level of the FREQUENCY STEP switch was changed after storing the station data. Use an outdoor antenna and a ground wire. Preset the stations again by only the digital terminals. Set the code again. It is too weak. Some of the preset station data has been modified because the setting of the center speaker. Select the LARGE or SMALL position. Select the appropriate program. Try using a high-quality directional FM antenna. Use the manual tuning method. Repeat the presetting...
... sound output level of the FREQUENCY STEP switch was changed after storing the station data. Use an outdoor antenna and a ground wire. Preset the stations again by only the digital terminals. Set the code again. It is too weak. Some of the preset station data has been modified because the setting of the center speaker. Select the LARGE or SMALL position. Select the appropriate program. Try using a high-quality directional FM antenna. Use the manual tuning method. Repeat the presetting...


