Operation Manual
Page 7
... The source code will be provided at no charge; English Welcome to the software for purchasing the Yamaha Disklavier control unit! This control unit is a registered trademark of Microsoft Corporation in the United States and other countries. • Macintosh and Mac OS are licensed under the GNU General Public License, GNU Lesser General Public License, the BSD...
... The source code will be provided at no charge; English Welcome to the software for purchasing the Yamaha Disklavier control unit! This control unit is a registered trademark of Microsoft Corporation in the United States and other countries. • Macintosh and Mac OS are licensed under the GNU General Public License, GNU Lesser General Public License, the BSD...
Operation Manual
Page 8
... Important Precautions Read the following before operating the Disklavier control unit. ■ Warnings • Do not locate the Disklavier control unit in a place subject to the Disklavier control unit. If the AC adaptor is , prolonged playback of the Disklavier control unit may damage your dealer. • Do not...Use of other AC adaptors may also affect the performance of the Disklavier control unit can damage the Disklavier control unit. • Use a soft, dry cloth to remove it off the Disklavier control unit immediately, and remove the AC adaptor from the plug. The color...
... Important Precautions Read the following before operating the Disklavier control unit. ■ Warnings • Do not locate the Disklavier control unit in a place subject to the Disklavier control unit. If the AC adaptor is , prolonged playback of the Disklavier control unit may damage your dealer. • Do not...Use of other AC adaptors may also affect the performance of the Disklavier control unit can damage the Disklavier control unit. • Use a soft, dry cloth to remove it off the Disklavier control unit immediately, and remove the AC adaptor from the plug. The color...
Operation Manual
Page 9
..., rinse your skin or clothing, rinse it . English ■ Interference • The Disklavier control unit uses high-frequency digital circuits that may cause interference to radios and TVs placed close to the unit. • Remove spent batteries immediately from equipment. Otherwise the batteries will overdischarge, causing them... in burns, injury or other bodily harm. Do not use different types of time, remove the dry batteries from the unit. Please keep this unit is not going to ensure correct usage. • Do not directly touch the chemicals (electrolyte) which in turn may ...
..., rinse your skin or clothing, rinse it . English ■ Interference • The Disklavier control unit uses high-frequency digital circuits that may cause interference to radios and TVs placed close to the unit. • Remove spent batteries immediately from equipment. Otherwise the batteries will overdischarge, causing them... in burns, injury or other bodily harm. Do not use different types of time, remove the dry batteries from the unit. Please keep this unit is not going to ensure correct usage. • Do not directly touch the chemicals (electrolyte) which in turn may ...
Operation Manual
Page 10
... Piano 7 Replacing the Existing Control Unit with the Disklavier Control Unit 8 Connecting the Disklavier Control Unit with the MIDI Cables 10 Connecting Monitor Speakers 12 Using the Remote Control 13 Turning On the Disklavier Control Unit 14 Setting the Type of Your Piano 15 Setting the Internal Calendar 16 Turning Off the Disklavier Control Unit (Standby Mode 19 Shutting Down the Disklavier Control Unit ...........19 Compatible Media Format...
... Piano 7 Replacing the Existing Control Unit with the Disklavier Control Unit 8 Connecting the Disklavier Control Unit with the MIDI Cables 10 Connecting Monitor Speakers 12 Using the Remote Control 13 Turning On the Disklavier Control Unit 14 Setting the Type of Your Piano 15 Setting the Internal Calendar 16 Turning Off the Disklavier Control Unit (Standby Mode 19 Shutting Down the Disklavier Control Unit ...........19 Compatible Media Format...
Operation Manual
Page 11
... Speakers 111 Setting the Disklavier Control Unit for Audio Data Reception/Transmission 113 Hooking Up MIDI Devices 115 Setting the Disklavier Control Unit for MIDI Data Reception 116 Setting the Disklavier Control Unit for MIDI Data Transmission 118 Setting the Disklavier Control Unit for Keyboard Playing Data... the Brightness of the Display 128 Switching the Languages for the Screen .......... 129 Resetting the Disklavier Control Unit 130 Updating the Disklavier Control Unit 132 Chapter 14 Troubleshooting 134 Chapter 15 Error Messages 137 Chapter 16 Glossary 139 Chapter 17 ...
... Speakers 111 Setting the Disklavier Control Unit for Audio Data Reception/Transmission 113 Hooking Up MIDI Devices 115 Setting the Disklavier Control Unit for MIDI Data Reception 116 Setting the Disklavier Control Unit for MIDI Data Transmission 118 Setting the Disklavier Control Unit for Keyboard Playing Data... the Brightness of the Display 128 Switching the Languages for the Screen .......... 129 Resetting the Disklavier Control Unit 130 Updating the Disklavier Control Unit 132 Chapter 14 Troubleshooting 134 Chapter 15 Error Messages 137 Chapter 16 Glossary 139 Chapter 17 ...

Operation Manual
Page 12
...Disklavier control unit to preserve your home. • DisklavierRadio; Here are supplied with sights. You can see as well as hear performances with perfectly synchronized audio and video. • Your valuable music data on the floppy disk can listen to over 11 music channel by Yamaha... the internal memory. • Video synchronization features offer great listening experience with your Disklavier control unit. • 1 Remote control • 2 Batteries for remote control • 1 Remote control sensor shielding sticker • 1 Sample PianoSoft CD software • 2 MIDI cables...
...Disklavier control unit to preserve your home. • DisklavierRadio; Here are supplied with sights. You can see as well as hear performances with perfectly synchronized audio and video. • Your valuable music data on the floppy disk can listen to over 11 music channel by Yamaha... the internal memory. • Video synchronization features offer great listening experience with your Disklavier control unit. • 1 Remote control • 2 Batteries for remote control • 1 Remote control sensor shielding sticker • 1 Sample PianoSoft CD software • 2 MIDI cables...
Operation Manual
Page 13
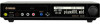
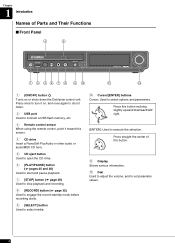
... values. 2 Press once to turn it on or shuts down . 2 USB port Used to connect a USB flash memory, etc. 3 Remote control sensor When using the remote control, point it down the Disklavier control unit. Press this button. 11 Display Shows various information. 12 Dial Used to adjust the volume, and to select options and parameters.
... values. 2 Press once to turn it on or shuts down . 2 USB port Used to connect a USB flash memory, etc. 3 Remote control sensor When using the remote control, point it down the Disklavier control unit. Press this button. 11 Display Shows various information. 12 Dial Used to adjust the volume, and to select options and parameters.

Operation Manual
Page 14
... connect the USB cable from a computer. 10 MIDI OUT terminal For models to be connected with the MIDI cables: Used to connect the existing control unit. 3 For models to be replaced with Disklavier control unit: Used to connect external MIDI equipment. For models to be connected with the MIDI cables: Used to connect the existing...
... connect the USB cable from a computer. 10 MIDI OUT terminal For models to be connected with the MIDI cables: Used to connect the existing control unit. 3 For models to be replaced with Disklavier control unit: Used to connect external MIDI equipment. For models to be connected with the MIDI cables: Used to connect the existing...
Operation Manual
Page 15
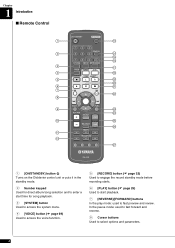
... 2 14 15 16 3 17 4 18 5 19 20 6 21 7 22 8 9 23 24 10 25 26 11 12 27 1 [ON/STANDBY] button Turns on the Disklavier control unit or puts it in the standby mode. 2 Number keypad Used for direct album/song selection and to enter a start time for song playback. 3 [SYSTEM] button ...
... 2 14 15 16 3 17 4 18 5 19 20 6 21 7 22 8 9 23 24 10 25 26 11 12 27 1 [ON/STANDBY] button Turns on the Disklavier control unit or puts it in the standby mode. 2 Number keypad Used for direct album/song selection and to enter a start time for song playback. 3 [SYSTEM] button ...
Operation Manual
Page 17
...prerecorded ensemble songs featuring instrumental accompaniment that can be played back on track 2 (R). XG Yamaha XG is an extension of music with the Disklavier series. Internal Flash Memory The Disklavier control unit has a total of 128 megabytes of internal flash memory that allow you can record ...generator. However, in Chapter 16. Tone Generator An electronic device that can include acoustic bass, drums, strings, vibes, etc. The Disklavier control unit has an internal XG tone generator that generates instrument voices. When a song in this manual the term "song" is used as...
...prerecorded ensemble songs featuring instrumental accompaniment that can be played back on track 2 (R). XG Yamaha XG is an extension of music with the Disklavier series. Internal Flash Memory The Disklavier control unit has a total of 128 megabytes of internal flash memory that allow you can record ...generator. However, in Chapter 16. Tone Generator An electronic device that can include acoustic bass, drums, strings, vibes, etc. The Disklavier control unit has an internal XG tone generator that generates instrument voices. When a song in this manual the term "song" is used as...
Operation Manual
Page 18
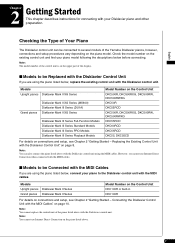
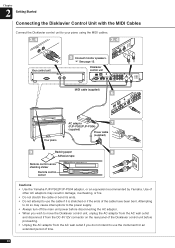
... cannot replace the control unit of the control unit is on page 10. Checking the Type of the Yamaha Disklavier pianos, however, connections and setup procedures vary depending on connections and setup, see Chapter 2 "Getting Started - English Chapter 2 Getting Started This chapter describes instructions for connecting with the MIDI cables. Connecting the Disklavier Control Unit with the MIDI Cables...
... cannot replace the control unit of the control unit is on page 10. Checking the Type of the Yamaha Disklavier pianos, however, connections and setup procedures vary depending on connections and setup, see Chapter 2 "Getting Started - English Chapter 2 Getting Started This chapter describes instructions for connecting with the MIDI cables. Connecting the Disklavier Control Unit with the MIDI Cables...
Operation Manual
Page 19
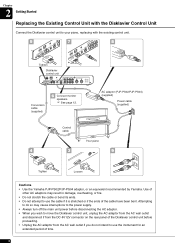
...recommended by Yamaha. Chapter 2 Getting Started Replacing the Existing Control Unit with the existing control unit. 5 7 8 Tighten Disklavier control unit Conversion cable (supplied) 6 Connect monitor speakers. Attempting to do not intend to your piano, replacing with the Disklavier Control Unit Connect the Disklavier control unit to use ... attempt to use the instrument for an extended period of the Disklavier control unit before disconnecting the AC adaptor. • When you wish to move the Disklavier control unit, unplug the AC adaptor from the AC wall outlet and disconnect...
...recommended by Yamaha. Chapter 2 Getting Started Replacing the Existing Control Unit with the existing control unit. 5 7 8 Tighten Disklavier control unit Conversion cable (supplied) 6 Connect monitor speakers. Attempting to do not intend to your piano, replacing with the Disklavier Control Unit Connect the Disklavier control unit to use ... attempt to use the instrument for an extended period of the Disklavier control unit before disconnecting the AC adaptor. • When you wish to move the Disklavier control unit, unplug the AC adaptor from the AC wall outlet and disconnect...
Operation Manual
Page 20
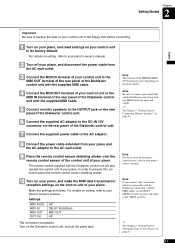
.... 5 Connect the supplied conversion cable to the TO PIANO connector on the piano model. Attention: The Disklavier control unit does not work properly if the control cable is connected directly to the control cable disconnected in step 2. Turn on page 15. 9 The connection completed. For details on setting,...Setting the Type of your piano and the AC adaptor to the DC-IN 12V connector on the rear panel of Your Piano" on the Disklavier control unit, and set the piano type. See Chapter 2 "Getting Started - Tighten the two screws attached to the connector by the ...
.... 5 Connect the supplied conversion cable to the TO PIANO connector on the piano model. Attention: The Disklavier control unit does not work properly if the control cable is connected directly to the control cable disconnected in step 2. Turn on page 15. 9 The connection completed. For details on setting,...Setting the Type of your piano and the AC adaptor to the DC-IN 12V connector on the rear panel of Your Piano" on the Disklavier control unit, and set the piano type. See Chapter 2 "Getting Started - Tighten the two screws attached to the connector by the ...
Operation Manual
Page 21
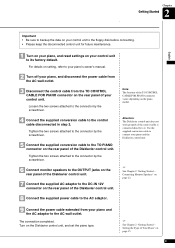
... the Disklavier Control Unit with the MIDI Cables Connect the Disklavier control unit to use the instrument for an extended period of the cable have been bent. Disklavier control unit MIDI cable (supplied) 6 Your piano AC adaptor 7 (PJP-PS02/PJP-PS04) (supplied) Power cable (supplied) 9 Backing paper 8 Adhesive tape Remote control sensor shielding sticker Remote control sensor Cautions • Use the Yamaha...
... the Disklavier Control Unit with the MIDI Cables Connect the Disklavier control unit to use the instrument for an extended period of the cable have been bent. Disklavier control unit MIDI cable (supplied) 6 Your piano AC adaptor 7 (PJP-PS02/PJP-PS04) (supplied) Power cable (supplied) 9 Backing paper 8 Adhesive tape Remote control sensor shielding sticker Remote control sensor Cautions • Use the Yamaha...
Operation Manual
Page 22
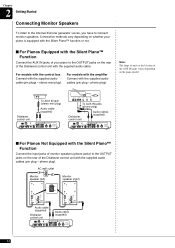
...Connect monitor speakers to the OUTPUT jack on the rear panel of your piano. Setting the Type of Your Piano" on the control unit of the Disklavier control unit. 6 Connect the supplied AC adaptor to the DC-IN 12V connector on setting, refer to your piano's owner's manual. ...Make the settings as follows. Connecting Monitor Speakers" on page 12. Note: For the location of the remote control sensor, refer to connect your control unit and the Disklavier control unit with the Disklavier control unit will also operate the control unit of the MIDI IN/MIDI OUT terminals varies depending on your...
...Connect monitor speakers to the OUTPUT jack on the rear panel of your piano. Setting the Type of Your Piano" on the control unit of the Disklavier control unit. 6 Connect the supplied AC adaptor to the DC-IN 12V connector on setting, refer to your piano's owner's manual. ...Make the settings as follows. Connecting Monitor Speakers" on page 12. Note: For the location of the remote control sensor, refer to connect your control unit and the Disklavier control unit with the Disklavier control unit will also operate the control unit of the MIDI IN/MIDI OUT terminals varies depending on your...
Operation Manual
Page 23
...) POWER ON OFF Monitor speaker (right) POWER ON OFF INPUT LINE 1 (--10dB) PARALLEL LINE 2 (--4dB) Audio cable (supplied) Disklavier control unit Audio cable (supplied) 12 Chapter 2 Getting Started Connecting Monitor Speakers To listen to the internal XG tone generator voices, you have to the... OUTPUT jacks on the rear of the Disklavier control unit with the supplied audio cables (pin plug - Disklavier control unit To AUX IN jack (stereo mini plug) Audio cable (supplied) To AUX IN jacks (phone plug) Disklavier control unit Audio cables (supplied) ■ For Pianos Not...
...) POWER ON OFF Monitor speaker (right) POWER ON OFF INPUT LINE 1 (--10dB) PARALLEL LINE 2 (--4dB) Audio cable (supplied) Disklavier control unit Audio cable (supplied) 12 Chapter 2 Getting Started Connecting Monitor Speakers To listen to the internal XG tone generator voices, you have to the... OUTPUT jacks on the rear of the Disklavier control unit with the supplied audio cables (pin plug - Disklavier control unit To AUX IN jack (stereo mini plug) Audio cable (supplied) To AUX IN jacks (phone plug) Disklavier control unit Audio cables (supplied) ■ For Pianos Not...
Operation Manual
Page 24
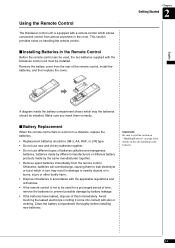
...cover from almost anywhere in the Remote Control Before the remote control can be used, the two batteries supplied with the Disklavier control unit must be installed. Make sure you insert them correctly. ■ Battery Replacement When the remote control fails to read the section on ...into contact with a remote control which allows convenient control from the rear of the remote control, install the batteries, and then replace the cover. Using the Remote Control The Disklavier control unit is not to be used for details on handling the remote control. ■ Installing Batteries...
...cover from almost anywhere in the Remote Control Before the remote control can be used, the two batteries supplied with the Disklavier control unit must be installed. Make sure you insert them correctly. ■ Battery Replacement When the remote control fails to read the section on ...into contact with a remote control which allows convenient control from the rear of the remote control, install the batteries, and then replace the cover. Using the Remote Control The Disklavier control unit is not to be used for details on handling the remote control. ■ Installing Batteries...
Operation Manual
Page 25
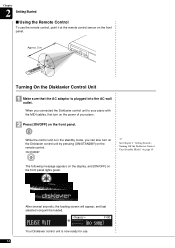
...appears on the display, and [ON/OFF] on page 19. Chapter 2 Getting Started ■ Using the Remote Control To use . 14 Turning Off the Disklavier Control Unit (Standby Mode)" on the front panel lights green. After several seconds, the loading screen will appear, and last ...° 30° Turning On the Disklavier Control Unit 1 Make sure that the AC adaptor is in the standby mode, you connected the Disklavier control unit to your piano with the MIDI cables, first turn on the Disklavier control unit by pressing [ON/STANDBY] on the remote control. See Chapter 2 "Getting ...
...appears on the display, and [ON/OFF] on page 19. Chapter 2 Getting Started ■ Using the Remote Control To use . 14 Turning Off the Disklavier Control Unit (Standby Mode)" on the front panel lights green. After several seconds, the loading screen will appear, and last ...° 30° Turning On the Disklavier Control Unit 1 Make sure that the AC adaptor is in the standby mode, you connected the Disklavier control unit to your piano with the MIDI cables, first turn on the Disklavier control unit by pressing [ON/STANDBY] on the remote control. See Chapter 2 "Getting ...
Operation Manual
Page 26
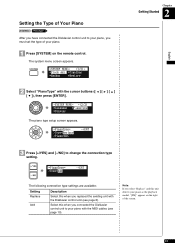
...Type of Your Piano [SYSTEM] "PianoType" After you have connected the Disklavier control unit to your piano, you select "Replace" and this unit detects your piano as the playback model, "[PB]" appears on the remote control. Note: If you must set the type of the screen. 15...[+/YES] and [-/NO] to your piano. 1 Press [SYSTEM] on the right of your piano with the Disklavier control unit (see page 10). Select this when you connected the Disklavier control unit to change the connection type setting. =PianoType= >Type=Add -+ENT The following connection type settings are available: ...
...Type of Your Piano [SYSTEM] "PianoType" After you have connected the Disklavier control unit to your piano, you select "Replace" and this unit detects your piano as the playback model, "[PB]" appears on the remote control. Note: If you must set the type of the screen. 15...[+/YES] and [-/NO] to your piano. 1 Press [SYSTEM] on the right of your piano with the Disklavier control unit (see page 10). Select this when you connected the Disklavier control unit to change the connection type setting. =PianoType= >Type=Add -+ENT The following connection type settings are available: ...
Operation Manual
Page 27
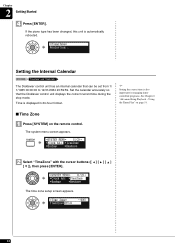
...*TimeZone *Backup *Restore The time zone setup screen appears. =Time Zone= -+ENT TimeZone=GMT+0 16 The Disklavier control unit has an internal calendar that the Disklavier control unit displays the correct current time during the stop mode. Setting the Internal Calendar [SYSTEM] "TimeZone" and "Clock ...Adj." If the piano type has been changed, this unit is also important for engaging timercontrolled ...
...*TimeZone *Backup *Restore The time zone setup screen appears. =Time Zone= -+ENT TimeZone=GMT+0 16 The Disklavier control unit has an internal calendar that the Disklavier control unit displays the correct current time during the stop mode. Setting the Internal Calendar [SYSTEM] "TimeZone" and "Clock ...Adj." If the piano type has been changed, this unit is also important for engaging timercontrolled ...


