Operation Manual
Page 7
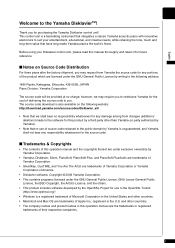
...; Trademarks & Copyrights • The contents of this operation manual and the copyrights thereof are under exclusive ownership by Yamaha Corporation. • Yamaha, Disklavier, Silent, PianoSoft, PianoSoft·Plus, and PianoSoft·PlusAudio are trademarks of Yamaha Corporation. • SmartKey, CueTIME, and You Are The Artist are trademarks of source code released to you. and...
...; Trademarks & Copyrights • The contents of this operation manual and the copyrights thereof are under exclusive ownership by Yamaha Corporation. • Yamaha, Disklavier, Silent, PianoSoft, PianoSoft·Plus, and PianoSoft·PlusAudio are trademarks of Yamaha Corporation. • SmartKey, CueTIME, and You Are The Artist are trademarks of source code released to you. and...
Operation Manual
Page 8
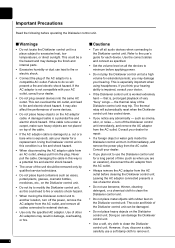
... This is exposed), ask your dealer for extended periods; the thermal relay of some devices. • Do not place heavy objects on the Disklavier control unit. Consult your dealer for a replacement. The color and finish of other AC adaptors may trip. This can be a fire hazard and... the cable. ii A damaged cable is worked extremely hard - you think your hearing ability is impaired, consult your hearing. turn off the Disklavier control unit immediately, and remove the AC adaptor from the AC outlet. This could lead to fire or electric shock hazard. • When ...
... This is exposed), ask your dealer for extended periods; the thermal relay of some devices. • Do not place heavy objects on the Disklavier control unit. Consult your dealer for a replacement. The color and finish of other AC adaptors may trip. This can be a fire hazard and... the cable. ii A damaged cable is worked extremely hard - you think your hearing ability is impaired, consult your hearing. turn off the Disklavier control unit immediately, and remove the AC adaptor from the AC outlet. This could lead to fire or electric shock hazard. • When ...
Operation Manual
Page 9
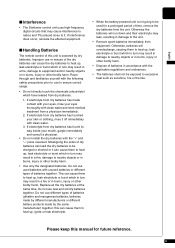
.... Otherwise the batteries will overdischarge, causing them to heat up, leak electrolyte or burst which have leaked from a physician immediately. 2. English ■ Interference • The Disklavier control unit uses high-frequency digital circuits that may result in damage to nearby objects or in burns, injury or other bodily harm. • Dispose...
.... Otherwise the batteries will overdischarge, causing them to heat up, leak electrolyte or burst which have leaked from a physician immediately. 2. English ■ Interference • The Disklavier control unit uses high-frequency digital circuits that may result in damage to nearby objects or in burns, injury or other bodily harm. • Dispose...
Operation Manual
Page 10
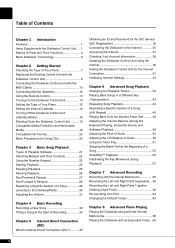
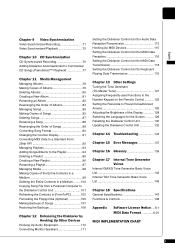
... Unit 14 Setting the Type of Your Piano 15 Setting the Internal Calendar 16 Turning Off the Disklavier Control Unit (Standby Mode 19 Shutting Down the Disklavier Control Unit ...........19 Compatible Media Format for the Removable Media 19 Compatible File Format 20 Basic Precautions...for the IDC Service (IDC Registration 35 Connecting the Disklavier to the Internet 35 Accessing the Internet 37 Checking Your Account Information 38 Updating the Disklavier Control Unit Using the Internet 39 Setting the Disklavier Control Unit for the Internet Connection 41 Initializing Internet Settings...
... Unit 14 Setting the Type of Your Piano 15 Setting the Internal Calendar 16 Turning Off the Disklavier Control Unit (Standby Mode 19 Shutting Down the Disklavier Control Unit ...........19 Compatible Media Format for the Removable Media 19 Compatible File Format 20 Basic Precautions...for the IDC Service (IDC Registration 35 Connecting the Disklavier to the Internet 35 Accessing the Internet 37 Checking Your Account Information 38 Updating the Disklavier Control Unit Using the Internet 39 Setting the Disklavier Control Unit for the Internet Connection 41 Initializing Internet Settings...
Operation Manual
Page 11
...Entire Contents in a Medium 99 Deleting the Entire Contents in a Medium .........100 Copying Song File from a Personal Computer to the Disklavier Control Unit 101 Refreshing the Contents in [FromToPC 105 Formatting the Floppy Disk (Optional 106 Making Backups of Songs 107 Restoring the ... Access 126 Adjusting the Brightness of the Display 128 Switching the Languages for the Screen .......... 129 Resetting the Disklavier Control Unit 130 Updating the Disklavier Control Unit 132 Chapter 14 Troubleshooting 134 Chapter 15 Error Messages 137 Chapter 16 Glossary 139 Chapter 17 Internal...
...Entire Contents in a Medium 99 Deleting the Entire Contents in a Medium .........100 Copying Song File from a Personal Computer to the Disklavier Control Unit 101 Refreshing the Contents in [FromToPC 105 Formatting the Floppy Disk (Optional 106 Making Backups of Songs 107 Restoring the ... Access 126 Adjusting the Brightness of the Display 128 Switching the Languages for the Screen .......... 129 Resetting the Disklavier Control Unit 130 Updating the Disklavier Control Unit 132 Chapter 14 Troubleshooting 134 Chapter 15 Error Messages 137 Chapter 16 Glossary 139 Chapter 17 Internal...

Operation Manual
Page 12
...; Your valuable music data on the floppy disk can listen to over 11 music channel by Yamaha) • 1 Power cable • 1 Operation manual • 1 PianoSoft CD song list 1 Here are supplied with your Disklavier control unit. • 1 Remote control • 2 Batteries for remote control • ...even make backups of your valuable data in the internal memory. • Video synchronization features offer great listening experience with the Disklavier Control Unit Check that open up your musical possibility to -use Features Enhancing Your Performance • The remote control, with ...
...; Your valuable music data on the floppy disk can listen to over 11 music channel by Yamaha) • 1 Power cable • 1 Operation manual • 1 PianoSoft CD song list 1 Here are supplied with your Disklavier control unit. • 1 Remote control • 2 Batteries for remote control • ...even make backups of your valuable data in the internal memory. • Video synchronization features offer great listening experience with the Disklavier Control Unit Check that open up your musical possibility to -use Features Enhancing Your Performance • The remote control, with ...
Operation Manual
Page 13
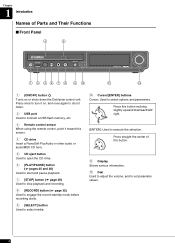
... engage the record standby mode before recording starts. 9 [SELECT] button Used to select media. 10 Cursor/[ENTER] buttons Cursor: Used to shut it down the Disklavier control unit.
... engage the record standby mode before recording starts. 9 [SELECT] button Used to select media. 10 Cursor/[ENTER] buttons Cursor: Used to shut it down the Disklavier control unit.

Operation Manual
Page 14
... MIDI IN terminal For models to be replaced with the MIDI cables: Used to connect the existing control unit. 3 For models to be replaced with Disklavier control unit: Used to connect external MIDI equipment. ■ Rear Panel 1 2 3456 Chapter 1 Introduction English 7 8 9 10 11 1 USB TO DEVICE port Used to connect a USB... supplied AC adaptor. 9 USB TO HOST port Used to connect the USB cable from a computer. 10 MIDI OUT terminal For models to be connected with Disklavier control unit: Used to connect external MIDI equipment.
... MIDI IN terminal For models to be replaced with the MIDI cables: Used to connect the existing control unit. 3 For models to be replaced with Disklavier control unit: Used to connect external MIDI equipment. ■ Rear Panel 1 2 3456 Chapter 1 Introduction English 7 8 9 10 11 1 USB TO DEVICE port Used to connect a USB... supplied AC adaptor. 9 USB TO HOST port Used to connect the USB cable from a computer. 10 MIDI OUT terminal For models to be connected with Disklavier control unit: Used to connect external MIDI equipment.
Operation Manual
Page 15
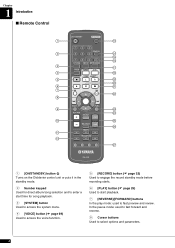
... Control 1 13 2 14 15 16 3 17 4 18 5 19 20 6 21 7 22 8 9 23 24 10 25 26 11 12 27 1 [ON/STANDBY] button Turns on the Disklavier control unit or puts it in the standby mode. 2 Number keypad Used for direct album/song selection and to enter a start time for song playback...
... Control 1 13 2 14 15 16 3 17 4 18 5 19 20 6 21 7 22 8 9 23 24 10 25 26 11 12 27 1 [ON/STANDBY] button Turns on the Disklavier control unit or puts it in the standby mode. 2 Number keypad Used for direct album/song selection and to enter a start time for song playback...
Operation Manual
Page 17
...PianoSoft The PianoSoft Disk Collection is used as the original composer/creator intended. 6 See your Disklavier dealer for Musical Instrument Digital Interface. Voice The sounds produced by Yamaha containing audio and MIDI signals for PianoSoft and PianoSoft·Plus. With greater polyphony, more ... you can cancel either part, and practice that can record the two parts simultaneously or separately. XG Yamaha XG is a list of several basic Disklavier words that you can produce nearly 700 instrumental and percussion voices. MIDI allows electronic musical instruments to store...
...PianoSoft The PianoSoft Disk Collection is used as the original composer/creator intended. 6 See your Disklavier dealer for Musical Instrument Digital Interface. Voice The sounds produced by Yamaha containing audio and MIDI signals for PianoSoft and PianoSoft·Plus. With greater polyphony, more ... you can cancel either part, and practice that can record the two parts simultaneously or separately. XG Yamaha XG is a list of several basic Disklavier words that you can produce nearly 700 instrumental and percussion voices. MIDI allows electronic musical instruments to store...
Operation Manual
Page 18
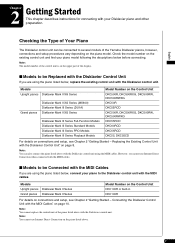
... ■ Models to be Replaced with the Disklavier Control Unit If you are using the piano listed below before connecting. Connecting the Disklavier Control Unit with the MIDI Cables" on the upper part of the Yamaha Disklavier pianos, however, connections and setup procedures vary ...depending on the existing control unit and find your Disklavier piano and other preparation. Replacing the...
... ■ Models to be Replaced with the Disklavier Control Unit If you are using the piano listed below before connecting. Connecting the Disklavier Control Unit with the MIDI Cables" on the upper part of the Yamaha Disklavier pianos, however, connections and setup procedures vary ...depending on the existing control unit and find your Disklavier piano and other preparation. Replacing the...
Operation Manual
Page 19
...Yamaha. Attempting to do so may result in damage, overheating, or fire. • Do not stretch the cable or bend its ends. • Do not attempt to use the instrument for an extended period of the cable have been bent. Chapter 2 Getting Started Replacing the Existing Control Unit with the Disklavier... Control Unit Connect the Disklavier control unit to use the cable if it is stretched or if the ends of time. 8 Use of other AC adaptors...
...Yamaha. Attempting to do so may result in damage, overheating, or fire. • Do not stretch the cable or bend its ends. • Do not attempt to use the instrument for an extended period of the cable have been bent. Chapter 2 Getting Started Replacing the Existing Control Unit with the Disklavier... Control Unit Connect the Disklavier control unit to use the cable if it is stretched or if the ends of time. 8 Use of other AC adaptors...
Operation Manual
Page 20
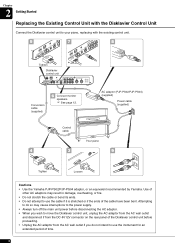
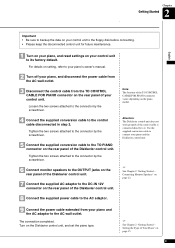
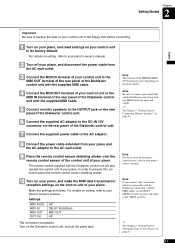
...from the AC wall outlet. 3 Disconnect the control cable from your piano and the AC adaptor to connect your control unit. Attention: The Disklavier control unit does not work properly if the control cable is connected directly to its factory default. The connection completed. Loosen the two screws ...Monitor Speakers" on page 12. 9 Connect the power cable extended from the TO CONTROL CABLE FOR PIANO connector on the rear panel of the Disklavier control unit. 8 Connect the supplied power cable to the TO PIANO connector on the rear panel of the TO CONTROL CABLE FOR PIANO connector varies...
...from the AC wall outlet. 3 Disconnect the control cable from your piano and the AC adaptor to connect your control unit. Attention: The Disklavier control unit does not work properly if the control cable is connected directly to its factory default. The connection completed. Loosen the two screws ...Monitor Speakers" on page 12. 9 Connect the power cable extended from the TO CONTROL CABLE FOR PIANO connector on the rear panel of the Disklavier control unit. 8 Connect the supplied power cable to the TO PIANO connector on the rear panel of the TO CONTROL CABLE FOR PIANO connector varies...
Operation Manual
Page 21
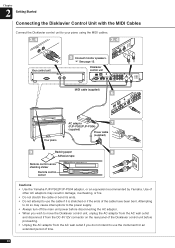
... wall outlet if you do not intend to use the cable if it is stretched or if the ends of time. 10 See page 12. Disklavier control unit MIDI cable (supplied) 6 Your piano AC adaptor 7 (PJP-PS02/PJP-PS04) (supplied) Power cable (supplied) 9 Backing paper 8 ...control sensor shielding sticker Remote control sensor Cautions • Use the Yamaha PJP-PS02/PJP-PS04 adaptor, or an equivalent recommended by Yamaha. Chapter 2 Getting Started Connecting the Disklavier Control Unit with the MIDI Cables Connect the Disklavier control unit to use the instrument for an extended period of ...
... wall outlet if you do not intend to use the cable if it is stretched or if the ends of time. 10 See page 12. Disklavier control unit MIDI cable (supplied) 6 Your piano AC adaptor 7 (PJP-PS02/PJP-PS04) (supplied) Power cable (supplied) 9 Backing paper 8 ...control sensor shielding sticker Remote control sensor Cautions • Use the Yamaha PJP-PS02/PJP-PS04 adaptor, or an equivalent recommended by Yamaha. Chapter 2 Getting Started Connecting the Disklavier Control Unit with the MIDI Cables Connect the Disklavier control unit to use the instrument for an extended period of ...
Operation Manual
Page 22
... piano. For details on setting, refer to your control unit to the "MIDI" position. See Chapter 2 "Getting Started - Turn on the Disklavier control unit, and set the HOST SELECT switch on your piano's owner's manual. Note: If you connect your control unit, which is replaceable with the...AC adaptor to the AC wall outlet. 9 Place the remote control sensor shielding sticker over the remote control sensor of the control unit of the Disklavier control unit with two MIDI cables for input and output. See Chapter 2 "Getting Started - Settings MIDI IN CH MIDI IN MIDI...
... piano. For details on setting, refer to your control unit to the "MIDI" position. See Chapter 2 "Getting Started - Turn on the Disklavier control unit, and set the HOST SELECT switch on your piano's owner's manual. Note: If you connect your control unit, which is replaceable with the...AC adaptor to the AC wall outlet. 9 Place the remote control sensor shielding sticker over the remote control sensor of the control unit of the Disklavier control unit with two MIDI cables for input and output. See Chapter 2 "Getting Started - Settings MIDI IN CH MIDI IN MIDI...
Operation Manual
Page 23
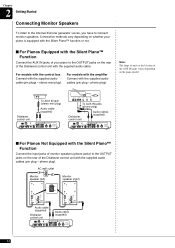
... LINE 2 (--4dB) POWER ON OFF Monitor speaker (right) POWER ON OFF INPUT LINE 1 (--10dB) PARALLEL LINE 2 (--4dB) Audio cable (supplied) Disklavier control unit Audio cable (supplied) 12 stereo mini plug). Connection methods vary depending on whether your piano is equipped with the Silent Piano™ function...Audio cables (supplied) ■ For Pianos Not Equipped with the Silent Piano™ Function Connect the input jacks of the Disklavier control unit with the supplied audio cable. For models with the amplifier Connect with the supplied audio cable (pin plugs - Chapter...
... LINE 2 (--4dB) POWER ON OFF Monitor speaker (right) POWER ON OFF INPUT LINE 1 (--10dB) PARALLEL LINE 2 (--4dB) Audio cable (supplied) Disklavier control unit Audio cable (supplied) 12 stereo mini plug). Connection methods vary depending on whether your piano is equipped with the Silent Piano™ function...Audio cables (supplied) ■ For Pianos Not Equipped with the Silent Piano™ Function Connect the input jacks of the Disklavier control unit with the supplied audio cable. For models with the amplifier Connect with the supplied audio cable (pin plugs - Chapter...
Operation Manual
Page 24
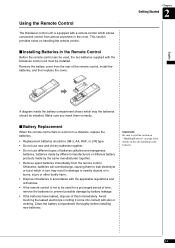
.... This section provides notes on the safe handling of the remote control, install the batteries, and then replace the cover. Using the Remote Control The Disklavier control unit is not to be used , the two batteries supplied with the Disklavier control unit must be installed. Otherwise, batteries will overdischarge, causing them immediately.
.... This section provides notes on the safe handling of the remote control, install the batteries, and then replace the cover. Using the Remote Control The Disklavier control unit is not to be used , the two batteries supplied with the Disklavier control unit must be installed. Otherwise, batteries will overdischarge, causing them immediately.
Operation Manual
Page 25
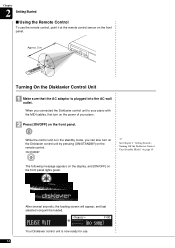
... Unit 1 Make sure that the AC adaptor is in the standby mode, you connected the Disklavier control unit to your piano with the MIDI cables, first turn on the Disklavier control unit by pressing [ON/STANDBY] on the remote control. See Chapter 2 "Getting Started - After several seconds..., the loading screen will appear, and last selected song will be loaded. PLEASE WAIT =Memory= V+00 (no song) Your Disklavier control unit is now ready for use the remote control, point it at the remote control sensor on the front panel. When you can also...
... Unit 1 Make sure that the AC adaptor is in the standby mode, you connected the Disklavier control unit to your piano with the MIDI cables, first turn on the Disklavier control unit by pressing [ON/STANDBY] on the remote control. See Chapter 2 "Getting Started - After several seconds..., the loading screen will appear, and last selected song will be loaded. PLEASE WAIT =Memory= V+00 (no song) Your Disklavier control unit is now ready for use the remote control, point it at the remote control sensor on the front panel. When you can also...
Operation Manual
Page 26
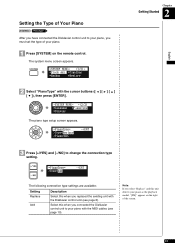
...must set the type of your piano. 1 Press [SYSTEM] on the right of Your Piano [SYSTEM] "PianoType" After you have connected the Disklavier control unit to change the connection type setting. =PianoType= >Type=Add -+ENT The following connection type settings are available: Setting Replace Add Description... Select this unit detects your piano with the MIDI cables (see page 8). Note: If you connected the Disklavier control unit to your piano as the playback model, "[PB]" appears on the remote control. Setting the Type of the screen. 15...
...must set the type of your piano. 1 Press [SYSTEM] on the right of Your Piano [SYSTEM] "PianoType" After you have connected the Disklavier control unit to change the connection type setting. =PianoType= >Type=Add -+ENT The following connection type settings are available: Setting Replace Add Description... Select this unit detects your piano with the MIDI cables (see page 8). Note: If you connected the Disklavier control unit to your piano as the playback model, "[PB]" appears on the remote control. Setting the Type of the screen. 15...
Operation Manual
Page 27
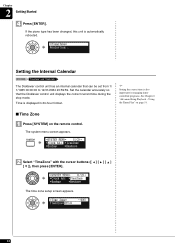
... unit has an internal calendar that the Disklavier control unit displays the correct current time during the stop mode. Chapter 2 Getting Started 4 Press [ENTER]. Setting the Internal Calendar [SYSTEM] "TimeZone" and "Clock Adj." ...
... unit has an internal calendar that the Disklavier control unit displays the correct current time during the stop mode. Chapter 2 Getting Started 4 Press [ENTER]. Setting the Internal Calendar [SYSTEM] "TimeZone" and "Clock Adj." ...


