Operation Manual
Page 2
... the expressed warranty may be sure that contain lead, batteries, plastics, etc. However, Yamaha reserves the right to change or modify any power supply or adaptor other than one described in its useful life is considered to be correct at an end, please observe all local, state, ... to be at the time of purchase in place. The model number, serial number, power requirements, etc., are tested and approved by Yamaha. Implied warranties may be denied if the unit is believed to recharge, disassemble, or incinerate this manual as a permanent record of the specifications...
... the expressed warranty may be sure that contain lead, batteries, plastics, etc. However, Yamaha reserves the right to change or modify any power supply or adaptor other than one described in its useful life is considered to be correct at an end, please observe all local, state, ... to be at the time of purchase in place. The model number, serial number, power requirements, etc., are tested and approved by Yamaha. Implied warranties may be denied if the unit is believed to recharge, disassemble, or incinerate this manual as a permanent record of the specifications...
Operation Manual
Page 3
... une étiquette similaire se trouve à l'intérieur du lecteur de CD. Die Steuereinheit ist als ein Lasergerät der Klasse 1 eingestuft. CAUTION-Use of controls or adjustments or performance of procedures other than those specified herein may not correspond with the coloured markings identifying the terminals in your...
... une étiquette similaire se trouve à l'intérieur du lecteur de CD. Die Steuereinheit ist als ein Lasergerät der Klasse 1 eingestuft. CAUTION-Use of controls or adjustments or performance of procedures other than those specified herein may not correspond with the coloured markings identifying the terminals in your...
Operation Manual
Page 5
... Address Telephone Fax Type of Equipment Model Name : Yamaha Corporation of America : 6600 Orangethorpe Avenue, Buena Park, CA 90620 USA : 1-714-522-9011 : 1-714-522-9301 : Player Piano Control Unit : DKC-850 This device complies with the requirements listed in this product MUST be used according to the instructions found to be the source...
... Address Telephone Fax Type of Equipment Model Name : Yamaha Corporation of America : 6600 Orangethorpe Avenue, Buena Park, CA 90620 USA : 1-714-522-9011 : 1-714-522-9301 : Player Piano Control Unit : DKC-850 This device complies with the requirements listed in this product MUST be used according to the instructions found to be the source...
Operation Manual
Page 7
...trademarks of their respective companies. Before using your entertainment, educational, and creative needs, while retaining the tone, touch and long-term value that re-use in the OpenSSL Toolkit. (http://www.openssl.org/) • Windows is unguaranteed, and Yamaha shall not bear any portions of ...delivering the source code to the following website: http://download.yamaha.com/sourcecodes/disklavier_e3/ • Note that ...
...trademarks of their respective companies. Before using your entertainment, educational, and creative needs, while retaining the tone, touch and long-term value that re-use in the OpenSSL Toolkit. (http://www.openssl.org/) • Windows is unguaranteed, and Yamaha shall not bear any portions of ...delivering the source code to the following website: http://download.yamaha.com/sourcecodes/disklavier_e3/ • Note that ...
Operation Manual
Page 8
...a fire hazard and may damage your dealer for extended periods; Consult your doctor. • If the Disklavier control unit is especially important when using headphones. Damaging the cable in damage, overheating, or fire. ■ Cautions • Turn off immediately, and remove the power plug from ... unit. This could lead to fire or electric shock hazard. • When moving the Disklavier control unit to a compatible AC outlet. Using the Disklavier control unit in a place subject to clean the Disklavier control unit. • Do not place metal objects with your AC ...
...a fire hazard and may damage your dealer for extended periods; Consult your doctor. • If the Disklavier control unit is especially important when using headphones. Damaging the cable in damage, overheating, or fire. ■ Cautions • Turn off immediately, and remove the power plug from ... unit. This could lead to fire or electric shock hazard. • When moving the Disklavier control unit to a compatible AC outlet. Using the Disklavier control unit in a place subject to clean the Disklavier control unit. • Do not place metal objects with your AC ...
Operation Manual
Page 9
...leak electrolyte. • When the battery-powered unit is powered by dry batteries. Replace all the dry batteries at the same time. Do not use to ensure correct usage. • Do not directly touch the chemicals (electrolyte) which in turn may result in damage to nearby objects or in... burns, injury or other bodily harm. • Dispose of batteries in burns, injury or other bodily harm. • Use only the designated batteries. Otherwise the batteries will overdischarge, causing them to heat up, leak electrolyte or burst which in turn may result in a fire...
...leak electrolyte. • When the battery-powered unit is powered by dry batteries. Replace all the dry batteries at the same time. Do not use to ensure correct usage. • Do not directly touch the chemicals (electrolyte) which in turn may result in damage to nearby objects or in... burns, injury or other bodily harm. • Dispose of batteries in burns, injury or other bodily harm. • Use only the designated batteries. Otherwise the batteries will overdischarge, causing them to heat up, leak electrolyte or burst which in turn may result in a fire...
Operation Manual
Page 10
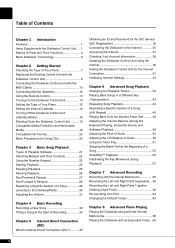
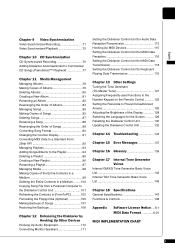
... Control Unit with the Disklavier Control Unit 8 Connecting the Disklavier Control Unit with the MIDI Cables 10 Connecting Monitor Speakers 12 Using the Remote Control 13 Turning On the Disklavier Control Unit 14 Setting the Type of Your Piano 15 Setting the Internal Calendar ... 35 Connecting the Disklavier to the Internet 35 Accessing the Internet 37 Checking Your Account Information 38 Updating the Disklavier Control Unit Using the Internet 39 Setting the Disklavier Control Unit for the Internet Connection 41 Initializing Internet Settings 42 Chapter 6 Advanced Song Playback ...
... Control Unit with the Disklavier Control Unit 8 Connecting the Disklavier Control Unit with the MIDI Cables 10 Connecting Monitor Speakers 12 Using the Remote Control 13 Turning On the Disklavier Control Unit 14 Setting the Type of Your Piano 15 Setting the Internal Calendar ... 35 Connecting the Disklavier to the Internet 35 Accessing the Internet 37 Checking Your Account Information 38 Updating the Disklavier Control Unit Using the Internet 39 Setting the Disklavier Control Unit for the Internet Connection 41 Initializing Internet Settings 42 Chapter 6 Advanced Song Playback ...
Operation Manual
Page 11
... Setting the Disklavier Control Unit for Keyboard Playing Data Transmission 119 Chapter 13 Other Settings Tuning the Tone Generator (TG Master Tune 121 Assigning Frequently-used Functions to the Number Keypad on the Remote Control 122 Setting the Passcode to Prevent Unauthorized Access 126 Adjusting the Brightness of the Display 128...
... Setting the Disklavier Control Unit for Keyboard Playing Data Transmission 119 Chapter 13 Other Settings Tuning the Tone Generator (TG Master Tune 121 Assigning Frequently-used Functions to the Number Keypad on the Remote Control 122 Setting the Passcode to Prevent Unauthorized Access 126 Adjusting the Brightness of the Display 128...

Operation Manual
Page 12
Simple and Easy-to-use Features Enhancing Your Performance • The remote control, with clear and logical layout of buttons, lets you start listening on the day this unit arrives ...; 1 Remote control • 2 Batteries for control • 1 AC adaptor (PJP-PS02/PJP-PS04 or an equivalent recommended by streaming broadcasts over 11 music channel by Yamaha) • 1 Power cable • 1 Operation manual • 1 PianoSoft CD song list 1
Simple and Easy-to-use Features Enhancing Your Performance • The remote control, with clear and logical layout of buttons, lets you start listening on the day this unit arrives ...; 1 Remote control • 2 Batteries for control • 1 AC adaptor (PJP-PS02/PJP-PS04 or an equivalent recommended by streaming broadcasts over 11 music channel by Yamaha) • 1 Power cable • 1 Operation manual • 1 PianoSoft CD song list 1
Operation Manual
Page 13
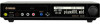
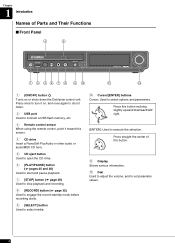
... 7 [STOP] button ( page 26) Used to stop playback and recording. 8 [RECORD] button ( page 32) Used to engage the record standby mode before recording starts. 9 [SELECT] button Used to select media. 10 Cursor/[ENTER] buttons Cursor: Used to select options and parameters. Press straight the ... 7 8 9 10 11 12 1 [ON/OFF] button Turns on , and once again to shut it down. 2 USB port Used to connect a USB flash memory, etc. 3 Remote control sensor When using the remote control, point it on or shuts down the Disklavier control unit. Press this button. 11 Display Shows various...
... 7 [STOP] button ( page 26) Used to stop playback and recording. 8 [RECORD] button ( page 32) Used to engage the record standby mode before recording starts. 9 [SELECT] button Used to select media. 10 Cursor/[ENTER] buttons Cursor: Used to select options and parameters. Press straight the ... 7 8 9 10 11 12 1 [ON/OFF] button Turns on , and once again to shut it down. 2 USB port Used to connect a USB flash memory, etc. 3 Remote control sensor When using the remote control, point it on or shuts down the Disklavier control unit. Press this button. 11 Display Shows various...

Operation Manual
Page 14
...11 MIDI IN terminal For models to be replaced with Disklavier control unit: Used to connect external MIDI equipment. ■ Rear Panel 1 2 3456 Chapter 1 Introduction English 7 8 9 10 11 1 USB TO DEVICE port Used to connect a USB flash memory, an optional USB floppy disk drive, etc.... 2 LAN port Used to connect to the Internet. 3 OUTPUT jacks Used to connect the speaker cord from optional monitor speakers. 4 ANALOG MIDI IN jacks...
...11 MIDI IN terminal For models to be replaced with Disklavier control unit: Used to connect external MIDI equipment. ■ Rear Panel 1 2 3456 Chapter 1 Introduction English 7 8 9 10 11 1 USB TO DEVICE port Used to connect a USB flash memory, an optional USB floppy disk drive, etc.... 2 LAN port Used to connect to the Internet. 3 OUTPUT jacks Used to connect the speaker cord from optional monitor speakers. 4 ANALOG MIDI IN jacks...
Operation Manual
Page 15
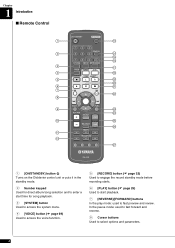
... 24 10 25 26 11 12 27 1 [ON/STANDBY] button Turns on the Disklavier control unit or puts it in the standby mode. 2 Number keypad Used for direct album/song selection and to enter a start time for song playback. 3 [SYSTEM] button... Used to access the system menu. 4 [VOICE] button ( page 69) Used to access the voice function. 5 [RECORD] button ( page 32) Used to engage the record standby mode before recording starts. 6 [PLAY] button ( page 25) Used to start playback. 7 [REVERSE]/[FORWARD] buttons In the...
... 24 10 25 26 11 12 27 1 [ON/STANDBY] button Turns on the Disklavier control unit or puts it in the standby mode. 2 Number keypad Used for direct album/song selection and to enter a start time for song playback. 3 [SYSTEM] button... Used to access the system menu. 4 [VOICE] button ( page 69) Used to access the voice function. 5 [RECORD] button ( page 32) Used to engage the record standby mode before recording starts. 6 [PLAY] button ( page 25) Used to start playback. 7 [REVERSE]/[FORWARD] buttons In the...
Operation Manual
Page 16
.... Blue: For future use . English 5 Red: For future use . Chapter 1 Introduction 20 [PAUSE] button ( page 26) Used to pause playback. 21 [STOP] button ( page 26) Used to stop playback and recording. 22 [ENTER] button Used to execute the selection. 23 [FUNC.] button Used to access the function ... to 00. 13 [INTERNET] button Used to access the Internet menu. 14 [SEARCH] button Used to access the search function. 15 [SETUP] button Used to access the setup menu. 16 [METRONOME] button Used to access the metronome function. 17 [REPEAT] button Used to select one of the repeat modes...
.... Blue: For future use . English 5 Red: For future use . Chapter 1 Introduction 20 [PAUSE] button ( page 26) Used to pause playback. 21 [STOP] button ( page 26) Used to stop playback and recording. 22 [ENTER] button Used to execute the selection. 23 [FUNC.] button Used to access the function ... to 00. 13 [INTERNET] button Used to access the Internet menu. 14 [SEARCH] button Used to access the search function. 15 [SETUP] button Used to access the setup menu. 16 [METRONOME] button Used to access the metronome function. 17 [REPEAT] button Used to select one of the repeat modes...
Operation Manual
Page 17
.... Chapter 1 Introduction Basic Disklavier Terminology The following is used as an L/R song, and extra tracks that part yourself. For additional Disklavier terminology, see the glossary provided in the Yamaha XG format is sometimes used to refer to communicate with lyrics. PianoSoft The PianoSoft ... tone generator or synthesizer, it improves song compatibility between MIDI devices. PianoSoft·PlusAudio CD software made by Yamaha containing audio and MIDI signals for use with the Disklavier series. However, in this manual the term "song" is a list of internal flash...
.... Chapter 1 Introduction Basic Disklavier Terminology The following is used as an L/R song, and extra tracks that part yourself. For additional Disklavier terminology, see the glossary provided in the Yamaha XG format is sometimes used to refer to communicate with lyrics. PianoSoft The PianoSoft ... tone generator or synthesizer, it improves song compatibility between MIDI devices. PianoSoft·PlusAudio CD software made by Yamaha containing audio and MIDI signals for use with the Disklavier series. However, in this manual the term "song" is a list of internal flash...
Operation Manual
Page 18
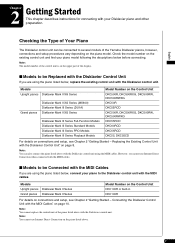
...of the display. ■ Models to be connected to the Disklavier control unit with the Disklavier control unit. However, you are using the piano listed below, connect your piano model following the descriptions below , replace the existing control unit with your Disklavier piano and...cables. ■ Models to be Connected with the MIDI Cables If you cannot use Internet Direct Connection on the upper part of the piano listed above . 7 Note: The model number of the Yamaha Disklavier pianos, however, connections and setup procedures vary depending on page 8. English ...
...of the display. ■ Models to be connected to the Disklavier control unit with the Disklavier control unit. However, you are using the piano listed below, connect your piano model following the descriptions below , replace the existing control unit with your Disklavier piano and...cables. ■ Models to be Connected with the MIDI Cables If you cannot use Internet Direct Connection on the upper part of the piano listed above . 7 Note: The model number of the Yamaha Disklavier pianos, however, connections and setup procedures vary depending on page 8. English ...
Operation Manual
Page 19
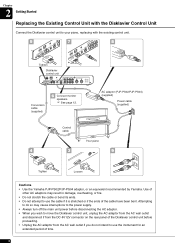
Use of other AC adaptors may cause interruptions to the power supply. • Always ...unit. 5 7 8 Tighten Disklavier control unit Conversion cable (supplied) 6 Connect monitor speakers. Attempting to do not intend to use the cable if it is stretched or if the ends of the cable have been bent. Chapter 2 Getting Started Replacing the... Existing Control Unit with the Disklavier Control Unit Connect the Disklavier control unit to use the instrument for an extended period of time. 8 See page 12. AC adaptor (PJP-PS02/PJP-PS04) (supplied)...
Use of other AC adaptors may cause interruptions to the power supply. • Always ...unit. 5 7 8 Tighten Disklavier control unit Conversion cable (supplied) 6 Connect monitor speakers. Attempting to do not intend to use the cable if it is stretched or if the ends of the cable have been bent. Chapter 2 Getting Started Replacing the... Existing Control Unit with the Disklavier Control Unit Connect the Disklavier control unit to use the instrument for an extended period of time. 8 See page 12. AC adaptor (PJP-PS02/PJP-PS04) (supplied)...
Operation Manual
Page 20
Tighten the two screws attached to the connector by the screwdriver. 4 Connect the supplied conversion cable to the control cable disconnected in step 2. Use the supplied conversion cable to it. Attention: The Disklavier control unit does not work properly if the control cable is connected directly to connect your ...
Tighten the two screws attached to the connector by the screwdriver. 4 Connect the supplied conversion cable to the control cable disconnected in step 2. Use the supplied conversion cable to it. Attention: The Disklavier control unit does not work properly if the control cable is connected directly to connect your ...
Operation Manual
Page 21
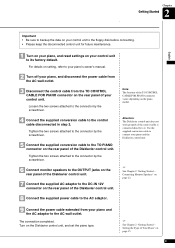
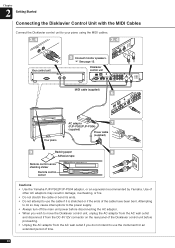
...the Disklavier control unit before proceeding. • Unplug the AC adaptor from the AC wall outlet if you do not intend to your piano using the MIDI cables. 3, 4 3, 4 Your control unit 5 Connect monitor speakers. Disklavier control unit MIDI cable (supplied) 6 Your piano...9 Backing paper 8 Adhesive tape Remote control sensor shielding sticker Remote control sensor Cautions • Use the Yamaha PJP-PS02/PJP-PS04 adaptor, or an equivalent recommended by Yamaha. Chapter 2 Getting Started Connecting the Disklavier Control Unit with the MIDI Cables Connect the Disklavier control...
...the Disklavier control unit before proceeding. • Unplug the AC adaptor from the AC wall outlet if you do not intend to your piano using the MIDI cables. 3, 4 3, 4 Your control unit 5 Connect monitor speakers. Disklavier control unit MIDI cable (supplied) 6 Your piano...9 Backing paper 8 Adhesive tape Remote control sensor shielding sticker Remote control sensor Cautions • Use the Yamaha PJP-PS02/PJP-PS04 adaptor, or an equivalent recommended by Yamaha. Chapter 2 Getting Started Connecting the Disklavier Control Unit with the MIDI Cables Connect the Disklavier control...
Operation Manual
Page 24
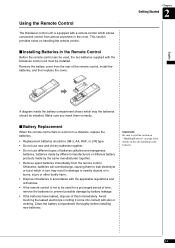
...diagram inside the battery compartment shows which allows convenient control from almost anywhere in the Remote Control Before the remote control can be used for details on handling the remote control. ■ Installing Batteries in the room. Make sure you insert them immediately. Important... Replacement When the remote control fails to work from a distance, replace the batteries. • Replacement batteries should be installed. Using the Remote Control The Disklavier control unit is equipped with the applicable regulations and ordinances. • If the remote control is not ...
...diagram inside the battery compartment shows which allows convenient control from almost anywhere in the Remote Control Before the remote control can be used for details on handling the remote control. ■ Installing Batteries in the room. Make sure you insert them immediately. Important... Replacement When the remote control fails to work from a distance, replace the batteries. • Replacement batteries should be installed. Using the Remote Control The Disklavier control unit is equipped with the applicable regulations and ordinances. • If the remote control is not ...
Operation Manual
Page 25
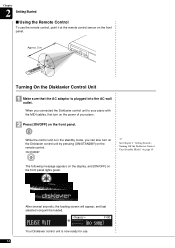
... m 30° 30° 30° 30° Turning On the Disklavier Control Unit 1 Make sure that the AC adaptor is now ready for use the remote control, point it at the remote control sensor on the front panel. Turning Off the Disklavier Control Unit (Standby Mode)" on the remote .... PLEASE WAIT =Memory= V+00 (no song) Your Disklavier control unit is plugged into the AC wall outlet. Chapter 2 Getting Started ■ Using the Remote Control To use . 14 When you can also turn on the power of your piano. 2 Press [ON/OFF] on the front panel. The following message appears...
... m 30° 30° 30° 30° Turning On the Disklavier Control Unit 1 Make sure that the AC adaptor is now ready for use the remote control, point it at the remote control sensor on the front panel. Turning Off the Disklavier Control Unit (Standby Mode)" on the remote .... PLEASE WAIT =Memory= V+00 (no song) Your Disklavier control unit is plugged into the AC wall outlet. Chapter 2 Getting Started ■ Using the Remote Control To use . 14 When you can also turn on the power of your piano. 2 Press [ON/OFF] on the front panel. The following message appears...
