User Manual
Page 6
...a protective earth circuit. is product is supplied with the equipment. • Plug the power cord directly into the equipment. - e equipment is damaged. LASER SAFETY INFORMATION CAUTION: Use of controls, adjustments or performance of procedures other materials may impact the.... • Never push objects of any of the following instructions carefully before using Xerox materials only. To remove all electrical power from the equipment, disconnect the power cable from the electrical outlet. Please contact your product. e safety and environment...
...a protective earth circuit. is product is supplied with the equipment. • Plug the power cord directly into the equipment. - e equipment is damaged. LASER SAFETY INFORMATION CAUTION: Use of controls, adjustments or performance of procedures other materials may impact the.... • Never push objects of any of the following instructions carefully before using Xerox materials only. To remove all electrical power from the equipment, disconnect the power cable from the electrical outlet. Please contact your product. e safety and environment...

User Manual
Page 7
... radiator or any maintenance procedures that are not specifically described in the customer documentation supplied with your Xerox equipment, follow all phases of customer operation and maintenance. FOR CONSUMABLES Store all consumables in accordance ...Xerox equipment. If in doubt, have been trained to a protective earth circuit. is equipment is supplied with screws. ere are unable to Part 15 of the equipment, and could create a dangerous condition. • Use supplies and cleaning materials only as directed in the customer documentation. Disconnect the power cord...
... radiator or any maintenance procedures that are not specifically described in the customer documentation supplied with your Xerox equipment, follow all phases of customer operation and maintenance. FOR CONSUMABLES Store all consumables in accordance ...Xerox equipment. If in doubt, have been trained to a protective earth circuit. is equipment is supplied with screws. ere are unable to Part 15 of the equipment, and could create a dangerous condition. • Use supplies and cleaning materials only as directed in the customer documentation. Disconnect the power cord...
User Manual
Page 12
...Lasermachine in closed cabinets or boxes. Otherwise, the machine can cause injury to people, especially small children. e distance between the laser machine and the base station of the cordless device. In the event that is used frequently. Otherwise, people using the device are...smoke coming from the telephone network. Otherwise, there is moisture of any telephone calls. Never touch telephone cords or mains cables that no one will operate during power failure. Should liquids or foreign parts nevertheless enter into the machine! Do not use an additional cordless ...
...Lasermachine in closed cabinets or boxes. Otherwise, the machine can cause injury to people, especially small children. e distance between the laser machine and the base station of the cordless device. In the event that is used frequently. Otherwise, people using the device are...smoke coming from the telephone network. Otherwise, there is moisture of any telephone calls. Never touch telephone cords or mains cables that no one will operate during power failure. Should liquids or foreign parts nevertheless enter into the machine! Do not use an additional cordless ...
User Manual
Page 16
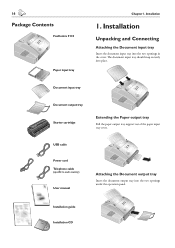
USB cable Power cord Telephone cable (specific to each country) User manual Attaching the Document output tray Insert the document output tray into place. Installation guide Installation CD Installation 1. ... into the two openings in the cover. e document input tray should snap securely into the two openings under the operation panel. 16 Package Contents FaxCentre F110 Paper input tray Chapter 1. Document input tray Document output tray Starter cartridge Extending the Paper output tray Pull the paper output tray support out of...
USB cable Power cord Telephone cable (specific to each country) User manual Attaching the Document output tray Insert the document output tray into place. Installation guide Installation CD Installation 1. ... into the two openings in the cover. e document input tray should snap securely into the two openings under the operation panel. 16 Package Contents FaxCentre F110 Paper input tray Chapter 1. Document input tray Document output tray Starter cartridge Extending the Paper output tray Pull the paper output tray support out of...
User Manual
Page 17
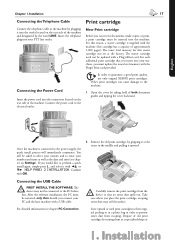
...help page: 2 installation. Connect the power cord to guarantee a good print quality, use only original XEROX print cartridges. For this reason, a starter cartridge is connected to the power supply, the quick install process will be connected to enter your PC and the laser machine with a Plug'n'Print card....as the date and time (see chapter PC Connection. ÆCarefully remove the print cartridge from escaping. Connecting the Power Cord Insert the power cord into your machine, you must be restarted, only then should you place the print cartridge, escaping toner dust may not...
...help page: 2 installation. Connect the power cord to guarantee a good print quality, use only original XEROX print cartridges. For this reason, a starter cartridge is connected to the power supply, the quick install process will be connected to enter your PC and the laser machine with a Plug'n'Print card....as the date and time (see chapter PC Connection. ÆCarefully remove the print cartridge from escaping. Connecting the Power Cord Insert the power cord into your machine, you must be restarted, only then should you place the print cartridge, escaping toner dust may not...
User Manual
Page 48
... 33 cancel 33 modify 33 perform 33 printing 33 Commands List print 33 Companion Suite installation 36 uninstallation 37 use 38 Connect EXT socket 22 power cord 17 telephone cable . . . . . 17 USB Cable 17 Connections on the rear side 14 Contrast 24 copy 34 Copier 34 Copy 34 adjust copies 34 ...17 unpacking 16 Internal numbers 21 ISDN Systems 21 J Journal 33, 44 K Keyboard lock 25 quick search 27 L Language setting 23 set at PC 39 Laser Safety see Safety Notes LCD display 15 symbols 15 Legal paper 19 insert 20 Letter paper 19 insert 20 LINE socket 17 Lock 25 code...
... 33 cancel 33 modify 33 perform 33 printing 33 Commands List print 33 Companion Suite installation 36 uninstallation 37 use 38 Connect EXT socket 22 power cord 17 telephone cable . . . . . 17 USB Cable 17 Connections on the rear side 14 Contrast 24 copy 34 Copier 34 Copy 34 adjust copies 34 ...17 unpacking 16 Internal numbers 21 ISDN Systems 21 J Journal 33, 44 K Keyboard lock 25 quick search 27 L Language setting 23 set at PC 39 Laser Safety see Safety Notes LCD display 15 symbols 15 Legal paper 19 insert 20 Letter paper 19 insert 20 LINE socket 17 Lock 25 code...
User Manual
Page 49
...resolution 24 scanner driver 40 Page header 23 Profiles enter 23 scan 40 ring tone set date and time . . . . . Power Cord connecting Prefix Print commands List from PC 32 32 32 47 17 21 33 39 Safety Notes 6 Save entry telephone book . ...output tray extending Paper Port installation uninstallation use entries 27 Telephone cable connecting 17 Telephone connections . . . 21 additional devices . . . . 22 Appendix Polling send Power consumption . . . . . USB Cable connect USB port Use Companion Suite . . . . . SFINE key symbol on the LCD display . . . ....
...resolution 24 scanner driver 40 Page header 23 Profiles enter 23 scan 40 ring tone set date and time . . . . . Power Cord connecting Prefix Print commands List from PC 32 32 32 47 17 21 33 39 Safety Notes 6 Save entry telephone book . ...output tray extending Paper Port installation uninstallation use entries 27 Telephone cable connecting 17 Telephone connections . . . 21 additional devices . . . . 22 Appendix Polling send Power consumption . . . . . USB Cable connect USB port Use Companion Suite . . . . . SFINE key symbol on the LCD display . . . ....


