Troubleshooting Guide
Page 2
Contents of Nebiolo. Marigold™ and Oxford™ are four- Hoefler Text was designed by the Phaser 7300 Color Printer are trademarks of Novell, Incorporated. Antique Olive® is a trademark of this publication may not be registered in... of qualified licensees. marks. This product includes an implementation of Hewlett-Packard Corporation. PCL® and HP-GL® are trademarks of Xerox Corporation. Wingdings™ in any form without limitation, material generated from the software programs which is a trademark of SPARC International, Incorporated. ...
Contents of Nebiolo. Marigold™ and Oxford™ are four- Hoefler Text was designed by the Phaser 7300 Color Printer are trademarks of Novell, Incorporated. Antique Olive® is a trademark of this publication may not be registered in... of qualified licensees. marks. This product includes an implementation of Hewlett-Packard Corporation. PCL® and HP-GL® are trademarks of Xerox Corporation. Wingdings™ in any form without limitation, material generated from the software programs which is a trademark of SPARC International, Incorporated. ...
Troubleshooting Guide
Page 4
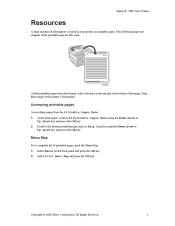
...1 Scroll to the Printable Pages Menu using the Down Arrow or Up Arrow key and press the OK key. Phaser® 7300 Color Printer Resources A large amount of information is stored in your printer as Help Guide) using the Down Arrow or Up Arrow key and press the OK key. Print these pages from...OK key. Copyright © 2002 Xerox Corporation. Menu Map For a complete list of the page. The following pages are samples of the printable page for this topic. 7300-58 All the printable pages have this format, with color bars at the top and at the printer's front panel. Select Menus on the...
...1 Scroll to the Printable Pages Menu using the Down Arrow or Up Arrow key and press the OK key. Phaser® 7300 Color Printer Resources A large amount of information is stored in your printer as Help Guide) using the Down Arrow or Up Arrow key and press the OK key. Print these pages from...OK key. Copyright © 2002 Xerox Corporation. Menu Map For a complete list of the page. The following pages are samples of the printable page for this topic. 7300-58 All the printable pages have this format, with color bars at the top and at the printer's front panel. Select Menus on the...
Troubleshooting Guide
Page 5
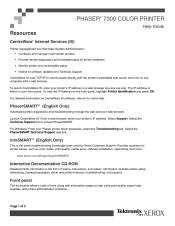
.... www.xerox.com/officeprinting/infoSMART Interactive Documentation CD-ROM Detailed printer information in a web browser (xxx.xxx.xxx.xxx). CentreWare IS uses TCP/IP to communicate directly with the printer's embedded web server and runs on the front panel, highlight Printer Identification and press OK. Select the Technical Support link to help . PHASER 7300 COLOR PRINTER Help...
.... www.xerox.com/officeprinting/infoSMART Interactive Documentation CD-ROM Detailed printer information in a web browser (xxx.xxx.xxx.xxx). CentreWare IS uses TCP/IP to communicate directly with the printer's embedded web server and runs on the front panel, highlight Printer Identification and press OK. Select the Technical Support link to help . PHASER 7300 COLOR PRINTER Help...
Troubleshooting Guide
Page 8
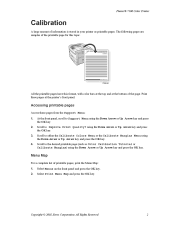
Phaser® 7300 Color Printer Calibration A large amount of information is stored in your printer as Color Calibration Tutorial or Calibrate Margins) using the Down Arrow or Up Arrow key and press the OK key. Print these pages from the Support Menu: 1. 2. 3. 4. ... key. Accessing printable pages Access these pages at the bottom of printable pages, print the Menu Map: 1. 2. Copyright © 2002 Xerox Corporation. At the front panel, scroll to either the Calibrate Colors Menu or the Calibrate Margins Menu using the Down Arrow or Up Arrow key and press the OK key. The...
Phaser® 7300 Color Printer Calibration A large amount of information is stored in your printer as Color Calibration Tutorial or Calibrate Margins) using the Down Arrow or Up Arrow key and press the OK key. Print these pages from the Support Menu: 1. 2. 3. 4. ... key. Accessing printable pages Access these pages at the bottom of printable pages, print the Menu Map: 1. 2. Copyright © 2002 Xerox Corporation. At the front panel, scroll to either the Calibrate Colors Menu or the Calibrate Margins Menu using the Down Arrow or Up Arrow key and press the OK key. The...
Troubleshooting Guide
Page 9
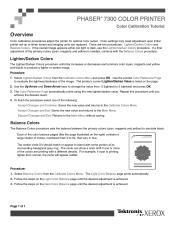
.... Follow the steps on the right) contains a large cluster of the color balance pages (like the page illustrated on the Light Color Balance page until you achieve the desired result. 4. PHASER 7300 COLOR PRINTER Color Calibration Tutorial ® Overview Color calibration procedures adjust the printer for optimal color output. If a finer adjustment of 1 Procedure: 1. Accept Changes and Exit: Saves...
.... Follow the steps on the right) contains a large cluster of the color balance pages (like the page illustrated on the Light Color Balance page until you achieve the desired result. 4. PHASER 7300 COLOR PRINTER Color Calibration Tutorial ® Overview Color calibration procedures adjust the printer for optimal color output. If a finer adjustment of 1 Procedure: 1. Accept Changes and Exit: Saves...
Troubleshooting Guide
Page 10
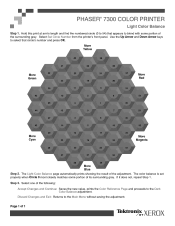
... 33 More Magenta 51 30 32 47 31 50 48 49 More Blue Step 2. Step 3. Page 1 of the adjustment. The color balance is set properly when Circle 0 most closely matches some portion of the following: Accept Changes and Continue: Saves the new value, ...the Main Menu without saving the adjustment. Select one of the surrounding gray. Select Set Circle Number from the printer's front panel. PHASER 7300 COLOR PRINTER Light Color Balance Step 1. The Light Color Balance page automatically prints showing the result of 1 If it does not, repeat Step 1. Discard Changes and ...
... 33 More Magenta 51 30 32 47 31 50 48 49 More Blue Step 2. Step 3. Page 1 of the adjustment. The color balance is set properly when Circle 0 most closely matches some portion of the following: Accept Changes and Continue: Saves the new value, ...the Main Menu without saving the adjustment. Select one of the surrounding gray. Select Set Circle Number from the printer's front panel. PHASER 7300 COLOR PRINTER Light Color Balance Step 1. The Light Color Balance page automatically prints showing the result of 1 If it does not, repeat Step 1. Discard Changes and ...
Troubleshooting Guide
Page 11
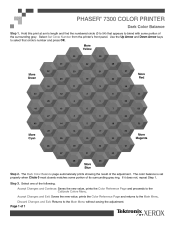
...ring. If it does not, repeat Step 1. Discard Changes and Exit: Returns to the Calibrate Colors Menu. Step 3. Select one of the surrounding gray. Select Set Circle Number from the printer's front panel. Hold this print at arm's length and find the numbered circle (0 to ... The color balance is set properly when Circle 0 most closely matches some portion of the following: Accept Changes and Continue: Saves the new value, prints the Color Reference Page and proceeds to the Main Menu without saving the adjustment. Page 1 of the adjustment. PHASER 7300 COLOR PRINTER Dark Color Balance ...
...ring. If it does not, repeat Step 1. Discard Changes and Exit: Returns to the Calibrate Colors Menu. Step 3. Select one of the surrounding gray. Select Set Circle Number from the printer's front panel. Hold this print at arm's length and find the numbered circle (0 to ... The color balance is set properly when Circle 0 most closely matches some portion of the following: Accept Changes and Continue: Saves the new value, prints the Color Reference Page and proceeds to the Main Menu without saving the adjustment. Page 1 of the adjustment. PHASER 7300 COLOR PRINTER Dark Color Balance ...

Troubleshooting Guide
Page 12
... 1 "B" Margin setting to Calibrate Margins Menu and press OK. the printer will not print outside this page. 3. B+ Phaser 7700 Color Printer Phaser 7700 Color Printer Calibrate Margins Phaser 7700 Color Printer Calibrate Margins Phaser 7700 Color Printer Calibrate Margins Calibrate Margins A- Step 2. Use the front panel menu items... 1 of the solid lines printed on the page: 1. PHASER 7300 COLOR PRINTER Calibrate for Margins (Long-Edge Feed) The Calibrate Margins Menu allows you , hold the print up . From the printer's front panel Support Menu, scroll to verify your adjustment....
... 1 "B" Margin setting to Calibrate Margins Menu and press OK. the printer will not print outside this page. 3. B+ Phaser 7700 Color Printer Phaser 7700 Color Printer Calibrate Margins Phaser 7700 Color Printer Calibrate Margins Phaser 7700 Color Printer Calibrate Margins Calibrate Margins A- Step 2. Use the front panel menu items... 1 of the solid lines printed on the page: 1. PHASER 7300 COLOR PRINTER Calibrate for Margins (Long-Edge Feed) The Calibrate Margins Menu allows you , hold the print up . From the printer's front panel Support Menu, scroll to verify your adjustment....

Troubleshooting Guide
Page 13
... 2 Margins. 1. With Side 1 facing you to adjust the printer's imaging area relative to verify your adjustment. PHASER 7300 COLOR PRINTER Calibrate for Margins (Short-Edge Feed) The Calibrate Margins Menu allows you , hold the print up . A+ Phaser 7700 Color Printer Phaser 7700 Color Printer Calibrate Margins Calibrate Margins Phaser 7700 Color Printer Calibrate Margins Phaser 7700 Color Printer Calibrate Margins ® B- Use the front panel menu...
... 2 Margins. 1. With Side 1 facing you to adjust the printer's imaging area relative to verify your adjustment. PHASER 7300 COLOR PRINTER Calibrate for Margins (Short-Edge Feed) The Calibrate Margins Menu allows you , hold the print up . A+ Phaser 7700 Color Printer Phaser 7700 Color Printer Calibrate Margins Calibrate Margins Phaser 7700 Color Printer Calibrate Margins Phaser 7700 Color Printer Calibrate Margins ® B- Use the front panel menu...

Troubleshooting Guide
Page 14
... 1. 2. Menu Map For a complete list of information is stored in your printer as Diagnosing Print Quality) using the Down Arrow or Up Arrow key and press the OK key. Copyright © 2002 Xerox Corporation. All Rights Reserved. 3 Select Menus on the front panel and press the... At the front panel, scroll to the desired printable page (such as printable pages. The following pages are samples of the page. Phaser® 7300 Color Printer Diagnosing Print Quality A large amount of printable pages, print the Menu Map: 1. 2. Accessing printable pages Access these pages at the ...
... 1. 2. Menu Map For a complete list of information is stored in your printer as Diagnosing Print Quality) using the Down Arrow or Up Arrow key and press the OK key. Copyright © 2002 Xerox Corporation. All Rights Reserved. 3 Select Menus on the front panel and press the... At the front panel, scroll to the desired printable page (such as printable pages. The following pages are samples of the page. Phaser® 7300 Color Printer Diagnosing Print Quality A large amount of printable pages, print the Menu Map: 1. 2. Accessing printable pages Access these pages at the ...

Troubleshooting Guide
Page 15
... came with the defect of cyan, yellow, magenta, and black; From the printer's front panel Support Menu select Improve Print Quality?, then select Print-Quality Tips Page and press OK. Not all four colors. Check the Imaging Unit and remove any foreign material if found. Use the..., replace the Imaging Unit. Use the information below are Long-Edge Feed (LEF). With the Imaging Unit in only one color when a light color is normal. b. PHASER 7300 COLOR PRINTER Diagnosing Print Quality Review the five test pages printed with black. 2. Page 1 of the Imaging Unit.
... came with the defect of cyan, yellow, magenta, and black; From the printer's front panel Support Menu select Improve Print Quality?, then select Print-Quality Tips Page and press OK. Not all four colors. Check the Imaging Unit and remove any foreign material if found. Use the..., replace the Imaging Unit. Use the information below are Long-Edge Feed (LEF). With the Imaging Unit in only one color when a light color is normal. b. PHASER 7300 COLOR PRINTER Diagnosing Print Quality Review the five test pages printed with black. 2. Page 1 of the Imaging Unit.

Troubleshooting Guide
Page 18
... jam, this section includes instructions for clearing jams. Videos are available for clearing the following jams: I I I I I Copyright © 2002 Xerox Corporation. For proper paper-loading instructions, see page 8. see page 6. Phaser® 7300 Color Printer Paper Jams In addition to clear the jam. see the Loading Trays section in the Trays and Paper Guide...
... jam, this section includes instructions for clearing jams. Videos are available for clearing the following jams: I I I I I Copyright © 2002 Xerox Corporation. For proper paper-loading instructions, see page 8. see page 6. Phaser® 7300 Color Printer Paper Jams In addition to clear the jam. see the Loading Trays section in the Trays and Paper Guide...

Troubleshooting Guide
Page 19
... a paper jam? paper is moist, bent, or folded. Refer to clear the jam. Phaser® 7300 Color Printer 5 The paper does not meet specifications. Jam at Door A Follow these conditions: I I I I I I I An incorrect paper type was selected in the printer driver. The tray's side and rear guides are not adjusted properly for jam-clearing... fill line. The tray is not supported by the paper tray. Paper jams occur most often under these steps to the labels inside the printer for the paper. The loaded paper size or weight is overfilled; Open the door labeled A on the right side of the...
... a paper jam? paper is moist, bent, or folded. Refer to clear the jam. Phaser® 7300 Color Printer 5 The paper does not meet specifications. Jam at Door A Follow these conditions: I I I I I I I An incorrect paper type was selected in the printer driver. The tray's side and rear guides are not adjusted properly for jam-clearing... fill line. The tray is not supported by the paper tray. Paper jams occur most often under these steps to the labels inside the printer for the paper. The loaded paper size or weight is overfilled; Open the door labeled A on the right side of the...
Troubleshooting Guide
Page 20
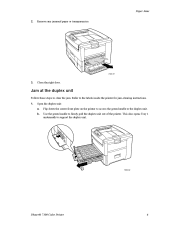
Open the duplex unit: a. Remove any jammed paper or transparencies. 7300-57 3. Flip down the center front plate on the printer to access the green handle to support the duplex unit. 7300-02 Phaser® 7300 Color Printer 6 This also opens Tray 1 underneath to the duplex unit. Close the right door. Refer to firmly pull the duplex unit out of the printer. b. Use the green handle to the labels inside the printer for jam-clearing instructions. 1. Paper Jams 2. Jam at the duplex unit Follow these steps to clear the jam.
Open the duplex unit: a. Remove any jammed paper or transparencies. 7300-57 3. Flip down the center front plate on the printer to access the green handle to support the duplex unit. 7300-02 Phaser® 7300 Color Printer 6 This also opens Tray 1 underneath to the duplex unit. Close the right door. Refer to firmly pull the duplex unit out of the printer. b. Use the green handle to the labels inside the printer for jam-clearing instructions. 1. Paper Jams 2. Jam at the duplex unit Follow these steps to clear the jam.
Troubleshooting Guide
Page 21
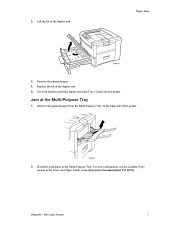
Remove the jammed paper. Replace the lid of the duplex unit. 7300-56 3. 4. 5. Use both hands to push the duplex unit (and Tray 1) back into the printer. Lift the lid of the duplex unit. Jam at the Multi-Purpose Tray 1. Remove the jammed paper from the Multi-Purpose Tray on the Interactive Documentation CD-ROM. For more information, see the Loading Trays section in the Multi-Purpose Tray. Paper Jams 2. If needed, load paper in the Trays and Paper Guide on the right side of the printer. 7300-03 2. Phaser® 7300 Color Printer 7
Remove the jammed paper. Replace the lid of the duplex unit. 7300-56 3. 4. 5. Use both hands to push the duplex unit (and Tray 1) back into the printer. Lift the lid of the duplex unit. Jam at the Multi-Purpose Tray 1. Remove the jammed paper from the Multi-Purpose Tray on the Interactive Documentation CD-ROM. For more information, see the Loading Trays section in the Multi-Purpose Tray. Paper Jams 2. If needed, load paper in the Trays and Paper Guide on the right side of the printer. 7300-03 2. Phaser® 7300 Color Printer 7
Troubleshooting Guide
Page 22
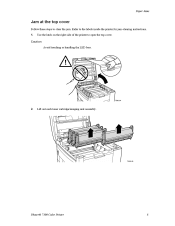
Use the latch on the right side of the printer to the labels inside the printer for jam-clearing instructions. 1. Caution Avoid touching or handling the LED bars. 7300-04 2. Lift out each toner cartridge/imaging unit assembly. 7300-05 Phaser® 7300 Color Printer 8 Refer to open the top cover. Paper Jams Jam at the top cover Follow these steps to clear the jam.
Use the latch on the right side of the printer to the labels inside the printer for jam-clearing instructions. 1. Caution Avoid touching or handling the LED bars. 7300-04 2. Lift out each toner cartridge/imaging unit assembly. 7300-05 Phaser® 7300 Color Printer 8 Refer to open the top cover. Paper Jams Jam at the top cover Follow these steps to clear the jam.
Troubleshooting Guide
Page 23
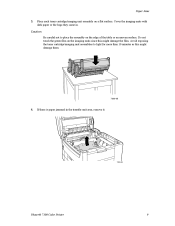
Do not touch the green film on the imaging units since this might damage the film. Avoid exposing the toner cartridge/imaging unit assemblies to place the assembly on a flat surface. If there is paper jammed in . Paper Jams 3. Place each toner cartridge/imaging unit assembly on the edge of the table or an uneven surface. Caution Be careful not to light for more than 10 minutes as this might damage them. 7300-06 4. Cover the imaging units with dark paper or the bags they came in the transfer unit area, remove it. 7300-08 Phaser® 7300 Color Printer 9
Do not touch the green film on the imaging units since this might damage the film. Avoid exposing the toner cartridge/imaging unit assemblies to place the assembly on a flat surface. If there is paper jammed in . Paper Jams 3. Place each toner cartridge/imaging unit assembly on the edge of the table or an uneven surface. Caution Be careful not to light for more than 10 minutes as this might damage them. 7300-06 4. Cover the imaging units with dark paper or the bags they came in the transfer unit area, remove it. 7300-08 Phaser® 7300 Color Printer 9
Troubleshooting Guide
Page 24
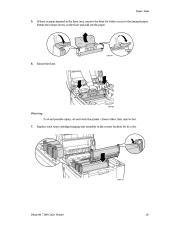
Rotate the release levers on the fuser and pull out the paper. 7300-91 6. they may be hot. 7. Replace each toner cartridge/imaging unit assembly in the fuser area, remove the fuser for its color. 7300-10 Phaser® 7300 Color Printer 10 If there is paper jammed in the correct location for better access to the jammed paper. Reseat the fuser. 7300-92 Warning To avoid possible injury, do not touch the printer's fuser rollers; Paper Jams 5.
Rotate the release levers on the fuser and pull out the paper. 7300-91 6. they may be hot. 7. Replace each toner cartridge/imaging unit assembly in the fuser area, remove the fuser for its color. 7300-10 Phaser® 7300 Color Printer 10 If there is paper jammed in the correct location for better access to the jammed paper. Reseat the fuser. 7300-92 Warning To avoid possible injury, do not touch the printer's fuser rollers; Paper Jams 5.
Troubleshooting Guide
Page 25
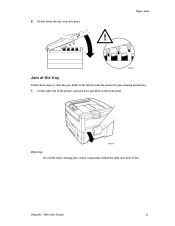
Paper Jams 8. Refer to clear the jam. Slowly lower the top cover into place. 7300-11 Jam at the tray Follow these steps to the labels inside the printer for jam-clearing instructions. 1. Phaser® 7300 Color Printer 11 On the right side of the printer, open the door specified on the front panel. 7300-01 Warning Be careful when clearing jams. Some components behind the right door may be hot.
Paper Jams 8. Refer to clear the jam. Slowly lower the top cover into place. 7300-11 Jam at the tray Follow these steps to the labels inside the printer for jam-clearing instructions. 1. Phaser® 7300 Color Printer 11 On the right side of the printer, open the door specified on the front panel. 7300-01 Warning Be careful when clearing jams. Some components behind the right door may be hot.
Troubleshooting Guide
Page 26
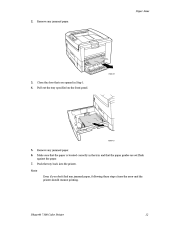
Phaser® 7300 Color Printer 12 Pull out the tray specified on the front panel. 7300-13 5. 6. 7. Paper Jams 2. Remove any jammed paper. 7300-57 3. 4. Remove any jammed paper. Make sure that the paper is located correctly in Step 1. Note Even if you opened in the tray and that you don't find any jammed paper, following these steps clears the error and the printer should resume printing. Push the tray back into the printer. Close the door that the paper guides are set flush against the paper.
Phaser® 7300 Color Printer 12 Pull out the tray specified on the front panel. 7300-13 5. 6. 7. Paper Jams 2. Remove any jammed paper. 7300-57 3. 4. Remove any jammed paper. Make sure that the paper is located correctly in Step 1. Note Even if you opened in the tray and that you don't find any jammed paper, following these steps clears the error and the printer should resume printing. Push the tray back into the printer. Close the door that the paper guides are set flush against the paper.


