Troubleshooting Guide
Page 5
..., paper feed, supplies, and printer administration problems. Page 1 of topics, instructions, and videos. www.xerox.com/officeprinting/infoSMART Interactive Documentation CD-ROM Detailed printer information in a web browser (xxx.xxx.xxx.xxx). PHASER 7300 COLOR PRINTER Help Guide ® Resources CentreWare® Internet Services (IS) Printer management tool that helps System Administrators: • Configure and manage multi-vendor printers. • Provide remote diagnostics and troubleshooting for printer issues, such as error codes, print quality, media jams, software installation...
..., paper feed, supplies, and printer administration problems. Page 1 of topics, instructions, and videos. www.xerox.com/officeprinting/infoSMART Interactive Documentation CD-ROM Detailed printer information in a web browser (xxx.xxx.xxx.xxx). PHASER 7300 COLOR PRINTER Help Guide ® Resources CentreWare® Internet Services (IS) Printer management tool that helps System Administrators: • Configure and manage multi-vendor printers. • Provide remote diagnostics and troubleshooting for printer issues, such as error codes, print quality, media jams, software installation...
Troubleshooting Guide
Page 6
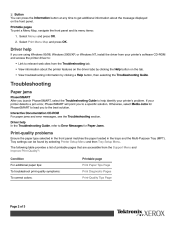
... printer's software CD-ROM and access the printer driver to: • Link to relevant web sites from the Support Menu and Improve Print Quality?: Condition For additional paper tips: To troubleshoot print-quality symptoms: To correct colors: Printable page Print Paper Tips Page Print Diagnostic Pages Print-Quality Tips Page Page 2 of 3 Interactive Documentation CD-ROM For paper jams and error messages, see the Troubleshooting section. Select Menus and press OK. 2. Otherwise, select Media Jams for Paper Jams. Print-quality problems Ensure the paper type selected in the front panel...
... printer's software CD-ROM and access the printer driver to: • Link to relevant web sites from the Support Menu and Improve Print Quality?: Condition For additional paper tips: To troubleshoot print-quality symptoms: To correct colors: Printable page Print Paper Tips Page Print Diagnostic Pages Print-Quality Tips Page Page 2 of 3 Interactive Documentation CD-ROM For paper jams and error messages, see the Troubleshooting section. Select Menus and press OK. 2. Otherwise, select Media Jams for Paper Jams. Print-quality problems Ensure the paper type selected in the front panel...
Troubleshooting Guide
Page 7
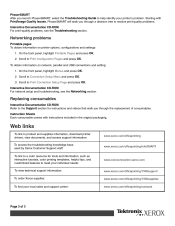
...printer options, configurations and settings: 1. Scroll to Print Configuration Pages and press OK. On the front panel, highlight Printable Pages and press OK. 2. Instruction Sheets Each consumable comes with Print/Image Quality Issues, PhaserSMART will walk you through a decision tree to resolve print-quality problems. Interactive Documentation CD-ROM For print-quality problems, see the Networking section. Scroll to Connection Setup Menu and press OK. 3. Interactive Documentation CD-ROM For network setup and troubleshooting, see the Troubleshooting section. Replacing...
...printer options, configurations and settings: 1. Scroll to Print Configuration Pages and press OK. On the front panel, highlight Printable Pages and press OK. 2. Instruction Sheets Each consumable comes with Print/Image Quality Issues, PhaserSMART will walk you through a decision tree to resolve print-quality problems. Interactive Documentation CD-ROM For print-quality problems, see the Networking section. Scroll to Connection Setup Menu and press OK. 3. Interactive Documentation CD-ROM For network setup and troubleshooting, see the Troubleshooting section. Replacing...

Troubleshooting Guide
Page 15
... the printer's front panel Support Menu select Improve Print Quality?, then select Print-Quality Tips Page and press OK. The images shown are printed. ® Problem Solution 1. Clean the four LED bars (a) using the cleaning pad supplied with this page: The pages consist of the print, replace the Imaging Unit. PHASER 7300 COLOR PRINTER Diagnosing Print Quality Review the five test pages printed with a each new toner cartridge. and another page with the defect of cyan, yellow, magenta, and black; Not all four colors. Open the top cover...
... the printer's front panel Support Menu select Improve Print Quality?, then select Print-Quality Tips Page and press OK. The images shown are printed. ® Problem Solution 1. Clean the four LED bars (a) using the cleaning pad supplied with this page: The pages consist of the print, replace the Imaging Unit. PHASER 7300 COLOR PRINTER Diagnosing Print Quality Review the five test pages printed with a each new toner cartridge. and another page with the defect of cyan, yellow, magenta, and black; Not all four colors. Open the top cover...
Troubleshooting Guide
Page 27
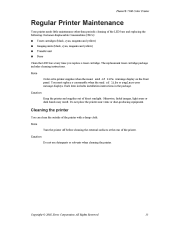
...) Imaging units (black, cyan, magenta and yellow) Transfer unit Fuser Clean the LED bars every time you replace a toner cartridge. All Rights Reserved. 13 Phaser® 7300 Color Printer Regular Printer Maintenance Your printer needs little maintenance other than periodic cleaning of direct sunlight. Caution Do not use detergents or solvents when cleaning the printer. Each item includes installation instructions in the package. Cleaning the printer You can clean the outside of life warnings display on the front panel. The replacement toner cartridge package...
...) Imaging units (black, cyan, magenta and yellow) Transfer unit Fuser Clean the LED bars every time you replace a toner cartridge. All Rights Reserved. 13 Phaser® 7300 Color Printer Regular Printer Maintenance Your printer needs little maintenance other than periodic cleaning of direct sunlight. Caution Do not use detergents or solvents when cleaning the printer. Each item includes installation instructions in the package. Cleaning the printer You can clean the outside of life warnings display on the front panel. The replacement toner cartridge package...

Service Manual
Page 7
... precautions. ■ Immediately before applying power to the unit under test to avoid potential shock.) ■ After removing a static sensitive assembly from a carpeted floor can generate enough static electricity to damage an electro-statically sensitive device ■ Handle IC's and EEPROM's carefully to avoid bending pins. ■ Pay attention to the direction of a replacement device, touch the protective material to...
... precautions. ■ Immediately before applying power to the unit under test to avoid potential shock.) ■ After removing a static sensitive assembly from a carpeted floor can generate enough static electricity to damage an electro-statically sensitive device ■ Handle IC's and EEPROM's carefully to avoid bending pins. ■ Pay attention to the direction of a replacement device, touch the protective material to...
Service Manual
Page 13
... Printer Overview 1 - 2 Phaser 7300 Printer Configurations 1 - 3 Printer Memory and RAM Capabilities 1 - 5 Parts of the IP Board 1 - 11 DIP Switches 1 - 12 Printer Specifications 1 - 13 Physical Dimensions - Options 1 - 13 Printer Clearances 1 - 13 Functional Specifications 1 - 14 Print Speeds 1 - 14 Electrical Specifications 1 - 15 Environmental Specifications 1 - 15 Media and Tray Specifications 1 - 16 Error Messages and Codes 2 - 19 Accessing Error Codes and Fault History 2 - 19 Error Messages and Codes Index 2 - 20 Service Flowchart 2 - 24 Using the Troubleshooting...
... Printer Overview 1 - 2 Phaser 7300 Printer Configurations 1 - 3 Printer Memory and RAM Capabilities 1 - 5 Parts of the IP Board 1 - 11 DIP Switches 1 - 12 Printer Specifications 1 - 13 Physical Dimensions - Options 1 - 13 Printer Clearances 1 - 13 Functional Specifications 1 - 14 Print Speeds 1 - 14 Electrical Specifications 1 - 15 Environmental Specifications 1 - 15 Media and Tray Specifications 1 - 16 Error Messages and Codes 2 - 19 Accessing Error Codes and Fault History 2 - 19 Error Messages and Codes Index 2 - 20 Service Flowchart 2 - 24 Using the Troubleshooting...
Service Manual
Page 36
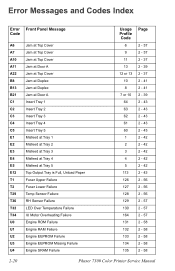
Error Messages and Codes Index Error Front Panel Message Code A6 Jam at Top Cover A7 Jam at Top Cover A10 Jam at Top Cover A11 Jam at Door A A22 Jam at Top Cover B8 Jam at Duplex B13 Jam at Duplex B21 Jam at Door A C1 Insert Tray 1 C2 Insert Tray 2 C3 Insert Tray 3 C4 Insert Tray 4 C5 Insert Tray 5 E1 Misfeed at Tray 1 E2 Misfeed at Tray 2 E3 Misfeed at Tray 3 E4 Misfeed at Tray 4 E5 Misfeed at Tray 5 E12 Top Output Tray is...
Error Messages and Codes Index Error Front Panel Message Code A6 Jam at Top Cover A7 Jam at Top Cover A10 Jam at Top Cover A11 Jam at Door A A22 Jam at Top Cover B8 Jam at Duplex B13 Jam at Duplex B21 Jam at Door A C1 Insert Tray 1 C2 Insert Tray 2 C3 Insert Tray 3 C4 Insert Tray 4 C5 Insert Tray 5 E1 Misfeed at Tray 1 E2 Misfeed at Tray 2 E3 Misfeed at Tray 3 E4 Misfeed at Tray 4 E5 Misfeed at Tray 5 E12 Top Output Tray is...
Service Manual
Page 40
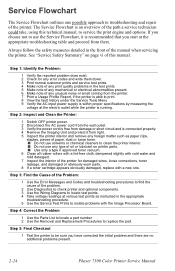
... print quality problems in the test prints. 5 Make note of any mechanical or electrical abnormalities present. 6 Make note of any unusual noise or smell coming from damage or short circuit and is running. Step 3: Find the Cause of the Problem: 1 Use the Error Messages and Codes and troubleshooting procedures to find the cause of the problem. 2 Use Diagnostics to check printer and optional components. 3 Use the Wiring Diagrams to replace the part. Service...
... print quality problems in the test prints. 5 Make note of any mechanical or electrical abnormalities present. 6 Make note of any unusual noise or smell coming from damage or short circuit and is running. Step 3: Find the Cause of the Problem: 1 Use the Error Messages and Codes and troubleshooting procedures to find the cause of the problem. 2 Use Diagnostics to check printer and optional components. 3 Use the Wiring Diagrams to replace the part. Service...
Service Manual
Page 43
... and returns printer to print. Detects presence of Duplex option. is online and ready to Ready. is nnn deg.C Consumable Status ■ Total Pages ■ Fuser Unit Life (total sheets) ■ transfer unit Life (total images) ■ Black IU Life (total images) ■ Yellow IU Life (total images) ■ Cyan IU Life (total images) ■ Magenta IU Life (total images) ■ Black Toner Life (% used) ■ Yellow Toner Life (% used) ■ Magenta Toner Life (% used) ■ Cyan Toner Life (% used) Displays engine reported upper, lower and upper-side fuser temperature...
... and returns printer to print. Detects presence of Duplex option. is online and ready to Ready. is nnn deg.C Consumable Status ■ Total Pages ■ Fuser Unit Life (total sheets) ■ transfer unit Life (total images) ■ Black IU Life (total images) ■ Yellow IU Life (total images) ■ Cyan IU Life (total images) ■ Magenta IU Life (total images) ■ Black Toner Life (% used) ■ Yellow Toner Life (% used) ■ Magenta Toner Life (% used) ■ Cyan Toner Life (% used) Displays engine reported upper, lower and upper-side fuser temperature...
Service Manual
Page 44
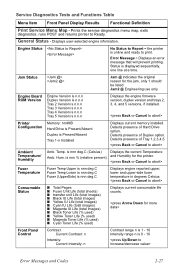
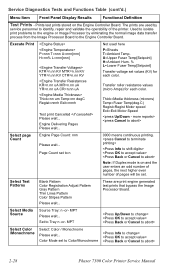
Service Diagnostics Tests and Functions Table (cont'd.) Menu Item Front Panel Display Results Functional Definition Test Prints - Execute Print P=nnn T=nnn U=nnn[nnn] H=nn% L=nnn[nnn] KTR=n.nn KV MTR=n.nn KV YTR=n.nn KV CTR=n.nn KV Used to isolate print problems to the engine or Image Processor by service personnel to the Engine Controller Board. The prints are used by eliminating the normal image data transfer process from the Image Processor Board to identify, repair and validate the operability of the printer. Prints test prints stored on the Engine Controller Board.
Service Diagnostics Tests and Functions Table (cont'd.) Menu Item Front Panel Display Results Functional Definition Test Prints - Execute Print P=nnn T=nnn U=nnn[nnn] H=nn% L=nnn[nnn] KTR=n.nn KV MTR=n.nn KV YTR=n.nn KV CTR=n.nn KV Used to isolate print problems to the engine or Image Processor by service personnel to the Engine Controller Board. The prints are used by eliminating the normal image data transfer process from the Image Processor Board to identify, repair and validate the operability of the printer. Prints test prints stored on the Engine Controller Board.
Service Manual
Page 68
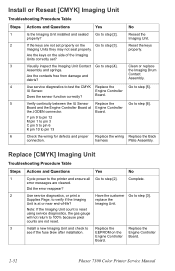
... power to step [3]. Note: If the Imaging Unit count is at the JODEN connector. Have the customer replace the Imaging Unit. Go to the printer and ensure all error messages are cleared. Replace the Engine Controller Board. 2-52 Phaser 7300 Color Printer Service Manual If the keys are not reset. Visually inspect the Imaging Unit Contact Assembly and springs. Go to pin 13 Replace the Engine Controller Board. Use service diagnostics, or print a Supplies Page, to verify if the Imaging Unit...
... power to step [3]. Note: If the Imaging Unit count is at the JODEN connector. Have the customer replace the Imaging Unit. Go to the printer and ensure all error messages are cleared. Replace the Engine Controller Board. 2-52 Phaser 7300 Color Printer Service Manual If the keys are not reset. Visually inspect the Imaging Unit Contact Assembly and springs. Go to pin 13 Replace the Engine Controller Board. Use service diagnostics, or print a Supplies Page, to verify if the Imaging Unit...
Service Manual
Page 87
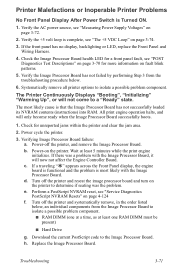
... jams within the printer and clear the jam area. 2. Power cycle the printer. 3. If there was the problem. Perform a PostScript NVRAM reset, see "Service Diagnostics PostScript NVRAM Resets" on the printer. Turn off the printer and reseat the image processor board and turn on the printer to determine if seating was a problem with the Image Processor Board. Download the current PostScript code to isolate a possible problem component. h. Troubleshooting 3-71 If the front panel...
... jams within the printer and clear the jam area. 2. Power cycle the printer. 3. If there was the problem. Perform a PostScript NVRAM reset, see "Service Diagnostics PostScript NVRAM Resets" on the printer. Turn off the printer and reseat the image processor board and turn on the printer to determine if seating was a problem with the Image Processor Board. Download the current PostScript code to isolate a possible problem component. h. Troubleshooting 3-71 If the front panel...
Service Manual
Page 92
.... Clean the pick and feed rollers with one tray or the MPT: a. Check the rollers for approved media types and weights. 2. Check for excessive wear or damaged. If the problem occurs in the paper path. 5. Check for and remove any debris or obstructions in only one another along the entire length of paper, or ensure that the guides fit snug against the media. Replace the tray. 3-76 Phaser 7300 Color Printer Service Manual Check...
.... Clean the pick and feed rollers with one tray or the MPT: a. Check the rollers for approved media types and weights. 2. Check for excessive wear or damaged. If the problem occurs in the paper path. 5. Check for and remove any debris or obstructions in only one another along the entire length of paper, or ensure that the guides fit snug against the media. Replace the tray. 3-76 Phaser 7300 Color Printer Service Manual Check...

Service Manual
Page 95
... paper, software applications, environmental conditions, and printer hardware need to be eliminated before replacing printer parts. To successfully troubleshoot print quality problems, as many variables as possible must be researched. ■ Ensure the front panel and driver settings match the media loaded in the Phaser 7300 printer. BEFORE USING ANY TROUBLESHOOTING PROCEDURE FOR PRINT-QUALITY PROBLEMS, PERFORM THE FOLLOWING STEPS: ■ See "Media and Tray Specifications" on approved media from the printers paper path. ■ Vacuum any obvious toner...
... paper, software applications, environmental conditions, and printer hardware need to be eliminated before replacing printer parts. To successfully troubleshoot print quality problems, as many variables as possible must be researched. ■ Ensure the front panel and driver settings match the media loaded in the Phaser 7300 printer. BEFORE USING ANY TROUBLESHOOTING PROCEDURE FOR PRINT-QUALITY PROBLEMS, PERFORM THE FOLLOWING STEPS: ■ See "Media and Tray Specifications" on approved media from the printers paper path. ■ Vacuum any obvious toner...
Service Manual
Page 103
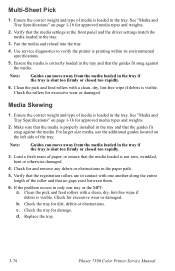
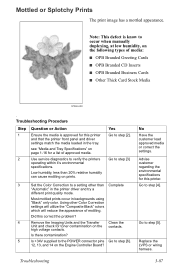
... ■ OPB Branded Business Cards ■ Other Thick Card Stock Media S7300-022 . Mottled or Splotchy Prints The print image has a mottled appearance. Low humidity, less than Complete "Automatic" in the printer driver and try a different print quality mode. Using other than 20% relative humidity can cause mottling on the Engine Controller Board? Did this correct the problem? 4 Remove the Imaging Units and the Transfer Clean the Unit and check for this...
... ■ OPB Branded Business Cards ■ Other Thick Card Stock Media S7300-022 . Mottled or Splotchy Prints The print image has a mottled appearance. Low humidity, less than Complete "Automatic" in the printer driver and try a different print quality mode. Using other than 20% relative humidity can cause mottling on the Engine Controller Board? Did this correct the problem? 4 Remove the Imaging Units and the Transfer Clean the Unit and check for this...
Service Manual
Page 112
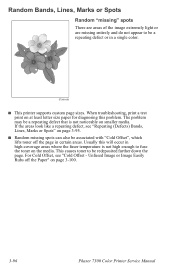
... fuse the toner on smaller media. S7300-026 ■ This printer supports custom page sizes. When troubleshooting, print a test print on page 3-100. 3-96 Phaser 7300 Color Printer Service Manual Usually this problem. This causes toner to be a repeating defect or in high-coverage areas where the fuser temperature is not noticeable on the media. Random Bands, Lines, Marks or Spots Random "missing" spots There are areas of the image extremely light or are missing entirely...
... fuse the toner on smaller media. S7300-026 ■ This printer supports custom page sizes. When troubleshooting, print a test print on page 3-100. 3-96 Phaser 7300 Color Printer Service Manual Usually this problem. This causes toner to be a repeating defect or in high-coverage areas where the fuser temperature is not noticeable on the media. Random Bands, Lines, Marks or Spots Random "missing" spots There are areas of the image extremely light or are missing entirely...
Service Manual
Page 125
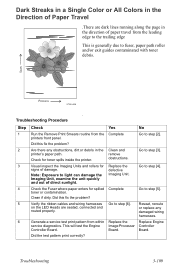
Troubleshooting Procedure Step 1 2 3 4 5 6 Check Run the Remove Print Smears routine from within service diagnostics. Clean if dirty. Generate a service test print pattern from the printers front panel. Clean and remove obstructions. Replace the Replace Engine Image Processor Controller Board. Troubleshooting 3-109 Replace the defective Imaging Unit. Reseat, reroute or replace any obstructions, dirt or debris in the printer's paper path. Check for signs of damage. Note: Exposure to light can damage the Imaging Unit, examine the unit quickly and out...
Troubleshooting Procedure Step 1 2 3 4 5 6 Check Run the Remove Print Smears routine from within service diagnostics. Clean if dirty. Generate a service test print pattern from the printers front panel. Clean and remove obstructions. Replace the Replace Engine Image Processor Controller Board. Troubleshooting 3-109 Replace the defective Imaging Unit. Reseat, reroute or replace any obstructions, dirt or debris in the printer's paper path. Check for signs of damage. Note: Exposure to light can damage the Imaging Unit, examine the unit quickly and out...
Service Manual
Page 139
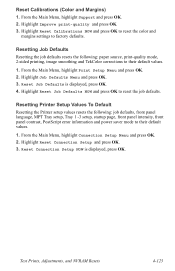
... OK to reset the color and margins settings to reset the job defaults. Reset Job Defaults is displayed, press OK. Highlight Reset Job Defaults NOW and press OK to factory defaults. Resetting Printer Setup Values To Default Resetting the Printer setup values resets the following : paper source, print-quality mode, 2-sided printing, image smoothing and TekColor corrections to their default values. 1. Resetting Job Defaults Resetting the job defaults resets the following : job defaults, front panel language, MPT Tray setup, Tray 1 -3 setup, startup page, front panel intensity, front...
... OK to reset the color and margins settings to reset the job defaults. Reset Job Defaults is displayed, press OK. Highlight Reset Job Defaults NOW and press OK to factory defaults. Resetting Printer Setup Values To Default Resetting the Printer setup values resets the following : paper source, print-quality mode, 2-sided printing, image smoothing and TekColor corrections to their default values. 1. Resetting Job Defaults Resetting the job defaults resets the following : job defaults, front panel language, MPT Tray setup, Tray 1 -3 setup, startup page, front panel intensity, front...

Service Manual
Page 140
... printer setup, job defaults, color, margin, and calibrations to their factory default values. The consumable counts, network settings, and the Adobe firmware serial number are not affected by this reset 1. Note: Print a Configuration Page to provide a reference of the current network settings prior to their factory default values. From the Main Menu, highlight Connection Setup Menu and press OK. 2. Service Diagnostics PostScript NVRAM Resets Resetting NVRAM restores all the settings to their default values. 1. Enter Service Diagnostics. 2. Are you sure? Resetting Network...
... printer setup, job defaults, color, margin, and calibrations to their factory default values. The consumable counts, network settings, and the Adobe firmware serial number are not affected by this reset 1. Note: Print a Configuration Page to provide a reference of the current network settings prior to their factory default values. From the Main Menu, highlight Connection Setup Menu and press OK. 2. Service Diagnostics PostScript NVRAM Resets Resetting NVRAM restores all the settings to their default values. 1. Enter Service Diagnostics. 2. Are you sure? Resetting Network...


