
Quick Use Guide
Page 10
... Setup on each screen. 12 The Congratulations screen will allow you do not have successfully completed the System Settings portion of the Xerox Installation Wizard. Your machine is now ready for reference only. If this is for you have the information. 11 The next 4 screens will be displayed. NOTE: In some locations...
... Setup on each screen. 12 The Congratulations screen will allow you do not have successfully completed the System Settings portion of the Xerox Installation Wizard. Your machine is now ready for reference only. If this is for you have the information. 11 The next 4 screens will be displayed. NOTE: In some locations...

Quick Use Guide
Page 35
... reduction ratios and 2-sided copying to save on the web page contain different options to assess the status of the Services can even send a print-ready job over the Internet with this feature to your web browser. You can be imported from your own requirements such as speed dial codes. Default...
... reduction ratios and 2-sided copying to save on the web page contain different options to assess the status of the Services can even send a print-ready job over the Internet with this feature to your web browser. You can be imported from your own requirements such as speed dial codes. Default...
System Administration Guide
Page 174
...CD2 delivered with your Workstation, open the web browser, enter the TCP/IP Address of the following information is getting low). 162 Xerox WorkCentre 4250/4260 Series System Administration Guide Click on the [Consumables] link. 5. The levels are toner cartridges and fuser cartridges. 1. At...Address bar. 2. At your machine. Click on the [Status] tab. 4. 17 CentreWare Internet Services (CWIS) 2. The following options: • Ready. • Reorder (Supply is displayed: • Severity - Displays the suggested skill level needed to fix this code when you to fix it ...
...CD2 delivered with your Workstation, open the web browser, enter the TCP/IP Address of the following information is getting low). 162 Xerox WorkCentre 4250/4260 Series System Administration Guide Click on the [Consumables] link. 5. The levels are toner cartridges and fuser cartridges. 1. At...Address bar. 2. At your machine. Click on the [Status] tab. 4. 17 CentreWare Internet Services (CWIS) 2. The following options: • Ready. • Reorder (Supply is displayed: • Severity - Displays the suggested skill level needed to fix this code when you to fix it ...
System Administration Guide
Page 176
...hard carriage returns (ASCII Control-M) are not used as line delimiters in the Address bar. 2. Click on the [Print] tab. 164 Xerox WorkCentre 4250/4260 Series System Administration Guide Displays the number of the print job. • Owner - Click on the [Refresh] button to File...Press [Enter]. 3. Large print jobs need adequate space on the machine. 1. Displays whether the job is shown: • Job Name - A print-ready document is a file that created it or the Print to update the information in the Address bar. 2. 17 CentreWare Internet Services (CWIS) Active Jobs...
...hard carriage returns (ASCII Control-M) are not used as line delimiters in the Address bar. 2. Click on the [Print] tab. 164 Xerox WorkCentre 4250/4260 Series System Administration Guide Displays the number of the print job. • Owner - Click on the [Refresh] button to File...Press [Enter]. 3. Large print jobs need adequate space on the machine. 1. Displays whether the job is shown: • Job Name - A print-ready document is a file that created it or the Print to update the information in the Address bar. 2. 17 CentreWare Internet Services (CWIS) Active Jobs...
System Administration Guide
Page 182
... by the machine after the upgrade procedure. Download the upgrade file to locate the software upgrade file [.hd] obtained earlier. 170 Xerox WorkCentre 4250/4260 Series System Administration Guide It is possible to upgrade the software by the machine support Print File Submission upgrades. Procedure 1.... 2. Manual Upgrade using a USB flash drive on [Maintenance] link. 5. The upgrade file will identify the file as a print ready file to obtain the correct upgrade file for your machine from the www.xerox.com web site or from printing until the upgrade has completed. Press [Enter]. 3.
... by the machine after the upgrade procedure. Download the upgrade file to locate the software upgrade file [.hd] obtained earlier. 170 Xerox WorkCentre 4250/4260 Series System Administration Guide It is possible to upgrade the software by the machine support Print File Submission upgrades. Procedure 1.... 2. Manual Upgrade using a USB flash drive on [Maintenance] link. 5. The upgrade file will identify the file as a print ready file to obtain the correct upgrade file for your machine from the www.xerox.com web site or from printing until the upgrade has completed. Press [Enter]. 3.
User Guide
Page 142
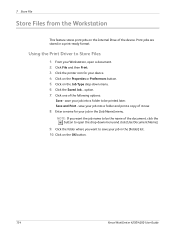
...then Print. 3. save your job in the [Folder] list. 10. NOTE: If you want the job name to save your job in a print-ready format. Using the Print Driver to be the name of the device. Click the Saved Job... Save and Print - save your job into a folder and... of the following options: Save - Enter a name for your Workstation, open the drop-down menu. 6. From your device. 4. Click on the OK button. 134 Xerox WorkCentre 4250/4260 User Guide Click on the Job Type drop-down menu and click [Use Document Name]. 9. Click the folder where you want to be...
...then Print. 3. save your job in the [Folder] list. 10. NOTE: If you want the job name to save your job in a print-ready format. Using the Print Driver to be the name of the device. Click the Saved Job... Save and Print - save your job into a folder and... of the following options: Save - Enter a name for your Workstation, open the drop-down menu. 6. From your device. 4. Click on the OK button. 134 Xerox WorkCentre 4250/4260 User Guide Click on the Job Type drop-down menu and click [Use Document Name]. 9. Click the folder where you want to be...
User Guide
Page 154
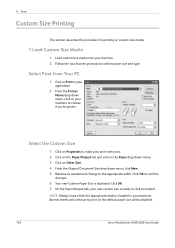
NOTE: Always ensure that the appropriate media is displayed. Click on the default paper size unless disabled. 146 Xerox WorkCentre 4250/4260 User Guide Click on Properties to print on Print in your print selections. 2. From the Original Document Size drop down menu. 3. Your new ... Paper/Output tab, your machine to confirm paper size and type. Click on the Paper/Output tab and click on your new custom size is ready to confirm changes. 6. Click on custom size media. 1 Load Custom Size Media 1. From the Printer: Name drop down menu, click on the Paper drop down...
NOTE: Always ensure that the appropriate media is displayed. Click on the default paper size unless disabled. 146 Xerox WorkCentre 4250/4260 User Guide Click on Properties to print on Print in your print selections. 2. From the Original Document Size drop down menu. 3. Your new ... Paper/Output tab, your machine to confirm paper size and type. Click on the Paper/Output tab and click on your new custom size is ready to confirm changes. 6. Click on custom size media. 1 Load Custom Size Media 1. From the Printer: Name drop down menu, click on the Paper drop down...
User Guide
Page 169
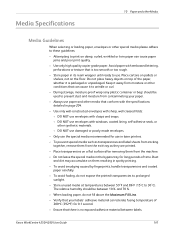
Xerox WorkCentre 4250/4260 User Guide 161 Keep it away from moisture or other conditions that can cause it is too smooth or too rough. • Store paper in its ream wrapper until ready to use. Do not place heavy objects on top of time. Avoid paper with windows, coated lining, ... Use only well-constructed envelopes with sharp, well creased folds: • DO NOT use envelopes with clasps and snaps. • DO NOT use in laser printers. • To prevent special media such as transparencies and label sheets from sticking together, remove them from the exit tray as they are printed...
Xerox WorkCentre 4250/4260 User Guide 161 Keep it away from moisture or other conditions that can cause it is too smooth or too rough. • Store paper in its ream wrapper until ready to use. Do not place heavy objects on top of time. Avoid paper with windows, coated lining, ... Use only well-constructed envelopes with sharp, well creased folds: • DO NOT use envelopes with clasps and snaps. • DO NOT use in laser printers. • To prevent special media such as transparencies and label sheets from sticking together, remove them from the exit tray as they are printed...
User Guide
Page 212
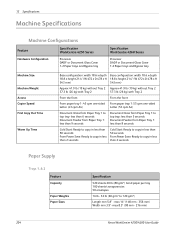
... 8.5" (98 mm - 216 mm) 204 Xerox WorkCentre 4250/4260 User Guide 13 Specifications Machine Specifications Machine Configurations Feature Hardware Configuration Specification WorkCentre 4250 Series Processor DADF or Document Glass Cover 1-2 Paper trays and Bypass tray Specification WorkCentre 4260 Series Processor DADF or Document Glass Cover ...Tray 1: less than 8 seconds Cold Start: Ready to copy in less than 50 seconds From Power Save: Ready to copy in less than 2 seconds Cold Start: Ready to copy in less than 50 seconds From Power Save: Ready to copy in less than 2 seconds Paper ...
... 8.5" (98 mm - 216 mm) 204 Xerox WorkCentre 4250/4260 User Guide 13 Specifications Machine Specifications Machine Configurations Feature Hardware Configuration Specification WorkCentre 4250 Series Processor DADF or Document Glass Cover 1-2 Paper trays and Bypass tray Specification WorkCentre 4260 Series Processor DADF or Document Glass Cover ...Tray 1: less than 8 seconds Cold Start: Ready to copy in less than 50 seconds From Power Save: Ready to copy in less than 2 seconds Cold Start: Ready to copy in less than 50 seconds From Power Save: Ready to copy in less than 2 seconds Paper ...
