Quick Use Guide
Page 5
..., you for choosing the WorkCentre 4250/4260 Series. Xerox WorkCentre 4250/4260 Series Quick Use Guide Thank you will successfully: Connect the WorkCentre 4250/4260 Series Printer to a network Set-up the WorkCentre 4250/4260 Series Printer Install optional features Operate the WorkCentre 4250/4260 Series Printer Contents Install the WorkCentre 4250/4260 Series 3 Switch On the Machine 5 Your WorkCentre 4250/4260 7 Connecting to the...
..., you for choosing the WorkCentre 4250/4260 Series. Xerox WorkCentre 4250/4260 Series Quick Use Guide Thank you will successfully: Connect the WorkCentre 4250/4260 Series Printer to a network Set-up the WorkCentre 4250/4260 Series Printer Install optional features Operate the WorkCentre 4250/4260 Series Printer Contents Install the WorkCentre 4250/4260 Series 3 Switch On the Machine 5 Your WorkCentre 4250/4260 7 Connecting to the...

Quick Use Guide
Page 6
...on your device, please refer to the User Guide and the System Administration CD. For the latest information go to the Xerox website www.xerox.com/support. Changes and technical updates will be added in the User Guide. If you require more detailed information about any... time to change the information without notice. Xerox reserves the right at the time of publication. For information about Safety, Regulatory Information, Environmental Compliance, Illegal Copies, and Product Recycling ...
...on your device, please refer to the User Guide and the System Administration CD. For the latest information go to the Xerox website www.xerox.com/support. Changes and technical updates will be added in the User Guide. If you require more detailed information about any... time to change the information without notice. Xerox reserves the right at the time of publication. For information about Safety, Regulatory Information, Environmental Compliance, Illegal Copies, and Product Recycling ...

Quick Use Guide
Page 7
... type of the following configurations. E-mail - quick use guide 3 Install the WorkCentre 4250/4260 Series 1 Unpack the machine and any hardware options. 2 Locate the Installation Instructions. 3 Follow the Installation Instructions to assemble the machine and hardware options. Features WorkCentre 4250 WorkCentre 4250S/ 4260S WorkCentre 4250X/ 4260X WorkCentre 4250XF/ 4260XF Digital Copying Standard Standard Standard Standard Direct/Network -
... type of the following configurations. E-mail - quick use guide 3 Install the WorkCentre 4250/4260 Series 1 Unpack the machine and any hardware options. 2 Locate the Installation Instructions. 3 Follow the Installation Instructions to assemble the machine and hardware options. Features WorkCentre 4250 WorkCentre 4250S/ 4260S WorkCentre 4250X/ 4260X WorkCentre 4250XF/ 4260XF Digital Copying Standard Standard Standard Standard Direct/Network -
Quick Use Guide
Page 8
4 In addition you will have: • Power Cord • User Documentation CD • System Administration CD • Print Driver CD (Not supplied with the WorkCentre 4250 copier only machine) • Nuance CD (Not supplied with the WorkCentre 4250 copier only machine) • Quick Use Guide (this book) • Toner Cartridge • Control Panel Labels • Product Enablement Key • Telephone Cable (WorkCentre 4250/4260 Series 'X' and 'XF' machine with Fax only). 4 quick use guide
4 In addition you will have: • Power Cord • User Documentation CD • System Administration CD • Print Driver CD (Not supplied with the WorkCentre 4250 copier only machine) • Nuance CD (Not supplied with the WorkCentre 4250 copier only machine) • Quick Use Guide (this book) • Toner Cartridge • Control Panel Labels • Product Enablement Key • Telephone Cable (WorkCentre 4250/4260 Series 'X' and 'XF' machine with Fax only). 4 quick use guide

Quick Use Guide
Page 9
The Product Enablement Key is as follows: 1 Locate the tube containing the Product Enablement Key. Card Reader slot Green LED 5 The Language Default screen will be displayed. Select your chosen language and then select Save. 6 The Installation Wizard screen will be configured. NOTE: When the Green LED light stops blinking and remains on continuously (about 10 seconds), the configuration is switched on the screen. quick use guide 5 The procedure to the machine and a suitable power supply outlet. 3 Switch on the display. Remove the plastic card and carefully ...
The Product Enablement Key is as follows: 1 Locate the tube containing the Product Enablement Key. Card Reader slot Green LED 5 The Language Default screen will be displayed. Select your chosen language and then select Save. 6 The Installation Wizard screen will be configured. NOTE: When the Green LED light stops blinking and remains on continuously (about 10 seconds), the configuration is switched on the screen. quick use guide 5 The procedure to the machine and a suitable power supply outlet. 3 Switch on the display. Remove the plastic card and carefully ...

Quick Use Guide
Page 10
....Refer to Fax Setup on each screen. 12 The Congratulations screen will allow you do not have successfully completed the System Settings portion of the Xerox Installation Wizard. NOTE: In some locations a popup screen will display a Machine Self Test In Progress screen while the machine applies the configuration settings. Your machine...
....Refer to Fax Setup on each screen. 12 The Congratulations screen will allow you do not have successfully completed the System Settings portion of the Xerox Installation Wizard. NOTE: In some locations a popup screen will display a Machine Self Test In Progress screen while the machine applies the configuration settings. Your machine...
Quick Use Guide
Page 11
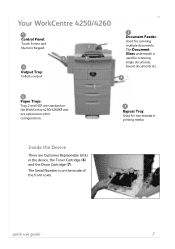
... non-standard printing media Inside the Device There are optional on other configurations. 2 Document Feeder: Used for scanning multiple documents. Your WorkCentre 4250/4260 1 Control Panel: Touch Screen and Numeric Keypad 2 3 1 3 Output Tray: Collects output 5 5 Paper Trays: Tray 2 and HCF are standard on... the WorkCentre 4250/4260XF and are Customer Replaceable Units in the device, the Toner Cartridge (6) and the Drum Cartridge (7)....
... non-standard printing media Inside the Device There are optional on other configurations. 2 Document Feeder: Used for scanning multiple documents. Your WorkCentre 4250/4260 1 Control Panel: Touch Screen and Numeric Keypad 2 3 1 3 Output Tray: Collects output 5 5 Paper Trays: Tray 2 and HCF are standard on... the WorkCentre 4250/4260XF and are Customer Replaceable Units in the device, the Toner Cartridge (6) and the Drum Cartridge (7)....
Quick Use Guide
Page 12
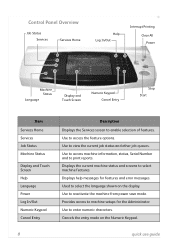
Use to print reports. Cancels the entry made on the display. Use to access machine information, status, Serial Number and to view the current job status and other job queues. Displays the current machine status and screens to reactivate the machine from power save mode. Displays help messages for the Administrator. Use to select machine features. Use to enter numeric characters. Use to access the feature options. Used to select the language shown on the Numeric Keypad. 8 quick use guide Provides access to enable selection of features. Control Panel Overview Job ...
Use to print reports. Cancels the entry made on the display. Use to access machine information, status, Serial Number and to view the current job status and other job queues. Displays the current machine status and screens to reactivate the machine from power save mode. Displays help messages for the Administrator. Use to select machine features. Use to enter numeric characters. Use to access the feature options. Used to select the language shown on the Numeric Keypad. 8 quick use guide Provides access to enable selection of features. Control Panel Overview Job ...
Quick Use Guide
Page 13
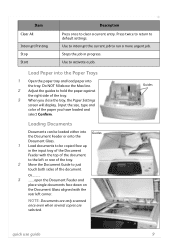
Guides quick use guide 9 Press twice to return to run a more urgent job. Load Paper into the Paper Trays 1 Open the paper tray and load paper into Guides the Document Feeder or onto the Document Glass. 1 Load documents to be copied face up in progress. Or........... 3 ........open the Document Feeder and place single documents face down on the Document Glass aligned with the top of the document. Use to interrupt the current job to default settings. Input the size, type and color of the tray. 3 When you have loaded and select Confirm. NOTE: Documents are only ...
Guides quick use guide 9 Press twice to return to run a more urgent job. Load Paper into the Paper Trays 1 Open the paper tray and load paper into Guides the Document Feeder or onto the Document Glass. 1 Load documents to be copied face up in progress. Or........... 3 ........open the Document Feeder and place single documents face down on the Document Glass aligned with the top of the document. Use to interrupt the current job to default settings. Input the size, type and color of the tray. 3 When you have loaded and select Confirm. NOTE: Documents are only ...
Quick Use Guide
Page 14
Network Connection using TCP/IP You can set a static IP address, skip to manually assign an IP address provided by Xerox. 2 To setup the address using either of the following methods: • DHCP: Use this method to Network Setup Using a Static IP Address on the back ...
Network Connection using TCP/IP You can set a static IP address, skip to manually assign an IP address provided by Xerox. 2 To setup the address using either of the following methods: • DHCP: Use this method to Network Setup Using a Static IP Address on the back ...
Quick Use Guide
Page 15
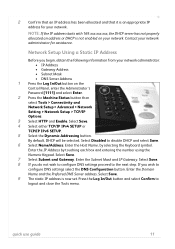
Select Save. 8 If you begin, obtain the following information from your network. Select Save. 9 The static IP address is an appropriate IP address for your network administrator: • IP Address • Gateway Address • Subnet Mask • DNS Server Address 1 Press the Log In/Out button on your network administrator for assistance. Select Save. 4 Select either TCP/IP IPv4 SETUP or TCP/IP IPv6 SETUP. 5 Select the Dynamic Addressing button. Select Save. 7 Select Subnet and Gateway. Network Setup Using a Static IP Address Before you do not wish to configure DNS ...
Select Save. 8 If you begin, obtain the following information from your network. Select Save. 9 The static IP address is an appropriate IP address for your network administrator: • IP Address • Gateway Address • Subnet Mask • DNS Server Address 1 Press the Log In/Out button on your network administrator for assistance. Select Save. 4 Select either TCP/IP IPv4 SETUP or TCP/IP IPv6 SETUP. 5 Select the Dynamic Addressing button. Select Save. 7 Select Subnet and Gateway. Network Setup Using a Static IP Address Before you do not wish to configure DNS ...
Quick Use Guide
Page 16
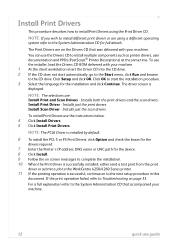
... complete the installation. 10 When the Print Driver is successfully installed, either send a test print from the print driver or submit a job to the WorkCentre 4250/4260 Series printer. 11 If the printing operation is successful, continue on to the next setup procedure in this document. To use guide Installs just the...
... complete the installation. 10 When the Print Driver is successfully installed, either send a test print from the print driver or submit a job to the WorkCentre 4250/4260 Series printer. 11 If the printing operation is successful, continue on to the next setup procedure in this document. To use guide Installs just the...
Quick Use Guide
Page 17
... if required. This task should be used. If you need to change it, click Static from the IP Address Resolution menu list. 4 Scroll to the Xerox machine account. The default is case sensitive, and [1111]. 6 From the Protocols menu click SMTP Server. 7 Click either IP Address or Host Name and enter...
... if required. This task should be used. If you need to change it, click Static from the IP Address Resolution menu list. 4 Scroll to the Xerox machine account. The default is case sensitive, and [1111]. 6 From the Protocols menu click SMTP Server. 7 Click either IP Address or Host Name and enter...
Quick Use Guide
Page 18
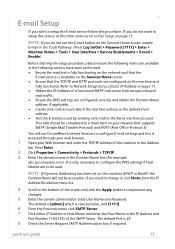
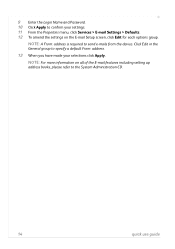
NOTE: For more information on the E-mail Setup screen, click Edit for each options group. Click Edit in the General group to specify a default From: address. 13 When you have made your settings. 11 From the Properties menu, click Services > E-mail Settings > Defaults. 12 To amend the settings on all of the E-mail features including setting up address books, please refer to send e-mails from the device. 9 Enter the Login Name and Password. 10 Click Apply to confirm your selections click Apply. NOTE: A From: address is required to the System Administration CD. 14 quick use guide
NOTE: For more information on the E-mail Setup screen, click Edit for each options group. Click Edit in the General group to specify a default From: address. 13 When you have made your settings. 11 From the Properties menu, click Services > E-mail Settings > Defaults. 12 To amend the settings on all of the E-mail features including setting up address books, please refer to send e-mails from the device. 9 Enter the Login Name and Password. 10 Click Apply to confirm your selections click Apply. NOTE: A From: address is required to the System Administration CD. 14 quick use guide
Quick Use Guide
Page 19
... the handset to change the Fax Setup enter the Tools Pathway as standard. The various Fax options can be selected and changed. Fax Setup The WorkCentre 4250X/XF and 4260X/XF Series configurations have Fax installed as described in steps 4 and 5 and select Tools > User Interface > Fax Service Settings. For a 10...
... the handset to change the Fax Setup enter the Tools Pathway as standard. The various Fax options can be selected and changed. Fax Setup The WorkCentre 4250X/XF and 4260X/XF Series configurations have Fax installed as described in steps 4 and 5 and select Tools > User Interface > Fax Service Settings. For a 10...
Quick Use Guide
Page 20
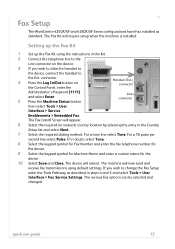
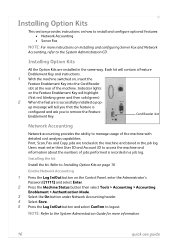
Installing Option Kits This section provides instructions on how to install and configure optional features: • Network Accounting • Server Fax NOTE: For more information. 16 quick use guide Each kit will contain a Feature Enablement Key and instructions. 1 With the machine switched on, insert the Feature Enablement Key into the Card Reader slot at the machine and stored in the job log. Users must enter their User ID and Account ID to access the machine and information about the numbers of the machine with detailed cost analysis capabilities. Refer to Installing...
Installing Option Kits This section provides instructions on how to install and configure optional features: • Network Accounting • Server Fax NOTE: For more information. 16 quick use guide Each kit will contain a Feature Enablement Key and instructions. 1 With the machine switched on, insert the Feature Enablement Key into the Card Reader slot at the machine and stored in the job log. Users must enter their User ID and Account ID to access the machine and information about the numbers of the machine with detailed cost analysis capabilities. Refer to Installing...
Quick Use Guide
Page 21
Installing the kit 1 Install the kit. Refer to Installing Option Kits on the Control Panel, enter the Administrator's Password [1111] and select Enter. 3 Press the Machine Status button then select Tools > User Interface > Service Enablements > Server Fax. 4 Select Enable. 5 Select Save. 6 Press the Log In/Out button and select Confirm to a network Fax Server which can manage fax transmissions throughout an organisation. Server Fax The Server Fax feature enables Users to send documents to one or more fax machines via the telephone network without having a dedicated telephone line ...
Installing the kit 1 Install the kit. Refer to Installing Option Kits on the Control Panel, enter the Administrator's Password [1111] and select Enter. 3 Press the Machine Status button then select Tools > User Interface > Service Enablements > Server Fax. 4 Select Enable. 5 Select Save. 6 Press the Log In/Out button and select Confirm to a network Fax Server which can manage fax transmissions throughout an organisation. Server Fax The Server Fax feature enables Users to send documents to one or more fax machines via the telephone network without having a dedicated telephone line ...
Quick Use Guide
Page 22
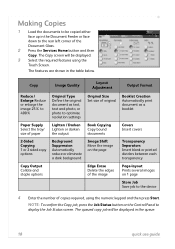
Making Copies 1 Load the documents to be copied either face up in the Document Feeder or face down to the rear left corner of copies required, using the Touch Screen. The Copy screen will be displayed. 3 Select the required features using the numeric keypad and then press Start. Copy Image Quality Layout Adjustment Output Format Reduce / Enlarge Reduce or enlarge the image 25% to 400% Original Type Define the original document as text, text and photo, or photo to optimise resolution settings Original Size Set size of original Booklet Creation Automatically print document as a ...
Making Copies 1 Load the documents to be copied either face up in the Document Feeder or face down to the rear left corner of copies required, using the Touch Screen. The Copy screen will be displayed. 3 Select the required features using the numeric keypad and then press Start. Copy Image Quality Layout Adjustment Output Format Reduce / Enlarge Reduce or enlarge the image 25% to 400% Original Type Define the original document as text, text and photo, or photo to optimise resolution settings Original Size Set size of original Booklet Creation Automatically print document as a ...

Quick Use Guide
Page 23
To use guide 19 Multiple images This feature is ideal for archival purposes. Original Type: Select the type of the original being scanned. The machine produces 2-sided prints automatically, which when folded, produces a booklet with all the pages in the Document Feeder and select the Output Format tab and Booklet Creation. The machine will also reduce and correctly position each image to fit on the type and quality of document to be reduced or enlarged between 25% and 400%. quick use this option, select the Copy tab. Background Suppression: Use to automatically ...
To use guide 19 Multiple images This feature is ideal for archival purposes. Original Type: Select the type of the original being scanned. The machine produces 2-sided prints automatically, which when folded, produces a booklet with all the pages in the Document Feeder and select the Output Format tab and Booklet Creation. The machine will also reduce and correctly position each image to fit on the type and quality of document to be reduced or enlarged between 25% and 400%. quick use this option, select the Copy tab. Background Suppression: Use to automatically ...
Quick Use Guide
Page 24
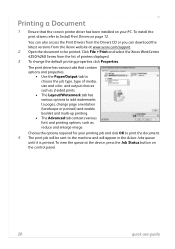
.../Watermark tab has various options to add watermarks to pages, change the default printing properties click Properties. Click File > Print and select the Xerox WorkCentre 4250/4260 Series from the Xerox website at the device, press the Job Status button on page 12. To install the print drivers refer to Install Print Drivers on...
.../Watermark tab has various options to add watermarks to pages, change the default printing properties click Properties. Click File > Print and select the Xerox WorkCentre 4250/4260 Series from the Xerox website at the device, press the Job Status button on page 12. To install the print drivers refer to Install Print Drivers on...