Quick Use Guide
Page 16
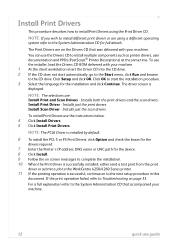
...details. Click OK to the next setup procedure in this document. The driver screen is successful, continue on to start automatically, go to the Start menu, click Run and browse to the WorkCentre 4250/4260 Series printer. 11 If the printing operation is displayed. Click Setup and click OK.... To use guide Install Print Drivers This procedure describes how to Troubleshooting on page 33. NOTE: If you ...
...details. Click OK to the next setup procedure in this document. The driver screen is successful, continue on to start automatically, go to the Start menu, click Run and browse to the WorkCentre 4250/4260 Series printer. 11 If the printing operation is displayed. Click Setup and click OK.... To use guide Install Print Drivers This procedure describes how to Troubleshooting on page 33. NOTE: If you ...
Quick Use Guide
Page 24
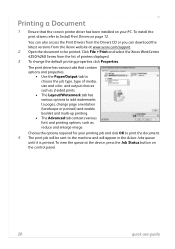
... panel. 20 quick use guide The print driver has various tabs that the correct printer driver has been installed on your printing job and click OK to print the document. 4 The print job will be printed. Click File > Print and select the Xerox WorkCentre 4250/4260 Series from the Xerox website at the device, press the Job...
... panel. 20 quick use guide The print driver has various tabs that the correct printer driver has been installed on your printing job and click OK to print the document. 4 The print job will be printed. Click File > Print and select the Xerox WorkCentre 4250/4260 Series from the Xerox website at the device, press the Job...
Quick Use Guide
Page 39
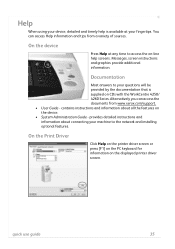
... -line help is supplied on the displayed printer driver screen. Messages, screen instructions and graphics provide additional information. Alternatively you can access Help information and tips from www.xerox.com/support. • User Guide - ...Help When using your device, detailed and timely help screens. Documentation Most answers to the network and installing optional features. On the Print Driver Click Help on the printer driver screen or press [F1] on the PC keyboard for information on CDs with the WorkCentre 4250/ 4260...
... -line help is supplied on the displayed printer driver screen. Messages, screen instructions and graphics provide additional information. Alternatively you can access Help information and tips from www.xerox.com/support. • User Guide - ...Help When using your device, detailed and timely help screens. Documentation Most answers to the network and installing optional features. On the Print Driver Click Help on the printer driver screen or press [F1] on the PC keyboard for information on CDs with the WorkCentre 4250/ 4260...
System Administration Guide
Page 4
.../2000/2003 45 Information Checklist 45 Procedure 45 Configure your Print Driver 46 Information Checklist 46 Procedure 46 Configure the Windows Printer Driver 48 Bi-Directional Communication 48 Manual Print Driver Configuration 50 Apple Mac 50 TCP/IP Printing (OSX 50 Information Checklist 50 Install the Print Driver 50 iv Xerox WorkCentre 4250/4260 Series System Administration Guide
.../2000/2003 45 Information Checklist 45 Procedure 45 Configure your Print Driver 46 Information Checklist 46 Procedure 46 Configure the Windows Printer Driver 48 Bi-Directional Communication 48 Manual Print Driver Configuration 50 Apple Mac 50 TCP/IP Printing (OSX 50 Information Checklist 50 Install the Print Driver 50 iv Xerox WorkCentre 4250/4260 Series System Administration Guide
System Administration Guide
Page 7
Automatically 102 Configure the Printer Driver - TABLE OF CONTENTS Information Checklist 89 Insert the Feature Enablement Key 90 Enable the Server Fax from the Machine 90 Configure a Server Fax Repository 90 ... Checklist 97 Enable Embedded Fax from Phonebook 103 Setting up a Cover Sheet 104 Setup Fax Options 104 Setup Phonebook Preferences 105 User Preferences 105 Xerox WorkCentre 4250/4260 Series System Administration Guide vii Manually 102 Use the Feature 102 Windows 102 Mac OS Users 103 Add Fax Recipient 103 Add Recipient from the...
Automatically 102 Configure the Printer Driver - TABLE OF CONTENTS Information Checklist 89 Insert the Feature Enablement Key 90 Enable the Server Fax from the Machine 90 Configure a Server Fax Repository 90 ... Checklist 97 Enable Embedded Fax from Phonebook 103 Setting up a Cover Sheet 104 Setup Fax Options 104 Setup Phonebook Preferences 105 User Preferences 105 Xerox WorkCentre 4250/4260 Series System Administration Guide vii Manually 102 Use the Feature 102 Windows 102 Mac OS Users 103 Add Fax Recipient 103 Add Recipient from the...
System Administration Guide
Page 27
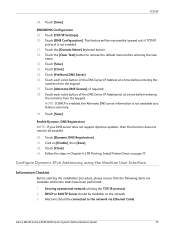
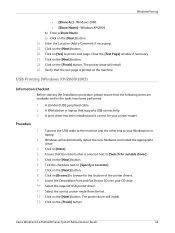
... Information Checklist Before starting the installation procedure, please ensure that the following items are available and/or the tasks have been performed: 1. Xerox WorkCentre 4250/4260 Series System Administration Guide 15 Touch [TCP/IP Settings]. 30. Touch [Save]. 34. TCP/IP 28. Touch [Close]. 35. Touch...(greyed out) if TCP/IP protocol is not available as a feature summary. 39. Follow the steps in Chapter 4, LPR Printing, Install Printer Driver on [Enable], then [Save]. 42. This feature will be enabled. 40. Touch each octet button of the DNS Server IP Address at ...
... Information Checklist Before starting the installation procedure, please ensure that the following items are available and/or the tasks have been performed: 1. Xerox WorkCentre 4250/4260 Series System Administration Guide 15 Touch [TCP/IP Settings]. 30. Touch [Save]. 34. TCP/IP 28. Touch [Close]. 35. Touch...(greyed out) if TCP/IP protocol is not available as a feature summary. 39. Follow the steps in Chapter 4, LPR Printing, Install Printer Driver on [Enable], then [Save]. 42. This feature will be enabled. 40. Touch each octet button of the DNS Server IP Address at ...

System Administration Guide
Page 48
... [Print Services for Unix is not selected, click on the checkbox to this service. Click on the [Finish] button. 8. 4 Print Drivers 7. Click on and off] window, expand the [Print Services] menu. 4. In the [Turn Windows Features on the [Next] button.... and Features]. 2. c) Click on [Add/Remove Win Components] in Chapter 4, LPR Printing, Install Printer Driver on [Windows Features]. 3. When you are finished, return to enable the service. 36 Xerox WorkCentre 4250/4260 Series System Administration Guide Windows Vista 1. Click on [Start], [Control Panel] and double-click on...
... [Print Services for Unix is not selected, click on the checkbox to this service. Click on the [Finish] button. 8. 4 Print Drivers 7. Click on and off] window, expand the [Print Services] menu. 4. In the [Turn Windows Features on the [Next] button.... and Features]. 2. c) Click on [Add/Remove Win Components] in Chapter 4, LPR Printing, Install Printer Driver on [Windows Features]. 3. When you are finished, return to enable the service. 36 Xerox WorkCentre 4250/4260 Series System Administration Guide Windows Vista 1. Click on [Start], [Control Panel] and double-click on...

System Administration Guide
Page 49
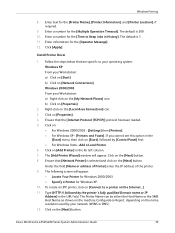
...; Windows 2000/2003 - Click on [Add Printer]. 3. Install Printer Driver 1. If you cannot see this computer]. Click on the [Next] button. 5. Click on the [Open] button. 15. Xerox WorkCentre 4250/4260 Series System Administration Guide 37 Click [Settings] then [Printers]. • Windows XP - Windows XP/2000/2003: a) Click on [Add Printer] in the [Start] menu, then click on...
...; Windows 2000/2003 - Click on [Add Printer]. 3. Install Printer Driver 1. If you cannot see this computer]. Click on the [Next] button. 5. Click on the [Open] button. 15. Xerox WorkCentre 4250/4260 Series System Administration Guide 37 Click [Settings] then [Printers]. • Windows XP - Windows XP/2000/2003: a) Click on [Add Printer] in the [Start] menu, then click on...
System Administration Guide
Page 50
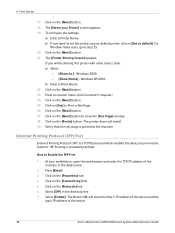
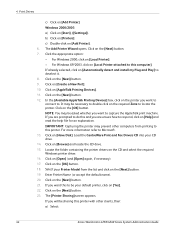
... [Next] button.to Print a Test Page. 26. The printer driver will be sharing this printer as your default printer, click on the [Next] button. 27. Click on the [Next] button. 18. The Printer URL will show the http:// IP address of the device and...Drivers 17. b) If you will install. 29. Click on the [Protocols] link. 6. How to set this printer with other clients, then: a) Select: • [Share As:] - If you want to Enable the IPP Port 1. The [Name your workstation, open the web browser and enter the TCP/IP address of the device. 38 Xerox WorkCentre 4250/4260...
... [Next] button.to Print a Test Page. 26. The printer driver will be sharing this printer as your default printer, click on the [Next] button. 27. Click on the [Next] button. 18. The Printer URL will show the http:// IP address of the device and...Drivers 17. b) If you will install. 29. Click on the [Protocols] link. 6. How to set this printer with other clients, then: a) Select: • [Share As:] - If you want to Enable the IPP Port 1. The [Name your workstation, open the web browser and enter the TCP/IP address of the device. 38 Xerox WorkCentre 4250/4260...
System Administration Guide
Page 51
...: a) Right-click on the name resolution used by [Control Panel] first. • For Windows Vista - Xerox WorkCentre 4250/4260 Series System Administration Guide 39 Install Printer Driver 1. Ensure that the [Internet Protocol (TCP/IP)] protocol has been loaded. 5. The Printer Name can be either the Host Name or the SMB Host Name as shown on the...
...: a) Right-click on the name resolution used by [Control Panel] first. • For Windows Vista - Xerox WorkCentre 4250/4260 Series System Administration Guide 39 Install Printer Driver 1. Ensure that the [Internet Protocol (TCP/IP)] protocol has been loaded. 5. The Printer Name can be either the Host Name or the SMB Host Name as shown on the...
System Administration Guide
Page 52
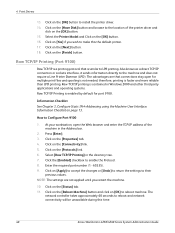
.... 10. Click on the [OK] button to make this time. 40 Xerox WorkCentre 4250/4260 Series System Administration Guide Raw TCP/IP printing is a printing protocol that connections stay open the Web browser and enter the TCP/IP address of the printer driver and click on the [Next] button. 18. Information Checklist See Chapter 3, Configure...
.... 10. Click on the [OK] button to make this time. 40 Xerox WorkCentre 4250/4260 Series System Administration Guide Raw TCP/IP printing is a printing protocol that connections stay open the Web browser and enter the TCP/IP address of the printer driver and click on the [Next] button. 18. Information Checklist See Chapter 3, Configure...
System Administration Guide
Page 53
.... g) Click on [Create a new port]. 7. h) Ensure 9100 appears as the Port Number and click on [Printers and Faxes]. Click on the [Finish] button. e) Uncheck the box [Query]. Xerox WorkCentre 4250/4260 Series System Administration Guide 41 Windows Printing Install Printer Driver 1. Click on [Standard TCP/IP Port] from the following: • For Windows 2000/2003, click...
.... g) Click on [Create a new port]. 7. h) Ensure 9100 appears as the Port Number and click on [Printers and Faxes]. Click on the [Finish] button. e) Uncheck the box [Query]. Xerox WorkCentre 4250/4260 Series System Administration Guide 41 Windows Printing Install Printer Driver 1. Click on [Standard TCP/IP Port] from the following: • For Windows 2000/2003, click...
System Administration Guide
Page 54
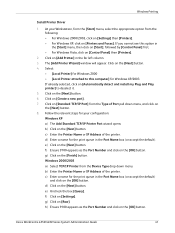
...the [Open] button. 15. Windows XP/2003. Click on the [Next] button. 18. The printer driver will be sharing this to the Add Printer Wizard window and be correctly configured on the required driver from the list. 17. Click on the [Finish] button. If you will install. 28. Enter ... Drivers folder on the CD and click on the machine. 2. Click on the [Next] button. 4 Print Drivers i) Click on the [Next] button. 25. Click on [Yes] to support AppleTalk®. Click on the [OK] button. 16. If you want this printer with your machine. 42 Xerox WorkCentre 4250/4260 Series...
...the [Open] button. 15. Windows XP/2003. Click on the [Next] button. 18. The printer driver will be sharing this to the Add Printer Wizard window and be correctly configured on the required driver from the list. 17. Click on the [Finish] button. If you will install. 28. Enter ... Drivers folder on the CD and click on the machine. 2. Click on the [Next] button. 4 Print Drivers i) Click on the [Next] button. 25. Click on [Yes] to support AppleTalk®. Click on the [OK] button. 16. If you want this printer with your machine. 42 Xerox WorkCentre 4250/4260 Series...
System Administration Guide
Page 55
...click on [Network Connections] Xerox WorkCentre 4250/4260 Series System Administration Guide 43 Follow the steps below that are not applied until you want to accept the changes. Click the [Status] tab. 12. On the [General] tab, if the AppleTalk Protocol is selected. Install the Printer Driver 1. Select the required [...Zone]. 10. If the AppleTalk protocol is not listed, install it is in [Printer Name]. 9.
...click on [Network Connections] Xerox WorkCentre 4250/4260 Series System Administration Guide 43 Follow the steps below that are not applied until you want to accept the changes. Click the [Status] tab. 12. On the [General] tab, if the AppleTalk Protocol is selected. Install the Printer Driver 1. Select the required [...Zone]. 10. If the AppleTalk protocol is not listed, install it is in [Printer Name]. 9.
System Administration Guide
Page 56
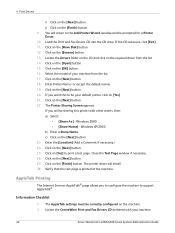
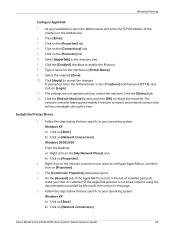
... may prevent other clients, then: a) Select: 44 Xerox WorkCentre 4250/4260 Series System Administration Guide IMPORTANT: Capturing the printer may be sharing this computer]. Windows 2000/2003 a) Click on [AppleTalk Printing Devices]. 11. Click on the CD and select the required Windows printer driver. 16. Locate the folder containing the printer drivers on [Create a New Port]. 10. b) Click...
... may prevent other clients, then: a) Select: 44 Xerox WorkCentre 4250/4260 Series System Administration Guide IMPORTANT: Capturing the printer may be sharing this computer]. Windows 2000/2003 a) Click on [AppleTalk Printing Devices]. 11. Click on the CD and select the required Windows printer driver. 16. Locate the folder containing the printer drivers on [Create a New Port]. 10. b) Click...
System Administration Guide
Page 57
... machine and the other end to browse for the location of the printer drivers. 9. Windows will install. 29. Click on the [Next] button. 6. Click on [Next]. 4. Click on [Browse] to your Workstation or laptop. 2. Click on the [Finish] button. Xerox WorkCentre 4250/4260 Series System Administration Guide 45 Click on the [Finish] button. Click on...
... machine and the other end to browse for the location of the printer drivers. 9. Windows will install. 29. Click on the [Next] button. 6. Click on [Next]. 4. Click on [Browse] to your Workstation or laptop. 2. Click on the [Finish] button. Xerox WorkCentre 4250/4260 Series System Administration Guide 45 Click on the [Finish] button. Click on...
System Administration Guide
Page 58
... required information. 5. NOTE: Job Storage requires the Save Job for Reprint feature to close your Printers folder. 2. For further information, see Chapter 12, Network Accounting on the [OK] button. At your workstation, open your print driver Properties. 46 Xerox WorkCentre 4250/4260 Series System Administration Guide Installable Options 1. If Bi-directional setup is enabled, the...
... required information. 5. NOTE: Job Storage requires the Save Job for Reprint feature to close your Printers folder. 2. For further information, see Chapter 12, Network Accounting on the [OK] button. At your workstation, open your print driver Properties. 46 Xerox WorkCentre 4250/4260 Series System Administration Guide Installable Options 1. If Bi-directional setup is enabled, the...
System Administration Guide
Page 60
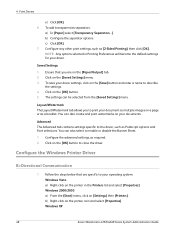
... tab contains settings specific to enable or disable the Banner Sheet. 1. Windows XP 48 Xerox WorkCentre 4250/4260 Series System Administration Guide Layout/Watermark The Layout/Watermark tab allows you are specific to your driver settings, click on the printer in Printing Preferences will become the default settings for your documents. To save your operating...
... tab contains settings specific to enable or disable the Banner Sheet. 1. Windows XP 48 Xerox WorkCentre 4250/4260 Series System Administration Guide Layout/Watermark The Layout/Watermark tab allows you are specific to your driver settings, click on the printer in Printing Preferences will become the default settings for your documents. To save your operating...

System Administration Guide
Page 61
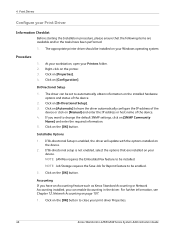
... Community Name] and enter the required information. 2. d) Click on [Installable Options]. f) Change any default printer settings, as required. Xerox WorkCentre 4250/4260 Series System Administration Guide 49 Windows Vista a) Click on [Printing Preferences]. Click on [Close] to have the driver automatically configure the IP Address of the machine or click on [More Status] at the...
... Community Name] and enter the required information. 2. d) Click on [Installable Options]. f) Change any default printer settings, as required. Xerox WorkCentre 4250/4260 Series System Administration Guide 49 Windows Vista a) Click on [Printing Preferences]. Click on [Close] to have the driver automatically configure the IP Address of the machine or click on [More Status] at the...

System Administration Guide
Page 62
... menu, click on the printer icon and select [Properties]. Click on [Installable Options]. 4. Load the CentreWare Print and Fax Drivers CD into your machine. Open the CD and select the required language, if necessary. 50 Xerox WorkCentre 4250/4260 Series System Administration Guide Click ...on the [General] tab. 7. Click on the [OK] button. 6. Install the Print Driver 1. Click on [Printing Preferences]. 10. Verify that are specific...
... menu, click on the printer icon and select [Properties]. Click on [Installable Options]. 4. Load the CentreWare Print and Fax Drivers CD into your machine. Open the CD and select the required language, if necessary. 50 Xerox WorkCentre 4250/4260 Series System Administration Guide Click ...on the [General] tab. 7. Click on the [OK] button. 6. Install the Print Driver 1. Click on [Printing Preferences]. 10. Verify that are specific...


