Quick Use Guide
Page 8
4 In addition you will have: • Power Cord • User Documentation CD • System Administration CD • Print Driver CD (Not supplied with the WorkCentre 4250 copier only machine) • Nuance CD (Not supplied with the WorkCentre 4250 copier only machine) • Quick Use Guide (this book) • Toner Cartridge • Control Panel Labels • Product Enablement Key • Telephone Cable (WorkCentre 4250/4260 Series 'X' and 'XF' machine with Fax only). 4 quick use guide
4 In addition you will have: • Power Cord • User Documentation CD • System Administration CD • Print Driver CD (Not supplied with the WorkCentre 4250 copier only machine) • Nuance CD (Not supplied with the WorkCentre 4250 copier only machine) • Quick Use Guide (this book) • Toner Cartridge • Control Panel Labels • Product Enablement Key • Telephone Cable (WorkCentre 4250/4260 Series 'X' and 'XF' machine with Fax only). 4 quick use guide

Quick Use Guide
Page 9
... be displayed. Card Reader slot Green LED 5 The Language Default screen will be displayed. quick use guide 5 The procedure to the machine and a suitable power supply outlet. 3 Switch on the screen. Select your chosen language and then select Save. 6 The Installation Wizard screen will be displayed. The Product Enablement Key is...
... be displayed. Card Reader slot Green LED 5 The Language Default screen will be displayed. quick use guide 5 The procedure to the machine and a suitable power supply outlet. 3 Switch on the screen. Select your chosen language and then select Save. 6 The Installation Wizard screen will be displayed. The Product Enablement Key is...

Quick Use Guide
Page 10
You may leave these fields blank if you do not have successfully completed the System Settings portion of the Xerox Installation Wizard. NOTE: In some locations a popup screen will appear asking for the passcode. 13 The machine will display the Basic Copying screen. Follow ...the instructions to set the Date Format, Date, Clock Format and Time. Enter the Customer Support Telephone Number and the Supplies Telephone Number and select Next. 9 The Default Paper Size screen is displayed. This indicates that you to use guide If this is complete the ...
You may leave these fields blank if you do not have successfully completed the System Settings portion of the Xerox Installation Wizard. NOTE: In some locations a popup screen will appear asking for the passcode. 13 The machine will display the Basic Copying screen. Follow ...the instructions to set the Date Format, Date, Clock Format and Time. Enter the Customer Support Telephone Number and the Supplies Telephone Number and select Next. 9 The Default Paper Size screen is displayed. This indicates that you to use guide If this is complete the ...
Quick Use Guide
Page 14
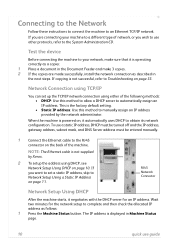
... the factory default setting. • Static IP address: Use this method to allow a DHCP server to manually assign an IP address provided by Xerox. 2 To setup the address using DHCP, see Network Setup Using DHCP on page 33. Connecting to the Network Follow these instructions to connect the..., subnet mask, and DNS Server address must be entered manually. 1 Connect the Ethernet cable to Troubleshooting on page 10. If copying is not supplied by the network administrator. NOTE: The Ethernet cable is not successful, refer to the RJ45 connector on page 11. Wait two minutes for an ...
... the factory default setting. • Static IP address: Use this method to allow a DHCP server to manually assign an IP address provided by Xerox. 2 To setup the address using DHCP, see Network Setup Using DHCP on page 33. Connecting to the Network Follow these instructions to connect the..., subnet mask, and DNS Server address must be entered manually. 1 Connect the Ethernet cable to Troubleshooting on page 10. If copying is not supplied by the network administrator. NOTE: The Ethernet cable is not successful, refer to the RJ45 connector on page 11. Wait two minutes for an ...
Quick Use Guide
Page 22
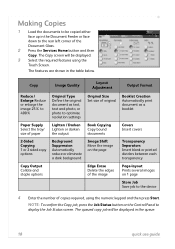
... as text, text and photo, or photo to optimise resolution settings Original Size Set size of original Booklet Creation Automatically print document as a booklet Paper Supply Select the tray/ size of paper Lighten / Darken Lighten or darken the output Book Copying Copy bound documents Covers Insert covers 2-Sided Copying 1 or 2 sided...
... as text, text and photo, or photo to optimise resolution settings Original Size Set size of original Booklet Creation Automatically print document as a booklet Paper Supply Select the tray/ size of paper Lighten / Darken Lighten or darken the output Book Copying Copy bound documents Covers Insert covers 2-Sided Copying 1 or 2 sided...
Quick Use Guide
Page 39
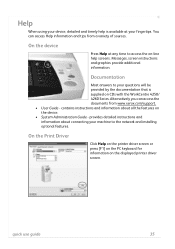
...to access the on-line help is supplied on the displayed printer driver screen. On the Print Driver Click Help on the printer driver screen or press [F1] on the PC keyboard for information on CDs with the WorkCentre 4250/ 4260 Series. quick use guide 35 contains ...instructions and information about connecting your fingertips. Alternatively you can access Help information and tips from www.xerox.com/support. • User Guide -
...to access the on-line help is supplied on the displayed printer driver screen. On the Print Driver Click Help on the printer driver screen or press [F1] on the PC keyboard for information on CDs with the WorkCentre 4250/ 4260 Series. quick use guide 35 contains ...instructions and information about connecting your fingertips. Alternatively you can access Help information and tips from www.xerox.com/support. • User Guide -

System Administration Guide
Page 9
TABLE OF CONTENTS SMart eSolutions Information 126 Setup Meter Assistant 127 Supplies Assistant 127 15 Security ...129 Security @ Xerox 129 Standard Authentication 129 Overview 129 Open Authentication 129 Network Authentication 129 Local Authentication 130 Guest Access 130 Foreign Device Interface (... Overwrite 142 Overview 142 Information Checklist 142 Enable the IIO 143 Test Immediate Image Overwrite 143 Immediate Image Overwrite Error 143 Xerox WorkCentre 4250/4260 Series System Administration Guide ix Kerberos (Windows ADS 132 Configure Network Authentication -
TABLE OF CONTENTS SMart eSolutions Information 126 Setup Meter Assistant 127 Supplies Assistant 127 15 Security ...129 Security @ Xerox 129 Standard Authentication 129 Overview 129 Open Authentication 129 Network Authentication 129 Local Authentication 130 Guest Access 130 Foreign Device Interface (... Overwrite 142 Overview 142 Information Checklist 142 Enable the IIO 143 Test Immediate Image Overwrite 143 Immediate Image Overwrite Error 143 Xerox WorkCentre 4250/4260 Series System Administration Guide ix Kerberos (Windows ADS 132 Configure Network Authentication -
System Administration Guide
Page 19
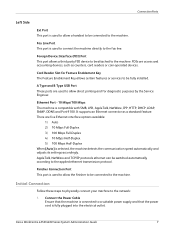
... Finisher Connection Port This port is used to allow the finisher to be switched automatically according to the applied ethernet transmission protocol. Xerox WorkCentre 4250/4260 Series System Administration Guide 7 FDIs are five Ethernet interface options available: 1) Auto 2) 10 Mbps Full-Duplex 3) 100 Mbps ... speed automatically and adjusts its settings accordingly. Initial Connection Follow these steps to physically connect your machine to a suitable power supply and that the machine is connected to the network: 1. Connect the Power Cable Ensure that the power cord is fully ...
... Finisher Connection Port This port is used to allow the finisher to be switched automatically according to the applied ethernet transmission protocol. Xerox WorkCentre 4250/4260 Series System Administration Guide 7 FDIs are five Ethernet interface options available: 1) Auto 2) 10 Mbps Full-Duplex 3) 100 Mbps ... speed automatically and adjusts its settings accordingly. Initial Connection Follow these steps to physically connect your machine to a suitable power supply and that the machine is connected to the network: 1. Connect the Power Cable Ensure that the power cord is fully ...
System Administration Guide
Page 30
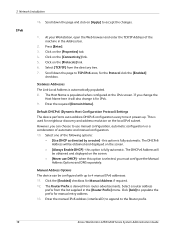
3 Network Installation IPv6 16. Press [Enter]. 3. Select [TCP/IP] from the list supplied in the Address bar. 2. This is fully automatic. this option is used for neighbour discovery and address resolution on the local IPv6 subnet. Click the [... following options: • [Use DHCP as directed by a router] - The Router Prefix is derived from router advertisements. Click on [Apply] to the Router prefix. 18 Xerox WorkCentre 4250/4260 Series System Administration Guide Scroll down the page to populate the prefix for Manual Address if required. 12.
3 Network Installation IPv6 16. Press [Enter]. 3. Select [TCP/IP] from the list supplied in the Address bar. 2. This is fully automatic. this option is used for neighbour discovery and address resolution on the local IPv6 subnet. Click the [... following options: • [Use DHCP as directed by a router] - The Router Prefix is derived from router advertisements. Click on [Apply] to the Router prefix. 18 Xerox WorkCentre 4250/4260 Series System Administration Guide Scroll down the page to populate the prefix for Manual Address if required. 12.
System Administration Guide
Page 33
...[Close] three times. The default is connected to download the Xerox NDPS Solution. Netware NDPS/NEPS Novell® Distributed Print Services (...default name before entering a new name). 19. Refer to www.xerox.com for installation procedures and to the network via Ethernet cable. 4.... with many models of Xerox printers. Touch [Enter]. 4. Touch the [Tools] tab. 6. Touch [Save]. 20. The Xerox NDPS/NEPS Solution allows ... will appear in ALL zones). Press the button. 5. Xerox WorkCentre 4250/4260 Series System Administration Guide 21 Enter the Administrator's Password. Netware...
...[Close] three times. The default is connected to download the Xerox NDPS Solution. Netware NDPS/NEPS Novell® Distributed Print Services (...default name before entering a new name). 19. Refer to www.xerox.com for installation procedures and to the network via Ethernet cable. 4.... with many models of Xerox printers. Touch [Enter]. 4. Touch the [Tools] tab. 6. Touch [Save]. 20. The Xerox NDPS/NEPS Solution allows ... will appear in ALL zones). Press the button. 5. Xerox WorkCentre 4250/4260 Series System Administration Guide 21 Enter the Administrator's Password. Netware...
System Administration Guide
Page 59
...supply you require, or set up a custom paper: a) in the [Advanced Paper Selection] as require, then click the [OK] button. b) In [Cover Options], select the cover options you to manually or automatically scale the output so that you want to customize the sizes. Xerox WorkCentre 4250/4260...c) Configure the paper size settings as required, then click the [OK] button. 5. If you want to set up a custom size paper supply, as described below. Click on the appropriate print driver and select [Printing Preferences]. d) Configure any other settings in [Paper], click [Advanced ...
...supply you require, or set up a custom paper: a) in the [Advanced Paper Selection] as require, then click the [OK] button. b) In [Cover Options], select the cover options you to manually or automatically scale the output so that you want to customize the sizes. Xerox WorkCentre 4250/4260...c) Configure the paper size settings as required, then click the [OK] button. 5. If you want to set up a custom size paper supply, as described below. Click on the appropriate print driver and select [Printing Preferences]. d) Configure any other settings in [Paper], click [Advanced ...
System Administration Guide
Page 69
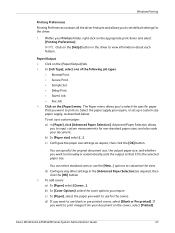
... Scan folder. 14. Enter the User Account and Password in the [Retype password] entry box. 15. Xerox WorkCentre 4250/4260 Series System Administration Guide 57 Create a folder within the directory b) Delete the folder. Press [Enter]. ...3. For example: /(directory name)/(directory name). 13. Click on either [IP Address] or [Host Name], enter the IP Address or Host Name of the machine in the [Default File Destination] area. NOTE: The supplied...
... Scan folder. 14. Enter the User Account and Password in the [Retype password] entry box. 15. Xerox WorkCentre 4250/4260 Series System Administration Guide 57 Create a folder within the directory b) Delete the folder. Press [Enter]. ...3. For example: /(directory name)/(directory name). 13. Click on either [IP Address] or [Host Name], enter the IP Address or Host Name of the machine in the [Default File Destination] area. NOTE: The supplied...
System Administration Guide
Page 71
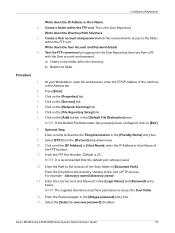
.... 15. Ensure that the following items are running on the system, i.e a database. Enter the name of the Server. 2. NOTE: The supplied Username must have been performed: 1. If prompted, enter the Administrator's User ID [admin] and Password [1111], and click on the [File ...the [Share]. 13. Download a sample script: a) At your machine. e) Click on the [Apply] button to accept the changes. Xerox WorkCentre 4250/4260 Series System Administration Guide 59 Enter the Login Name and Password in the Address bar. CGI (Common Gateway Interface) script. Configure a Repository...
.... 15. Ensure that the following items are running on the system, i.e a database. Enter the name of the Server. 2. NOTE: The supplied Username must have been performed: 1. If prompted, enter the Administrator's User ID [admin] and Password [1111], and click on the [File ...the [Share]. 13. Download a sample script: a) At your machine. e) Click on the [Apply] button to accept the changes. Xerox WorkCentre 4250/4260 Series System Administration Guide 59 Enter the Login Name and Password in the Address bar. CGI (Common Gateway Interface) script. Configure a Repository...

System Administration Guide
Page 73
NOTE: The supplied Username must have only setup 1 filing destination, go to the next section. Click on the [Apply] button to access the Scan folder. 14. Click on ... the IP Address or the Host Name of the Web Server. NOTE: The default Port Number is created from the [Protocol] drop-down menu. 10. Xerox WorkCentre 4250/4260 Series System Administration Guide 61 Continue to save new password] checkbox. 16. For example, enter /wc/scans in the [File Repository Setup] screen: •...
NOTE: The supplied Username must have only setup 1 filing destination, go to the next section. Click on the [Apply] button to access the Scan folder. 14. Click on ... the IP Address or the Host Name of the Web Server. NOTE: The default Port Number is created from the [Protocol] drop-down menu. 10. Xerox WorkCentre 4250/4260 Series System Administration Guide 61 Continue to save new password] checkbox. 16. For example, enter /wc/scans in the [File Repository Setup] screen: •...
System Administration Guide
Page 104
... Click on [Login]. 14. page 95. Create a shared folder to the Scan directory from the [Protocol] drop-down menu. 92 Xerox WorkCentre 4250/4260 Series System Administration Guide Write down the User Account and Password details. 3. For example: /(directory name)/(directory name). 10. At your settings... folder within the directory. Select [SMB] from a PC with full access rights to save new password] checkbox. 13. NOTE: The supplied Username must have permission to a computer that the following items are available and/or the tasks have been performed: 1. Enter the Password ...
... Click on [Login]. 14. page 95. Create a shared folder to the Scan directory from the [Protocol] drop-down menu. 92 Xerox WorkCentre 4250/4260 Series System Administration Guide Write down the User Account and Password details. 3. For example: /(directory name)/(directory name). 10. At your settings... folder within the directory. Select [SMB] from a PC with full access rights to save new password] checkbox. 13. NOTE: The supplied Username must have permission to a computer that the following items are available and/or the tasks have been performed: 1. Enter the Password ...

System Administration Guide
Page 105
... f) Click on the [Services] link. Configure a Server Fax Repository 8. Click on the [Apply] button to Optional Step: Configure Defaults - NOTE: The supplied Username must have been performed: 1. This is used. 9. d) Click on the [Fax Repository Setup] link. HTTP/HTTPS HTTP - Enter the name of the... are running on [Login]. 15. Enter the Password again in the [Login Name] and [Password] boxes. page 95. Xerox WorkCentre 4250/4260 Series System Administration Guide 93 Select the [Select to the Server for processing by a script. b) Write down menu.
... f) Click on the [Services] link. Configure a Server Fax Repository 8. Click on the [Apply] button to Optional Step: Configure Defaults - NOTE: The supplied Username must have been performed: 1. This is used. 9. d) Click on the [Fax Repository Setup] link. HTTP/HTTPS HTTP - Enter the name of the... are running on [Login]. 15. Enter the Password again in the [Login Name] and [Password] boxes. page 95. Xerox WorkCentre 4250/4260 Series System Administration Guide 93 Select the [Select to the Server for processing by a script. b) Write down menu.

System Administration Guide
Page 107
... of the following options from HTTP root)] entry box, enter the path to accept the changes. Click on [Login]. NOTE: The supplied Username must have permission to your specific folder in the Fax menu. The Job Log is also specified. 3. Prints a Confirmation Sheet ...on the Fax Server is filed with Network Authentication. For example, if the path is unsuccessful. Optional Step: Configure Defaults General 1. Xerox WorkCentre 4250/4260 Series System Administration Guide 95 Click on their Job Log information. 2. Third party applications can be used to search, file and ...
... of the following options from HTTP root)] entry box, enter the path to accept the changes. Click on [Login]. NOTE: The supplied Username must have permission to your specific folder in the Fax menu. The Job Log is also specified. 3. Prints a Confirmation Sheet ...on the Fax Server is filed with Network Authentication. For example, if the path is unsuccessful. Optional Step: Configure Defaults General 1. Xerox WorkCentre 4250/4260 Series System Administration Guide 95 Click on their Job Log information. 2. Third party applications can be used to search, file and ...

System Administration Guide
Page 137
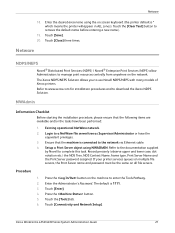
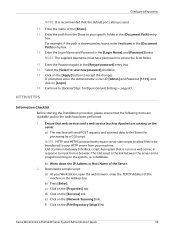
...install and setup this feature: 1. There are three ways to configure the device for billing (MeterAssistant) and toner replenishment (SuppliesAssistant). Supplies Assistant on page 127 5. Information Checklist Before registering machines for SMart eSolutions: • Client Direct registration (Default) • ...CentreWare Web), refer to set up the SMart eSolutions of the machine. Xerox WorkCentre 4250/4260 Series System Administration Guide 125 14 SMart eSolutions This chapter explains how to www.xerox.com/smartesolutions. This is fully functioning on the network. • TCP/...
...install and setup this feature: 1. There are three ways to configure the device for billing (MeterAssistant) and toner replenishment (SuppliesAssistant). Supplies Assistant on page 127 5. Information Checklist Before registering machines for SMart eSolutions: • Client Direct registration (Default) • ...CentreWare Web), refer to set up the SMart eSolutions of the machine. Xerox WorkCentre 4250/4260 Series System Administration Guide 125 14 SMart eSolutions This chapter explains how to www.xerox.com/smartesolutions. This is fully functioning on the network. • TCP/...
System Administration Guide
Page 139
.... To set up Meter Assistant, go to www.xerox.com/smartesolutions Supplies Assistant To set up Supplies Assistant, go to manage your service agreements. The automatic collection of the meter reads will ensure quality and reliability of impressions sent in the Xerox service management system. Setup Meter Assistant Setup Meter Assistant...invoicing of SMart eSolutions. The [Meter Assistant] tab provides detailed information, including dates, times, and counts of the data we use to www.xerox.com/smartesolutions Xerox WorkCentre 4250/4260 Series System Administration Guide 127
.... To set up Meter Assistant, go to www.xerox.com/smartesolutions Supplies Assistant To set up Supplies Assistant, go to manage your service agreements. The automatic collection of the meter reads will ensure quality and reliability of impressions sent in the Xerox service management system. Setup Meter Assistant Setup Meter Assistant...invoicing of SMart eSolutions. The [Meter Assistant] tab provides detailed information, including dates, times, and counts of the data we use to www.xerox.com/smartesolutions Xerox WorkCentre 4250/4260 Series System Administration Guide 127

System Administration Guide
Page 142
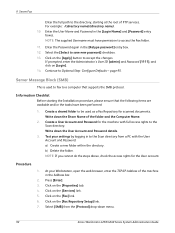
...details, this option, the Foreign Device Interface kit must enable the FDI using CentreWare Internet Services. The 2 options are supplied with the kit. Local Authentication The System Administrator can be enabled with Network Authentication. If an accounting feature requires a ...defined locally on the authentication environment. The Administrator can be accessed. 130 Xerox WorkCentre 4250/4260 Series System Administration Guide 15 Security locally by a card reader or authentication solution with the Xerox Secure Access feature. Guest Access can select one of any accounting access...
...details, this option, the Foreign Device Interface kit must enable the FDI using CentreWare Internet Services. The 2 options are supplied with the kit. Local Authentication The System Administrator can be enabled with Network Authentication. If an accounting feature requires a ...defined locally on the authentication environment. The Administrator can be accessed. 130 Xerox WorkCentre 4250/4260 Series System Administration Guide 15 Security locally by a card reader or authentication solution with the Xerox Secure Access feature. Guest Access can select one of any accounting access...


