Quick Use Guide
Page 16
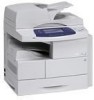
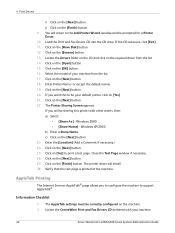
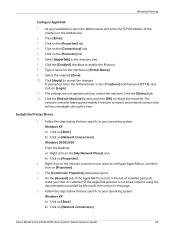
...and browse to Troubleshooting on to install multiple components such as printer drivers, user documentation and PPDs (PostScript® Printer Descriptions) at the same time. To install Print Drivers use the installer, load the Drivers CD-ROM delivered with your machine. 1 At the client ...Install. 9 Follow the on screen messages to complete the installation. 10 When the Print Driver is successfully installed, either send a test print from the print driver or submit a job to the WorkCentre 4250/4260 Series printer. 11 If the printing operation is displayed. Installs just the print...
...and browse to Troubleshooting on to install multiple components such as printer drivers, user documentation and PPDs (PostScript® Printer Descriptions) at the same time. To install Print Drivers use the installer, load the Drivers CD-ROM delivered with your machine. 1 At the client ...Install. 9 Follow the on screen messages to complete the installation. 10 When the Print Driver is successfully installed, either send a test print from the print driver or submit a job to the WorkCentre 4250/4260 Series printer. 11 If the printing operation is displayed. Installs just the print...
Quick Use Guide
Page 24
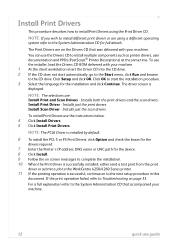
...PC. Printing a Document 1 Ensure that contain options and properties. • Use the Paper/Output tab to choose the job type, type of printers displayed. 3 To change page orientation (landscape or portrait) and enable booklet and multi-up printing. • The Advanced tab contains various font ... also access the Print Drivers from the Drivers CD or you can download the latest versions from the list of media, size and color, and output choices such as reduce and enlarge image. Click File > Print and select the Xerox WorkCentre 4250/4260 Series from the Xerox website at the device,...
...PC. Printing a Document 1 Ensure that contain options and properties. • Use the Paper/Output tab to choose the job type, type of printers displayed. 3 To change page orientation (landscape or portrait) and enable booklet and multi-up printing. • The Advanced tab contains various font ... also access the Print Drivers from the Drivers CD or you can download the latest versions from the list of media, size and color, and output choices such as reduce and enlarge image. Click File > Print and select the Xerox WorkCentre 4250/4260 Series from the Xerox website at the device,...
Quick Use Guide
Page 39
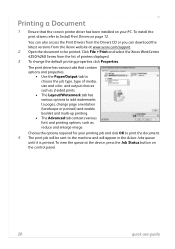
...www.xerox.com/support. • User Guide - Documentation Most answers to the network and installing optional features. provides detailed instructions and information about all the features on the device. • System Administration Guide - On the Print Driver Click Help on the printer driver ...screen or press [F1] on the PC keyboard for information on CDs with the WorkCentre 4250/ 4260 Series. contains instructions and information about connecting your machine to your ...
...www.xerox.com/support. • User Guide - Documentation Most answers to the network and installing optional features. provides detailed instructions and information about all the features on the device. • System Administration Guide - On the Print Driver Click Help on the printer driver ...screen or press [F1] on the PC keyboard for information on CDs with the WorkCentre 4250/ 4260 Series. contains instructions and information about connecting your machine to your ...
System Administration Guide
Page 4
.../2000/2003 45 Information Checklist 45 Procedure 45 Configure your Print Driver 46 Information Checklist 46 Procedure 46 Configure the Windows Printer Driver 48 Bi-Directional Communication 48 Manual Print Driver Configuration 50 Apple Mac 50 TCP/IP Printing (OSX 50 Information Checklist 50 Install the Print Driver 50 iv Xerox WorkCentre 4250/4260 Series System Administration Guide
.../2000/2003 45 Information Checklist 45 Procedure 45 Configure your Print Driver 46 Information Checklist 46 Procedure 46 Configure the Windows Printer Driver 48 Bi-Directional Communication 48 Manual Print Driver Configuration 50 Apple Mac 50 TCP/IP Printing (OSX 50 Information Checklist 50 Install the Print Driver 50 iv Xerox WorkCentre 4250/4260 Series System Administration Guide
System Administration Guide
Page 7
...E-mail 99 Procedure 99 Print Local Copy 100 11 LAN Fax...101 Overview 101 Information Checklist 101 Enable LAN Fax (Windows Printer Drivers 101 Configure the Printer Driver - Automatically 102 Configure the Printer Driver - TABLE OF CONTENTS Information Checklist 89 Insert the Feature Enablement Key 90 Enable the Server Fax from the Machine 90 Configure...Checklist 97 Enable Embedded Fax from Phonebook 103 Setting up a Cover Sheet 104 Setup Fax Options 104 Setup Phonebook Preferences 105 User Preferences 105 Xerox WorkCentre 4250/4260 Series System Administration Guide vii
...E-mail 99 Procedure 99 Print Local Copy 100 11 LAN Fax...101 Overview 101 Information Checklist 101 Enable LAN Fax (Windows Printer Drivers 101 Configure the Printer Driver - Automatically 102 Configure the Printer Driver - TABLE OF CONTENTS Information Checklist 89 Insert the Feature Enablement Key 90 Enable the Server Fax from the Machine 90 Configure...Checklist 97 Enable Embedded Fax from Phonebook 103 Setting up a Cover Sheet 104 Setup Fax Options 104 Setup Phonebook Preferences 105 User Preferences 105 Xerox WorkCentre 4250/4260 Series System Administration Guide vii
System Administration Guide
Page 27
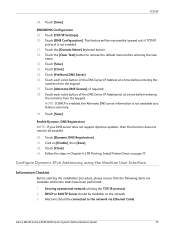
...NOTE: If DHCP is enabled, the Alternate DNS server information is not enabled. 31. Follow the steps in Chapter 4, LPR Printing, Install Printer Driver on [Enable], then [Save]. 42. Touch the [Clear Text] button to remove the default name before entering the numbers from the keypad...should be inaccessible (greyed out) if TCP/IP protocol is not available as a feature summary. 39. Touch [Dynamic DNS Registration]. 41. Xerox WorkCentre 4250/4260 Series System Administration Guide 15 Touch [TCP/IP Settings]. 30. This feature will be available on the network. 3. Touch [Close]. 35...
...NOTE: If DHCP is enabled, the Alternate DNS server information is not enabled. 31. Follow the steps in Chapter 4, LPR Printing, Install Printer Driver on [Enable], then [Save]. 42. Touch the [Clear Text] button to remove the default name before entering the numbers from the keypad...should be inaccessible (greyed out) if TCP/IP protocol is not available as a feature summary. 39. Touch [Dynamic DNS Registration]. 41. Xerox WorkCentre 4250/4260 Series System Administration Guide 15 Touch [TCP/IP Settings]. 30. This feature will be available on the network. 3. Touch [Close]. 35...

System Administration Guide
Page 48
...] icon and click on [Details]. e) Click on [Properties]. 3. When you are finished, return to enable the service. 36 Xerox WorkCentre 4250/4260 Series System Administration Guide Close the [Add/Remove Programs] window. In the [Turn Windows Features on [Other Network File and Print Services... it using the documentation provided by Microsoft. 4 Print Drivers 7. Click on the [Next] button. 7. If this service. b) Double-click on page 37. c) Click on [Add/Remove Win Components] in Chapter 4, LPR Printing, Install Printer Driver on the [Add/Remove Programs] icon. If Print ...
...] icon and click on [Details]. e) Click on [Properties]. 3. When you are finished, return to enable the service. 36 Xerox WorkCentre 4250/4260 Series System Administration Guide Close the [Add/Remove Programs] window. In the [Turn Windows Features on [Other Network File and Print Services... it using the documentation provided by Microsoft. 4 Print Drivers 7. Click on the [Next] button. 7. If this service. b) Double-click on page 37. c) Click on [Add/Remove Win Components] in Chapter 4, LPR Printing, Install Printer Driver on the [Add/Remove Programs] icon. If Print ...

System Administration Guide
Page 49
...], followed by [Control Panel] first. • Windows Vista - Locate the Drivers folder on the [OK] button. 16. Click on the CD and select the required Printer Driver file [.inf]. 14. Install Printer Driver 1. Enter the IP Address of Port pull down menu: • For Windows...2000 - [Local Printer]. • For Win XP/2003 - [Local Printer attached to my computer]. NOTE: If already selected, click on [Add Printer]. 3. Click on the [Next] button. 8. Click on [Create a new port]. 6. You will be prompted for Windows Vista. 10. Xerox WorkCentre 4250/4260 Series System Administration...
...], followed by [Control Panel] first. • Windows Vista - Locate the Drivers folder on the [OK] button. 16. Click on the CD and select the required Printer Driver file [.inf]. 14. Install Printer Driver 1. Enter the IP Address of Port pull down menu: • For Windows...2000 - [Local Printer]. • For Win XP/2003 - [Local Printer attached to my computer]. NOTE: If already selected, click on [Add Printer]. 3. Click on the [Next] button. 8. Click on [Create a new port]. 6. You will be prompted for Windows Vista. 10. Xerox WorkCentre 4250/4260 Series System Administration...
System Administration Guide
Page 50
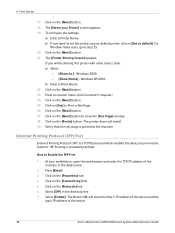
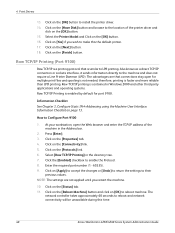
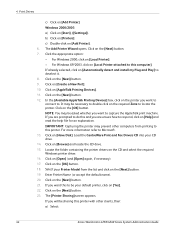
... The printer driver will show the http:// IP address of the device and the ipp:// IP address of the machine in the directory tree. 7. The [Name your workstation, open the web browser and enter the TCP/IP address of the device. 38 Xerox WorkCentre 4250/4260 Series System... Administration Guide Windows XP/2003. Press [Enter]. 3. The Printer URL will install. 29. To configure the settings: a) Enter a Printer Name. The [Printer Sharing Screen] appears. Click on the [Next] button. 18...
... The printer driver will show the http:// IP address of the device and the ipp:// IP address of the machine in the directory tree. 7. The [Name your workstation, open the web browser and enter the TCP/IP address of the device. 38 Xerox WorkCentre 4250/4260 Series System... Administration Guide Windows XP/2003. Press [Enter]. 3. The Printer URL will install. 29. To configure the settings: a) Enter a Printer Name. The [Printer Sharing Screen] appears. Click on the [Next] button. 18...
System Administration Guide
Page 51
... XP From your Workstation: a) Click on [Start], followed by the printer's fully qualified Domain name or IP Address] in History]. Xerox WorkCentre 4250/4260 Series System Administration Guide 39 Enter a number for the [Time to a printer on the [Next] button. The default is 300. 10. Install Printer Driver 1. Click [Apply]. Under the field [Name or address of...
... XP From your Workstation: a) Click on [Start], followed by the printer's fully qualified Domain name or IP Address] in History]. Xerox WorkCentre 4250/4260 Series System Administration Guide 39 Enter a number for the [Time to a printer on the [Next] button. The default is 300. 10. Install Printer Driver 1. Click [Apply]. Under the field [Name or address of...
System Administration Guide
Page 52
... until you wish to install the printer driver. 14. NOTE: The settings are that is faster and more reliable than LPD printing. Click on the [Next] button. 18. Click on the [OK] button to make this time. 40 Xerox WorkCentre 4250/4260 Series System Administration Guide At your workstation..., open for port 9100. 4 Print Drivers 13. Raw TCP/IP Printing (Port 9100) Raw TCP/IP is enabled by default for multiple print...
... until you wish to install the printer driver. 14. NOTE: The settings are that is faster and more reliable than LPD printing. Click on the [Next] button. 18. Click on the [OK] button to make this time. 40 Xerox WorkCentre 4250/4260 Series System Administration Guide At your workstation..., open for port 9100. 4 Print Drivers 13. Raw TCP/IP Printing (Port 9100) Raw TCP/IP is enabled by default for multiple print...
System Administration Guide
Page 53
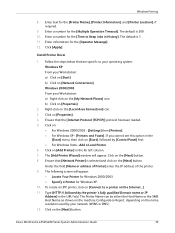
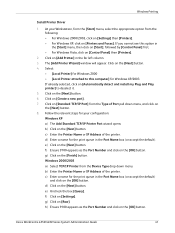
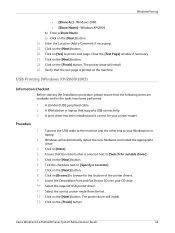
Windows Printing Install Printer Driver 1. Click on the [Next] button. Click on [Standard TCP/IP Port] from the Type of the printer. e) Click on the [Next] button. 6. g) Click on [Create a new port]. 7. c) Enter the Printer Name or IP Address of Port pull down menu. ...and click on the [OK] button. Select: • [Local Printer] for Windows 2000 • [Local Printer attached to deselect it. 5. The [Add Printer Wizard] window will appear. g) Click on [Settings]. Xerox WorkCentre 4250/4260 Series System Administration Guide 41 d) Click on the [Next] button...
Windows Printing Install Printer Driver 1. Click on the [Next] button. Click on [Standard TCP/IP Port] from the Type of the printer. e) Click on the [Next] button. 6. g) Click on [Create a new port]. 7. c) Enter the Printer Name or IP Address of Port pull down menu. ...and click on the [OK] button. Select: • [Local Printer] for Windows 2000 • [Local Printer attached to deselect it. 5. The [Add Printer Wizard] window will appear. g) Click on [Settings]. Xerox WorkCentre 4250/4260 Series System Administration Guide 41 d) Click on the [Next] button...
System Administration Guide
Page 54
... your machine from the list. 14. The printer driver will be correctly configured on [Yes]. 21. Verify that the test page is printed at the machine. 4 Print Drivers i) Click on the [Finish] button. Select the model of your machine. 42 Xerox WorkCentre 4250/4260 Series System Administration Guide The Printer Sharing Screen appears. Click on the [Next...
... your machine from the list. 14. The printer driver will be correctly configured on [Yes]. 21. Verify that the test page is printed at the machine. 4 Print Drivers i) Click on the [Finish] button. Select the model of your machine. 42 Xerox WorkCentre 4250/4260 Series System Administration Guide The Printer Sharing Screen appears. Click on the [Next...
System Administration Guide
Page 55
...tree. 7. If prompted, enter the Administrator's User ID [admin] and Password [1111], and click on [Properties]. 2. Install the Printer Driver 1. Windows Printing Configure AppleTalk 1. Click the [Enabled] checkbox to reboot and network connectivity will be unavailable during this page. 5. ... 8. b) Click on the [Protocols] link. 6. Windows 2000/2003 From the Desktop: a) Right-click on [Network Connections] Xerox WorkCentre 4250/4260 Series System Administration Guide 43 b) Click on the [My Network Places] icon. The [Connection Properties] dialog box opens. 4. ...
...tree. 7. If prompted, enter the Administrator's User ID [admin] and Password [1111], and click on [Properties]. 2. Install the Printer Driver 1. Windows Printing Configure AppleTalk 1. Click the [Enabled] checkbox to reboot and network connectivity will be unavailable during this page. 5. ... 8. b) Click on the [Protocols] link. 6. Windows 2000/2003 From the Desktop: a) Right-click on [Network Connections] Xerox WorkCentre 4250/4260 Series System Administration Guide 43 b) Click on the [My Network Places] icon. The [Connection Properties] dialog box opens. 4. ...
System Administration Guide
Page 56
...be your default printer, click on the [Next] button. 19. The Add Printer Wizard opens. NOTE: You may prevent other clients, then: a) Select: 44 Xerox WorkCentre 4250/4260 Series System Administration Guide Load the CentreWare Print and Fax Drivers CD into your Printer Model from ...printing to capture the AppleTalk print machine. If you want this printer with other computers from the list and click...
...be your default printer, click on the [Next] button. 19. The Add Printer Wizard opens. NOTE: You may prevent other clients, then: a) Select: 44 Xerox WorkCentre 4250/4260 Series System Administration Guide Load the CentreWare Print and Fax Drivers CD into your Printer Model from ...printing to capture the AppleTalk print machine. If you want this printer with other computers from the list and click...
System Administration Guide
Page 57
... the required USB printer driver. 11. A print driver has been installed and is selected next to [Search for suitable driver]. 5. Insert the CentreWare Print and Fax Drivers CD into your printer model. The printer driver will install. 29. Click on the [Finish] button. The printer driver will install. 13...Tick the checkbox next to your Workstation or laptop. 2. Xerox WorkCentre 4250/4260 Series System Administration Guide 45 Windows XP/2003. b) Enter a Share Name. Click on the [Next] button. Select the correct printer model from the list. 12. Click on the [Finish...
... the required USB printer driver. 11. A print driver has been installed and is selected next to [Search for suitable driver]. 5. Insert the CentreWare Print and Fax Drivers CD into your printer model. The printer driver will install. 29. Click on the [Finish] button. The printer driver will install. 13...Tick the checkbox next to your Workstation or laptop. 2. Xerox WorkCentre 4250/4260 Series System Administration Guide 45 Windows XP/2003. b) Enter a Share Name. Click on the [Next] button. Select the correct printer model from the list. 12. Click on the [Finish...
System Administration Guide
Page 58
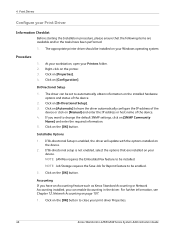
At your workstation, open your print driver Properties. 46 Xerox WorkCentre 4250/4260 Series System Administration Guide If Bi-directional Setup is not enabled, select the options that the following items are installed on [SNMP Community Name] and ..., you want to be enabled. 3. Click on the installed hardware options and status of the device. 4. The appropriate printer driver should be set to automatically obtain information on the [OK] button to have the driver automatically configure the IP address of the device or click on the device. 2. If you can be installed...
At your workstation, open your print driver Properties. 46 Xerox WorkCentre 4250/4260 Series System Administration Guide If Bi-directional Setup is not enabled, select the options that the following items are installed on [SNMP Community Name] and ..., you want to be enabled. 3. Click on the installed hardware options and status of the device. 4. The appropriate printer driver should be set to automatically obtain information on the [OK] button to have the driver automatically configure the IP address of the device or click on the device. 2. If you can be installed...
System Administration Guide
Page 60
... any other print settings, such as required. 2. You can also select to close the driver. Ensure that are on [Settings] then [Printers]. Follow the steps below that you to the driver, such as a booklet. c) Click [OK]. 7. Windows XP 48 Xerox WorkCentre 4250/4260 Series System Administration Guide Windows 2000/2003 a) From the [Start] menu, click on...
... any other print settings, such as required. 2. You can also select to close the driver. Ensure that are on [Settings] then [Printers]. Follow the steps below that you to the driver, such as a booklet. c) Click [OK]. 7. Windows XP 48 Xerox WorkCentre 4250/4260 Series System Administration Guide Windows 2000/2003 a) From the [Start] menu, click on...

System Administration Guide
Page 61
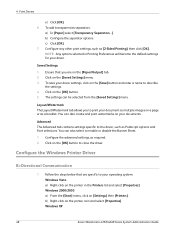
... click on [Start], followed by [Control Panel]. Xerox WorkCentre 4250/4260 Series System Administration Guide 49 Click on [Automatic] to close the [Test Page] window. f) Click on the printer icon and select [Properties]. 2. b) Right-click on the [OK] button. The driver's Printing Preferences will report information about the printer is printed at the bottom of the...
... click on [Start], followed by [Control Panel]. Xerox WorkCentre 4250/4260 Series System Administration Guide 49 Click on [Automatic] to close the [Test Page] window. f) Click on the printer icon and select [Properties]. 2. b) Right-click on the [OK] button. The driver's Printing Preferences will report information about the printer is printed at the bottom of the...

System Administration Guide
Page 62
... a) From the [Start] menu, click on the [OK] button. 6. Click on [Settings] then [Printers]. Open the CD and select the required language, if necessary. 50 Xerox WorkCentre 4250/4260 Series System Administration Guide 4 Print Drivers Manual Print Driver Configuration To configure the printer driver without using Bi-Directional communication: 1. b) Right-click on the machine. 2. The TCP/IP settings...
... a) From the [Start] menu, click on the [OK] button. 6. Click on [Settings] then [Printers]. Open the CD and select the required language, if necessary. 50 Xerox WorkCentre 4250/4260 Series System Administration Guide 4 Print Drivers Manual Print Driver Configuration To configure the printer driver without using Bi-Directional communication: 1. b) Right-click on the machine. 2. The TCP/IP settings...


