Readme file
Page 1
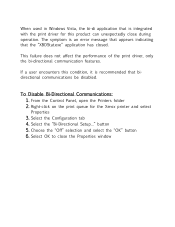
... on the print queue for this condition, it is recommended that the "XBDStat.exe" application has closed. Select OK to close during operation. From the Control Panel, open the Printers folder 2. When used in Windows Vista, the bi-di application that is integrated with the print driver for the...
... on the print queue for this condition, it is recommended that the "XBDStat.exe" application has closed. Select OK to close during operation. From the Control Panel, open the Printers folder 2. When used in Windows Vista, the bi-di application that is integrated with the print driver for the...
Getting Started Guide
Page 10
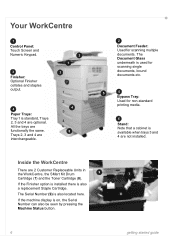
.... 2 1 3 1 2 4 3 4 6 2 Document Feeder: Used for non-standard printing media. 6 Stand: Note that a cabinet is also a replacement Staple Cartridge. Inside the WorkCentre There are optional. If the machine display is also located here. Your WorkCentre 1 Control Panel: Touch Screen and Numeric Keypad. 3 Finisher: Optional Finisher collates and staples output. 4 Paper Trays: Tray 1 is standard, Trays 2, 3 and...
.... 2 1 3 1 2 4 3 4 6 2 Document Feeder: Used for non-standard printing media. 6 Stand: Note that a cabinet is also a replacement Staple Cartridge. Inside the WorkCentre There are optional. If the machine display is also located here. Your WorkCentre 1 Control Panel: Touch Screen and Numeric Keypad. 3 Finisher: Optional Finisher collates and staples output. 4 Paper Trays: Tray 1 is standard, Trays 2, 3 and...
Getting Started Guide
Page 11
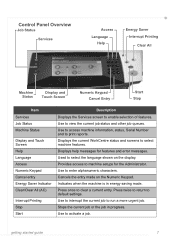
... to select machine features. Provides access to machine setups for features and error messages. getting started guide 7 Displays the current WorkCentre status and screens to clear a current entry. Use to print reports. Use to access machine information, status, Serial Number ... for the Administrator. Use to run a more urgent job. Use to interrupt the current job to enter alphanumeric characters. Control Panel Overview Job Status Services Access Language Help Energy Saver Interrupt Printing Clear All Machine Status Display and Touch Screen Numeric Keypad Cancel...
... to select machine features. Provides access to machine setups for features and error messages. getting started guide 7 Displays the current WorkCentre status and screens to clear a current entry. Use to print reports. Use to access machine information, status, Serial Number ... for the Administrator. Use to run a more urgent job. Use to interrupt the current job to enter alphanumeric characters. Control Panel Overview Job Status Services Access Language Help Energy Saver Interrupt Printing Clear All Machine Status Display and Touch Screen Numeric Keypad Cancel...

Getting Started Guide
Page 13
... DHCP server to setup the address using TCP/IP You can set a static IP address, skip to manually assign an IP address provided by Xerox. 2 Continue on to the next step to automatically assign an IP address. If you wish to use a static IP address, DHCP must...follows: • On the Control Panel, select the Access button and then enter the Administrator passcode [1111] and select Enter. • Select Go to your WorkCentre is a 4150s, 4150x or 4150xf, follow these instructions to connect the WorkCentre to an Ethernet TCP/IP network. When the WorkCentre is powered on, it ...
... DHCP server to setup the address using TCP/IP You can set a static IP address, skip to manually assign an IP address provided by Xerox. 2 Continue on to the next step to automatically assign an IP address. If you wish to use a static IP address, DHCP must...follows: • On the Control Panel, select the Access button and then enter the Administrator passcode [1111] and select Enter. • Select Go to your WorkCentre is a 4150s, 4150x or 4150xf, follow these instructions to connect the WorkCentre to an Ethernet TCP/IP network. When the WorkCentre is powered on, it ...
Getting Started Guide
Page 14
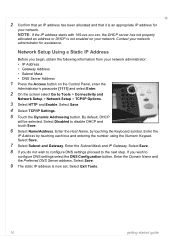
... the IP address starts with 169.xxx.xxx.xxx, the DHCP server has not properly allocated an address or DHCP is not enabled on the Control Panel, enter the Administrator's passcode [1111] and select Enter. 2 On the screen select Go to disable DHCP and touch Save. 6 Select Name/Address. 2 Confirm that an...
... the IP address starts with 169.xxx.xxx.xxx, the DHCP server has not properly allocated an address or DHCP is not enabled on the Control Panel, enter the Administrator's passcode [1111] and select Enter. 2 On the screen select Go to disable DHCP and touch Save. 6 Select Name/Address. 2 Confirm that an...
Getting Started Guide
Page 21
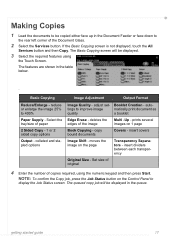
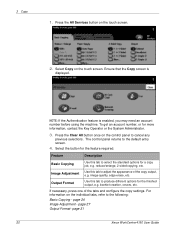
... 25% to improve image matically print document as quality a booklet Edge Erase - NOTE: To confirm the Copy job, press the Job Status button on the Control Panel to display the Job Status screen. Making Copies 1 Load the documents to be displayed. 3 Select the required features using the numeric keypad and then press...
... 25% to improve image matically print document as quality a booklet Edge Erase - NOTE: To confirm the Copy job, press the Job Status button on the Control Panel to display the Job Status screen. Making Copies 1 Load the documents to be displayed. 3 Select the required features using the numeric keypad and then press...
Getting Started Guide
Page 25
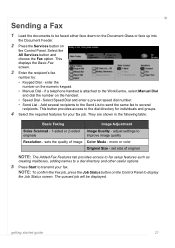
... job will be faxed either face down on the Document Glass or face up into the Document Feeder. 2 Press the Services button on the Control Panel to the dial directory for individuals and groups. 4 Select the required features for your fax. They are shown in the following table: Basic ... number by: • Keypad Dial - if a telephone handset is attached to several recipients to the Send List to send the same fax to the WorkCentre, select Manual Dial and dial the number on the numeric keypad. • Manual Dial - adjust settings to be displayed. getting started guide 21 Sending ...
... job will be faxed either face down on the Document Glass or face up into the Document Feeder. 2 Press the Services button on the Control Panel to the dial directory for individuals and groups. 4 Select the required features for your fax. They are shown in the following table: Basic ... number by: • Keypad Dial - if a telephone handset is attached to several recipients to the Send List to send the same fax to the WorkCentre, select Manual Dial and dial the number on the numeric keypad. • Manual Dial - adjust settings to be displayed. getting started guide 21 Sending ...

Getting Started Guide
Page 27
... be scanned either face down on the Document Glass or face up into the Document Feeder. 2 Press the Services button on the Control Panel. Lighten or darken the image Scan to Edge - Text or photo Scan Presets - Network Scanning Network Scanning enables you require from ...the Template Destinations list. 4 If required, modify the template settings from the options on the Control Panel to display the Job Status screen. You can be displayed. The queued job will be 1 or 2 sided Image Options - optimum quality versus...
... be scanned either face down on the Document Glass or face up into the Document Feeder. 2 Press the Services button on the Control Panel. Lighten or darken the image Scan to Edge - Text or photo Scan Presets - Network Scanning Network Scanning enables you require from ...the Template Destinations list. 4 If required, modify the template settings from the options on the Control Panel to display the Job Status screen. You can be displayed. The queued job will be 1 or 2 sided Image Options - optimum quality versus...
Getting Started Guide
Page 29
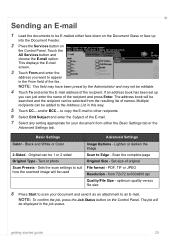
... be selected from 72x72 to an E-mail. If an address book has been set up into the Document Feeder. 2 Press the Services button on the Control Panel. and/or BCC... Black and White or Color Image Options - Set size of the recipient. NOTE: This field may have been preset by the Administrator... can just enter the name of names. Scan the complete page Original Type - NOTE: To confirm the job, press the Job Status button on the Control Panel. Sets the scan settings to the Address List in the job queue. Touch the All Services button and choose the E-mail option.
... be selected from 72x72 to an E-mail. If an address book has been set up into the Document Feeder. 2 Press the Services button on the Control Panel. and/or BCC... Black and White or Color Image Options - Set size of the recipient. NOTE: This field may have been preset by the Administrator... can just enter the name of names. Scan the complete page Original Type - NOTE: To confirm the job, press the Job Status button on the Control Panel. Sets the scan settings to the Address List in the job queue. Touch the All Services button and choose the E-mail option.

Getting Started Guide
Page 34
... documents can be sent as E-mail attachments to the E-mail features is gained using the Services button on the Control Panel and the All Services button on the WorkCentre that need replenishing or replacing, such as meeting notes. This is an excellent feature for scanning documents for your ...customer replaceable units. Units like the SMart Kit Drum Cartridge, Toner Cartridge and Staple Cartridge are customer replaceable, meaning you to call out a Xerox service representative. This enables you can be in color and sent to your needs, be it will be created using the Multi-up feature...
... documents can be sent as E-mail attachments to the E-mail features is gained using the Services button on the Control Panel and the All Services button on the WorkCentre that need replenishing or replacing, such as meeting notes. This is an excellent feature for scanning documents for your ...customer replaceable units. Units like the SMart Kit Drum Cartridge, Toner Cartridge and Staple Cartridge are customer replaceable, meaning you to call out a Xerox service representative. This enables you can be in color and sent to your needs, be it will be created using the Multi-up feature...
Getting Started Guide
Page 35
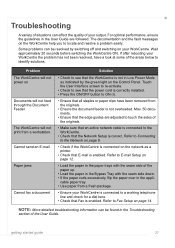
...as a printer. • Check that E-mail is correct. For optimal performance, ensure the guidelines in the appli- If after rebooting your WorkCentre is enabled. Cannot send an E-mail Paper jams Cannot fax a document Solution • Check to see that the power cord is correctly ...• Ensure the document feeder is connected on the Control Panel. Refer to identify solutions. Max. 50 documents. • Ensure that an active network cable is connected to the Network on page 9. • Check if the WorkCentre is not overloaded. NOTE: More detailed troubleshooting information can...
...as a printer. • Check that E-mail is correct. For optimal performance, ensure the guidelines in the appli- If after rebooting your WorkCentre is enabled. Cannot send an E-mail Paper jams Cannot fax a document Solution • Check to see that the power cord is correctly ...• Ensure the document feeder is connected on the Control Panel. Refer to identify solutions. Max. 50 documents. • Ensure that an active network cable is connected to the Network on page 9. • Check if the WorkCentre is not overloaded. NOTE: More detailed troubleshooting information can...
Quick Reference Poster
Page 1
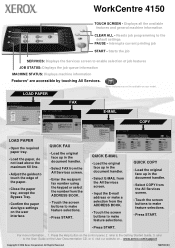
... document handler. • Select COPY from the ADDRESS BOOK. • Touch the screen buttons to the User Guide on the control panel, 2. For more information... 1. Starts the job SERVICES: Displays the Services screen to touch the edge of job features JOB STATUS... from the All Services screen. • Touch the screen buttons to the Getting Started Guide, 3. www.xerox.com/support Copyright © 2006 Xerox Corporation. All Rights Reserved 708PXXXXX WorkCentre 4150 TOUCH SCREEN - QUICK E-MAIL • Load the original face up in the document handler. • ...
... document handler. • Select COPY from the ADDRESS BOOK. • Touch the screen buttons to the User Guide on the control panel, 2. For more information... 1. Starts the job SERVICES: Displays the Services screen to touch the edge of job features JOB STATUS... from the All Services screen. • Touch the screen buttons to the Getting Started Guide, 3. www.xerox.com/support Copyright © 2006 Xerox Corporation. All Rights Reserved 708PXXXXX WorkCentre 4150 TOUCH SCREEN - QUICK E-MAIL • Load the original face up in the document handler. • ...
User Guide
Page 26
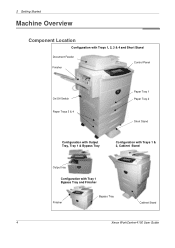
2 Getting Started Machine Overview Component Location Configuration with Trays 1, 2, 3 & 4 and Short Stand Document Feeder Finisher Control Panel On/Off Switch Paper Trays 3 & 4 Paper Tray 1 Paper Tray 2 Short Stand Configuration with Output Tray, Tray 1 & Bypass Tray Configuration with Trays 1 & 2, Cabinet Stand Output tray Configuration with Tray 1 Bypass Tray and Finisher Finisher Bypass Tray Cabinet Stand 4 Xerox WorkCentre 4150 User Guide
2 Getting Started Machine Overview Component Location Configuration with Trays 1, 2, 3 & 4 and Short Stand Document Feeder Finisher Control Panel On/Off Switch Paper Trays 3 & 4 Paper Tray 1 Paper Tray 2 Short Stand Configuration with Output Tray, Tray 1 & Bypass Tray Configuration with Trays 1 & 2, Cabinet Stand Output tray Configuration with Tray 1 Bypass Tray and Finisher Finisher Bypass Tray Cabinet Stand 4 Xerox WorkCentre 4150 User Guide
User Guide
Page 27
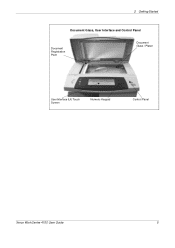
2 Getting Started Document Glass, User Interface and Control Panel Document Registration Point Document Glass / Platen User Interface (UI) Touch Screen Numeric Keypad Control Panel Xerox WorkCentre 4150 User Guide 5
2 Getting Started Document Glass, User Interface and Control Panel Document Registration Point Document Glass / Platen User Interface (UI) Touch Screen Numeric Keypad Control Panel Xerox WorkCentre 4150 User Guide 5

User Guide
Page 29
Xerox WorkCentre 4150 User Guide 7 Job Status Displays job progress information. Help Accesses additional information. Displays and selects all the available programming features, Display and Touch Screen plus ... cancel the entry made on the screen. Displays when the machine is in energy saver mode. Press to reset to an alternative language. 2 Getting Started Control Panel Overview Job Status Services Display and Touch Screen Help Language Access Energy Saver Clear All Interrupt Printing Display Brightness Machine Status Numeric Keypad Cancel Entry...
Xerox WorkCentre 4150 User Guide 7 Job Status Displays job progress information. Help Accesses additional information. Displays and selects all the available programming features, Display and Touch Screen plus ... cancel the entry made on the screen. Displays when the machine is in energy saver mode. Press to reset to an alternative language. 2 Getting Started Control Panel Overview Job Status Services Display and Touch Screen Help Language Access Energy Saver Clear All Interrupt Printing Display Brightness Machine Status Numeric Keypad Cancel Entry...
User Guide
Page 30
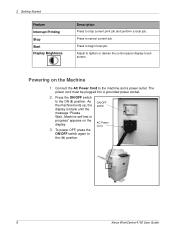
... ON/OFF switch to the machine and a power outlet. ON/OFF switch AC Power Cord 8 Xerox WorkCentre 4150 User Guide Press to begin local job. Powering on the display. 3. Press to cancel current job. Adjust to lighten or darken the control panel display touch screen. The power cord must be plugged into a grounded power socket. 2.
... ON/OFF switch to the machine and a power outlet. ON/OFF switch AC Power Cord 8 Xerox WorkCentre 4150 User Guide Press to begin local job. Powering on the display. 3. Press to cancel current job. Adjust to lighten or darken the control panel display touch screen. The power cord must be plugged into a grounded power socket. 2.

User Guide
Page 32
2 Getting Started 1. When Network Accounting has been enabled, enter a valid User ID and Account ID and select Enter. 3. To Log Off: 1) Press Access on the control panel. 2) Select Logout on the touch screen. Complete your job. 4. Machine Status The Machine Status feature displays the following: • Machine Information • Error Messages • Service Information 10 Xerox WorkCentre 4150 User Guide When the Auditron is enabled, use the keypad to enter a 4 digit password and then select Enter. 2.
2 Getting Started 1. When Network Accounting has been enabled, enter a valid User ID and Account ID and select Enter. 3. To Log Off: 1) Press Access on the control panel. 2) Select Logout on the touch screen. Complete your job. 4. Machine Status The Machine Status feature displays the following: • Machine Information • Error Messages • Service Information 10 Xerox WorkCentre 4150 User Guide When the Auditron is enabled, use the keypad to enter a 4 digit password and then select Enter. 2.
User Guide
Page 34
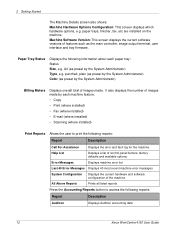
... Prints all listed reports Press the Accounting Reports button to print the following reports: Report Description Auditron Displays Auditron accounting data 12 Xerox WorkCentre 4150 User Guide Help List Displays a list of control panel buttons, factory defaults and available options Error Messages Displays machine error list Last 40 Error Messages Displays 40 most recent machine...
... Prints all listed reports Press the Accounting Reports button to print the following reports: Report Description Auditron Displays Auditron accounting data 12 Xerox WorkCentre 4150 User Guide Help List Displays a list of control panel buttons, factory defaults and available options Error Messages Displays machine error list Last 40 Error Messages Displays 40 most recent machine...

User Guide
Page 37
... time to access the online help on using the Access button on the control panel. For additional Help If you get optimum performance from your System and/or Machine Administrator. 3) Visit our Customer Web Site at any additional help screens. Xerox WorkCentre 4150 User Guide 15 System Management Tools include: System Settings Fax Setups Screen...
... time to access the online help on using the Access button on the control panel. For additional Help If you get optimum performance from your System and/or Machine Administrator. 3) Visit our Customer Web Site at any additional help screens. Xerox WorkCentre 4150 User Guide 15 System Management Tools include: System Settings Fax Setups Screen...
User Guide
Page 42
... number, or for a copy job, e.g. The control panel returns to cancel any previous selections. image quality, edge erase, etc. Use this tab to the following: Basic Copying - For information on the touch screen. 2. page 31 20 Xerox WorkCentre 4150 User Guide Press the All Services button on the individual... Press the Clear All button once on the touch screen. If necessary, press one of the copy output, e.g. Select Copy on the control panel to the default entry screen. 4. Ensure that the Copy screen is enabled, you may need an account number before using the machine. 3...
... number, or for a copy job, e.g. The control panel returns to cancel any previous selections. image quality, edge erase, etc. Use this tab to the following: Basic Copying - For information on the touch screen. 2. page 31 20 Xerox WorkCentre 4150 User Guide Press the All Services button on the individual... Press the Clear All button once on the touch screen. If necessary, press one of the copy output, e.g. Select Copy on the control panel to the default entry screen. 4. Ensure that the Copy screen is enabled, you may need an account number before using the machine. 3...


