
Quick Use Guide
Page 9
... poor image quality may result. 7 CAUTION: Ensure the side cover is always open the side cover. CAUTION: Do not expose the green drum to direct sunlight or touch the drum surface. quick_use.book Page 7 Thursday, March 2, 2006 9:38 AM Installing Cartridges 1 ¾ Pull the release latch to open before opening the front... front cover. ¾ If the cartridge locking lever is in the lower position, turn the lever upward until it locks into place. 3 ¾ Remove the drum cartridge from its bag and slide it into the machine firmly until it locks into place.
... poor image quality may result. 7 CAUTION: Ensure the side cover is always open the side cover. CAUTION: Do not expose the green drum to direct sunlight or touch the drum surface. quick_use.book Page 7 Thursday, March 2, 2006 9:38 AM Installing Cartridges 1 ¾ Pull the release latch to open before opening the front... front cover. ¾ If the cartridge locking lever is in the lower position, turn the lever upward until it locks into place. 3 ¾ Remove the drum cartridge from its bag and slide it into the machine firmly until it locks into place.
System Administration Guide
Page 108
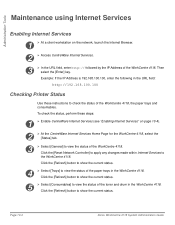
... on page 10-4). 2 ¾ At the CentreWare Internet Services Home Page for the WorkCentre 4118, select the [Status] tab. 3 ¾ Select [General] to check the status of the toner and drum in the WorkCentre 4118. Click the [Reset Network Controller] to apply any changes made within Internet Services ... Browser. 2 ¾ Access CentreWare Internet Services. 3 ¾ In the URL field, enter http:// followed by the IP Address of the WorkCentre 4118. Page 10-4 Xerox WorkCentre 4118 System Administration Guide Example: If the IP Address is 192.168.100.100, enter the following in the...
... on page 10-4). 2 ¾ At the CentreWare Internet Services Home Page for the WorkCentre 4118, select the [Status] tab. 3 ¾ Select [General] to check the status of the toner and drum in the WorkCentre 4118. Click the [Reset Network Controller] to apply any changes made within Internet Services ... Browser. 2 ¾ Access CentreWare Internet Services. 3 ¾ In the URL field, enter http:// followed by the IP Address of the WorkCentre 4118. Page 10-4 Xerox WorkCentre 4118 System Administration Guide Example: If the IP Address is 192.168.100.100, enter the following in the...
User Guide
Page 4
Page ii 4 in 1 Control panel 2-9 Installing Drum and Toner Cartridges 2-12 Making Connections 2-14 Powering On the Machine 2-16 Loading Paper 2-17 Machine Setup 2-20 Machine Setup Options 2-21 Installing Software 2-24 ... 4-9 5 Fax (4 in 1 only 5-1 Faxing Procedure 5-2 Dialing Methods 5-6 Basic Fax Features 5-8 Feature Description 5-8 Special Fax Features 5-10 Feature Description 5-10 Fax Forwarding 5-14 Mailbox Setup 5-15 Xerox WorkCentre 4118 User Guide
Page ii 4 in 1 Control panel 2-9 Installing Drum and Toner Cartridges 2-12 Making Connections 2-14 Powering On the Machine 2-16 Loading Paper 2-17 Machine Setup 2-20 Machine Setup Options 2-21 Installing Software 2-24 ... 4-9 5 Fax (4 in 1 only 5-1 Faxing Procedure 5-2 Dialing Methods 5-6 Basic Fax Features 5-8 Feature Description 5-8 Special Fax Features 5-10 Feature Description 5-10 Fax Forwarding 5-14 Mailbox Setup 5-15 Xerox WorkCentre 4118 User Guide
User Guide
Page 6
...Glass and Constant Velocity Transport (CVT) Glass ...9-2 Control Panel and LCD 9-3 Outside Areas of the Machine 9-3 Ordering Supplies 9-4 Customer Replaceable Units 9-5 Toner Cartridge 9-5 Drum Cartridge 9-8 Replacing the Drum Cartridge 9-8 10 Troubleshooting 10-1 General ...10-2 Fault Clearance 10-3 Document Jams 10-3 Paper Jams 10-6 Paper Exit Area 10-7 2 Sided Jam 10-9 Bypass ...14 Copying Problems 10-14 Printing Problems 10-15 Faxing Problems Solution Chart 10-17 11 Specifications 11-1 Introduction 11-2 Printer Specifications 11-3 Page iv Xerox WorkCentre 4118 User Guide
...Glass and Constant Velocity Transport (CVT) Glass ...9-2 Control Panel and LCD 9-3 Outside Areas of the Machine 9-3 Ordering Supplies 9-4 Customer Replaceable Units 9-5 Toner Cartridge 9-5 Drum Cartridge 9-8 Replacing the Drum Cartridge 9-8 10 Troubleshooting 10-1 General ...10-2 Fault Clearance 10-3 Document Jams 10-3 Paper Jams 10-6 Paper Exit Area 10-7 2 Sided Jam 10-9 Bypass ...14 Copying Problems 10-14 Printing Problems 10-15 Faxing Problems Solution Chart 10-17 11 Specifications 11-1 Introduction 11-2 Printer Specifications 11-3 Page iv Xerox WorkCentre 4118 User Guide

User Guide
Page 31
Using the instructions provided in this chapter, unpack and setup your machine, there are a number of tasks to perform. 2 Getting Started Before you start to use your machine. ¾ Unpacking 2-2 ¾ Machine Overview 2-6 ¾ Installing Drum and Toner Cartridges 2-12 ¾ Making Connections 2-14 ¾ Powering On the Machine 2-16 ¾ Loading Paper 2-17 ¾ Machine Setup 2-20 ¾ Installing Software 2-24 Xerox WorkCentre 4118 User Guide Page 2-1
Using the instructions provided in this chapter, unpack and setup your machine, there are a number of tasks to perform. 2 Getting Started Before you start to use your machine. ¾ Unpacking 2-2 ¾ Machine Overview 2-6 ¾ Installing Drum and Toner Cartridges 2-12 ¾ Making Connections 2-14 ¾ Powering On the Machine 2-16 ¾ Loading Paper 2-17 ¾ Machine Setup 2-20 ¾ Installing Software 2-24 Xerox WorkCentre 4118 User Guide Page 2-1
User Guide
Page 33
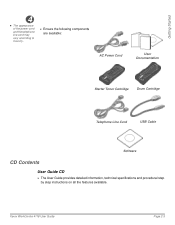
Xerox WorkCentre 4118 User Guide Page 2-3 Getting Started 4 z The appearance of the power cord and the telephone line cord may vary according to Country. ¾ Ensure the following components are available: AC Power Cord User Documentation Starter Toner Cartridge Drum Cartridge Telephone Line Cord USB Cable Software CD Contents User Guide CD ¾ The User Guide provides detailed information, technical specifications and procedural step by step instructions on all the features available.
Xerox WorkCentre 4118 User Guide Page 2-3 Getting Started 4 z The appearance of the power cord and the telephone line cord may vary according to Country. ¾ Ensure the following components are available: AC Power Cord User Documentation Starter Toner Cartridge Drum Cartridge Telephone Line Cord USB Cable Software CD Contents User Guide CD ¾ The User Guide provides detailed information, technical specifications and procedural step by step instructions on all the features available.
User Guide
Page 42
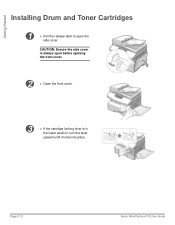
CAUTION: Ensure the side cover is in the lower position, turn the lever upward until it locks into place. Page 2-12 Xerox WorkCentre 4118 User Guide Getting Started Installing Drum and Toner Cartridges 1 ¾ Pull the release latch to open before opening the front cover. 2 ¾ Open the front cover. 3 ¾ If the cartridge locking lever is always open the side cover.
CAUTION: Ensure the side cover is in the lower position, turn the lever upward until it locks into place. Page 2-12 Xerox WorkCentre 4118 User Guide Getting Started Installing Drum and Toner Cartridges 1 ¾ Pull the release latch to open before opening the front cover. 2 ¾ Open the front cover. 3 ¾ If the cartridge locking lever is always open the side cover.

User Guide
Page 43
... quality may result. 5 z Xerox has included a Starter Toner Cartridge. Shaking the cartridge will yield approximately two times the number of the slot, until it locks into place. 7 z When the drum or toner cartridge need to loosen the toner. Xerox WorkCentre 4118 User Guide Page 2-13 Getting... Started CAUTION: Do not expose the green drum to direct sunlight or touch the drum surface. Purchased replacement toner cartridges will ensure maximum copies...
... quality may result. 5 z Xerox has included a Starter Toner Cartridge. Shaking the cartridge will yield approximately two times the number of the slot, until it locks into place. 7 z When the drum or toner cartridge need to loosen the toner. Xerox WorkCentre 4118 User Guide Page 2-13 Getting... Started CAUTION: Do not expose the green drum to direct sunlight or touch the drum surface. Purchased replacement toner cartridges will ensure maximum copies...
User Guide
Page 146
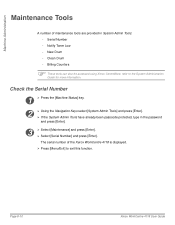
... [System Admin Tools] and press [Enter]. ¾ If the System Admin Tools have already been passcode protected, type in System Admin Tools: - New Drum - Machine Administration Maintenance Tools A number of the Xerox WorkCentre 4118 is displayed. ¾ Press [Menu/Exit] to the System Administration Guide for more information. Serial Number - Notify Toner Low -
... [System Admin Tools] and press [Enter]. ¾ If the System Admin Tools have already been passcode protected, type in System Admin Tools: - New Drum - Machine Administration Maintenance Tools A number of the Xerox WorkCentre 4118 is displayed. ¾ Press [Menu/Exit] to the System Administration Guide for more information. Serial Number - Notify Toner Low -
User Guide
Page 147
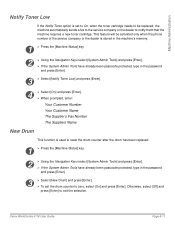
... enter: Your Customer Number Your Customer Name The Supplier's Fax Number The Suppliers Name New Drum This function is set the drum counter to zero, select [On] and press [Enter]. Xerox WorkCentre 4118 User Guide Page 8-11 Machine Administration Notify Toner Low If the Notify Toner option is... used to reset the drum counter after the drum has been replaced. 1 ¾ Press the [Machine Status] key. 2 ¾ Using the ...
... enter: Your Customer Number Your Customer Name The Supplier's Fax Number The Suppliers Name New Drum This function is set the drum counter to zero, select [On] and press [Enter]. Xerox WorkCentre 4118 User Guide Page 8-11 Machine Administration Notify Toner Low If the Notify Toner option is... used to reset the drum counter after the drum has been replaced. 1 ¾ Press the [Machine Status] key. 2 ¾ Using the ...
User Guide
Page 148
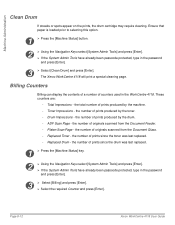
...total number of prints produced by the toner. - Platen Scan Page - The Xerox WorkCentre 4118 will print a special cleaning page. These counters are: - the number of prints produced by the drum. - the number of originals scanned from the Document Feeder. - Ensure that ...used in the password and press [Enter]. 3 ¾ Select [Clean Drum] and press [Enter]. Replaced Drum - Drum Impressions - Replaced Toner - Page 8-12 Xerox WorkCentre 4118 User Guide the number of prints since the drum was last replaced. - Toner Impressions - ADF Scan Page - Billing ...
...total number of prints produced by the toner. - Platen Scan Page - The Xerox WorkCentre 4118 will print a special cleaning page. These counters are: - the number of prints produced by the drum. - the number of originals scanned from the Document Feeder. - Ensure that ...used in the password and press [Enter]. 3 ¾ Select [Clean Drum] and press [Enter]. Replaced Drum - Drum Impressions - Replaced Toner - Page 8-12 Xerox WorkCentre 4118 User Guide the number of prints since the drum was last replaced. - Toner Impressions - ADF Scan Page - Billing ...
User Guide
Page 154
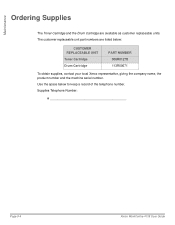
Maintenance Ordering Supplies The Toner Cartridge and the Drum Cartridge are listed below to keep a record of the telephone number. Supplies Telephone Number: Page 9-4 Xerox WorkCentre 4118 User Guide Use the space below : CUSTOMER REPLACEABLE UNIT Toner Cartridge Drum Cartridge PART NUMBER 006R01278 113R00671 To obtain supplies, contact your local Xerox representative, giving the company name, the product number and the machine serial number. The customer replaceable unit part numbers are available as customer replaceable units.
Maintenance Ordering Supplies The Toner Cartridge and the Drum Cartridge are listed below to keep a record of the telephone number. Supplies Telephone Number: Page 9-4 Xerox WorkCentre 4118 User Guide Use the space below : CUSTOMER REPLACEABLE UNIT Toner Cartridge Drum Cartridge PART NUMBER 006R01278 113R00671 To obtain supplies, contact your local Xerox representative, giving the company name, the product number and the machine serial number. The customer replaceable unit part numbers are available as customer replaceable units.

User Guide
Page 158
... page 8-10. Page 9-8 Xerox WorkCentre 4118 User Guide Damage or poor image quality may result. The machine displays 'Drum Warning' when the drum is displayed, after approximately 20,000 copies. CAUTION: Do not expose the green drum to direct sunlight or touch the drum surface. Never expose the drum to light for cleaning the drum. ) For instructions on...
... page 8-10. Page 9-8 Xerox WorkCentre 4118 User Guide Damage or poor image quality may result. The machine displays 'Drum Warning' when the drum is displayed, after approximately 20,000 copies. CAUTION: Do not expose the green drum to direct sunlight or touch the drum surface. Never expose the drum to light for cleaning the drum. ) For instructions on...

User Guide
Page 159
Maintenance 3 z The toner cartridge must be removed to replace the drum cartridge. ¾ Turn the cartridge locking lever upwards to release the toner cartridge. 4 ¾ Pull out the used drum cartridge. 5 ¾ Unpack the new drum cartridge and slide it in place, making sure not to touch the surface of the drum. Xerox WorkCentre 4118 User Guide Page 9-9
Maintenance 3 z The toner cartridge must be removed to replace the drum cartridge. ¾ Turn the cartridge locking lever upwards to release the toner cartridge. 4 ¾ Pull out the used drum cartridge. 5 ¾ Unpack the new drum cartridge and slide it in place, making sure not to touch the surface of the drum. Xerox WorkCentre 4118 User Guide Page 9-9

User Guide
Page 160
Maintenance 6 ¾ Reinstall the toner cartridge, then lock the lever. ¾ Close the front cover and the side cover. ¾ The display shows [New Drum Unit?]. Page 9-10 Xerox WorkCentre 4118 User Guide To reset the counter manually refer to Standby mode. ) If the counter is not reset, 'Drum Warning' may appear before the new drum reaches its maximum life. Select [Yes] and press [Enter]. The machine returns to the "Maintenance Tools" on page 8-10.
Maintenance 6 ¾ Reinstall the toner cartridge, then lock the lever. ¾ Close the front cover and the side cover. ¾ The display shows [New Drum Unit?]. Page 9-10 Xerox WorkCentre 4118 User Guide To reset the counter manually refer to Standby mode. ) If the counter is not reset, 'Drum Warning' may appear before the new drum reaches its maximum life. Select [Yes] and press [Enter]. The machine returns to the "Maintenance Tools" on page 8-10.

User Guide
Page 171
... to "Document jammed in communication. If the Error, Heating Error and fuser unit. Tray. This may show up as polling. Drum Empty The drum cartridge is degraded. Fuser Error, Open Heat There is performed, a message indicating the nature of 2 Sided printing. 10-9. problem...page 9-8. Door Open The side cover is near the end of the page. Drum Warning The drum cartridge is not securely latched. Refer to select a Try again. group. Incompatible Remote party did not have tried to "Drum Cartridge" on page 9-8. Xerox WorkCentre 4118 User Guide Page 10-11
... to "Document jammed in communication. If the Error, Heating Error and fuser unit. Tray. This may show up as polling. Drum Empty The drum cartridge is degraded. Fuser Error, Open Heat There is performed, a message indicating the nature of 2 Sided printing. 10-9. problem...page 9-8. Door Open The side cover is near the end of the page. Drum Warning The drum cartridge is not securely latched. Refer to select a Try again. group. Incompatible Remote party did not have tried to "Drum Cartridge" on page 9-8. Xerox WorkCentre 4118 User Guide Page 10-11

User Guide
Page 174
...positioned correctly on page 9-2. Check that there is face down on the Document Glass or face up piece of the Document Feeder. Page 10-14 Xerox WorkCentre 4118 User Guide Smears, lines, marks, or spots If defects are on the original, press the Lighten/Darken key to on the original, ...a credit card. If no defects are too light or too dark If the original is loaded correctly. If the problem still persists, clean the Drum Cartridge. Copies are on copies adjust the image. If a line is in the product for service. Copying Problems CONDITION SUGGESTED SOLUTION The LCD does...
...positioned correctly on page 9-2. Check that there is face down on the Document Glass or face up piece of the Document Feeder. Page 10-14 Xerox WorkCentre 4118 User Guide Smears, lines, marks, or spots If defects are on the original, press the Lighten/Darken key to on the original, ...a credit card. If no defects are too light or too dark If the original is loaded correctly. If the problem still persists, clean the Drum Cartridge. Copies are on copies adjust the image. If a line is in the product for service. Copying Problems CONDITION SUGGESTED SOLUTION The LCD does...
User Guide
Page 175
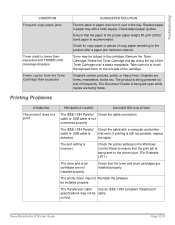
... weight 80 g/m² (20 lb) bond paper is being sent to the correct port. (For Example: LPT1.) The toner and drum cartridges are not installed properly. Remove the Toner Cartridge. The Document Feeder is lower than expected and TONER LOW message displays Fewer copies... supply. Take care not to ensure that the toner and drum cartridges are forms, newsletters, books etc. PROBLEM The product does not print PROBABLE CAUSE SUGGESTED SOLUTION The IEEE-1284 Parallel Check the cable connection. Xerox WorkCentre 4118 User Guide Page 10-15 Originals contain pictures, solids,...
... weight 80 g/m² (20 lb) bond paper is being sent to the correct port. (For Example: LPT1.) The toner and drum cartridges are not installed properly. Remove the Toner Cartridge. The Document Feeder is lower than expected and TONER LOW message displays Fewer copies... supply. Take care not to ensure that the toner and drum cartridges are forms, newsletters, books etc. PROBLEM The product does not print PROBABLE CAUSE SUGGESTED SOLUTION The IEEE-1284 Parallel Check the cable connection. Xerox WorkCentre 4118 User Guide Page 10-15 Originals contain pictures, solids,...

User Guide
Page 178
... original that the problem is not due to "Maintenance Tools" on the machine, clean the drum. Paper is a clean copy. For example, dirty scan glass or dirty scan lamp. Ensure there enough toner. Page 10-18 Xerox WorkCentre 4118 User Guide Troubleshooting PROBLEM SUGGESTED SOLUTION The received original is printed dark and is...
... original that the problem is not due to "Maintenance Tools" on the machine, clean the drum. Paper is a clean copy. For example, dirty scan glass or dirty scan lamp. Ensure there enough toner. Page 10-18 Xerox WorkCentre 4118 User Guide Troubleshooting PROBLEM SUGGESTED SOLUTION The received original is printed dark and is...

User Guide
Page 184
Specifications General Specifications ITEM Input paper tray capacity Output tray capacity Toner cartridge life Drum life Operating Environment Paper size and weight Original document width and weight Document Feeder capacity Power rating Power consumption Weight Dimensions (WxDxH) Memory Size DESCRIPTION... Hz 3.0A AC110 ~ 127V (US, Canada), 50/60 Hz 6.0A 35 W in Power Save mode 115 W in Standby mode 430 W / 420 W during operation 32 kg (Drum and Toner Cartridges included) 540 x 441 x 488 mm (21 x 17 x 19 inches) without Tray 2 540 x 441 x 619 mm (21 x 17 x 24.4 inches) with Tray 2 ...
Specifications General Specifications ITEM Input paper tray capacity Output tray capacity Toner cartridge life Drum life Operating Environment Paper size and weight Original document width and weight Document Feeder capacity Power rating Power consumption Weight Dimensions (WxDxH) Memory Size DESCRIPTION... Hz 3.0A AC110 ~ 127V (US, Canada), 50/60 Hz 6.0A 35 W in Power Save mode 115 W in Standby mode 430 W / 420 W during operation 32 kg (Drum and Toner Cartridges included) 540 x 441 x 488 mm (21 x 17 x 19 inches) without Tray 2 540 x 441 x 619 mm (21 x 17 x 24.4 inches) with Tray 2 ...


