Network Guide
Page 3
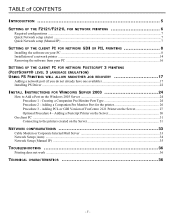
...CONTENTS INTRODUCTION 5 SETTING UP THE F2121/F2121L FOR NETWORK PRINTING 6 Required configurations ...7 Quick Network setup (Auto) ...7 Quick Network setup (Manual IP) ...7 SETTING UP THE CLIENT PC FOR NETWORK GDI OR PCL PRINTING 8 Installing the software on your PC ...16 SETTING UP... printer ...14 Removing the software from your PC ...8 Installation of FaxCentre 2121 Printer on the Server 31 NETWORK CONFIGURATIONS 33 Cable Modem or Corporate Internal Mail Server 33 Network Setup (Auto) ...34 Network Setup (Manual IP) ...35 TROUBLESHOOTING 36 Printing does not work ...36 TECHNICAL ...
...CONTENTS INTRODUCTION 5 SETTING UP THE F2121/F2121L FOR NETWORK PRINTING 6 Required configurations ...7 Quick Network setup (Auto) ...7 Quick Network setup (Manual IP) ...7 SETTING UP THE CLIENT PC FOR NETWORK GDI OR PCL PRINTING 8 Installing the software on your PC ...16 SETTING UP... printer ...14 Removing the software from your PC ...8 Installation of FaxCentre 2121 Printer on the Server 31 NETWORK CONFIGURATIONS 33 Cable Modem or Corporate Internal Mail Server 33 Network Setup (Auto) ...34 Network Setup (Manual IP) ...35 TROUBLESHOOTING 36 Printing does not work ...36 TECHNICAL ...
Quick Reference Guide
Page 2
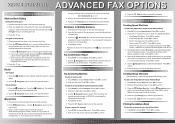
...the group dial or subscriber list assigned number. Redial Fax Number 1. The redial list contains the last 10 numbers 2. Press the Internet key. Manual Dial 1. Enter the fax number or E-mail address, or use the Navigation keys to your Address Book 1. Press M 231 to confirm. ...send as "+" on the control panel screen. To modify the ID number, select another available number. Press OK to Multiple Numbers 1. XEROX 2121/2121L ADVANCED FAX OPTIONS Advanced Dialing Options Address Book Dialing Dialing from the phone book. Press the key. Broadcast to confirm. 4. ...
...the group dial or subscriber list assigned number. Redial Fax Number 1. The redial list contains the last 10 numbers 2. Press the Internet key. Manual Dial 1. Enter the fax number or E-mail address, or use the Navigation keys to your Address Book 1. Press M 231 to confirm. ...send as "+" on the control panel screen. To modify the ID number, select another available number. Press OK to Multiple Numbers 1. XEROX 2121/2121L ADVANCED FAX OPTIONS Advanced Dialing Options Address Book Dialing Dialing from the phone book. Press the key. Broadcast to confirm. 4. ...
User Guide
Page 62
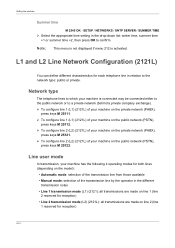
... / SNTP SERVER / SUMMER TIME ¾ Select the appropriate time setting in the different transmission notes • Line 1 transmission mode (L1) (2121): all transmissions are made on line 1 (line 2 reserved for both lines (depending on the model): • Automatic mode: selection of the transmission... line from those available • Manual mode: selection of your machine on line 2 (line 1 reserved for reception) 4-14 Setting the machine Summer time M 2545 OK - Note: ...
... / SNTP SERVER / SUMMER TIME ¾ Select the appropriate time setting in the different transmission notes • Line 1 transmission mode (L1) (2121): all transmissions are made on line 1 (line 2 reserved for both lines (depending on the model): • Automatic mode: selection of the transmission... line from those available • Manual mode: selection of your machine on line 2 (line 1 reserved for reception) 4-14 Setting the machine Summer time M 2545 OK - Note: ...
User Guide
Page 63
... your machine in automatic transmission line selection mode, press keys M 2611. ¾ To configure your machine in manual transmission line selection mode, press keys M 2612. ¾ To configure your machine in systematic line 1 (L1)(2121) transmission line selection mode, press keys M 2613. ¾ To configure your machine is an additional selection possible...
... your machine in automatic transmission line selection mode, press keys M 2611. ¾ To configure your machine in manual transmission line selection mode, press keys M 2612. ¾ To configure your machine in systematic line 1 (L1)(2121) transmission line selection mode, press keys M 2613. ¾ To configure your machine is an additional selection possible...
User Guide
Page 64
... internal numbers, for which the prefix is especially useful when your machine may change the default value "10" to all the numbers dialed that it manually (L1 or L2) by pressing the (loadspeaker) key: ¾ Press the key. 4-16 To modify the minimum length ¾ Press the keys M 2521....installed behind a company telephone exchange: - To program the prefix ¾ Press the keys M 2522. ¾ Enter the dialing prefix associated with line L1 (2121) Note: The dialing prefix may define a numbering prefix for line L2 (2121L) of 5 characters. ¾ Press the key or the OK key to record...
... internal numbers, for which the prefix is especially useful when your machine may change the default value "10" to all the numbers dialed that it manually (L1 or L2) by pressing the (loadspeaker) key: ¾ Press the key. 4-16 To modify the minimum length ¾ Press the keys M 2521....installed behind a company telephone exchange: - To program the prefix ¾ Press the keys M 2522. ¾ Enter the dialing prefix associated with line L1 (2121) Note: The dialing prefix may define a numbering prefix for line L2 (2121L) of 5 characters. ¾ Press the key or the OK key to record...
User Guide
Page 65
... case, the operation requested is displayed: L1: called number TRANS. P1 Stopping a call in progress If only one call are in progress on line 1 (L1)(2121) or line 2 (L2)(2121L), the following on -screen display switches back and forward between the following is performed without using the menu described. P1 and... ¾ Press the key again to confirm. keys. P1 If 2 calls are in progress on line L2 (2121L), only line L1 may be picked up manually.
... case, the operation requested is displayed: L1: called number TRANS. P1 Stopping a call in progress If only one call are in progress on line 1 (L1)(2121) or line 2 (L2)(2121L), the following on -screen display switches back and forward between the following is performed without using the menu described. P1 and... ¾ Press the key again to confirm. keys. P1 If 2 calls are in progress on line L2 (2121L), only line L1 may be picked up manually.


