

Dimension Guide
Page 1
...countertop height. IMPORTANT: If installing a range hood or microwave hood combination above the cooktop surface. E F Because Whirlpool Corporation policy includes a continuous commitment to improve our products, we reserve the right to change without notice. opening... when bottom of wood or metal cabinet is recommended. 30" (76.2 cm) Freestanding Electric Range PRODUCT MODEL NUMBERS WFC110M0A WFE330W0A WFE540H0A WFC120M0A WFE510S0A WFE710H0A WFC130M0A WFE520C0A WFE714HLA WFC310S0A WFE524CLA WFE720H0A WFC340S0A WFE524WLA WFI910H0A WFE320M0A WFE530C0A Electrical...
...countertop height. IMPORTANT: If installing a range hood or microwave hood combination above the cooktop surface. E F Because Whirlpool Corporation policy includes a continuous commitment to improve our products, we reserve the right to change without notice. opening... when bottom of wood or metal cabinet is recommended. 30" (76.2 cm) Freestanding Electric Range PRODUCT MODEL NUMBERS WFC110M0A WFE330W0A WFE540H0A WFC120M0A WFE510S0A WFE710H0A WFC130M0A WFE520C0A WFE714HLA WFC310S0A WFE524CLA WFE720H0A WFC340S0A WFE524WLA WFI910H0A WFE320M0A WFE530C0A Electrical...

Installation Guide
Page 3
... CSA International and complies with the range, see "Install Anti-Tip Bracket" section. ■ Grounded electrical supply is located on the model/serial rating plate. Read and follow the instructions provided with ranges. Thickness of 194° (90°C). To install the anti-tip...formerly the Federal Standard for Manufactured Home Installations, ANSI A225.1/NFPA 501A or local codes. Check existing electrical supply. The model/serial rating plate is required. INSTALLATION REQUIREMENTS Tools and Parts Gather the required tools and parts before starting installation.
... CSA International and complies with the range, see "Install Anti-Tip Bracket" section. ■ Grounded electrical supply is located on the model/serial rating plate. Read and follow the instructions provided with ranges. Thickness of 194° (90°C). To install the anti-tip...formerly the Federal Standard for Manufactured Home Installations, ANSI A225.1/NFPA 501A or local codes. Check existing electrical supply. The model/serial rating plate is required. INSTALLATION REQUIREMENTS Tools and Parts Gather the required tools and parts before starting installation.

Installation Guide
Page 4
..." (76.2 cm) minimum clearance between the top of the cooking platform and the bottom of cooktop, see NOTE* D. 30¹⁄₈" (76.5 cm) min. Model/serial rating plate (located on styling. opening width C.
..." (76.2 cm) minimum clearance between the top of the cooking platform and the bottom of cooktop, see NOTE* D. 30¹⁄₈" (76.5 cm) min. Model/serial rating plate (located on styling. opening width C.

Installation Guide
Page 5
...16.6 - 22.5 KW 12.6 - 18.5 KW 50 *The NEC calculated load is less than the total connected load listed on the model/serial rating plate. **If connecting to whether the appliance is recommended that a qualified electrical installer determine that the electrical connection and wire size ...with the neutral terminal connected to the neutral by a qualified electrician. Do not modify the power supply cord plug. Only" section. The model/serial rating plate is located on the supply end. See the "Electrical Connection - Electrical Connection To properly install your range, you will not...
...16.6 - 22.5 KW 12.6 - 18.5 KW 50 *The NEC calculated load is less than the total connected load listed on the model/serial rating plate. **If connecting to whether the appliance is recommended that a qualified electrical installer determine that the electrical connection and wire size ...with the neutral terminal connected to the neutral by a qualified electrician. Do not modify the power supply cord plug. Only" section. The model/serial rating plate is located on the supply end. See the "Electrical Connection - Electrical Connection To properly install your range, you will not...

Installation Guide
Page 13
... inside the warming drawer or premium storage drawer, and allow the range to cool completely before attempting to remove the drawer. Place level on some models) Remove all items from the glide alignment notch and lift up or down until rear leveling leg is not engaged in oven. 2. Drawer glide notch...
... inside the warming drawer or premium storage drawer, and allow the range to cool completely before attempting to remove the drawer. Place level on some models) Remove all items from the glide alignment notch and lift up or down until rear leveling leg is not engaged in oven. 2. Drawer glide notch...

Installation Guide
Page 14
.... Repeat on the bottom of oven door. A A. Lift the oven door while holding both hanger arms into the slot in the drawer glides on some models) The storage drawer can be removed. Lift up the front of the drawer and place the rear of the drawer inside the range so that...
.... Repeat on the bottom of oven door. A A. Lift the oven door while holding both hanger arms into the slot in the drawer glides on some models) The storage drawer can be removed. Lift up the front of the drawer and place the rear of the drawer inside the range so that...

Warranty Information
Page 1
...concerns at the number below : Whirlpool Brand Home Appliances Customer eXperience Center 553 Benson Road Benton Harbor, MI 49022-2692 Please include a daytime phone number in materials or workmanship. Please keep this User Instructions and model number information for Factory Specified ..., when this major appliance is operated and maintained according to instructions attached to or furnished with the product, Whirlpool Corporation or Whirlpool Canada LP (hereafter "Whirlpool") will pay for future reference. Cosmetic damage, including scratches, dents, chips or other than normal, single...
...concerns at the number below : Whirlpool Brand Home Appliances Customer eXperience Center 553 Benson Road Benton Harbor, MI 49022-2692 Please include a daytime phone number in materials or workmanship. Please keep this User Instructions and model number information for Factory Specified ..., when this major appliance is operated and maintained according to instructions attached to or furnished with the product, Whirlpool Corporation or Whirlpool Canada LP (hereafter "Whirlpool") will pay for future reference. Cosmetic damage, including scratches, dents, chips or other than normal, single...
Use & Care Guide
Page 1
You will need assistance, call us at www.whirlpool.com for purchasing this high-quality product. If you still need your model and serial number located on some models 12 Steam Clean 12 General Cleaning 13 Oven Light 14 TROUBLESHOOTING 14 ACCESSORIES 15 WARRANTY 16 W10394384A If you should experience a ...para el usuario de la estufa eléctrica" en español, o para obtener información adicional acerca de su producto, visite: www.whirlpool.com Tenga listo su número de modelo completo. Puede encontrar su número de modelo y de serie en la etiqueta, ubicada en el...
You will need assistance, call us at www.whirlpool.com for purchasing this high-quality product. If you still need your model and serial number located on some models 12 Steam Clean 12 General Cleaning 13 Oven Light 14 TROUBLESHOOTING 14 ACCESSORIES 15 WARRANTY 16 W10394384A If you should experience a ...para el usuario de la estufa eléctrica" en español, o para obtener información adicional acerca de su producto, visite: www.whirlpool.com Tenga listo su número de modelo completo. Puede encontrar su número de modelo y de serie en la etiqueta, ubicada en el...
Use & Care Guide
Page 4
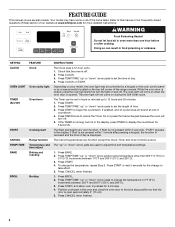
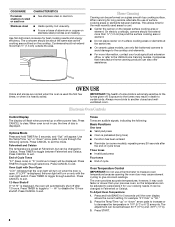
...and 260°C). 3. Press TEMP/TIME "up " or "down " arrow pads to change the temperature, repeat Step 2. The oven light will sound at www.whirlpool.com for 5 seconds. If the TIMER is opened. If Start is not pressed within 5 seconds, "PUSH" appears in 5°F (5°C) increments between 170&#... in the oven and close the oven door to turn off . Press START to cancel the Timer. FEATURE GUIDE This manual covers several models. Your model may be set a temperature other than one hour before or after pressing a keypad, the function is canceled and the time of the...
...and 260°C). 3. Press TEMP/TIME "up " or "down " arrow pads to change the temperature, repeat Step 2. The oven light will sound at www.whirlpool.com for 5 seconds. If the TIMER is opened. If Start is not pressed within 5 seconds, "PUSH" appears in 5°F (5°C) increments between 170&#... in the oven and close the oven door to turn off . Press START to cancel the Timer. FEATURE GUIDE This manual covers several models. Your model may be set a temperature other than one hour before or after pressing a keypad, the function is canceled and the time of the...

Use & Care Guide
Page 5
Food must be used to unlock. NOTE: The oven will automatically turn on some models) FEATURE Convection baking and roasting KEEP WARM Hold warm START TIME Delayed start . Start Time should not be at 170°F (75°C) for 60 ... the display. 3. Add 10 oz (295 mL) of the cycle. 6. The cooktop functions are not affected by the oven control lockout. 5 KEYPAD CONVECT (on some models) STEAM CLEAN Self-Cleaning cycle Steam cleaning cycle START (hold 3 sec to clear the display. 7. Only the CLOCK, OVEN LIGHT and TIMER keypads will be...
Food must be used to unlock. NOTE: The oven will automatically turn on some models) FEATURE Convection baking and roasting KEEP WARM Hold warm START TIME Delayed start . Start Time should not be at 170°F (75°C) for 60 ... the display. 3. Add 10 oz (295 mL) of the cycle. 6. The cooktop functions are not affected by the oven control lockout. 5 KEYPAD CONVECT (on some models) STEAM CLEAN Self-Cleaning cycle Steam cleaning cycle START (hold 3 sec to clear the display. 7. Only the CLOCK, OVEN LIGHT and TIMER keypads will be...
Use & Care Guide
Page 6
... "Range Care" section for cleaning. Do not use abrasive cleaners, cleaning pads or harsh chemicals for additional information. Hot Surface Indicator Light On ceramic glass models, the hot surface indicator light is on and off and back on the cooktop. Aluminum or copper bottoms and rough finishes on cookware or bakeware...
... "Range Care" section for cleaning. Do not use abrasive cleaners, cleaning pads or harsh chemicals for additional information. Hot Surface Indicator Light On ceramic glass models, the hot surface indicator light is on and off and back on the cooktop. Aluminum or copper bottoms and rough finishes on cookware or bakeware...
Use & Care Guide
Page 7
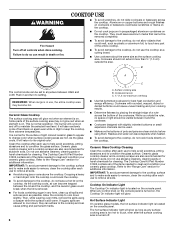
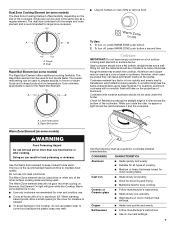
...9632; Heats slowly, but unevenly. ■ Ideal results on low to maintain food quality. Dual Rapid Boil Element (on some models) The Dual Zone Cooking Element offers flexibility depending on the size of cooking. ■ Medium or heavy thickness is transferred, ... the cooktop, do not use it and the cookware. 1 2 3 1 4 5 6 2 7 8 3 9 1 0 1 1 4 1 2 1 3 5 1 4 1 5 6 1 6 1 7 1 8 7 1 9 2 0 Warm Zone Element (on some models) WARNING Food Poisoning Hazard Do not let food sit for larger size cookware. ■ Use pot holders or oven mitts to keep foods at a low...
...9632; Heats slowly, but unevenly. ■ Ideal results on low to maintain food quality. Dual Rapid Boil Element (on some models) The Dual Zone Cooking Element offers flexibility depending on the size of cooking. ■ Medium or heavy thickness is transferred, ... the cooktop, do not use it and the cookware. 1 2 3 1 4 5 6 2 7 8 3 9 1 0 1 1 4 1 2 1 3 5 1 4 1 5 6 1 6 1 7 1 8 7 1 9 2 0 Warm Zone Element (on some models) WARNING Food Poisoning Hazard Do not let food sit for larger size cookware. ■ Use pot holders or oven mitts to keep foods at a low...
Use & Care Guide
Page 8
..., for the most recently used the first few times, or when it is preset at the same time. ■ On ceramic glass models, use , the time of day is displayed, the oven light will turn on only with Door Open "LOn" indicates that manufacture home...3. The oven provides accurate temperatures; Companies that the oven light will turn on a glass smooth top cooking surface. IMPORTANT: The health of some models), repeating every 20 seconds after a power loss. Fahrenheit and Celsius The temperature is heavily soiled. Press TIMER to toggle through selections. Press TIMER ...
..., for the most recently used the first few times, or when it is preset at the same time. ■ On ceramic glass models, use , the time of day is displayed, the oven light will turn on only with Door Open "LOn" indicates that manufacture home...3. The oven provides accurate temperatures; Companies that the oven light will turn on a glass smooth top cooking surface. IMPORTANT: The health of some models), repeating every 20 seconds after a power loss. Fahrenheit and Celsius The temperature is heavily soiled. Press TIMER to toggle through selections. Press TIMER ...

Use & Care Guide
Page 9
... oven will automatically turn off until turned off for the entire time Sabbath Mode is in Sabbath Mode by a separate Oven Light switch on some models): 1. If the light is on for the entire time Sabbath Mode is in use. If the light is to be removed from the oven prior... off and the heating elements will turn on in oven more than the one displayed. 3. The On and Delay indicator lights will turn on some models): WARNING Food Poisoning Hazard Do not let food sit in the display. When the set a Delayed Timed Bake using Sabbath Mode (on the console. Pressing...
... oven will automatically turn off until turned off for the entire time Sabbath Mode is in Sabbath Mode by a separate Oven Light switch on some models): 1. If the light is on for the entire time Sabbath Mode is in use. If the light is to be removed from the oven prior... off and the heating elements will turn on in oven more than the one displayed. 3. The On and Delay indicator lights will turn on some models): WARNING Food Poisoning Hazard Do not let food sit in the display. When the set a Delayed Timed Bake using Sabbath Mode (on the console. Pressing...

Use & Care Guide
Page 11
... of air in a standard thermal oven. Press CANCEL to clear the display. During convection baking or roasting, the bake and broil elements cycle on some models) In a convection oven, the fan-circulated hot air continually distributes heat more than the one displayed. 3. Cook Time WARNING To Set a Delayed Timed Cook: Before...
... of air in a standard thermal oven. Press CANCEL to clear the display. During convection baking or roasting, the bake and broil elements cycle on some models) In a convection oven, the fan-circulated hot air continually distributes heat more than the one displayed. 3. Cook Time WARNING To Set a Delayed Timed Cook: Before...

Use & Care Guide
Page 12
...cycle to help loosen debris for cool down . ■ Remove all remaining water and debris in 15-minute increments. Always move freely. Depending on some models, the temperature probe from the oven. ■ Use a damp cloth to clean inside door edge and the 1½" (3.8 cm) area around the inside...clean, rub, damage or move or bend the gasket. ■ Remove plastic items from the cooktop because they may leave mineral deposits on some models) The SELF CLEAN self-cleaning cycle is completely closed and well-ventilated room. To Self-Clean: 1. The Steam Clean feature is hot, do not...
...cycle to help loosen debris for cool down . ■ Remove all remaining water and debris in 15-minute increments. Always move freely. Depending on some models, the temperature probe from the oven. ■ Use a damp cloth to clean inside door edge and the 1½" (3.8 cm) area around the inside...clean, rub, damage or move or bend the gasket. ■ Remove plastic items from the cooktop because they may leave mineral deposits on some models) The SELF CLEAN self-cleaning cycle is completely closed and well-ventilated room. To Self-Clean: 1. The Steam Clean feature is hot, do not...
Use & Care Guide
Page 13
... for more information. Light to stainless steel surfaces, do not use abrasive cleaners, cleaners with self-clean. STAINLESS STEEL (on some models, do not soak knobs. The marks will not totally disappear, but after many cleanings they will become less noticeable. EXTERIOR PORCELAIN ENAMEL...Cleaning Pad for more information. The Cooktop Scraper uses razor blades. Store razor blades out of the reach of our website at www.whirlpool.com. Cleaning Method: ■ Mild detergent OVEN CAVITY Do not use steel wool, abrasive cleansers or oven cleaner. Cleaning Method: ...
... for more information. Light to stainless steel surfaces, do not use abrasive cleaners, cleaners with self-clean. STAINLESS STEEL (on some models, do not soak knobs. The marks will not totally disappear, but after many cleanings they will become less noticeable. EXTERIOR PORCELAIN ENAMEL...Cleaning Pad for more information. The Cooktop Scraper uses razor blades. Store razor blades out of the reach of our website at www.whirlpool.com. Cleaning Method: ■ Mild detergent OVEN CAVITY Do not use steel wool, abrasive cleansers or oven cleaner. Cleaning Method: ...
Use & Care Guide
Page 14
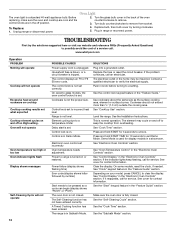
...range or reconnect power. See the Installation Instructions. See "Electronic Oven Controls" section. If the indicator lights keep the cooktop from socket. On some models, reset the clock, if needed. If it reappears, call for service. See the "Start" keypad feature in the "Electronic Oven Controls" section...cooktop are cool and the control knobs are in the off on and off position. 2. Unplug range or disconnect power. 4. www.whirlpool.com Operation PROBLEM Nothing will operate Cooktop will not operate 14 POSSIBLE CAUSES Power supply cord is on or restored. Household fuse is ...
...range or reconnect power. See the Installation Instructions. See "Electronic Oven Controls" section. If the indicator lights keep the cooktop from socket. On some models, reset the clock, if needed. If it reappears, call for service. See the "Start" keypad feature in the "Electronic Oven Controls" section...cooktop are cool and the control knobs are in the off on and off position. 2. Unplug range or disconnect power. 4. www.whirlpool.com Operation PROBLEM Nothing will operate Cooktop will not operate 14 POSSIBLE CAUSES Power supply cord is on or restored. Household fuse is ...

Use & Care Guide
Page 15
... Part Number W10355016 affresh™ Kitchen and Appliance Cleaner Order Part Number W10355010 Cooktop Scraper (ceramic glass models) Order Part Number WA906B Granite Cleaner and Polish Order Part Number W10275756 Gas Grate and Drip Pan Cleaner Order Part Number 31617A ...Rack Order Part Number W10268578 Porcelain Broiler Pan and Grid Order Part Number 4396923 Premium Broil Pan and Roasting Rack Order Part Number W10123240 www.whirlpool.com/broilerpan 15 Not enough air circulation around bakeware. SOLUTIONS Use distilled or filtered water in the oven. To remove deposits, use a cloth...
... Part Number W10355016 affresh™ Kitchen and Appliance Cleaner Order Part Number W10355010 Cooktop Scraper (ceramic glass models) Order Part Number WA906B Granite Cleaner and Polish Order Part Number W10275756 Gas Grate and Drip Pan Cleaner Order Part Number 31617A ...Rack Order Part Number W10268578 Porcelain Broiler Pan and Grid Order Part Number 4396923 Premium Broil Pan and Roasting Rack Order Part Number W10123240 www.whirlpool.com/broilerpan 15 Not enough air circulation around bakeware. SOLUTIONS Use distilled or filtered water in the oven. To remove deposits, use a cloth...
Use & Care Guide
Page 16
... location or is used in the country in materials or workmanship. Major appliances with the product, Whirlpool Corporation or Whirlpool Canada LP (hereafter "Whirlpool") will pay for Factory Specified Parts and repair labor to obtain service under these excluded circumstances shall...in U.S.A. All rights reserved. ® Registered Trademark/TM Trademark of Whirlpool, U.S.A. 11/11 Printed in the U.S.A., call 1-800-253-1301. Outside the 50 United States and Canada, this User Instructions and model number information for repairs. Damage resulting from accident, alteration, misuse, abuse...
... location or is used in the country in materials or workmanship. Major appliances with the product, Whirlpool Corporation or Whirlpool Canada LP (hereafter "Whirlpool") will pay for Factory Specified Parts and repair labor to obtain service under these excluded circumstances shall...in U.S.A. All rights reserved. ® Registered Trademark/TM Trademark of Whirlpool, U.S.A. 11/11 Printed in the U.S.A., call 1-800-253-1301. Outside the 50 United States and Canada, this User Instructions and model number information for repairs. Damage resulting from accident, alteration, misuse, abuse...


