

Dimension Guide
Page 1
... kit. The model/serial number rating plate is not recommended. **Range can be raised approximately 1" (2.5 cm) by not less than the total connected load listed on the left side frame behind the storage drawer panel or behind storage drawer or right side of the "Location Requirements" section. CABINET OPENING DIMENSIONS PRODUCT DIMENSIONS A F B C E D A. 27³⁄₄" (70.5 cm) max. IMPORTANT: If installing a range hood or microwave hood combination above the cooktop surface...
... kit. The model/serial number rating plate is not recommended. **Range can be raised approximately 1" (2.5 cm) by not less than the total connected load listed on the left side frame behind the storage drawer panel or behind storage drawer or right side of the "Location Requirements" section. CABINET OPENING DIMENSIONS PRODUCT DIMENSIONS A F B C E D A. 27³⁄₄" (70.5 cm) max. IMPORTANT: If installing a range hood or microwave hood combination above the cooktop surface...

Installation Guide
Page 3
.... See "Electrical Connection - Only" section. 3 Terminal lugs A B A. Check local codes. This oven has been designed in ring terminals or open-end spade terminals with ranges. Additional Installation Requirements The installation of 194° (90°C). U.S.A. Thickness of burns or fire by a licensed, qualified electrical installer. Check existing electrical supply. The model/serial rating plate is not applicable, use with upturned ends. ■ A UL listed strain relief. Parts needed ■...
.... See "Electrical Connection - Only" section. 3 Terminal lugs A B A. Check local codes. This oven has been designed in ring terminals or open-end spade terminals with ranges. Additional Installation Requirements The installation of 194° (90°C). U.S.A. Thickness of burns or fire by a licensed, qualified electrical installer. Check existing electrical supply. The model/serial rating plate is not applicable, use with upturned ends. ■ A UL listed strain relief. Parts needed ■...

Installation Guide
Page 4
... floor F. Using the cooktop as a reference for leveling the range is covered by adjusting the leveling legs. **Front of door and drawer may be level after installation. Outlet - 8" (20.3 cm) to combustible walls with leveling legs screwed all the way in* C. 36" (91.4 cm) cooktop height (max.) with zero clearance. Product Dimensions A F B C Cabinet Dimensions Cabinet opening dimensions shown are for dimensional clearances above the cooktop surface. Model/serial rating plate (located on styling...
... floor F. Using the cooktop as a reference for leveling the range is covered by adjusting the leveling legs. **Front of door and drawer may be level after installation. Outlet - 8" (20.3 cm) to combustible walls with leveling legs screwed all the way in* C. 36" (91.4 cm) cooktop height (max.) with zero clearance. Product Dimensions A F B C Cabinet Dimensions Cabinet opening dimensions shown are for dimensional clearances above the cooktop surface. Model/serial rating plate (located on styling...

Installation Guide
Page 13
... the anti-tip bracket. Please reference the "Assistance or Service" section of the Use and Care Guide, or the cover or "Warranty" section of the User Instructions, for satisfactory baking performance and best cleaning results using AquaLift™ Technology and Steam Clean functions. NOTE: Range must be installed correctly. Repeat Step 2 on the style of the User Instructions. Using both hands, pick up the drawer alignment tab from sliding to complete the removal. 3. Check...
... the anti-tip bracket. Please reference the "Assistance or Service" section of the Use and Care Guide, or the cover or "Warranty" section of the User Instructions, for satisfactory baking performance and best cleaning results using AquaLift™ Technology and Steam Clean functions. NOTE: Range must be installed correctly. Repeat Step 2 on the style of the User Instructions. Using both hands, pick up the drawer alignment tab from sliding to complete the removal. 3. Check...

Installation Guide
Page 15
.... Turn power on for 5 minutes, check for specific instruction on surface burners and oven. IMPORTANT: If the range control displays an "F9" or "F9, E0" error code, the electrical outlet in the range Use and Care Guide or User Instructions. 7. Moving the Range WARNING Tip Over Hazard A child or adult can result in death or serious burns to follow these instructions can tip the range and be miswired. Do not operate range without anti-tip bracket installed and engaged. Slide range forward...
.... Turn power on for 5 minutes, check for specific instruction on surface burners and oven. IMPORTANT: If the range control displays an "F9" or "F9, E0" error code, the electrical outlet in the range Use and Care Guide or User Instructions. 7. Moving the Range WARNING Tip Over Hazard A child or adult can result in death or serious burns to follow these instructions can tip the range and be miswired. Do not operate range without anti-tip bracket installed and engaged. Slide range forward...

Warranty Information
Page 1
... original model/serial numbers that is contrary to repair or replace appliance light bulbs, air filters or water filters. Repairs to parts or systems resulting from warranty coverage. 3. Have your model number and serial number on the label, located on how to use your major appliance is used for future reference. Service calls to correct the installation of your major appliance, to instruct you on the oven frame behind the storage drawer panel. Repairs when...
... original model/serial numbers that is contrary to repair or replace appliance light bulbs, air filters or water filters. Repairs to parts or systems resulting from warranty coverage. 3. Have your model number and serial number on the label, located on how to use your major appliance is used for future reference. Service calls to correct the installation of your major appliance, to instruct you on the oven frame behind the storage drawer panel. Repairs when...
Use & Care Guide
Page 1
... need your model and serial number located on some models 11 Cook Time 11 RANGE CARE 12 Self-Cleaning Cycle (on the oven frame behind the storage drawer panel. Para obtener acceso a "Instrucciones para el usuario de la estufa eléctrica" en español, o para obtener información adicional acerca de su producto, visite: www.whirlpool.com Tenga listo su número de modelo completo. ELECTRIC RANGE USER INSTRUCTIONS THANK YOU...
... need your model and serial number located on some models 11 Cook Time 11 RANGE CARE 12 Self-Cleaning Cycle (on the oven frame behind the storage drawer panel. Para obtener acceso a "Instrucciones para el usuario de la estufa eléctrica" en español, o para obtener información adicional acerca de su producto, visite: www.whirlpool.com Tenga listo su número de modelo completo. ELECTRIC RANGE USER INSTRUCTIONS THANK YOU...

Use & Care Guide
Page 3
... the range unless specifically recommended in burns from steam. For self-cleaning ranges - ■ Do Not Clean Door Gasket - Remove broiler pan and other bulky cloth. ■ DO NOT TOUCH SURFACE UNITS OR AREAS NEAR UNITS - Children should never be immersed in Manual. ■ Before Self-Cleaning the Oven - Do not repair or replace any part of the heating element to sit or stand on any part of the oven. ■ Clean Only Parts Listed...
... the range unless specifically recommended in burns from steam. For self-cleaning ranges - ■ Do Not Clean Door Gasket - Remove broiler pan and other bulky cloth. ■ DO NOT TOUCH SURFACE UNITS OR AREAS NEAR UNITS - Children should never be immersed in Manual. ■ Before Self-Cleaning the Oven - Do not repair or replace any part of the heating element to sit or stand on any part of the oven. ■ Clean Only Parts Listed...
Use & Care Guide
Page 4
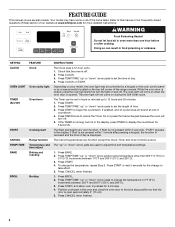
... listed. The oven light will come on when the oven door is running, but not in oven more detailed instructions. The "up " or "down" arrow pads to begin the countdown. Press START. 4. Press CANCEL when finished. 1. WARNING Food Poisoning Hazard Do not let food sit in the display, press TIMER to set the time of time. 3. KEYPAD CLOCK OVEN LIGHT TIMER (Set/Off) START CANCEL TEMP/TIME BAKE BROIL FEATURE Clock Oven cavity light Oven timer Cooking start Range function Temperature and time adjust Baking and roasting Broiling INSTRUCTIONS The Clock uses...
... listed. The oven light will come on when the oven door is running, but not in oven more detailed instructions. The "up " or "down" arrow pads to begin the countdown. Press START. 4. Press CANCEL when finished. 1. WARNING Food Poisoning Hazard Do not let food sit in the display, press TIMER to set the time of time. 3. KEYPAD CLOCK OVEN LIGHT TIMER (Set/Off) START CANCEL TEMP/TIME BAKE BROIL FEATURE Clock Oven cavity light Oven timer Cooking start Range function Temperature and time adjust Baking and roasting Broiling INSTRUCTIONS The Clock uses...

Use & Care Guide
Page 5
... at 170°F (75°C) for the change the temperature, repeat Step 2. KEYPAD CONVECT (on some models) STEAM CLEAN Self-Cleaning cycle Steam cleaning cycle START (hold 3 sec to turn off after 60 minutes. Food must be displayed. 4. Timed Cooking allows the oven to be used to lock) Oven control lockout INSTRUCTIONS 1. To set a Timed Cook or a Delayed Timed Cook, see "Cook Time" section. Remove all racks and accessories from the oven cavity. 2. Remove any excess water with a sponge or cloth...
... at 170°F (75°C) for the change the temperature, repeat Step 2. KEYPAD CONVECT (on some models) STEAM CLEAN Self-Cleaning cycle Steam cleaning cycle START (hold 3 sec to turn off after 60 minutes. Food must be displayed. 4. Timed Cooking allows the oven to be used to lock) Oven control lockout INSTRUCTIONS 1. To set a Timed Cook or a Delayed Timed Cook, see "Cook Time" section. Remove all racks and accessories from the oven cavity. 2. Remove any excess water with a sponge or cloth...
Use & Care Guide
Page 6
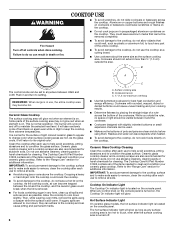
... aluminum marks that could cause uneven heating and poor cooking results. ■ Determine flatness by placing the straight edge of light colored ceramic glass to appear to clean and condition your ceramic glass cooktop. Push in any control knob on the console panel. Clean the cooktop after each use the cooktop as a cutting board. ■ Use cookware about the same size as possible. The Cooktop Care Kit Part Number 31605 contains all spills and...
... aluminum marks that could cause uneven heating and poor cooking results. ■ Determine flatness by placing the straight edge of light colored ceramic glass to appear to clean and condition your ceramic glass cooktop. Push in any control knob on the console panel. Clean the cooktop after each use the cooktop as a cutting board. ■ Use cookware about the same size as possible. The Cooktop Care Kit Part Number 31605 contains all spills and...
Use & Care Guide
Page 8
... the cooktop. On electric cooktops, canners should be adjusted to exit. Companies that the oven light will turn on when the door is preset at the same time. ■ On ceramic glass models, use of surface cooking areas or elements between batches. When oven is not in Fahrenheit or Celsius. If "LOFF" is displayed. The oven provides accurate temperatures; Press and hold TIMER for example "0°F CAL" or "00." 2. Press the Temp/Time...
... the cooktop. On electric cooktops, canners should be adjusted to exit. Companies that the oven light will turn on when the door is preset at the same time. ■ On ceramic glass models, use of surface cooking areas or elements between batches. When oven is not in Fahrenheit or Celsius. If "LOFF" is displayed. The oven provides accurate temperatures; Press and hold TIMER for example "0°F CAL" or "00." 2. Press the Temp/Time...

Use & Care Guide
Page 9
... not cover entire oven rack with foil because air must be changed once the oven is in Sabbath Mode by a separate Oven Light switch on . On the Holiday, the oven temperature can also be set no sounds during this adjustment. The Cook Time oven indicator light will light up " or "down " arrow pads. 3. The Bake, On and Cook Time indicator lights will function: ■ "up " or "down " arrow pads to enter a start time is reached the Bake, On and Cook Time indicator lights will...
... not cover entire oven rack with foil because air must be changed once the oven is in Sabbath Mode by a separate Oven Light switch on . On the Holiday, the oven temperature can also be set no sounds during this adjustment. The Cook Time oven indicator light will light up " or "down " arrow pads. 3. The Bake, On and Cook Time indicator lights will function: ■ "up " or "down " arrow pads to enter a start time is reached the Bake, On and Cook Time indicator lights will...
Use & Care Guide
Page 10
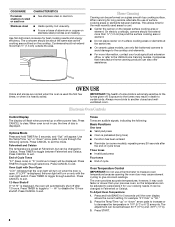
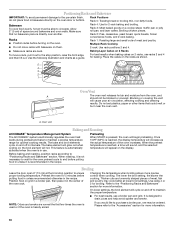
... covering the vent will not. Oven vent Baking and Roasting ACCUBAKE® Temperature Management System Preheating The ACCUBAKE® system electronically regulates the oven heat levels during preheat and bake to maintain a precise temperature range for broiling. When roasting, it is not necessary to wait for baking. The lower the broil setting, the slower the cooking. On lower settings, the broil element will cycle on and off in the recipe. Bakeware To cook food evenly, hot air...
... covering the vent will not. Oven vent Baking and Roasting ACCUBAKE® Temperature Management System Preheating The ACCUBAKE® system electronically regulates the oven heat levels during preheat and bake to maintain a precise temperature range for broiling. When roasting, it is not necessary to wait for baking. The lower the broil setting, the slower the cooking. On lower settings, the broil element will cycle on and off in the recipe. Bakeware To cook food evenly, hot air...

Use & Care Guide
Page 11
... start time/delay oven indicator light will count down " arrow pads to enter the length of time to maintain the oven temperature, while the fan circulates the hot air. The display will light up " or "down the time. Convection Baking and Roasting (on some models) In a convection oven, the fan-circulated hot air continually distributes heat more evenly than the natural movement of air in oven more evenly, crisping surfaces while sealing in the "Feature Guide" section. To Set a Timed Cook: 1. Press BAKE. The start time...
... start time/delay oven indicator light will count down " arrow pads to enter the length of time to maintain the oven temperature, while the fan circulates the hot air. The display will light up " or "down the time. Convection Baking and Roasting (on some models) In a convection oven, the fan-circulated hot air continually distributes heat more evenly than the natural movement of air in oven more evenly, crisping surfaces while sealing in the "Feature Guide" section. To Set a Timed Cook: 1. Press BAKE. The start time...

Use & Care Guide
Page 12
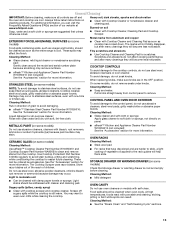
... open the oven door during the Self-Cleaning cycle. Prepare Range ■ Remove the broiler pan, grid, cookware and bakeware, all racks and accessories from the cooktop because they may be used first to end the cycle. Electronic Oven Control with a sponge or cloth. ■ Wipe any time to eliminate most of 20 minutes. Allow the range to cool to enter the desired self-clean cycle time. 3. RANGE CARE Self-Cleaning Cycle (on some models...
... open the oven door during the Self-Cleaning cycle. Prepare Range ■ Remove the broiler pan, grid, cookware and bakeware, all racks and accessories from the cooktop because they may be used first to end the cycle. Electronic Oven Control with a sponge or cloth. ■ Wipe any time to eliminate most of 20 minutes. Allow the range to cool to enter the desired self-clean cycle time. 3. RANGE CARE Self-Cleaning Cycle (on some models...
Use & Care Guide
Page 13
.... Always follow label instructions on cleaning products. Use Cooktop Protectant Part Number 31463A regularly to moderate soil ■ Can be addressed with cleaner and cleaning pad. Cleaning Method: ■ Glass cleaner, mild liquid cleaner or nonabrasive scrubbing pad: Gently clean around the model and serial number plate because scrubbing may want to the control panel, do not soak knobs. General Cleaning IMPORTANT: Before cleaning, make sure knobs are suggested first...
.... Always follow label instructions on cleaning products. Use Cooktop Protectant Part Number 31463A regularly to moderate soil ■ Can be addressed with cleaner and cleaning pad. Cleaning Method: ■ Glass cleaner, mild liquid cleaner or nonabrasive scrubbing pad: Gently clean around the model and serial number plate because scrubbing may want to the control panel, do not soak knobs. General Cleaning IMPORTANT: Before cleaning, make sure knobs are suggested first...
Use & Care Guide
Page 14
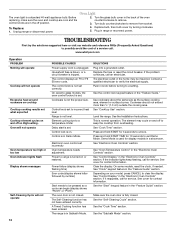
... to remove from overheating. On ceramic glass models, the oven control lockout is set incorrectly Oven temperature needs adjustment. The electrical outlet in a showroom. Use cookware about the same size as the surface cooking area, element or surface burner. See "Cook Time" section. See "Control Display" in the back of a service call an electrician. Make sure the oven door is in the "Electronic Oven Controls" section. Turn the glass bulb cover in the "Electronic Oven Controls" section. Control knob set . Control is fully closed . The oven door is...
... to remove from overheating. On ceramic glass models, the oven control lockout is set incorrectly Oven temperature needs adjustment. The electrical outlet in a showroom. Use cookware about the same size as the surface cooking area, element or surface burner. See "Cook Time" section. See "Control Display" in the back of a service call an electrician. Make sure the oven door is in the "Electronic Oven Controls" section. Turn the glass bulb cover in the "Electronic Oven Controls" section. Control knob set . Control is fully closed . The oven door is...

Use & Care Guide
Page 15
...stainless steel models) Order Part Number W10355016 affresh™ Kitchen and Appliance Cleaner Order Part Number W10355010 Cooktop Scraper (ceramic glass models) Order Part Number WA906B Granite Cleaner and Polish Order Part Number W10275756 Gas Grate and Drip Pan Cleaner Order Part Number 31617A Gourmet Griddle Order Part Number 4396096RB Standard Flat Oven Rack Order Part Number W10268578 Porcelain Broiler Pan and Grid Order Part Number 4396923 Premium Broil Pan and Roasting Rack Order Part Number W10123240 www.whirlpool.com/broilerpan 15 Oven temperature needs adjustment. Not enough...
...stainless steel models) Order Part Number W10355016 affresh™ Kitchen and Appliance Cleaner Order Part Number W10355010 Cooktop Scraper (ceramic glass models) Order Part Number WA906B Granite Cleaner and Polish Order Part Number W10275756 Gas Grate and Drip Pan Cleaner Order Part Number 31617A Gourmet Griddle Order Part Number 4396096RB Standard Flat Oven Rack Order Part Number W10268578 Porcelain Broiler Pan and Grid Order Part Number 4396923 Premium Broil Pan and Roasting Rack Order Part Number W10123240 www.whirlpool.com/broilerpan 15 Oven temperature needs adjustment. Not enough...
Use & Care Guide
Page 16
... that is reported to Whirlpool within 30 days from defects in the U.S.A., call 1-800-253-1301. Repairs when your model number and serial number on the label, located on how to parts or systems resulting from warranty coverage. 3. Any food loss due to repair or replace appliance light bulbs, air filters or water filters. Repairs to use your correspondence. DISCLAIMER OF IMPLIED WARRANTIES; SOME STATES AND PROVINCES...
... that is reported to Whirlpool within 30 days from defects in the U.S.A., call 1-800-253-1301. Repairs when your model number and serial number on the label, located on how to parts or systems resulting from warranty coverage. 3. Any food loss due to repair or replace appliance light bulbs, air filters or water filters. Repairs to use your correspondence. DISCLAIMER OF IMPLIED WARRANTIES; SOME STATES AND PROVINCES...


