
Use and Care Guide
Page 5
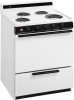
... No. Use the page references to learn where all parts and features are setting) Oven light switch (Some models) 82 Left front Left rear control knob control knob Oven temperature control dial Right rear Right front control knob control knob -4 GETTING TO KNOW YOUR RANGE This section contains captioned pictures of your range.
... No. Use the page references to learn where all parts and features are setting) Oven light switch (Some models) 82 Left front Left rear control knob control knob Oven temperature control dial Right rear Right front control knob control knob -4 GETTING TO KNOW YOUR RANGE This section contains captioned pictures of your range.
Use and Care Guide
Page 6
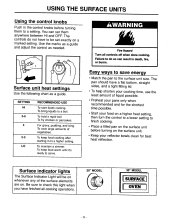
... to finish cooking. • Place a filled pan on the surface unit before turning them anywhere between HI and OFF. You can result in the control knobs before turning on a marked setting. To hold a rapid boil. AWARNING Fire Hazard Turn all cooking operations. 20" MODEL 30" MODEL SURFACE OVEN - 5 - .... To fry chicken or pancakes. Easy ways to save energy • Match the pan to a setting. USING THE SURFACE UNITS Using the control knobs Push in death, fire, or burns. To cook large amounts of the surface elements are on whenever any of vegetables. The controls do so can...
... to finish cooking. • Place a filled pan on the surface unit before turning them anywhere between HI and OFF. You can result in the control knobs before turning on a marked setting. To hold a rapid boil. AWARNING Fire Hazard Turn all cooking operations. 20" MODEL 30" MODEL SURFACE OVEN - 5 - .... To fry chicken or pancakes. Easy ways to save energy • Match the pan to a setting. USING THE SURFACE UNITS Using the control knobs Push in death, fire, or burns. To cook large amounts of the surface elements are on whenever any of vegetables. The controls do so can...
Use and Care Guide
Page 15
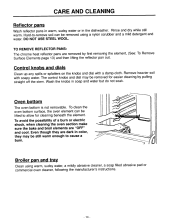
Rinse and dry while still warm. DO NOT USE STEEL WOOL. Control knobs and dials Clean up any spills or splatters on the knobs and dial with soapy water. Remove heavier soil with a damp cloth. Wash the knobs in color, they are dark in soap and water but do not soak. Oven bottom The... oven bottom is not removable. The control knobs and dial may be removed for cleaning beneath the element. To avoid the possibility of a burn or electric shock, when cleaning the oven section make ...
Rinse and dry while still warm. DO NOT USE STEEL WOOL. Control knobs and dials Clean up any spills or splatters on the knobs and dial with soapy water. Remove heavier soil with a damp cloth. Wash the knobs in color, they are dark in soap and water but do not soak. Oven bottom The... oven bottom is not removable. The control knobs and dial may be removed for cleaning beneath the element. To avoid the possibility of a burn or electric shock, when cleaning the oven section make ...
Parts List
Page 1
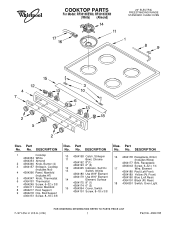
..., 6−32 x 1/4 17 Wire, Element 4364188 Red (Left Front) 4364189 Yellow (Rt. No. DESCRIPTION 1 Cooktop 4364352 White 4364353 Almond 2 4364346 Knob, Burner (4) 3 4364157 Strikepin, Cooktop (Includes Nut) 4 4364366 Panel, Manifold (Includes #7) 5 4364347 Knob, Thermostat 6 4364181 Thermostat 4364249 Screw, 6−32 x 3/8 7 4364111 Decal, Manifold 8 4364217 Rod, Support 9 4364218 Clip, Rod Support 4364151 Screw...
..., 6−32 x 1/4 17 Wire, Element 4364188 Red (Left Front) 4364189 Yellow (Rt. No. DESCRIPTION 1 Cooktop 4364352 White 4364353 Almond 2 4364346 Knob, Burner (4) 3 4364157 Strikepin, Cooktop (Includes Nut) 4 4364366 Panel, Manifold (Includes #7) 5 4364347 Knob, Thermostat 6 4364181 Thermostat 4364249 Screw, 6−32 x 3/8 7 4364111 Decal, Manifold 8 4364217 Rod, Support 9 4364218 Clip, Rod Support 4364151 Screw...


