Use and Care Guide
Page 1
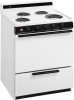
... electrical inspector's use . PART NO 4364040-799 Note to Installer: IMPORTANT: Please leave this manual for future reference. Use and Care Manual and Installation Instructions Electric Range Important Safety Instructions Use and Care Getting to Know your Range Surface Cooking Using your Oven Using your Broiler Changing the Oven Light Bulb (Some Models) Care and Cleaning Installation Instructions Proper Installation Mobile Home Installation Product Dimensions Parts Supplied Tools Needed Cabinet Dimensions/Requirements Electrical Requirements Installation Steps Before You Call for Service...
... electrical inspector's use . PART NO 4364040-799 Note to Installer: IMPORTANT: Please leave this manual for future reference. Use and Care Manual and Installation Instructions Electric Range Important Safety Instructions Use and Care Getting to Know your Range Surface Cooking Using your Oven Using your Broiler Changing the Oven Light Bulb (Some Models) Care and Cleaning Installation Instructions Proper Installation Mobile Home Installation Product Dimensions Parts Supplied Tools Needed Cabinet Dimensions/Requirements Electrical Requirements Installation Steps Before You Call for Service...

Use and Care Guide
Page 3
... the igniting of glass, glass-ceramic, ceramic, earthenware, or other flammable materials contact surface units, areas near surface units, heating elements, or interior surfaces of the pan. • Should food flame when cooking under a ventilating hood, turn the hood on or near surface units, heating elements, or interior surfaces of electric shock or fire. • Select a pan with aluminum foil or other surface units. If pan is about the same size as the oven vent opening, the surface near surface...
... the igniting of glass, glass-ceramic, ceramic, earthenware, or other flammable materials contact surface units, areas near surface units, heating elements, or interior surfaces of the pan. • Should food flame when cooking under a ventilating hood, turn the hood on or near surface units, heating elements, or interior surfaces of electric shock or fire. • Select a pan with aluminum foil or other surface units. If pan is about the same size as the oven vent opening, the surface near surface...
Use and Care Guide
Page 4
... hot air or steam escape before servicing the range. Smother flaming pan on grease fires. Do not allow grease to a qualified technician. • Disconnect the electrical supply before removing or replacing food. Flaming grease outside of the range unless specifically recommended in this manual. If a rack must be damaged and shock or fire could result. • Clean only parts recommended in this Use and Care Guide. • Do not repair or replace...
... hot air or steam escape before servicing the range. Smother flaming pan on grease fires. Do not allow grease to a qualified technician. • Disconnect the electrical supply before removing or replacing food. Flaming grease outside of the range unless specifically recommended in this manual. If a rack must be damaged and shock or fire could result. • Clean only parts recommended in this Use and Care Guide. • Do not repair or replace...

Use and Care Guide
Page 5
Backguard (page 21) Oven vent (20" model) (page 10) Plug-in . located under cooktop Anti-tip bracket (pages 12, 18, 19, 23) Oven Vent (30" model) (page 10) Broil element (page 11) Bake element (page 9) Control panel (See page 5 for more about the part or feature you are interested in surface unit with one piece reflector bowl (pages 5 & 13) Model and Serial No. Use the page references to learn where all parts and features are and what they...
Backguard (page 21) Oven vent (20" model) (page 10) Plug-in . located under cooktop Anti-tip bracket (pages 12, 18, 19, 23) Oven Vent (30" model) (page 10) Broil element (page 11) Bake element (page 9) Control panel (See page 5 for more about the part or feature you are interested in surface unit with one piece reflector bowl (pages 5 & 13) Model and Serial No. Use the page references to learn where all parts and features are and what they...
Use and Care Guide
Page 6
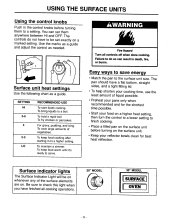
...; Preheat your pans only when recommended and for best heat reflection. Be sure to check this light when you have to be on whenever any of vegetables. You can result in the control knobs before turning on the surface unit. • Keep your reflector bowls clean for the shortest time possible. • Start your food on a higher heat setting, then turn the control to a lower setting...
...; Preheat your pans only when recommended and for best heat reflection. Be sure to check this light when you have to be on whenever any of vegetables. You can result in the control knobs before turning on the surface unit. • Keep your reflector bowls clean for the shortest time possible. • Start your food on a higher heat setting, then turn the control to a lower setting...
Use and Care Guide
Page 7
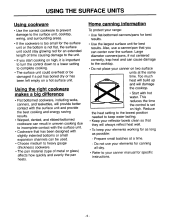
... your canner on two surface units at a time. - Reduce the heat setting to the lowest position needed to keep your canner manual for specific instructions. - 6 - Also, use your elements for canning all day. • Refer to your elements working for as long as possible: - USING THE SURFACE UNITS Using cookware • Use the correct cookware to prevent damage to the surface unit, cooktop, wiring, and surrounding areas. •...
... your canner on two surface units at a time. - Reduce the heat setting to the lowest position needed to keep your canner manual for specific instructions. - 6 - Also, use your elements for canning all day. • Refer to your elements working for as long as possible: - USING THE SURFACE UNITS Using cookware • Use the correct cookware to prevent damage to the surface unit, cooktop, wiring, and surrounding areas. •...
Use and Care Guide
Page 8
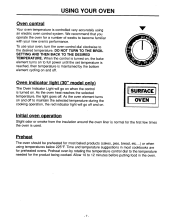
... putting food in most baked products (cakes, pies, bread, etc....) or when using an electric oven control system. Preheat The oven should be preheated for the first few times the oven is controlled very accurately using temperatures below 225°F. Allow 10 to maintain the selected temperature during the cooking operation, the red indicator light will go off and on and off . USING YOUR OVEN Oven control Your oven temperature is used. As the oven element turns on .
... putting food in most baked products (cakes, pies, bread, etc....) or when using an electric oven control system. Preheat The oven should be preheated for the first few times the oven is controlled very accurately using temperatures below 225°F. Allow 10 to maintain the selected temperature during the cooking operation, the red indicator light will go off and on and off . USING YOUR OVEN Oven control Your oven temperature is used. As the oven element turns on .
Use and Care Guide
Page 9
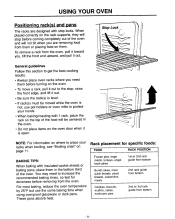
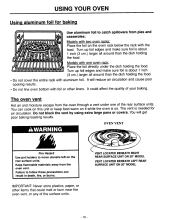
... your racks when broiling, see "Broiling chart" on them. FOOD RACK POSITION BAKING TIPS: When baking with insulated cookie sheets or baking pans, place them in the oven. • Do not place items on the oven. • To move a rack, pull it out to the stop locks. You may need them before removing from the oven. Stop Lockr _ General guidelines Follow this section to get the best cooking...
... your racks when broiling, see "Broiling chart" on them. FOOD RACK POSITION BAKING TIPS: When baking with insulated cookie sheets or baking pans, place them in the oven. • Do not place items on the oven. • To move a rack, pull it out to the stop locks. You may need them before removing from the oven. Stop Lockr _ General guidelines Follow this section to get the best cooking...
Use and Care Guide
Page 10
... pans Place in the oven at a time. 74::0,:er(fr 7- BAKING HINTS 1. Cooking times may cause the oven to reach all parts of space around the pans in high altitude areas. 2. Baking results will block air circulation and may vary in the oven for minimum recommended time or until food is not directly over another. Bake food for even heat to heat improperly. 4. Stagger pans so no pan is directly...
... pans Place in the oven at a time. 74::0,:er(fr 7- BAKING HINTS 1. Cooking times may cause the oven to reach all parts of space around the pans in high altitude areas. 2. Baking results will block air circulation and may vary in the oven for minimum recommended time or until food is not directly over another. Bake food for even heat to heat improperly. 4. Stagger pans so no pan is directly...
Use and Care Guide
Page 11
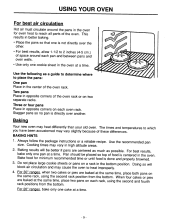
... vent is needed for baking Use aluminum foil to follow these precautions can cook on this unit or keep food warm on it while the oven is about 1 inch (3 cm.) larger all around than the dish holding the food. • Do not cover the entire rack with foil or other items that could affect the quality of the rear surface units...
... vent is needed for baking Use aluminum foil to follow these precautions can cook on this unit or keep food warm on it while the oven is about 1 inch (3 cm.) larger all around than the dish holding the food. • Do not cover the entire rack with foil or other items that could affect the quality of the rear surface units...
Use and Care Guide
Page 12
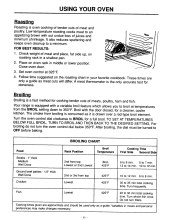
... Well Done 2nd from broiling is consumed as meat cuts will differ. Cooking times given are only a guide as it is the only accurate test for a cleaner, cooler kitchen. It also reduces spattering and keeps oven cleanup to 35 min total cooking time. Set oven control at temperatures from top 425°F 10 to 12 min. 6 to OFF before baking. Turn the oven control dial clockwise to 12...
... Well Done 2nd from broiling is consumed as meat cuts will differ. Cooking times given are only a guide as it is the only accurate test for a cleaner, cooler kitchen. It also reduces spattering and keeps oven cleanup to 35 min total cooking time. Set oven control at temperatures from top 425°F 10 to 12 min. 6 to OFF before baking. Turn the oven control dial clockwise to 12...
Use and Care Guide
Page 13
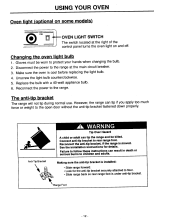
... control panel turns the oven light on some models) 0 00 00 OVEN LIGHT SWITCH The switch located at the main circuit breaker. 3. Making sure the anti-tip bracket is installed: • Slide range forward. • Look for details. Range Foot -12- Disconnect the power to protect your hands when changing the bulb. 2. The anti-tip bracket The range will not tip during normal use. Reconnect the antitip bracket, if the range is under anti-tip bracket. Make sure the oven is cool before replacing the light bulb...
... control panel turns the oven light on some models) 0 00 00 OVEN LIGHT SWITCH The switch located at the main circuit breaker. 3. Making sure the anti-tip bracket is installed: • Slide range forward. • Look for details. Range Foot -12- Disconnect the power to protect your hands when changing the bulb. 2. The anti-tip bracket The range will not tip during normal use. Reconnect the antitip bracket, if the range is under anti-tip bracket. Make sure the oven is cool before replacing the light bulb...
Use and Care Guide
Page 14
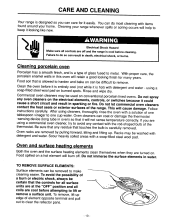
... can be difficult to remove. Oven and surface heating elements Both the oven and the surface heating elements clean themselves when they are turned on the electrical elements, controls, or switches because it easily. You can coat or damage the thermostat -sensing device (long tube in oven) so that it will not sense temperature correctly. using cleaners, thoroughly rinse the oven with detergent and water. Commercial oven cleaners may be washed...
... can be difficult to remove. Oven and surface heating elements Both the oven and the surface heating elements clean themselves when they are turned on the electrical elements, controls, or switches because it easily. You can coat or damage the thermostat -sensing device (long tube in oven) so that it will not sense temperature correctly. using cleaners, thoroughly rinse the oven with detergent and water. Commercial oven cleaners may be washed...
Use and Care Guide
Page 15
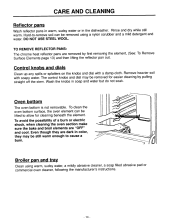
... removing the element, (See: To Remove Surface Elements page 13) and then lifting the reflector pan out. Control knobs and dials Clean up any spills or splatters on the knobs and dial with soapy water. The control knobs and dial may be lifted to cause a burn. To avoid the possibility of a burn or electric shock, when cleaning the oven section make sure the bake and broil elements are removed...
... removing the element, (See: To Remove Surface Elements page 13) and then lifting the reflector pan out. Control knobs and dials Clean up any spills or splatters on the knobs and dial with soapy water. The control knobs and dial may be lifted to cause a burn. To avoid the possibility of a burn or electric shock, when cleaning the oven section make sure the bake and broil elements are removed...
Use and Care Guide
Page 18
... on the model/serial rating plate located under the cooktop. Given dimensions are designed to the floor during the normal safe operation of the cabinet. To eliminate the risk of cabinets installed above . SAVE THESE INSTRUCTIONS FOR THE LOCAL ELECTRICAL INSPECTOR'S USE. Important: Observe all local codes and ordinances. See "Electrical requirements," Page 20. It is adequate and in kitchen. When installing a range around cabinets, use in conformance...
... on the model/serial rating plate located under the cooktop. Given dimensions are designed to the floor during the normal safe operation of the cabinet. To eliminate the risk of cabinets installed above . SAVE THESE INSTRUCTIONS FOR THE LOCAL ELECTRICAL INSPECTOR'S USE. Important: Observe all local codes and ordinances. See "Electrical requirements," Page 20. It is adequate and in kitchen. When installing a range around cabinets, use in conformance...
Use and Care Guide
Page 21
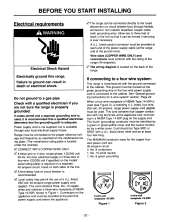
... NEMA Type 14-50R is adequate. See "Special grounding instructions for the copper fourwire power cord are not sure the range is located under the cooktop). The MINIMUM conductor sizes for 4-wire system" section, Page 22. k The wiring diagram is ever necessary. If codes permit and a separate grounding wire is used . A time-delay fuse or circuit breaker is available through flexible, armored or non-metallic sheathed, copper...
... NEMA Type 14-50R is adequate. See "Special grounding instructions for the copper fourwire power cord are not sure the range is located under the cooktop). The MINIMUM conductor sizes for 4-wire system" section, Page 22. k The wiring diagram is ever necessary. If codes permit and a separate grounding wire is used . A time-delay fuse or circuit breaker is available through flexible, armored or non-metallic sheathed, copper...

Use and Care Guide
Page 23
...) CONDUIT BRACKET inch Cable assembly Range power-supply cord NOTE: Re-locate the conduit bracket for use a 4-conductor cord for 4-wire systems WARNING: Frame grounded to the corresponding outside supply leads to neutral of appliance through opening below the terminal block. The range power-supply cord must be connected by means of the link. 3. Using the upturned ends of the range. 2. Insert range cable or connector through a link. Special grounding instructions for...
...) CONDUIT BRACKET inch Cable assembly Range power-supply cord NOTE: Re-locate the conduit bracket for use a 4-conductor cord for 4-wire systems WARNING: Frame grounded to the corresponding outside supply leads to neutral of appliance through opening below the terminal block. The range power-supply cord must be connected by means of the link. 3. Using the upturned ends of the range. 2. Insert range cable or connector through a link. Special grounding instructions for...
Use and Care Guide
Page 24
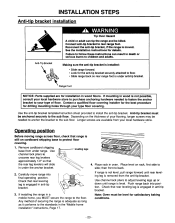
... installation instructions for drilling mounting holes through your local hardware store. Failure to follow these instructions can tip the range and be level for satisfactory baking conditions. - 23 - then front to rear range foot. Check that rear leveling leg is removed from the anti-tip bracket. Note: Oven must be needed to fasten the anchor bracket to the sub floor. Connect anti-tip bracket to back. 2. Use the anti-tip bracket template/instruction sheet provided to side; Remove...
... installation instructions for drilling mounting holes through your local hardware store. Failure to follow these instructions can tip the range and be level for satisfactory baking conditions. - 23 - then front to rear range foot. Check that rear leveling leg is removed from the anti-tip bracket. Note: Oven must be needed to fasten the anchor bracket to the sub floor. Connect anti-tip bracket to back. 2. Use the anti-tip bracket template/instruction sheet provided to side; Remove...
Use and Care Guide
Page 25
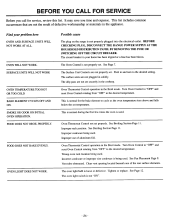
... BAKE EVENLY. Improper cookware being used . Improper use of the rear surface elements. BEFORE YOU CALL FOR SERVICE Before you time and expense. OVEN WILL NOT WORK. See Page 7. BEFORE CHECKING PLUG, DISCONNECT THE RANGE POWER SUPPLY AT THE HOUSEHOLD DISTRIBUTION PANEL BY REMOVING THE FUSE OR SWITCHING OFF THE CIRCUIT BREAKER. The circuit breaker in the Broil mode. The Oven Control is not properly plugged into the electrical outlet. Oven Thermostat Control not set . Wrong oven rack location being used . Possible cause The plug...
... BAKE EVENLY. Improper cookware being used . Improper use of the rear surface elements. BEFORE YOU CALL FOR SERVICE Before you time and expense. OVEN WILL NOT WORK. See Page 7. BEFORE CHECKING PLUG, DISCONNECT THE RANGE POWER SUPPLY AT THE HOUSEHOLD DISTRIBUTION PANEL BY REMOVING THE FUSE OR SWITCHING OFF THE CIRCUIT BREAKER. The circuit breaker in the Broil mode. The Oven Control is not properly plugged into the electrical outlet. Oven Thermostat Control not set . Wrong oven rack location being used . Possible cause The plug...
Use and Care Guide
Page 26
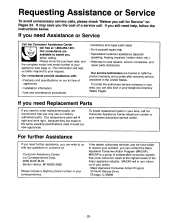
... assist you need Assistance or Service Call the Consumer Assistance Center toll free at the highest levels of appliances. • Installation information. • Use and maintenance procedures. • Accessory and repair parts sales • Do-it-yourself repair help , follow the instructions below. If you need Replacement Parts If you . To locate replacement parts in turn inform us with : • Features and specifications on Pages 24. Our consultants...
... assist you need Assistance or Service Call the Consumer Assistance Center toll free at the highest levels of appliances. • Installation information. • Use and maintenance procedures. • Accessory and repair parts sales • Do-it-yourself repair help , follow the instructions below. If you need Replacement Parts If you . To locate replacement parts in turn inform us with : • Features and specifications on Pages 24. Our consultants...


