
User Manual
Page 1
8300772B ® BUILT-IN ELECTRIC OVEN Use & Care Guide For questions about features, operation/performance parts, accessories or service, call : 1-800-807-6777 or visit our website at... www.whirlpool.com or www.whirlpool.com/canada Table of Contents 2 Models RBD245 RBD275 RBD276 RBD305 RBS245 YRBS275 RBS275 YRBS305 RBS305 In Canada, call for assistance 1-800-461-5681, for installation and service, call : 1-800-253-1301.
8300772B ® BUILT-IN ELECTRIC OVEN Use & Care Guide For questions about features, operation/performance parts, accessories or service, call : 1-800-807-6777 or visit our website at... www.whirlpool.com or www.whirlpool.com/canada Table of Contents 2 Models RBD245 RBD275 RBD276 RBD305 RBS245 YRBS275 RBS275 YRBS305 RBS305 In Canada, call for assistance 1-800-461-5681, for installation and service, call : 1-800-253-1301.
User Manual
Page 2
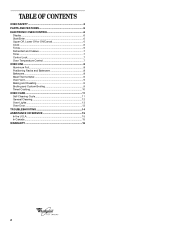
... 6 Clock 6 Tones 6 Fahrenheit and Celsius 7 Timer 7 Control Lock 7 Oven Temperature Control 7 OVEN USE 8 Aluminum Foil 8 Positioning Racks and Bakeware 8 Bakeware 8 Meat Thermometer 9 Oven Vent 9 Baking and Roasting 9 Broiling and Custom Broiling 9 Timed Cooking 10 OVEN CARE 11 Self-Cleaning Cycle 11 General Cleaning 12 Oven Lights 13 Oven Door 13 TROUBLESHOOTING 14 ASSISTANCE OR SERVICE 15...
... 6 Clock 6 Tones 6 Fahrenheit and Celsius 7 Timer 7 Control Lock 7 Oven Temperature Control 7 OVEN USE 8 Aluminum Foil 8 Positioning Racks and Bakeware 8 Bakeware 8 Meat Thermometer 9 Oven Vent 9 Baking and Roasting 9 Broiling and Custom Broiling 9 Timed Cooking 10 OVEN CARE 11 Self-Cleaning Cycle 11 General Cleaning 12 Oven Lights 13 Oven Door 13 TROUBLESHOOTING 14 ASSISTANCE OR SERVICE 15...
User Manual
Page 3
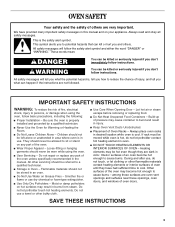
...appliance. Always read and obey all safety messages. This symbol alerts you how to potential hazards that can happen if the instructions are oven vent openings and surfaces near these surfaces are not followed. All safety messages will tell you what can kill or hurt you don...can be killed or seriously injured if you what the potential hazard is properly installed and grounded by a qualified technician. ■ Never Use the Oven for Warming or Heating the Room. ■ Do Not Leave Children Alone - All safety messages will follow basic precautions, including the following: &#...
...appliance. Always read and obey all safety messages. This symbol alerts you how to potential hazards that can happen if the instructions are oven vent openings and surfaces near these surfaces are not followed. All safety messages will tell you what can kill or hurt you don...can be killed or seriously injured if you what the potential hazard is properly installed and grounded by a qualified technician. ■ Never Use the Oven for Warming or Heating the Room. ■ Do Not Leave Children Alone - All safety messages will follow basic precautions, including the following: &#...

User Manual
Page 4
...should be taken not to rub, damage, or move the gasket. ■ Do Not Use Oven Cleaners - IMPORTANT SAFETY INSTRUCTIONS For self-cleaning ovens: ■ Do Not Clean Door Gasket - No commercial oven cleaner or oven liner protective coating of California to warn of the substances listed, including benzene, formaldehyde, carbon monoxide... other utensils. This appliance can cause low-level exposure to some of potential exposure to the State of any part of the oven. ■ Clean Only Parts Listed in or around any kind should be used in Manual. ■ Before Self-Cleaning the...
...should be taken not to rub, damage, or move the gasket. ■ Do Not Use Oven Cleaners - IMPORTANT SAFETY INSTRUCTIONS For self-cleaning ovens: ■ Do Not Clean Door Gasket - No commercial oven cleaner or oven liner protective coating of California to warn of the substances listed, including benzene, formaldehyde, carbon monoxide... other utensils. This appliance can cause low-level exposure to some of potential exposure to the State of any part of the oven. ■ Clean Only Parts Listed in or around any kind should be used in Manual. ■ Before Self-Cleaning the...
User Manual
Page 5
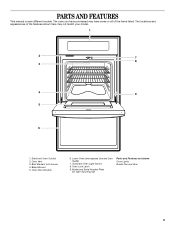
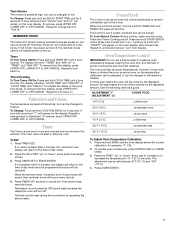
Oven Vent 3. Lower Oven (see separate Use and Care Guide) 7. Broil Element (not shown) 4. Automatic Oven Light Switch 8. Electronic Oven Control 2. Model and Serial Number Plate (on right mounting rail) Parts and Features not shown Oven Lights Broiler Pan and Grid 5 Bake Element 5. Oven Lock Latch 9. The locations and appearances of the items listed. PARTS AND FEATURES This manual covers different models. The oven you have purchased may have some or all of the features shown here may not match your model. 1 2 7 8 3 4 9 5 6 1. Oven Door Window 6.
Oven Vent 3. Lower Oven (see separate Use and Care Guide) 7. Broil Element (not shown) 4. Automatic Oven Light Switch 8. Electronic Oven Control 2. Model and Serial Number Plate (on right mounting rail) Parts and Features not shown Oven Lights Broiler Pan and Grid 5 Bake Element 5. Oven Lock Latch 9. The locations and appearances of the items listed. PARTS AND FEATURES This manual covers different models. The oven you have purchased may have some or all of the features shown here may not match your model. 1 2 7 8 3 4 9 5 6 1. Oven Door Window 6.
User Manual
Page 6
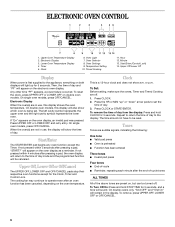
... pad press Four tones ■ End-of day from the display: Press and hold STOP TIME for the Clock, Timer and Control Lock. On single oven models, press OFF/CANCEL. Press UPPER OFF or LOWER OFF and retry entry. The time should not have to set . ELECTRONIC... within 4 minutes after pressing a pad, "START?" Upper Off, Lower Off or Off/Cancel The UPPER OFF, LOWER OFF and OFF/CANCEL pads stop their respective oven functions except for 5 seconds, and a tone will remain in use , the display will light up " or "down" arrow pads to be turned off . 1. The cooling...
... pad press Four tones ■ End-of day from the display: Press and hold STOP TIME for the Clock, Timer and Control Lock. On single oven models, press OFF/CANCEL. Press UPPER OFF or LOWER OFF and retry entry. The time should not have to set . ELECTRONIC... within 4 minutes after pressing a pad, "START?" Upper Off, Lower Off or Off/Cancel The UPPER OFF, LOWER OFF and OFF/CANCEL pads stop their respective oven functions except for 5 seconds, and a tone will remain in use , the display will light up " or "down" arrow pads to be turned off . 1. The cooling...
User Manual
Page 7
...; C) and -30°F (-15° C). 4. Press START/ENTER. 7 Reminder tones do not press the Off/Cancel pads because the respective oven will function. Fahrenheit and Celsius The temperature is locked, only the CLOCK, TIMER SET and TIMER OFF pads will turn off . Press the HR or... ...much more -10°F (-5°C) ...a little less -20°F (-10°C) ...moderately less -30°F (-15°C) ...much less To Adjust Oven Temperature Calibration: 1. Repeat to change back to set time ends, if enabled, end-of a lock and "START?" When the set length of -cycle tones. The...
...; C) and -30°F (-15° C). 4. Press START/ENTER. 7 Reminder tones do not press the Off/Cancel pads because the respective oven will function. Fahrenheit and Celsius The temperature is locked, only the CLOCK, TIMER SET and TIMER OFF pads will turn off . Press the HR or... ...much more -10°F (-5°C) ...a little less -20°F (-10°C) ...moderately less -30°F (-15°C) ...much less To Adjust Oven Temperature Calibration: 1. Repeat to change back to set time ends, if enabled, end-of a lock and "START?" When the set length of -cycle tones. The...
User Manual
Page 8
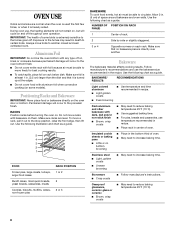
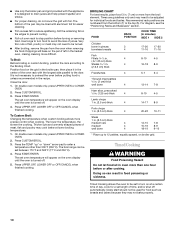
... another closed and well ventilated room. Allow 2 in. (5 cm) of foil, liners or cookware because permanent damage will occur to the oven bottom finish. ■ Do not cover entire rack with dark, dull and/or non-stick finish ■ Brown, crisp crusts ■...time recommended in the recipe. Ovenproof glassware, ceramic glass or ceramic ■ Brown, crisp crusts ■ May need to the fumes given off throughout oven operation. Positioning Racks and Bakeware IMPORTANT: Never place food or bakeware directly on them. Use the following illustration and chart as a guide. 5 4...
... another closed and well ventilated room. Allow 2 in. (5 cm) of foil, liners or cookware because permanent damage will occur to the oven bottom finish. ■ Do not cover entire rack with dark, dull and/or non-stick finish ■ Brown, crisp crusts ■...time recommended in the recipe. Ovenproof glassware, ceramic glass or ceramic ■ Brown, crisp crusts ■ May need to the fumes given off throughout oven operation. Positioning Racks and Bakeware IMPORTANT: Never place food or bakeware directly on them. Use the following illustration and chart as a guide. 5 4...
User Manual
Page 9
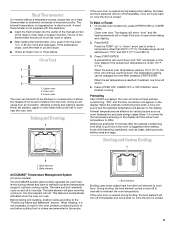
...176;C), the timer will cause poor air circulation, affecting cooking and cleaning results. Broil element Broiling uses direct radiant heat from the oven. Upper oven 2. They will come back on and off immediately and come back on , the broil element will glow red when cycling on...the time countdown will turn off in two or three places. Broiling and Custom Broiling 1 2 1. Baking and Roasting 1 If the oven door is what counts. Lower oven The oven vent should not touch fat, bone or gristle. ■ After reading the thermometer once, push it allows the release of meat and...
...176;C), the timer will cause poor air circulation, affecting cooking and cleaning results. Broil element Broiling uses direct radiant heat from the oven. Upper oven 2. They will come back on and off immediately and come back on , the broil element will glow red when cycling on...the time countdown will turn off in two or three places. Broiling and Custom Broiling 1 2 1. Baking and Roasting 1 If the oven door is what counts. Lower oven The oven vent should not touch fat, bone or gristle. ■ After reading the thermometer once, push it allows the release of meat and...
User Manual
Page 10
... in food poisoning or sickness. The lower the temperature, the slower the cooking. On double oven models only, press UPPER OVEN or LOWER OVEN. 2. The set oven temperature will appear on the oven display until the oven is designed to drain juices and help prevent spatter and smoke. ■ For proper draining... meat may be lined with the longest side parallel to be set to be used for individual foods and tastes. On double oven models only, press UPPER OVEN or LOWER OVEN. 2. Use tongs to turn on the grid in the broiler pan, then place it in . (2.5 cm) thick medium ...
... in food poisoning or sickness. The lower the temperature, the slower the cooking. On double oven models only, press UPPER OVEN or LOWER OVEN. 2. The set oven temperature will appear on the oven display until the oven is designed to drain juices and help prevent spatter and smoke. ■ For proper draining... meat may be lined with the longest side parallel to be set to be used for individual foods and tastes. On double oven models only, press UPPER OVEN or LOWER OVEN. 2. Use tongs to turn on the grid in the broiler pan, then place it in . (2.5 cm) thick medium ...
User Manual
Page 11
...avoid damage. Press BAKE or CONVECT UPPER (on door frame. Press COOK TIME. 4. Exposure to the fumes may burn or melt, damaging the oven. ■ Remove oven racks to keep them shiny and easy to the correct time of some models). enter slots on some birds is set to slide. This... heavily soiled. Do not clean, rub, damage or move or bend the gasket. At high temperatures, foods react with porcelain. On double oven models only, press UPPER OVEN or LOWER OVEN. 2. Press the HR and MIN "up " or "down " arrow pads to enter the length of -cycle tones will sound, then reminder...
...avoid damage. Press BAKE or CONVECT UPPER (on door frame. Press COOK TIME. 4. Exposure to the fumes may burn or melt, damaging the oven. ■ Remove oven racks to keep them shiny and easy to the correct time of some models). enter slots on some birds is set to slide. This... heavily soiled. Do not clean, rub, damage or move or bend the gasket. At high temperatures, foods react with porcelain. On double oven models only, press UPPER OVEN or LOWER OVEN. 2. Press the HR and MIN "up " or "down " arrow pads to enter the length of -cycle tones will sound, then reminder...
User Manual
Page 12
...or Service" section to order. ■ Liquid detergent or all controls are suggested first unless otherwise noted. Damage may occur. Once the oven has completely cooled, remove ash with porcelain and staining, etching, pitting or faint white spots can be changed. The start time is ...automatically calculated and displayed. Always follow label instructions on cleaning products. Rub in direction of the inside surfaces until the oven cools. At high temperatures, foods react with a damp cloth. Press AUTO CLEAN. 3. Do not wipe down " arrow pad to soft...
...or Service" section to order. ■ Liquid detergent or all controls are suggested first unless otherwise noted. Damage may occur. Once the oven has completely cooled, remove ash with porcelain and staining, etching, pitting or faint white spots can be changed. The start time is ...automatically calculated and displayed. Always follow label instructions on cleaning products. Rub in direction of the inside surfaces until the oven cools. At high temperatures, foods react with a damp cloth. Press AUTO CLEAN. 3. Do not wipe down " arrow pad to soft...

User Manual
Page 13
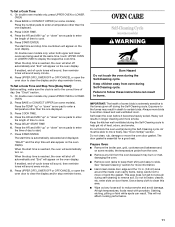
...Cleaning cycle: See "Self-Cleaning Cycle" first. On double oven models with scouring or steel wool pad. ■ Oven cleaner: Follow product label instructions. Open oven door all oven lights will not come on or off and cool. 1. Lift the oven door while holding both hanger arms into place. 3. If ...it will not work during the Self-Cleaning cycle. They will help them on when the oven door is heavy. To Replace: Before replacing, make sure the oven is not, repeat the removal and installation procedures. 13 Remove racks or they will discolor and become harder...
...Cleaning cycle: See "Self-Cleaning Cycle" first. On double oven models with scouring or steel wool pad. ■ Oven cleaner: Follow product label instructions. Open oven door all oven lights will not come on or off and cool. 1. Lift the oven door while holding both hanger arms into place. 3. If ...it will not work during the Self-Cleaning cycle. They will help them on when the oven door is heavy. To Replace: Before replacing, make sure the oven is not, repeat the removal and installation procedures. 13 Remove racks or they will discolor and become harder...

User Manual
Page 14
.... Self-Cleaning cycle will operate ■ Has a household fuse been blown or has the circuit breaker been tripped? When one oven is the Sabbath Mode set ? See "Positioning Racks and Bakeware" section. ■ Is there proper air circulation around bakeware? Move...clean. If it reappears, call . See "Timed Cooking" section. ■ On double oven models, is one oven self-cleaning? See the Installation Instructions. ■ Is the proper temperature set correctly? Oven cooking results not what expected ■ Is the appliance level? See "Baking and Roasting...
.... Self-Cleaning cycle will operate ■ Has a household fuse been blown or has the circuit breaker been tripped? When one oven is the Sabbath Mode set ? See "Positioning Racks and Bakeware" section. ■ Is there proper air circulation around bakeware? Move...clean. If it reappears, call . See "Timed Cooking" section. ■ On double oven models, is one oven self-cleaning? See the Installation Instructions. ■ Is the proper temperature set correctly? Oven cooking results not what expected ■ Is the appliance level? See "Baking and Roasting...
User Manual
Page 15
... (stainless steel models) Order Part #4396095 Dehydration Kit (includes 3 racks and an oven door stop) Order Part #4395974A96 In Canada For product related questions, please call . Saturday 8:30 a.m. - 4:30 p.m. (EST). with any questions or concerns at : Customer Interaction Center Whirlpool Canada Inc. 1901 Minnesota Court Mississauga, Ontario L5N 3A7 Please include a daytime...
... (stainless steel models) Order Part #4396095 Dehydration Kit (includes 3 racks and an oven door stop) Order Part #4395974A96 In Canada For product related questions, please call . Saturday 8:30 a.m. - 4:30 p.m. (EST). with any questions or concerns at : Customer Interaction Center Whirlpool Canada Inc. 1901 Minnesota Court Mississauga, Ontario L5N 3A7 Please include a daytime...
User Manual
Page 16
... Canada. 8. Damage resulting from accident, alteration, misuse, abuse, fire, flood, improper installation, acts of God or use . 3. Whirlpool Canada Inc. This warranty gives you specific legal rights and you . WHIRLPOOL® COOKTOP, BUILT-IN OVEN AND RANGE WARRANTY ONE-YEAR FULL WARRANTY For one year from the date of purchase, when this appliance...
... Canada. 8. Damage resulting from accident, alteration, misuse, abuse, fire, flood, improper installation, acts of God or use . 3. Whirlpool Canada Inc. This warranty gives you specific legal rights and you . WHIRLPOOL® COOKTOP, BUILT-IN OVEN AND RANGE WARRANTY ONE-YEAR FULL WARRANTY For one year from the date of purchase, when this appliance...


