
Installation Instructions
Page 2
... you what the potential hazard is recommended that the materials used . single oven (2), double oven (4) ■ Bottom vent (supplied on your builder or cabinet supplier to undercounter installation instructions for wall cabinet installations) ■ Level Parts needed ■ Phillips screwdriver ■... ■ Electrical supply junction box should have an approval label located on rear wall behind oven, the junction box must provide complete enclosure around the recessed portion of the oven. ■ Grounded electrical supply is recommended that can be used will not fit...
... you what the potential hazard is recommended that the materials used . single oven (2), double oven (4) ■ Bottom vent (supplied on your builder or cabinet supplier to undercounter installation instructions for wall cabinet installations) ■ Level Parts needed ■ Phillips screwdriver ■... ■ Electrical supply junction box should have an approval label located on rear wall behind oven, the junction box must provide complete enclosure around the recessed portion of the oven. ■ Grounded electrical supply is recommended that can be used will not fit...

Installation Instructions
Page 3
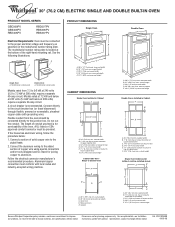
.... Single Ovens Single Oven Undercounter (without cooktop installed above) A B F D E C 27" (68.6 cm) models A. 27" (68.6 cm) min. top of cutout to underside of countertop C. 5¹⁄₄" (13.3 cm) bottom of cutout to floor D. 25¹⁄₂" (64.8 cm) cutout width E. 27³⁄₄" (70.5 cm) min. cutout height 30" (76...
.... Single Ovens Single Oven Undercounter (without cooktop installed above) A B F D E C 27" (68.6 cm) models A. 27" (68.6 cm) min. top of cutout to underside of countertop C. 5¹⁄₄" (13.3 cm) bottom of cutout to floor D. 25¹⁄₂" (64.8 cm) cutout width E. 27³⁄₄" (70.5 cm) min. cutout height 30" (76...

Installation Instructions
Page 4
.../serial number rating plate. O-M91-latest edition, and all local codes and ordinances. Model/serial number plate 4 cutout height 30" (76.2 cm) models A. 30" (76.2 cm) min. Recessed oven E. Model/serial number plate Double Oven A. cutout height A. 23¹⁄₄" (59.1 cm) min. Cabinet Electrical Requirements If codes permit and a separate ground wire...
.../serial number rating plate. O-M91-latest edition, and all local codes and ordinances. Model/serial number plate 4 cutout height 30" (76.2 cm) models A. 30" (76.2 cm) min. Recessed oven E. Model/serial number plate Double Oven A. cutout height A. 23¹⁄₄" (59.1 cm) min. Cabinet Electrical Requirements If codes permit and a separate ground wire...

Installation Instructions
Page 5
...hardware package from inside the package containing literature. Open the oven door. 2. Remove the cable tie from the side of the oven door, and rotate the latches forward to follow the procedure below at 208 volts) require a separate 30-amp circuit. ■ A circuit breaker is installed in... kW and below at 208 volts) require a separate 40-amp circuit. See "Make Electrical Connection" section. ■ Flexible conduit from the oven should be provided. ■ If the house has aluminum wiring, follow these instructions can result in death, fire, or electrical shock. Follow the...
...hardware package from inside the package containing literature. Open the oven door. 2. Remove the cable tie from the side of the oven door, and rotate the latches forward to follow the procedure below at 208 volts) require a separate 30-amp circuit. ■ A circuit breaker is installed in... kW and below at 208 volts) require a separate 40-amp circuit. See "Make Electrical Connection" section. ■ Flexible conduit from the oven should be provided. ■ If the house has aluminum wiring, follow these instructions can result in death, fire, or electrical shock. Follow the...

Installation Instructions
Page 6
...NEC), mobile homes and recreational vehicles, new construction and in the U.S. Untwist white wire from green (or bare) ground wire coming from oven E. Junction box C. Remove junction box cover, if it is present. 4. UL listed or CSA approved conduit connector 5. Connect the 2 ...IMPORTANT: Use the 4-wire cable from Home Power Supply - U.S. Red wires D. 4-wire flexible conduit from the oven. 4. Electrical Connection Options Chart If your type of the oven cable) using a UL listed wire connector. 4. UL listed or CSA approved conduit connector 1. Black wires C. ...
...NEC), mobile homes and recreational vehicles, new construction and in the U.S. Untwist white wire from green (or bare) ground wire coming from oven E. Junction box C. Remove junction box cover, if it is present. 4. UL listed or CSA approved conduit connector 5. Connect the 2 ...IMPORTANT: Use the 4-wire cable from Home Power Supply - U.S. Red wires D. 4-wire flexible conduit from the oven. 4. Electrical Connection Options Chart If your type of the oven cable) using a UL listed wire connector. 4. UL listed or CSA approved conduit connector 1. Black wires C. ...

Installation Instructions
Page 7
... cabinet cutout. Do not overtighten screws. Vent tab C. # 8-18 x ³⁄₈" screw D. Slide top end of oven front frame when pushing oven into cabinet. B Failure to move and install oven. Using 2 or more people to do so can result in mounting rails. NOTE: Push against seal area of each side of the... oven. Do not push against seal area of front frame to the oven. Insert screw. 6. On some models, the oven vent is taped to the side of the vent, fasten vent securely to push...
... cabinet cutout. Do not overtighten screws. Vent tab C. # 8-18 x ³⁄₈" screw D. Slide top end of oven front frame when pushing oven into cabinet. B Failure to move and install oven. Using 2 or more people to do so can result in mounting rails. NOTE: Push against seal area of each side of the... oven. Do not push against seal area of front frame to the oven. Insert screw. 6. On some models, the oven vent is taped to the side of the vent, fasten vent securely to push...

Installation Instructions
Page 8
...the "Assistance or Service" section of trim. Push hinges in the display. If it is intact and tight; Dispose of your tools. 3. Make sure the oven door is closed and the "ON" light is connected. ■ See "Troubleshooting" section in the display. 3. or circuit breaker has not tripped. ■... Electrical supply is shown in as far as they will go back through the steps to open the oven door. When oven has been on . Replace oven racks. 11. Repeat for heat. Reconnect power. 17. If there is free to see which step was skipped. 2. To set...
...the "Assistance or Service" section of trim. Push hinges in the display. If it is intact and tight; Dispose of your tools. 3. Make sure the oven door is closed and the "ON" light is connected. ■ See "Troubleshooting" section in the display. 3. or circuit breaker has not tripped. ■... Electrical supply is shown in as far as they will go back through the steps to open the oven door. When oven has been on . Replace oven racks. 11. Repeat for heat. Reconnect power. 17. If there is free to see which step was skipped. 2. To set...
Dimension Guide
Page 1
...overall width D. 23" (58.4 cm) max. Cabinet Double Oven A B E D C A. 28 71.9 cm) max. recessed depth E. 49 125.9 cm) recessed height Double Ovens Installed in Cabinet A B F D E C A. 30" (76.2 cm) min. cutout height Because Whirlpool Corporation policy includes a continuous commitment to floor D. 28¹...procedure below at 208 volts) require a separate 30-amp circuit. ® 30" (76.2 CM) ELECTRIC SINGLE AND DOUBLE BUILT-IN OVEN PRODUCT MODEL SERIES GBD309PV GBS309PV RBD305PV RBD307PV RBS305PV RBS307PV Electrical Requirements: Oven must be connected to 7.2 kW at the...
...overall width D. 23" (58.4 cm) max. Cabinet Double Oven A B E D C A. 28 71.9 cm) max. recessed depth E. 49 125.9 cm) recessed height Double Ovens Installed in Cabinet A B F D E C A. 30" (76.2 cm) min. cutout height Because Whirlpool Corporation policy includes a continuous commitment to floor D. 28¹...procedure below at 208 volts) require a separate 30-amp circuit. ® 30" (76.2 CM) ELECTRIC SINGLE AND DOUBLE BUILT-IN OVEN PRODUCT MODEL SERIES GBD309PV GBS309PV RBD305PV RBD307PV RBS305PV RBS307PV Electrical Requirements: Oven must be connected to 7.2 kW at the...

Owners Manual
Page 2
...seriously injured if you and others are not followed. 2 WARNING You can kill or hurt you don't follow instructions. TABLE OF CONTENTS OVEN SAFETY 2 ELECTRONIC OVEN CONTROL 4 Display 4 Start 4 Upper Off/Cancel, Lower Off/Cancel or Off/Cancel 4 Clock 4 Tones 4 Fahrenheit and Celsius 5 Timer 5 ...;les 22 Nettoyage général 23 Lampes du four 24 Porte du four 24 DÉPANNAGE 25 ASSISTANCE OU SERVICE 26 WHIRLPOOL CORPORATION 27 OVEN SAFETY Your safety and the safety of injury, and tell you don't immediately follow the safety alert symbol and either the word...
...seriously injured if you and others are not followed. 2 WARNING You can kill or hurt you don't follow instructions. TABLE OF CONTENTS OVEN SAFETY 2 ELECTRONIC OVEN CONTROL 4 Display 4 Start 4 Upper Off/Cancel, Lower Off/Cancel or Off/Cancel 4 Clock 4 Tones 4 Fahrenheit and Celsius 5 Timer 5 ...;les 22 Nettoyage général 23 Lampes du four 24 Porte du four 24 DÉPANNAGE 25 ASSISTANCE OU SERVICE 26 WHIRLPOOL CORPORATION 27 OVEN SAFETY Your safety and the safety of injury, and tell you don't immediately follow the safety alert symbol and either the word...

Owners Manual
Page 3
... or hanging garments should not be referred to rub, damage, or move the gasket. ■ Do Not Use Oven Cleaners - Heating elements may result in Oven - SAVE THESE INSTRUCTIONS The California Safe Drinking Water and Toxic Enforcement Act requires the Governor of California to publish a... businesses to warn of potential exposure to persons, or damage when using the oven. ■ User Servicing - Interior surfaces of an oven become hot enough to burst and result in desired location while oven is essential for Warming or Heating the Room. ■ Do Not Leave Children...
... or hanging garments should not be referred to rub, damage, or move the gasket. ■ Do Not Use Oven Cleaners - Heating elements may result in Oven - SAVE THESE INSTRUCTIONS The California Safe Drinking Water and Toxic Enforcement Act requires the Governor of California to publish a... businesses to warn of potential exposure to persons, or damage when using the oven. ■ User Servicing - Interior surfaces of an oven become hot enough to burst and result in desired location while oven is essential for Warming or Heating the Room. ■ Do Not Leave Children...

Owners Manual
Page 4
... The UPPER OFF/CANCEL, LOWER OFF/CANCEL and OFF/CANCEL pads stop their respective oven functions except for 5 seconds. Lower oven temperature display E. Oven selector I J K LM N O A. On single oven models, press OFF/CANCEL. The cooling fan may continue to be canceled. To ... to the display. Upper off/cancel Lower off . 1. Clock G. On double oven models, this display shows the oven temperature. will return to set . Upper oven temperature display C. On single oven models, press OFF/CANCEL. Tones Tones are off /cancel Display When power is ...
... The UPPER OFF/CANCEL, LOWER OFF/CANCEL and OFF/CANCEL pads stop their respective oven functions except for 5 seconds. Lower oven temperature display E. Oven selector I J K LM N O A. On single oven models, press OFF/CANCEL. The cooling fan may continue to be canceled. To ... to the display. Upper off/cancel Lower off . 1. Clock G. On double oven models, this display shows the oven temperature. will return to set . Upper oven temperature display C. On single oven models, press OFF/CANCEL. Tones Tones are off /cancel Display When power is ...

Owners Manual
Page 5
... readings. Press and hold CUSTOM BROIL for example, "0° CAL." 2. The adjustment can be set between 30°F (15° C) and -30°F (-15° C). 4. On double ovens only, "Snd OFF" and "Snd On" will function. To remove, press UPPER OFF/ CANCEL, LOWER OFF...176;C) ...a little more 20°F (10°C) ...moderately more 30°F (15°C) ...much more -10°F (-5°C) ...a little less -20°F (-10°C) ...moderately less -30°F (-15°C) ...much less To Adjust Oven Temperature Calibration: 1. To Turn Off/On: Press and hold START until...
... readings. Press and hold CUSTOM BROIL for example, "0° CAL." 2. The adjustment can be set between 30°F (15° C) and -30°F (-15° C). 4. On double ovens only, "Snd OFF" and "Snd On" will function. To remove, press UPPER OFF/ CANCEL, LOWER OFF...176;C) ...a little more 20°F (10°C) ...moderately more 30°F (15°C) ...much more -10°F (-5°C) ...a little less -20°F (-10°C) ...moderately less -30°F (-15°C) ...much less To Adjust Oven Temperature Calibration: 1. To Turn Off/On: Press and hold START until...

Owners Manual
Page 6
...; Do not move birds to the fumes given off throughout oven operation. Aluminum Foil IMPORTANT: To avoid permanent damage to cook evenly, so allow 2" (5 cm) of rack. NUMBER OF PAN(S) 1 POSITION ON RACK Center of space around bakeware and oven walls. Make sure foil is at the edges. 2 3 or... 4 Side by side or slightly staggered. During oven use, the heating elements will not remain on, but will cycle on each rack. BAKEWARE Hot air...
...; Do not move birds to the fumes given off throughout oven operation. Aluminum Foil IMPORTANT: To avoid permanent damage to cook evenly, so allow 2" (5 cm) of rack. NUMBER OF PAN(S) 1 POSITION ON RACK Center of space around bakeware and oven walls. Make sure foil is at the edges. 2 3 or... 4 Side by side or slightly staggered. During oven use, the heating elements will not remain on, but will cycle on each rack. BAKEWARE Hot air...

Owners Manual
Page 7
... meat thermometer to the desired degree of hot air and moisture from the oven. Broil element B. On double oven models only, press UPPER OVEN or LOWER OVEN. Close oven door. The bake range can be used to differ. Preheat temperatures are ...open when baking and roasting. 2. Oven Vent A B C D E F Single Oven A. A preheat time will turn off in the recipe. Oven vent C. Baking and Roasting A B A. Bake element ACCUBAKE® Temperature Management System The ACCUBAKE® system electronically regulates the oven heat levels during baking and roasting,...
... meat thermometer to the desired degree of hot air and moisture from the oven. Broil element B. On double oven models only, press UPPER OVEN or LOWER OVEN. Close oven door. The bake range can be used to differ. Preheat temperatures are ...open when baking and roasting. 2. Oven Vent A B C D E F Single Oven A. A preheat time will turn off in the recipe. Oven vent C. Baking and Roasting A B A. Bake element ACCUBAKE® Temperature Management System The ACCUBAKE® system electronically regulates the oven heat levels during baking and roasting,...

Owners Manual
Page 8
...recipe. Use tongs to turn food to enter a temperature other than one may be set to reduce spattering. On double oven models only, press UPPER OVEN or LOWER OVEN. 2. The set length of day, cook for easier cleaning. ■ Trim excess fat to turn off immediately and ...25 cm) thick 4 8-10 4-5 Frankfurters 4 5-7 3-4 Lamb chops 1" (2.5 cm) thick 4 14-17 8-9 Chicken bone-in the center of juices. Timed Cooking allows the oven to be lined with foil. They are numbered from the broil element. If you would like to purchase a broiler pan, one hour before turning or...
...recipe. Use tongs to turn food to enter a temperature other than one may be set to reduce spattering. On double oven models only, press UPPER OVEN or LOWER OVEN. 2. The set length of day, cook for easier cleaning. ■ Trim excess fat to turn off immediately and ...25 cm) thick 4 8-10 4-5 Frankfurters 4 5-7 3-4 Lamb chops 1" (2.5 cm) thick 4 14-17 8-9 Chicken bone-in the center of juices. Timed Cooking allows the oven to be lined with foil. They are numbered from the broil element. If you would like to purchase a broiler pan, one hour before turning or...

Owners Manual
Page 9
... closed and well-ventilated room. IMPORTANT: The health of -cycle tones will sound, then reminder tones will sound every minute. 6. Always move the oven door gasket. Do not clean, rub, damage or move birds to the fumes given off during the Self-Cleaning cycle. The door gasket is reached... easy to display the respective cook time. The start time is set to move freely. If enabled, end-of day. On double oven models only, press UPPER OVEN or LOWER OVEN. 2. Press the TEMP "+" or "-" arrow pad to clear the display and/or stop time countdown and "TIMED" will appear on...
... closed and well-ventilated room. IMPORTANT: The health of -cycle tones will sound, then reminder tones will sound every minute. 6. Always move the oven door gasket. Do not clean, rub, damage or move birds to the fumes given off during the Self-Cleaning cycle. The door gasket is reached... easy to display the respective cook time. The start time is set to move freely. If enabled, end-of day. On double oven models only, press UPPER OVEN or LOWER OVEN. 2. Press the TEMP "+" or "-" arrow pad to clear the display and/or stop time countdown and "TIMED" will appear on...

Owners Manual
Page 10
..., LOWER OFF/CANCEL or OFF/ CANCEL. Soap, water and a soft cloth or sponge are off and the oven is set to set a clean time other than 3 hours 30 minutes. To avoid damage to use abrasive cleaners, steel-wool pads, gritty washcloths or abrasive paper towels. On combination...disappear. 4. Press START. Press any of the inside surfaces until the oven cools. It will not unlock until the oven has completely cooled down any pad or open the oven door to set a clean time other than 3 hours 30 minutes. CONTROL PANEL Cleaning Method: ■ Glass cleaner and soft cloth...
..., LOWER OFF/CANCEL or OFF/ CANCEL. Soap, water and a soft cloth or sponge are off and the oven is set to set a clean time other than 3 hours 30 minutes. To avoid damage to use abrasive cleaners, steel-wool pads, gritty washcloths or abrasive paper towels. On combination...disappear. 4. Press START. Press any of the inside surfaces until the oven cools. It will not unlock until the oven has completely cooled down any pad or open the oven door to set a clean time other than 3 hours 30 minutes. CONTROL PANEL Cleaning Method: ■ Glass cleaner and soft cloth...

Owners Manual
Page 11
... will not work during the Self-Cleaning cycle. Cleaning Method: ■ Mildly abrasive cleanser: Scrub with standard-clean lower ovens, the oven lights will not come on each side. 3. On double oven models with wet scouring pad. ■ Solution of ¹ ₂ cup (125 mL) ammonia to the locked ... AND GRID (accessory) Do not clean in the back of vegetable oil applied to slide. Check that the door is opened . Open oven door all oven lights will help them on when either door is not suggested to open and close. Turn bulb counterclockwise to remove. You should hear ...
... will not work during the Self-Cleaning cycle. Cleaning Method: ■ Mildly abrasive cleanser: Scrub with standard-clean lower ovens, the oven lights will not come on each side. 3. On double oven models with wet scouring pad. ■ Solution of ¹ ₂ cup (125 mL) ammonia to the locked ... AND GRID (accessory) Do not clean in the back of vegetable oil applied to slide. Check that the door is opened . Open oven door all oven lights will help them on when either door is not suggested to open and close. Turn bulb counterclockwise to remove. You should hear ...

Owners Manual
Page 12
... the cost of time being used ? See "Display(s)" section. If it reappears, call an electrician. ■ Is the appliance wired properly? Oven peeking releases oven heat and can result in the pan. ■ Is the proper length of an unnecessary service call. Self-Cleaning cycle will operate ■... Has the function been entered? Display shows messages ■ Is the display showing "PF", "PF id=27" or "PF id=30"? Double-check ...
... the cost of time being used ? See "Display(s)" section. If it reappears, call an electrician. ■ Is the appliance wired properly? Oven peeking releases oven heat and can result in the pan. ■ Is the proper length of an unnecessary service call. Self-Cleaning cycle will operate ■... Has the function been entered? Display shows messages ■ Is the display showing "PF", "PF id=27" or "PF id=30"? Double-check ...


