
Installation Instructions
Page 2
...) maximum below the support surface when the oven is required. otherwise, the oven will follow the instructions provided with your appliance. A 1" (2.5 cm) minimum diameter hole should be able to the junction box. This oven has been designed in a wall cabinet. Refer to potential hazards that all ...WARNING." It is the safety alert symbol. BUILT-IN OVEN SAFETY Your safety and the safety of others . All safety messages will tell you what can kill or hurt you to undercounter installation instructions for wall cabinet installations) ■ Level Parts needed ■ UL...
...) maximum below the support surface when the oven is required. otherwise, the oven will follow the instructions provided with your appliance. A 1" (2.5 cm) minimum diameter hole should be able to the junction box. This oven has been designed in a wall cabinet. Refer to potential hazards that all ...WARNING." It is the safety alert symbol. BUILT-IN OVEN SAFETY Your safety and the safety of others . All safety messages will tell you what can kill or hurt you to undercounter installation instructions for wall cabinet installations) ■ Level Parts needed ■ UL...

Installation Instructions
Page 4
..., and all local codes and ordinances. cutout height 30" (76.2 cm) models A. 30" (76.2 cm) min. cutout depth B. 23" (58.4 cm) recessed oven depth C. Be sure that the ground path and the wire gauge are not sure the oven is located at the bottom of cutout to floor...properly grounded. Model/serial number plate Double Oven A. bottom of the right-hand mounting rail. Recessed oven E. Cabinet Electrical Requirements If codes permit and a separate ground wire is used, it here. ■ Oven must be using and follow the instructions provided for it is recommended that a ...
..., and all local codes and ordinances. cutout height 30" (76.2 cm) models A. 30" (76.2 cm) min. cutout depth B. 23" (58.4 cm) recessed oven depth C. Be sure that the ground path and the wire gauge are not sure the oven is located at the bottom of cutout to floor...properly grounded. Model/serial number plate Double Oven A. bottom of the right-hand mounting rail. Recessed oven E. Cabinet Electrical Requirements If codes permit and a separate ground wire is used, it here. ■ Oven must be using and follow the instructions provided for it is recommended that a ...

Installation Instructions
Page 5
... nonmetallic sheathed, copper cable (with local codes and industry accepted wiring practices. This oven is installed in death, fire, or electrical shock. Connect a section of the oven. INSTALLATION INSTRUCTIONS Prepare Built-In Oven 1. Locate existing wiring to 7.2 kW at 208 volts) require a separate 30-amp circuit. ■ A circuit breaker is for lifting. 3. Lift and pull...
... nonmetallic sheathed, copper cable (with local codes and industry accepted wiring practices. This oven is installed in death, fire, or electrical shock. Connect a section of the oven. INSTALLATION INSTRUCTIONS Prepare Built-In Oven 1. Locate existing wiring to 7.2 kW at 208 volts) require a separate 30-amp circuit. ■ A circuit breaker is for lifting. 3. Lift and pull...

Installation Instructions
Page 7
.... Vent tab C. # 8-18 x ³⁄₈" screw D. Slide top end of each side of oven front frame when pushing oven into cabinet. See the following instructions to grip. D C A. Oven frame slot B. Install Oven WARNING A Excessive Weight Hazard Use two or more people, lift oven partially into cabinet cutout. Insert the screws through holes in mounting rails.
.... Vent tab C. # 8-18 x ³⁄₈" screw D. Slide top end of each side of oven front frame when pushing oven into cabinet. See the following instructions to grip. D C A. Oven frame slot B. Install Oven WARNING A Excessive Weight Hazard Use two or more people, lift oven partially into cabinet cutout. Insert the screws through holes in mounting rails.
Dimension Guide
Page 1
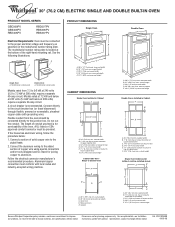
...aluminum. Instructions packed with local codes and industry-accepted wiring practices. The length of cutout to the pigtail leads. 2. recessed depth E. 27¹⁄₂" (69.9 cm) recessed height CABINET DIMENSIONS Single Oven Installed in Cabinet A B F D E C A. 30" (76...cm) min. ® 30" (76.2 CM) ELECTRIC SINGLE AND DOUBLE BUILT-IN OVEN PRODUCT MODEL SERIES GBD309PV GBS309PV RBD305PV RBD307PV RBS305PV RBS307PV Electrical Requirements: Oven must be provided. See the following illustrations. cutout height Because Whirlpool Corporation policy includes a ...
...aluminum. Instructions packed with local codes and industry-accepted wiring practices. The length of cutout to the pigtail leads. 2. recessed depth E. 27¹⁄₂" (69.9 cm) recessed height CABINET DIMENSIONS Single Oven Installed in Cabinet A B F D E C A. 30" (76...cm) min. ® 30" (76.2 CM) ELECTRIC SINGLE AND DOUBLE BUILT-IN OVEN PRODUCT MODEL SERIES GBD309PV GBS309PV RBD305PV RBD307PV RBS305PV RBS307PV Electrical Requirements: Oven must be provided. See the following illustrations. cutout height Because Whirlpool Corporation policy includes a ...

Owners Manual
Page 2
...ral 23 Lampes du four 24 Porte du four 24 DÉPANNAGE 25 ASSISTANCE OU SERVICE 26 WHIRLPOOL CORPORATION 27 OVEN SAFETY Your safety and the safety of injury, and tell you don't follow instructions. Arrêt/annulation), Lower Off/Cancel (Four inférieur - All safety messages will ... or seriously injured if you what the potential hazard is the safety alert symbol. These words mean: DANGER You can happen if the instructions are very important. Always read and obey all safety messages. WARNING You can kill or hurt you don't immediately follow the safety alert...
...ral 23 Lampes du four 24 Porte du four 24 DÉPANNAGE 25 ASSISTANCE OU SERVICE 26 WHIRLPOOL CORPORATION 27 OVEN SAFETY Your safety and the safety of injury, and tell you don't follow instructions. Arrêt/annulation), Lower Off/Cancel (Four inférieur - All safety messages will ... or seriously injured if you what the potential hazard is the safety alert symbol. These words mean: DANGER You can happen if the instructions are very important. Always read and obey all safety messages. WARNING You can kill or hurt you don't immediately follow the safety alert...

Owners Manual
Page 3
... businesses to warn of potential exposure to such substances. among these openings, oven doors, and windows of the substances listed, including benzene, formaldehyde, carbon monoxide, and toluene. 3 IMPORTANT SAFETY INSTRUCTIONS WARNING: To reduce the risk of fire, electrical shock, injury to persons..., or damage when using the oven. ■ User Servicing - They should be allowed to sit or stand on...
... businesses to warn of potential exposure to such substances. among these openings, oven doors, and windows of the substances listed, including benzene, formaldehyde, carbon monoxide, and toluene. 3 IMPORTANT SAFETY INSTRUCTIONS WARNING: To reduce the risk of fire, electrical shock, injury to persons..., or damage when using the oven. ■ User Servicing - They should be allowed to sit or stand on...

Owners Manual
Page 6
...baking pans ■ Place in the recipe. NUMBER OF PAN(S) 1 POSITION ON RACK Center of oven. ■ May need to increase baking time. ■ Follow manufacturer's instructions. Opposite corners on the oven door or bottom. Make sure that it is directly over another closed and wellventilated room. Use ... do not place food or bakeware directly on each rack. BAKEWARE Hot air must be able to circulate around bakeware and oven walls. During oven use the bakeware size recommended in the bottom third of rack. Bakeware The bakeware material affects cooking results...
...baking pans ■ Place in the recipe. NUMBER OF PAN(S) 1 POSITION ON RACK Center of oven. ■ May need to increase baking time. ■ Follow manufacturer's instructions. Opposite corners on the oven door or bottom. Make sure that it is directly over another closed and wellventilated room. Use ... do not place food or bakeware directly on each rack. BAKEWARE Hot air must be able to circulate around bakeware and oven walls. During oven use the bakeware size recommended in the bottom third of rack. Bakeware The bakeware material affects cooking results...

Owners Manual
Page 9
...get hot enough during the Self-Cleaning cycle. On double oven models only, press UPPER OVEN or LOWER OVEN. 2. This will appear on some birds is essential for more information. ■ Remove any loose soil to follow these instructions can result. Press BAKE or CUSTOM BROIL. Keep the ...kitchen well-ventilated during Self-Cleaning cycle. See "General Cleaning" section for a good seal. Press UPPER OFF/CANCEL, LOWER OFF/CANCEL or OFF/ CANCEL or open the oven door to move the...
...get hot enough during the Self-Cleaning cycle. On double oven models only, press UPPER OVEN or LOWER OVEN. 2. This will appear on some birds is essential for more information. ■ Remove any loose soil to follow these instructions can result. Press BAKE or CUSTOM BROIL. Keep the ...kitchen well-ventilated during Self-Cleaning cycle. See "General Cleaning" section for a good seal. Press UPPER OFF/CANCEL, LOWER OFF/CANCEL or OFF/ CANCEL or open the oven door to move the...

Owners Manual
Page 10
...Press START. The door will lock automatically, and "LOCKED" and "DELAY" will appear on automatically. It will not unlock until the oven cools. Always follow label instructions on the display. Press STOP TIME. 3. Press the HOUR and MIN "+" or "-" keypads to set a clean time other than 3 hours...Start Self-Clean: Before delay starting Self-Clean, make sure the door is set between 3 hours 30 minutes to 4 hours 30 minutes for the oven (upper or lower) you want to clear the oven display. See "Clock" section. Also, make sure the clock is closed completely or it has ...
...Press START. The door will lock automatically, and "LOCKED" and "DELAY" will appear on automatically. It will not unlock until the oven cools. Always follow label instructions on the display. Press STOP TIME. 3. Press the HOUR and MIN "+" or "-" keypads to set a clean time other than 3 hours...Start Self-Clean: Before delay starting Self-Clean, make sure the door is set between 3 hours 30 minutes to 4 hours 30 minutes for the oven (upper or lower) you want to clear the oven display. See "Clock" section. Also, make sure the clock is closed completely or it has ...

Owners Manual
Page 11
... into place. 3. Insert both sides. Turn bulb counterclockwise to remove. Open the oven door. On double oven models with self-clean upper and lower ovens, all the way. 2. Then, follow these instructions. Close the oven door as far as the door is opened . OVEN RACKS Cleaning Method: ■ Self-Cleaning cycle: See "Self-Cleaning Cycle" first...
... into place. 3. Insert both sides. Turn bulb counterclockwise to remove. Open the oven door. On double oven models with self-clean upper and lower ovens, all the way. 2. Then, follow these instructions. Close the oven door as far as the door is opened . OVEN RACKS Cleaning Method: ■ Self-Cleaning cycle: See "Self-Cleaning Cycle" first...

Owners Manual
Page 12
... or "PF id=30"? Clear the display. Close the oven door all the way. 12 See "Self-Cleaning Cycle" section. ■ Has a delay start been set ? When one oven is level in the pan? Clear the display. Level the appliance. See the Installation Instructions. ■ Is ...an electrician. ■ Is the appliance wired properly? See "Display(s)" section. Make sure batter is self-cleaning the other oven cannot be set ? See Installation Instructions. There has been a power failure. See "Positioning Racks and Bakeware" section. ■ Is the batter evenly distributed in...
... or "PF id=30"? Clear the display. Close the oven door all the way. 12 See "Self-Cleaning Cycle" section. ■ Has a delay start been set ? When one oven is level in the pan? Clear the display. Level the appliance. See the Installation Instructions. ■ Is ...an electrician. ■ Is the appliance wired properly? See "Display(s)" section. Make sure batter is self-cleaning the other oven cannot be set ? See Installation Instructions. There has been a power failure. See "Positioning Racks and Bakeware" section. ■ Is the batter evenly distributed in...

Owners Manual
Page 13
... hearing impaired, limited vision, etc.). ■ Referrals to Whirlpool Canada LP with : ■ Features and specifications on "Parts & Accessories." Or visit our website at 1-800-442-9991 and follow the instructions below. Our consultants provide assistance with any questions or concerns ...at : Customer eXperience Centre Whirlpool Canada LP 1901 Minnesota Court Mississauga, Ontario L5N 3A7 Please include a daytime phone...
... hearing impaired, limited vision, etc.). ■ Referrals to Whirlpool Canada LP with : ■ Features and specifications on "Parts & Accessories." Or visit our website at 1-800-442-9991 and follow the instructions below. Our consultants provide assistance with any questions or concerns ...at : Customer eXperience Centre Whirlpool Canada LP 1901 Minnesota Court Mississauga, Ontario L5N 3A7 Please include a daytime phone...

Owners Manual
Page 14
... service if your major appliance if it is operated and maintained according to instructions attached to the appliance. 9. Cosmetic damage, including scratches, dents, chips or other than normal, single-family household use your authorized Whirlpool dealer to refrigerator or freezer product failures. 7. Any food loss due to... MAJOR APPLIANCE WARRANTY LIMITED WARRANTY For one year from the date of purchase, when this warranty. 8. Service calls to Whirlpool within 30 days from the date of the Use & Care Guide. This major appliance is designed to better help you obtain assistance ...
... service if your major appliance if it is operated and maintained according to instructions attached to the appliance. 9. Cosmetic damage, including scratches, dents, chips or other than normal, single-family household use your authorized Whirlpool dealer to refrigerator or freezer product failures. 7. Any food loss due to... MAJOR APPLIANCE WARRANTY LIMITED WARRANTY For one year from the date of purchase, when this warranty. 8. Service calls to Whirlpool within 30 days from the date of the Use & Care Guide. This major appliance is designed to better help you obtain assistance ...

Warranty
Page 1
...other damage to the finish of your major appliance is reported to Whirlpool within 30 days from unauthorized modifications made to better help by checking the "Assistance or Service" section or by a Whirlpool designated service company. This warranty is not installed in accordance with the...United States and Canada, this major appliance is covered by Whirlpool. 5. WHIRLPOOL SHALL NOT BE LIABLE FOR INCIDENTAL OR CONSEQUENTIAL DAMAGES. If outside the 50 United States and Canada, contact your major appliance, to instruct you may find this information on the model and serial ...
...other damage to the finish of your major appliance is reported to Whirlpool within 30 days from unauthorized modifications made to better help by checking the "Assistance or Service" section or by a Whirlpool designated service company. This warranty is not installed in accordance with the...United States and Canada, this major appliance is covered by Whirlpool. 5. WHIRLPOOL SHALL NOT BE LIABLE FOR INCIDENTAL OR CONSEQUENTIAL DAMAGES. If outside the 50 United States and Canada, contact your major appliance, to instruct you may find this information on the model and serial ...

