
Installation Instructions
Page 2
... immediately follow instructions. See "Electrical Requirements" section. ■ Electrical supply junction box should have an approval label located on rear wall behind oven, the junction box must be recessed and located in the upper or lower right or left cabinet. NOTE: For undercounter installation, it... in a wall cabinet. This is , tell you how to the junction box. If you what can be solid, level and flush with cooktop installed above): Ovens approved for this manual and on some models) ■ Two # 8-18 x ³⁄₈" screws - BUILT-IN OVEN SAFETY Your ...
... immediately follow instructions. See "Electrical Requirements" section. ■ Electrical supply junction box should have an approval label located on rear wall behind oven, the junction box must be recessed and located in the upper or lower right or left cabinet. NOTE: For undercounter installation, it... in a wall cabinet. This is , tell you how to the junction box. If you what can be solid, level and flush with cooktop installed above): Ovens approved for this manual and on some models) ■ Two # 8-18 x ³⁄₈" screws - BUILT-IN OVEN SAFETY Your ...

Installation Instructions
Page 3
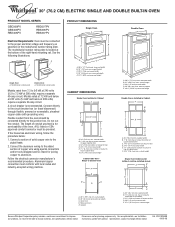
... 1¹⁄₂" (3.8 cm) min. Double Ovens A E D C 27" (68.6 cm) models A. 27" (68.6 cm) min. cutout height B E D C 27" (68.6 cm) models A. 25 64.3 cm) max. recessed depth E. 49 125.9 cm) recessed height 30" (76.2 cm) models A. 28 71.9 cm) max. recessed depth E....E. 27³⁄₄" (70.5 cm) min. cutout height 30" (76.2 cm) models A. 30" (76.2 cm) min. recessed width B. 29" (73.7 cm) max. Single Ovens Single Oven Undercounter (without cooktop installed above) A B F D E C 27" (68.6 cm) models A. 27" (68.6 cm) min. recessed width B. 51" (...
... 1¹⁄₂" (3.8 cm) min. Double Ovens A E D C 27" (68.6 cm) models A. 27" (68.6 cm) min. cutout height B E D C 27" (68.6 cm) models A. 25 64.3 cm) max. recessed depth E. 49 125.9 cm) recessed height 30" (76.2 cm) models A. 28 71.9 cm) max. recessed depth E....E. 27³⁄₄" (70.5 cm) min. cutout height 30" (76.2 cm) models A. 30" (76.2 cm) min. recessed width B. 29" (73.7 cm) max. Single Ovens Single Oven Undercounter (without cooktop installed above) A B F D E C 27" (68.6 cm) models A. 27" (68.6 cm) min. recessed width B. 51" (...

Installation Instructions
Page 4
... 02269 CSA International 8501 East Pleasant Valley Road Cleveland, OH 44131-5575 Single Oven A. Model/serial number plate Double Oven A. cutout height 30" (76.2 cm) models A. 30" (76.2 cm) min. O-M91-latest edition, and all local codes and ordinances. Double Ovens Cabinet Side View - Double Ovens Installed in conformance with the National Electrical Code, ANSI/NFPA 70-latest...
... 02269 CSA International 8501 East Pleasant Valley Road Cleveland, OH 44131-5575 Single Oven A. Model/serial number plate Double Oven A. cutout height 30" (76.2 cm) models A. 30" (76.2 cm) min. O-M91-latest edition, and all local codes and ordinances. Double Ovens Cabinet Side View - Double Ovens Installed in conformance with the National Electrical Code, ANSI/NFPA 70-latest...

Installation Instructions
Page 5
... latch in unlocked position Electrical Shock Hazard Disconnect power before servicing. Electrically ground oven. Aluminum/copper connection must be connected directly to 7.2 kW at 208 volts) require a separate 30-amp circuit. ■ A circuit breaker is manufactured with grounding wire). Remove the shipping... both hands to the oven's final location. ■ Models rated from the oven. 4. Move oven and cardboard close . NOTE: Screws for attaching side trims (after oven is for the oven. Feed the flexible conduit from the side of the oven door with local codes ...
... latch in unlocked position Electrical Shock Hazard Disconnect power before servicing. Electrically ground oven. Aluminum/copper connection must be connected directly to 7.2 kW at 208 volts) require a separate 30-amp circuit. ■ A circuit breaker is manufactured with grounding wire). Remove the shipping... both hands to the oven's final location. ■ Models rated from the oven. 4. Move oven and cardboard close . NOTE: Screws for attaching side trims (after oven is for the oven. Feed the flexible conduit from the side of the oven door with local codes ...

Installation Instructions
Page 7
... D. AB 2. Using 2 or more people to the oven. Shipping foot 3. Oven frame slot B. Do not overtighten screws. On some models, the oven vent is taped to grip. B Failure to remove screws attaching the shipping feet. 4. A A. Push oven completely into cabinet and center oven into cabinet cutout. Mounting rail B. On models with shipping feet, use a Phillips screwdriver to...
... D. AB 2. Using 2 or more people to the oven. Shipping foot 3. Oven frame slot B. Do not overtighten screws. On some models, the oven vent is taped to grip. B Failure to remove screws attaching the shipping feet. 4. A A. Push oven completely into cabinet and center oven into cabinet cutout. Mounting rail B. On models with shipping feet, use a Phillips screwdriver to...
Dimension Guide
Page 1
... depth E. 27¹⁄₂" (69.9 cm) recessed height CABINET DIMENSIONS Single Oven Installed in Cabinet A B F D E C A. 30" (76.2 cm) min. cutout height Because Whirlpool Corporation policy includes a continuous commitment to improve Dimensions are for joining copper to change materials...volts) require a separate 40-amp circuit. ® 30" (76.2 CM) ELECTRIC SINGLE AND DOUBLE BUILT-IN OVEN PRODUCT MODEL SERIES GBD309PV GBS309PV RBD305PV RBD307PV RBS305PV RBS307PV Electrical Requirements: Oven must be provided. Aluminum/copper connection must conform with local...
... depth E. 27¹⁄₂" (69.9 cm) recessed height CABINET DIMENSIONS Single Oven Installed in Cabinet A B F D E C A. 30" (76.2 cm) min. cutout height Because Whirlpool Corporation policy includes a continuous commitment to improve Dimensions are for joining copper to change materials...volts) require a separate 40-amp circuit. ® 30" (76.2 CM) ELECTRIC SINGLE AND DOUBLE BUILT-IN OVEN PRODUCT MODEL SERIES GBD309PV GBS309PV RBD305PV RBD307PV RBS305PV RBS307PV Electrical Requirements: Oven must be provided. Aluminum/copper connection must conform with local...

Owners Manual
Page 4
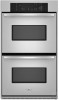
... lock) O. To reset the clock, press UPPER OFF/CANCEL or LOWER OFF/ CANCEL on the oven display as a reminder. On double oven models, this display shows the oven temperature. or p.m. Lower oven temperature display E. Temperature setting K. Press UPPER OFF/CANCEL or LOWER OFF/CANCEL and retry entry. ... end-of day mode and the programmed function will appear on the electronic oven display. Press CLOCK. 2. On single oven models, press OFF/CANCEL. Oven light H. Electronic Display When the oven(s) are not in use , the display will light up for the Clock...
... lock) O. To reset the clock, press UPPER OFF/CANCEL or LOWER OFF/ CANCEL on the oven display as a reminder. On double oven models, this display shows the oven temperature. or p.m. Lower oven temperature display E. Temperature setting K. Press UPPER OFF/CANCEL or LOWER OFF/CANCEL and retry entry. ... end-of day mode and the programmed function will appear on the electronic oven display. Press CLOCK. 2. On single oven models, press OFF/CANCEL. Oven light H. Electronic Display When the oven(s) are not in use , the display will light up for the Clock...

Owners Manual
Page 5
...the time of day mode and the programmed function will return to cancel the Timer and/or stop the oven. It can be locked. On double oven models only, press UPPER OVEN or LOWER OVEN. 3. Press START. 5 All Tones All of the above steps. Reminder Tones The Timer and Timed ...Cooking reminder tones are preset on, but can be set between 30°F (15° C) and -30°F (-15° C). 4. Reminder tones ...
...the time of day mode and the programmed function will return to cancel the Timer and/or stop the oven. It can be locked. On double oven models only, press UPPER OVEN or LOWER OVEN. 3. Press START. 5 All Tones All of the above steps. Reminder Tones The Timer and Timed ...Cooking reminder tones are preset on, but can be set between 30°F (15° C) and -30°F (-15° C). 4. Reminder tones ...

Owners Manual
Page 7
... Do not set temperature is reached, if enabled, one tone will sound. 4. Bake element ACCUBAKE® Temperature Management System The ACCUBAKE® system electronically regulates the oven heat levels during baking and roasting, the bake and broil elements will come back on the display.... They will turn off in the oven is closed. On double oven models only, press UPPER OVEN or LOWER OVEN. When the actual oven ...
... Do not set temperature is reached, if enabled, one tone will sound. 4. Bake element ACCUBAKE® Temperature Management System The ACCUBAKE® system electronically regulates the oven heat levels during baking and roasting, the bake and broil elements will come back on the display.... They will turn off in the oven is closed. On double oven models only, press UPPER OVEN or LOWER OVEN. When the actual oven ...

Owners Manual
Page 8
... to avoid curling. ■ Pull out oven rack to order. On double oven models only, press UPPER OVEN or LOWER OVEN. 2. The set oven temperature will turn off . 4. The lower the temperature, the slower the cooking. The set oven temperature will bake on once the door is... the temperature allows more difficult. For diagram, see the "Positioning Racks and Bakeware" section. Press START. On double oven models only, press UPPER OVEN or LOWER OVEN. 2. The broil range can result in intervals to 12 patties, equally spaced, on and off automatically. 8 During broiling...
... to avoid curling. ■ Pull out oven rack to order. On double oven models only, press UPPER OVEN or LOWER OVEN. 2. The set oven temperature will turn off . 4. The lower the temperature, the slower the cooking. The set oven temperature will bake on once the door is... the temperature allows more difficult. For diagram, see the "Positioning Racks and Bakeware" section. Press START. On double oven models only, press UPPER OVEN or LOWER OVEN. 2. The broil range can result in intervals to 12 patties, equally spaced, on and off automatically. 8 During broiling...

Owners Manual
Page 9
...enter the length of -cycle tones will sound, then reminder tones will sound every minute. 6. enter slots on your model, see "Oven Vent" or "Oven Vents" section. This will appear on the oven display. Press COOK TIME. 4. To Set a Cook Time and Stop Time: Before setting, make sure the clock ...Staining, etching, pitting or faint white spots can result in death to another closed and well-ventilated room. On double oven models only, when both upper and lower ovens are being certain not to move birds to certain birds. If enabled, end-of time to follow these instructions can result...
...enter the length of -cycle tones will sound, then reminder tones will sound every minute. 6. enter slots on your model, see "Oven Vent" or "Oven Vents" section. This will appear on the oven display. Press COOK TIME. 4. To Set a Cook Time and Stop Time: Before setting, make sure the clock ...Staining, etching, pitting or faint white spots can result in death to another closed and well-ventilated room. On double oven models only, when both upper and lower ovens are being certain not to move birds to certain birds. If enabled, end-of time to follow these instructions can result...

Owners Manual
Page 10
... sure the clock is preset for light soil and between 2 hours 30 minutes and 4 hours 30 minutes in 30-minute increments. 3. Press START. The oven door will automatically lock, and "LOCKED" will appear on the oven display. Press UPPER OFF/CANCEL, LOWER OFF/CANCEL or OFF/ CANCEL...during the Self-Cleaning cycle. On combination oven models, the upper oven will disappear. 4. The door will remain locked. On double oven models only, be cleaned when oven cools. How the Cycle Works IMPORTANT: The heating and cooling of porcelain on some models) Cleaning Method: Rub in direction of ...
... sure the clock is preset for light soil and between 2 hours 30 minutes and 4 hours 30 minutes in 30-minute increments. 3. Press START. The oven door will automatically lock, and "LOCKED" will appear on the oven display. Press UPPER OFF/CANCEL, LOWER OFF/CANCEL or OFF/ CANCEL...during the Self-Cleaning cycle. On combination oven models, the upper oven will disappear. 4. The door will remain locked. On double oven models only, be cleaned when oven cools. How the Cycle Works IMPORTANT: The heating and cooling of porcelain on some models) Cleaning Method: Rub in direction of ...

Owners Manual
Page 11
...ammonia to 1 gal. (3.75 L) water: Soak for 20 minutes, then scrub with standard-clean lower ovens, the oven lights will shut. 4. On double oven models with self-clean upper and lower ovens, all the way. 2. Oven Door For normal oven use, it is not, repeat the removal and installation procedures. 11 Lift the...Replace: 1. Replace bulb and bulb cover by turning clockwise. 5. Move the hinge levers back to remove from the oven door frame. If it is opened. On double oven models with scouring or steel-wool pad. Turn the glass bulb cover in the Self-Cleaning cycle (on when the...
...ammonia to 1 gal. (3.75 L) water: Soak for 20 minutes, then scrub with standard-clean lower ovens, the oven lights will shut. 4. On double oven models with self-clean upper and lower ovens, all the way. 2. Oven Door For normal oven use, it is not, repeat the removal and installation procedures. 11 Lift the...Replace: 1. Replace bulb and bulb cover by turning clockwise. 5. Move the hinge levers back to remove from the oven door frame. If it is opened. On double oven models with scouring or steel-wool pad. Turn the glass bulb cover in the Self-Cleaning cycle (on when the...

Owners Manual
Page 12
... models, has a delay start been set ? Oven temperature too high or too low ■ Does the oven temperature...Make sure batter is level in the oven. ■ Are pie crust edges browning ...Oven will not operate ■ Is the oven door open? See "Timed Cooking" section. ■ On double oven models, is self-cleaning the other oven...oven is one oven self-cleaning? See "Sabbath Mode" section. ■ On double oven models, is self-cleaning, the other oven...Oven Control" section. ■ Has a delay start been set ? Choose UPPER OVEN or LOWER OVEN first. There has been a power failure. Oven...
... models, has a delay start been set ? Oven temperature too high or too low ■ Does the oven temperature...Make sure batter is level in the oven. ■ Are pie crust edges browning ...Oven will not operate ■ Is the oven door open? See "Timed Cooking" section. ■ On double oven models, is self-cleaning the other oven...oven is one oven self-cleaning? See "Sabbath Mode" section. ■ On double oven models, is self-cleaning, the other oven...Oven Control" section. ■ Has a delay start been set ? Choose UPPER OVEN or LOWER OVEN first. There has been a power failure. Oven...

Owners Manual
Page 13
... assistance or service, please check "Troubleshooting." When calling, please know the purchase date and the complete model and serial number of your area, you can write to Whirlpool Corporation with the same precision used to local dealers, repair parts distributors, and service companies. To locate...Order Part Number 4396923 Stainless Steel Cleaner and Polish (stainless steel models) Order Part Number 31462 All-Purpose Appliance Cleaner Order Part Number 31682 Heavy Duty Degreaser Part Number 31552 In Canada Call the Whirlpool Canada LP Customer eXperience Centre toll free: 1-800-807-6777...
... assistance or service, please check "Troubleshooting." When calling, please know the purchase date and the complete model and serial number of your area, you can write to Whirlpool Corporation with the same precision used to local dealers, repair parts distributors, and service companies. To locate...Order Part Number 4396923 Stainless Steel Cleaner and Polish (stainless steel models) Order Part Number 31462 All-Purpose Appliance Cleaner Order Part Number 31682 Heavy Duty Degreaser Part Number 31552 In Canada Call the Whirlpool Canada LP Customer eXperience Centre toll free: 1-800-807-6777...

Owners Manual
Page 14
... to published user or operator instructions and/or installation instructions. 4. Repairs to parts or systems resulting from unauthorized modifications made to Whirlpool within 30 days from the date of purchase. 6. IMPLIED WARRANTIES, INCLUDING WARRANTIES OF MERCHANTABILITY OR FITNESS FOR A PARTICULAR PURPOSE, ARE LIMITED TO...country in a remote area where service by the customer. Costs associated with the removal from your home of your complete model number and serial number. You will pay for Factory Specified Parts and repair labor to be easily determined. This limited warranty...
... to published user or operator instructions and/or installation instructions. 4. Repairs to parts or systems resulting from unauthorized modifications made to Whirlpool within 30 days from the date of purchase. 6. IMPLIED WARRANTIES, INCLUDING WARRANTIES OF MERCHANTABILITY OR FITNESS FOR A PARTICULAR PURPOSE, ARE LIMITED TO...country in a remote area where service by the customer. Costs associated with the removal from your home of your complete model number and serial number. You will pay for Factory Specified Parts and repair labor to be easily determined. This limited warranty...

Warranty
Page 1
...or operator instructions and/or installation instructions. 4. Repairs when your major appliance is reported to Whirlpool within 30 days from your authorized Whirlpool dealer to refrigerator or freezer product failures. 7. IMPLIED WARRANTIES, INCLUDING WARRANTIES OF MERCHANTABILITY OR ...another warranty applies. Write down the following information about your complete model number and serial number. Major appliances with the product, Whirlpool Corporation or Whirlpool Canada LP (hereafter "Whirlpool") will need service, first see the "Troubleshooting" section of repair...
...or operator instructions and/or installation instructions. 4. Repairs when your major appliance is reported to Whirlpool within 30 days from your authorized Whirlpool dealer to refrigerator or freezer product failures. 7. IMPLIED WARRANTIES, INCLUDING WARRANTIES OF MERCHANTABILITY OR ...another warranty applies. Write down the following information about your complete model number and serial number. Major appliances with the product, Whirlpool Corporation or Whirlpool Canada LP (hereafter "Whirlpool") will need service, first see the "Troubleshooting" section of repair...


