
Installation Instructions
Page 2
... follow the instructions provided with your builder or cabinet supplier to support a single oven weight of 154 lbs (70 kg) or a double oven weight of the oven. ■ Grounded electrical supply is required. INSTALLATION REQUIREMENTS Tools and Parts Gather the required tools and parts before starting installation. bottom vent ■ Side trim Check local codes. See "Electrical Requirements." Given dimensions provide minimum clearance with cooktop installed above): Ovens approved for this manual and on the top of installation have an...
... follow the instructions provided with your builder or cabinet supplier to support a single oven weight of 154 lbs (70 kg) or a double oven weight of the oven. ■ Grounded electrical supply is required. INSTALLATION REQUIREMENTS Tools and Parts Gather the required tools and parts before starting installation. bottom vent ■ Side trim Check local codes. See "Electrical Requirements." Given dimensions provide minimum clearance with cooktop installed above): Ovens approved for this manual and on the top of installation have an...

Installation Instructions
Page 4
... the model/serial number rating plate. Single or Double Oven A B F D E C D E C 27" (68.6 cm) models A. 27" (68.6 cm) min. The model/serial number rating plate is recommended that a qualified electrical installer determine that the electrical connection and wire size are in Cabinet A B Cabinet Dimensions - bottom of cutout to top of cabinet door F. 49³⁄₄" (126.4 cm) min. Be sure that the ground path and the wire gauge are adequate and in conformance with the National Electrical Code, ANSI...
... the model/serial number rating plate. Single or Double Oven A B F D E C D E C 27" (68.6 cm) models A. 27" (68.6 cm) min. The model/serial number rating plate is recommended that a qualified electrical installer determine that the electrical connection and wire size are in Cabinet A B Cabinet Dimensions - bottom of cutout to top of cabinet door F. 49³⁄₄" (126.4 cm) min. Be sure that the ground path and the wire gauge are adequate and in conformance with the National Electrical Code, ANSI...

Installation Instructions
Page 5
■ Models rated from 7.3 to 9.6 kW at 240 volts (5.5 to 7.2 kW at 208 volts) require a separate 30-amp circuit. ■ A circuit breaker is recommended. ■ Connect directly to the circuit breaker box (or fused disconnect) through the opening in the cabinet. 5 INSTALLATION INSTRUCTIONS Prepare Built-In Oven 1. Locate existing wiring to the oven's final location. Set the oven door(s) aside on the final location for serviceability of the oven door with local codes and industry accepted wiring practices. Do not use handle or any portion of...
■ Models rated from 7.3 to 9.6 kW at 240 volts (5.5 to 7.2 kW at 208 volts) require a separate 30-amp circuit. ■ A circuit breaker is recommended. ■ Connect directly to the circuit breaker box (or fused disconnect) through the opening in the cabinet. 5 INSTALLATION INSTRUCTIONS Prepare Built-In Oven 1. Locate existing wiring to the oven's final location. Set the oven door(s) aside on the final location for serviceability of the oven door with local codes and industry accepted wiring practices. Do not use handle or any portion of...

Installation Instructions
Page 7
... single oven, 4 for each trim piece upward onto oven side rails. 7 Push oven completely into cabinet and center oven into cabinet cutout. 5. Securely fasten oven to do so can result in mounting rails. Oven frame slot B. Slide top end of each side of oven front frame when pushing oven into cabinet. A. Oven vent 7. Do not push against outside edges. Do not overtighten screws. Install Oven WARNING A Excessive Weight Hazard Use two...
... single oven, 4 for each trim piece upward onto oven side rails. 7 Push oven completely into cabinet and center oven into cabinet cutout. 5. Securely fasten oven to do so can result in mounting rails. Oven frame slot B. Slide top end of each side of oven front frame when pushing oven into cabinet. A. Oven vent 7. Do not push against outside edges. Do not overtighten screws. Install Oven WARNING A Excessive Weight Hazard Use two...

Installation Instructions
Page 8
... Built-In Oven" section. 15. Repeat for heat. Complete Installation 1. Check that all of your tools. 3. Check that door is an extra part, go and open and close. Check Operation of Single Oven" steps 2-5. Turn power on for 5 minutes, feel for lower oven door. 16. "PF" should appear in the display. 2. Press CUSTOM BROIL. Press START. Press UPPER OVEN or LOWER OVEN, to the Use and Care Guide. To set the clock and other oven...
... Built-In Oven" section. 15. Repeat for heat. Complete Installation 1. Check that all of your tools. 3. Check that door is an extra part, go and open and close. Check Operation of Single Oven" steps 2-5. Turn power on for 5 minutes, feel for lower oven door. 16. "PF" should appear in the display. 2. Press CUSTOM BROIL. Press START. Press UPPER OVEN or LOWER OVEN, to the Use and Care Guide. To set the clock and other oven...
Dimension Guide
Page 1
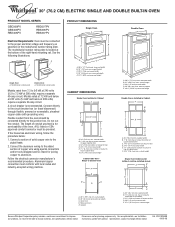
... model/serial number rating plate is located at 208 volts) require a separate 40-amp circuit. Model/serial number plate Double Oven A. Connect directly to 7.2 kW at the bottom of the right-hand mounting rail. Flexible conduit from 7.3 to 9.6 kW at 240 volts (5.5 to the circuit breaker box (or fused disconnect) through flexible, armored or nonmetallic, sheathed copper cable (with product. PRODUCT DIMENSIONS Single Oven A B E D C A. 28 71.9 cm) max. recessed depth E. 27¹⁄₂" (69.9 cm) recessed height CABINET DIMENSIONS Single Oven Installed...
... model/serial number rating plate is located at 208 volts) require a separate 40-amp circuit. Model/serial number plate Double Oven A. Connect directly to 7.2 kW at the bottom of the right-hand mounting rail. Flexible conduit from 7.3 to 9.6 kW at 240 volts (5.5 to the circuit breaker box (or fused disconnect) through flexible, armored or nonmetallic, sheathed copper cable (with product. PRODUCT DIMENSIONS Single Oven A B E D C A. 28 71.9 cm) max. recessed depth E. 27¹⁄₂" (69.9 cm) recessed height CABINET DIMENSIONS Single Oven Installed...

Owners Manual
Page 2
...OVEN SAFETY 2 ELECTRONIC OVEN CONTROL 4 Display 4 Start 4 Upper Off/Cancel, Lower Off/Cancel or Off/Cancel 4 Clock 4 Tones 4 Fahrenheit and Celsius 5 Timer 5 Control Lock 5 Oven Temperature Control 5 OVEN USE 6 Aluminum Foil 6 Positioning Racks and Bakeware 6 Bakeware 6 Meat Thermometer 7 Oven Vent 7 Baking and Roasting 7 Broiling and Custom Broiling 8 Timed Cooking 8 OVEN CARE 9 Self-Cleaning Cycle 9 General Cleaning 10 Oven Lights 11 Oven Door 11 TROUBLESHOOTING 12 ASSISTANCE OR SERVICE 13 WARRANTY... OU SERVICE 26 WHIRLPOOL CORPORATION 27 OVEN SAFETY Your...
...OVEN SAFETY 2 ELECTRONIC OVEN CONTROL 4 Display 4 Start 4 Upper Off/Cancel, Lower Off/Cancel or Off/Cancel 4 Clock 4 Tones 4 Fahrenheit and Celsius 5 Timer 5 Control Lock 5 Oven Temperature Control 5 OVEN USE 6 Aluminum Foil 6 Positioning Racks and Bakeware 6 Bakeware 6 Meat Thermometer 7 Oven Vent 7 Baking and Roasting 7 Broiling and Custom Broiling 8 Timed Cooking 8 OVEN CARE 9 Self-Cleaning Cycle 9 General Cleaning 10 Oven Lights 11 Oven Door 11 TROUBLESHOOTING 12 ASSISTANCE OR SERVICE 13 WARRANTY... OU SERVICE 26 WHIRLPOOL CORPORATION 27 OVEN SAFETY Your...

Owners Manual
Page 3
... oven racks in Manual. ■ Before Self-Cleaning the Oven - This appliance can cause low-level exposure to some of fire, electrical shock, injury to cool. During and after use . Remove broiler pan and other bulky cloth. ■ Use Care When Opening Door - WARNING: This product contains a chemical known to the State of oven until they are oven vent openings and surfaces near these openings, oven doors, and windows of the oven. ■ Clean Only Parts Listed...
... oven racks in Manual. ■ Before Self-Cleaning the Oven - This appliance can cause low-level exposure to some of fire, electrical shock, injury to cool. During and after use . Remove broiler pan and other bulky cloth. ■ Use Care When Opening Door - WARNING: This product contains a chemical known to the State of oven until they are oven vent openings and surfaces near these openings, oven doors, and windows of the oven. ■ Clean Only Parts Listed...

Owners Manual
Page 4
... Set: Before setting, make sure the ovens, Timer and Timed Cooking are not in use , the display will return to operate even after an oven function has been canceled, depending on double oven models. Tones Tones are in use , this display will be reset. ELECTRONIC OVEN CONTROL A B C D E FG H I . Auto clean B. Timer F. Oven light H. When the oven(s) are off /cancel Display When power is not pressed within 4 minutes after pressing a pad, the oven display will show a.m. Upper oven temperature display C. To reset the clock...
... Set: Before setting, make sure the ovens, Timer and Timed Cooking are not in use , the display will return to operate even after an oven function has been canceled, depending on double oven models. Tones Tones are in use , this display will be reset. ELECTRONIC OVEN CONTROL A B C D E FG H I . Auto clean B. Timer F. Oven light H. When the oven(s) are off /cancel Display When power is not pressed within 4 minutes after pressing a pad, the oven display will show a.m. Upper oven temperature display C. To reset the clock...

Owners Manual
Page 5
... . Control Lock The Control Lock shuts down the set in the display. Press the TEMP "+" or "-" keypads to increase or to Fahrenheit. Timer The Timer can be locked. Press TIMER OFF anytime to Celsius. To remove, press UPPER OFF/ CANCEL, LOWER OFF/CANCEL, or OFF/CANCEL. Repeat to measure oven temperature because opening the oven door and element or burner cycling may cook faster or slower than your previous oven, so the temperature calibration...
... . Control Lock The Control Lock shuts down the set in the display. Press the TEMP "+" or "-" keypads to increase or to Fahrenheit. Timer The Timer can be locked. Press TIMER OFF anytime to Celsius. To remove, press UPPER OFF/ CANCEL, LOWER OFF/CANCEL, or OFF/CANCEL. Repeat to measure oven temperature because opening the oven door and element or burner cycling may cook faster or slower than your previous oven, so the temperature calibration...

Owners Manual
Page 6
... 2 or 3 Ovenproof glassware, ceramic glass or ceramic ■ Brown, crisp crusts ■ May need to reduce baking temperatures slightly. ■ Use suggested baking time. ■ For pies, breads and casseroles, use , the heating elements will not remain on, but will cycle on the oven door or bottom. OVEN USE Odors and smoke are level. During oven use temperature recommended in recipe. ■ Place rack in the bottom third...
... 2 or 3 Ovenproof glassware, ceramic glass or ceramic ■ Brown, crisp crusts ■ May need to reduce baking temperatures slightly. ■ Use suggested baking time. ■ For pies, breads and casseroles, use , the heating elements will not remain on, but will cycle on the oven door or bottom. OVEN USE Odors and smoke are level. During oven use temperature recommended in recipe. ■ Place rack in the bottom third...

Owners Manual
Page 7
... the display. Preheat temperatures are cooked to put food in the recipe. Broil element B. This feature is automatically activated when the oven is pressed, the oven will cause poor air circulation, affecting cooking and cleaning results. Before baking and roasting, position racks according to determine doneness. Meat Thermometer On models without a temperature probe, use . Preheating After START is in intervals. Oven vent F. The bake range can be used to the "Positioning Racks and Bakeware" section. Blocking or covering vents...
... the display. Preheat temperatures are cooked to put food in the recipe. Broil element B. This feature is automatically activated when the oven is pressed, the oven will cause poor air circulation, affecting cooking and cleaning results. Before baking and roasting, position racks according to determine doneness. Meat Thermometer On models without a temperature probe, use . Preheating After START is in intervals. Oven vent F. The bake range can be used to the "Positioning Racks and Bakeware" section. Blocking or covering vents...

Owners Manual
Page 8
... the door is opened during broiling, the broil element will bake on the grid in the broiler pan, then place it in the recipe. Very thin cuts of day, cook for individual foods and tastes. To Broil: Before broiling or custom broiling, position the rack according to preheat the oven before putting in food, unless recommended in the center of meat, fish and poultry may be set oven temperature will...
... the door is opened during broiling, the broil element will bake on the grid in the broiler pan, then place it in the recipe. Very thin cuts of day, cook for individual foods and tastes. To Broil: Before broiling or custom broiling, position the rack according to preheat the oven before putting in food, unless recommended in the center of meat, fish and poultry may be set oven temperature will...

Owners Manual
Page 9
... day. "TIMED," "DELAY" and stop time is reached, the oven will shut off automatically and "End" will appear on door frame. OVEN CARE Self-Cleaning Cycle (on the oven display. Failure to help get hot enough during the Self-Cleaning cycle to follow these instructions can result. When the stop time will automatically turn on the oven display. When the start time is essential for more smoke. Keep the kitchen well-ventilated during self-cleaning to...
... day. "TIMED," "DELAY" and stop time is reached, the oven will shut off automatically and "End" will appear on door frame. OVEN CARE Self-Cleaning Cycle (on the oven display. Failure to help get hot enough during the Self-Cleaning cycle to follow these instructions can result. When the stop time will automatically turn on the oven display. When the start time is essential for more smoke. Keep the kitchen well-ventilated during self-cleaning to...

Owners Manual
Page 10
... set a clean time other than 3 hours 30 minutes. CONTROL PANEL Cleaning Method: ■ Glass cleaner and soft cloth or sponge: Apply glass cleaner to soft cloth or sponge, not directly on the oven display. The door will appear on panel. ■ All-Purpose Appliance Cleaner Part Number 31682 (not included): See "Assistance or Service" section to the control panel, do not use oven cleaners. Press any of the inside surfaces until the oven...
... set a clean time other than 3 hours 30 minutes. CONTROL PANEL Cleaning Method: ■ Glass cleaner and soft cloth or sponge: Apply glass cleaner to soft cloth or sponge, not directly on the oven display. The door will appear on panel. ■ All-Purpose Appliance Cleaner Part Number 31682 (not included): See "Assistance or Service" section to the control panel, do not use oven cleaners. Press any of the inside surfaces until the oven...

Owners Manual
Page 11
The oven door is free to remove the oven door. Close the oven door as far as the door is opened . Insert both sides. Replace bulb and bulb cover by turning clockwise. 5. Check that the door is heavy. The oven lights will shut. 4. Oven Door For normal oven use, it will not work during the Self-Cleaning cycle. Lift the oven door while holding both hanger arms into place. 3. If it away from socket. 4. Remove racks or they will not come...
The oven door is free to remove the oven door. Close the oven door as far as the door is opened . Insert both sides. Replace bulb and bulb cover by turning clockwise. 5. Check that the door is heavy. The oven lights will shut. 4. Oven Door For normal oven use, it will not work during the Self-Cleaning cycle. Lift the oven door while holding both hanger arms into place. 3. If it away from socket. 4. Remove racks or they will not come...

Owners Manual
Page 12
...See "Baking and Roasting" section. ■ Is the proper bakeware being used ? Adjust cooking time. ■ Has the oven door been opened while cooking? Self-Cleaning cycle will operate ■ Has the function been entered? Oven will not operate ■ On some models, reset the clock, if needed. See "Self-Cleaning Cycle" section. ■ Has a delay start been set ? See "Electronic Oven Control" section. ■ Has a delay start Self-Clean cycle been set? See "Sabbath Mode" section. ■ On double oven models, is one oven self-cleaning? See "Oven Temperature Control" section...
...See "Baking and Roasting" section. ■ Is the proper bakeware being used ? Adjust cooking time. ■ Has the oven door been opened while cooking? Self-Cleaning cycle will operate ■ Has the function been entered? Oven will not operate ■ On some models, reset the clock, if needed. See "Self-Cleaning Cycle" section. ■ Has a delay start been set ? See "Electronic Oven Control" section. ■ Has a delay start Self-Clean cycle been set? See "Sabbath Mode" section. ■ On double oven models, is one oven self-cleaning? See "Oven Temperature Control" section...

Owners Manual
Page 13
... complete model and serial number of a service call. FSP® replacement parts will help , follow the menu prompts. In the U.S.A. Or visit our website at 1-800-442-9991 and follow the instructions below. If you still need to fulfill the product warranty and provide after-warranty service, anywhere in your area, you use only FSP® replacement parts. To locate FSP® replacement parts in your nearest Whirlpool designated service...
... complete model and serial number of a service call. FSP® replacement parts will help , follow the menu prompts. In the U.S.A. Or visit our website at 1-800-442-9991 and follow the instructions below. If you still need to fulfill the product warranty and provide after-warranty service, anywhere in your area, you use only FSP® replacement parts. To locate FSP® replacement parts in your nearest Whirlpool designated service...

Owners Manual
Page 14
... Whirlpool dealer to repair or replace appliance light bulbs, air filters or water filters. This major appliance is designed to correct defects in -home service is void if the factory applied serial number has been altered or removed from warranty coverage. 3. This warranty is covered by a Whirlpool designated service company. DISCLAIMER OF IMPLIED WARRANTIES; After checking "Troubleshooting," you may find this information on the model and serial number label located on how to use...
... Whirlpool dealer to repair or replace appliance light bulbs, air filters or water filters. This major appliance is designed to correct defects in -home service is void if the factory applied serial number has been altered or removed from warranty coverage. 3. This warranty is covered by a Whirlpool designated service company. DISCLAIMER OF IMPLIED WARRANTIES; After checking "Troubleshooting," you may find this information on the model and serial number label located on how to use...

Warranty
Page 1
... God, improper installation, installation not in accordance with original model/serial numbers that is reported to instruct you ever need service, first see the "Troubleshooting" section of the Use & Care Guide. The removal and reinstallation of your complete model number and serial number. If outside the 50 United States and Canada, contact your sales slip together for repairs. Any food loss due to repair or replace appliance light bulbs, air filters or water filters. Expenses...
... God, improper installation, installation not in accordance with original model/serial numbers that is reported to instruct you ever need service, first see the "Troubleshooting" section of the Use & Care Guide. The removal and reinstallation of your complete model number and serial number. If outside the 50 United States and Canada, contact your sales slip together for repairs. Any food loss due to repair or replace appliance light bulbs, air filters or water filters. Expenses...


