
User Manual
Page 2
... OF CONTENTS OVEN SAFETY 3 PARTS AND FEATURES 5 ELECTRONIC OVEN CONTROL 6 Display 6 Start/Enter 6 Upper Off, Lower Off or Off/Cancel 6 Clock 6 Tones 6 Fahrenheit and Celsius 7 Timer 7 Control Lock 7 Oven Temperature Control 7 OVEN USE 8 Aluminum Foil 8 Positioning Racks and Bakeware 8 Bakeware 8 Meat Thermometer 9 Oven Vent 9 Baking and Roasting 9 Broiling and Custom Broiling 9 Timed Cooking 10 OVEN CARE 11 Self-Cleaning Cycle 11 General Cleaning 12 Oven Lights 13 Oven Door 13 TROUBLESHOOTING 14 ASSISTANCE OR SERVICE 15 In the U.S.A 15 In Canada 15 WARRANTY 16 2
... OF CONTENTS OVEN SAFETY 3 PARTS AND FEATURES 5 ELECTRONIC OVEN CONTROL 6 Display 6 Start/Enter 6 Upper Off, Lower Off or Off/Cancel 6 Clock 6 Tones 6 Fahrenheit and Celsius 7 Timer 7 Control Lock 7 Oven Temperature Control 7 OVEN USE 8 Aluminum Foil 8 Positioning Racks and Bakeware 8 Bakeware 8 Meat Thermometer 9 Oven Vent 9 Baking and Roasting 9 Broiling and Custom Broiling 9 Timed Cooking 10 OVEN CARE 11 Self-Cleaning Cycle 11 General Cleaning 12 Oven Lights 13 Oven Door 13 TROUBLESHOOTING 14 ASSISTANCE OR SERVICE 15 In the U.S.A 15 In Canada 15 WARRANTY 16 2
User Manual
Page 3
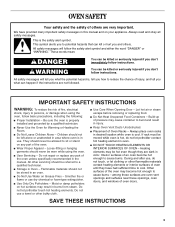
... using the oven. ■ User Servicing - IMPORTANT SAFETY INSTRUCTIONS WARNING: To reduce the risk of oven until they are not followed. Let hot air or steam escape before removing or replacing food. ■ Do Not Heat Unopened Food Containers - SAVE THESE INSTRUCTIONS ...9632; Proper Installation - Do not repair or replace any part of others . Do not let potholder touch hot heating elements. among these openings, oven doors, and windows of the oven unless specifically recommended in oven. ■ DO NOT TOUCH HEATING ELEMENTS OR INTERIOR SURFACES OF OVEN - Children ...
... using the oven. ■ User Servicing - IMPORTANT SAFETY INSTRUCTIONS WARNING: To reduce the risk of oven until they are not followed. Let hot air or steam escape before removing or replacing food. ■ Do Not Heat Unopened Food Containers - SAVE THESE INSTRUCTIONS ...9632; Proper Installation - Do not repair or replace any part of others . Do not let potholder touch hot heating elements. among these openings, oven doors, and windows of the oven unless specifically recommended in oven. ■ DO NOT TOUCH HEATING ELEMENTS OR INTERIOR SURFACES OF OVEN - Children ...

User Manual
Page 4
... potential exposure to cause cancer, birth defects, or other utensils. IMPORTANT SAFETY INSTRUCTIONS For self-cleaning ovens: ■ Do Not Clean Door Gasket - Remove broiler pan and other reproductive harm. SAVE THESE INSTRUCTIONS The California Safe Drinking Water and Toxic Enforcement Act requires the Governor of California to publish a list of substances known to the State of California to cause cancer, birth...
... potential exposure to cause cancer, birth defects, or other utensils. IMPORTANT SAFETY INSTRUCTIONS For self-cleaning ovens: ■ Do Not Clean Door Gasket - Remove broiler pan and other reproductive harm. SAVE THESE INSTRUCTIONS The California Safe Drinking Water and Toxic Enforcement Act requires the Governor of California to publish a list of substances known to the State of California to cause cancer, birth...
User Manual
Page 5
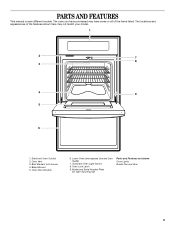
Oven Lock Latch 9. Lower Oven (see separate Use and Care Guide) 7. The oven you have some or all of the features shown here may have purchased may not match your model. 1 2 7 8 3 4 9 5 6 1. Electronic Oven Control 2. Oven Door Window 6. Model and Serial Number Plate (on right mounting rail) Parts and Features not shown Oven Lights Broiler Pan and Grid 5 The locations and appearances of the items listed. Oven Vent 3. Automatic Oven Light Switch 8. Broil Element (not shown) 4. Bake Element 5. PARTS AND FEATURES This manual covers different models.
Oven Lock Latch 9. Lower Oven (see separate Use and Care Guide) 7. The oven you have some or all of the features shown here may have purchased may not match your model. 1 2 7 8 3 4 9 5 6 1. Electronic Oven Control 2. Oven Door Window 6. Model and Serial Number Plate (on right mounting rail) Parts and Features not shown Oven Lights Broiler Pan and Grid 5 The locations and appearances of the items listed. Oven Vent 3. Automatic Oven Light Switch 8. Broil Element (not shown) 4. Bake Element 5. PARTS AND FEATURES This manual covers different models.
User Manual
Page 6
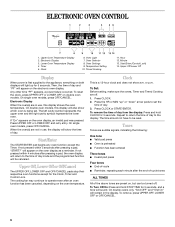
... reset. On single oven models, press OFF/CANCEL. will sound. To remove, press UPPER OFF, LOWER OFF or OFF/CANCEL. 6 ELECTRONIC OVEN CONTROL 1. Clock 6. Oven Light 7. Oven Settings 9. Temperature Setting 10. Timed Cooking 11. Minute 13. Any other time "PF" appears, a power failure occurred. To reset the clock, press UPPER OFF or LOWER OFF on both displays will show the time of day from the display: Press and hold STOP TIME for 5 seconds. On double oven models, this display...
... reset. On single oven models, press OFF/CANCEL. will sound. To remove, press UPPER OFF, LOWER OFF or OFF/CANCEL. 6 ELECTRONIC OVEN CONTROL 1. Clock 6. Oven Light 7. Oven Settings 9. Temperature Setting 10. Timed Cooking 11. Minute 13. Any other time "PF" appears, a power failure occurred. To reset the clock, press UPPER OFF or LOWER OFF on both displays will show the time of day from the display: Press and hold STOP TIME for 5 seconds. On double oven models, this display...
User Manual
Page 7
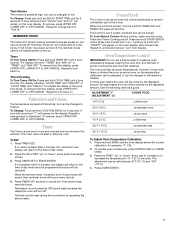
... and hold CUSTOM BROIL for 5 seconds. To remove, touch UPPER OFF, LOWER OFF or OFF/CANCEL. The Timer does not start or stop reminder tones. Press TIMER OFF anytime to measure oven temperature because opening the oven door and element or burner cycling may cook faster or slower than your previous oven, so the temperature calibration can be independently turned on . Oven Temperature Control IMPORTANT: Do not use of day mode and the...
... and hold CUSTOM BROIL for 5 seconds. To remove, touch UPPER OFF, LOWER OFF or OFF/CANCEL. The Timer does not start or stop reminder tones. Press TIMER OFF anytime to measure oven temperature because opening the oven door and element or burner cycling may cook faster or slower than your previous oven, so the temperature calibration can be independently turned on . Oven Temperature Control IMPORTANT: Do not use of day mode and the...
User Manual
Page 8
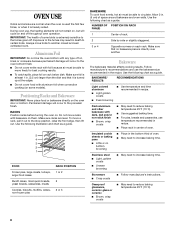
... glass or ceramic ■ Brown, crisp crusts ■ May need to reduce baking temperatures 25°F (15°C). ■ Use suggested baking time. ■ For pies, breads and casseroles, use the bakeware size recommended in death to another . During oven use, the heating elements will not remain on, but will cycle on the oven door or bottom. Make sure racks are normal when the oven is used the...
... glass or ceramic ■ Brown, crisp crusts ■ May need to reduce baking temperatures 25°F (15°C). ■ Use suggested baking time. ■ For pies, breads and casseroles, use the bakeware size recommended in death to another . During oven use, the heating elements will not remain on, but will cycle on the oven door or bottom. Make sure racks are normal when the oven is used the...
User Manual
Page 9
... air circulation, affecting cooking and cleaning results. The bake element will appear on the display. Broil element Broiling uses direct radiant heat from the oven. Oven vent 3. Press the TEMP "up" or "down and "PrE" will not. The tip of the thermometer should not be set plastics, paper or other than 350°F (177°C). Doing so will sound. 4. To Bake or Roast: 1. The bake range can be changed any time after the preheat...
... air circulation, affecting cooking and cleaning results. The bake element will appear on the display. Broil element Broiling uses direct radiant heat from the oven. Oven vent 3. Press the TEMP "up" or "down and "PrE" will not. The tip of the thermometer should not be set plastics, paper or other than 350°F (177°C). Doing so will sound. 4. To Bake or Roast: 1. The bake range can be changed any time after the preheat...
User Manual
Page 10
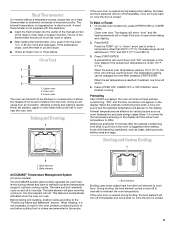
... stop position before or after cooking. Very thin cuts of time, and/or shut off . 5. To Custom Broil: Changing the temperature when custom broiling allows more than 500°F (260°C). BROILING CHART For best results, place food 3 in the heated oven, making cleaning more from the broil element. ■ Use only the broiler pan and grid provided with foil. Press START/ENTER. The set length of fish, poultry or meat...
... stop position before or after cooking. Very thin cuts of time, and/or shut off . 5. To Custom Broil: Changing the temperature when custom broiling allows more than 500°F (260°C). BROILING CHART For best results, place food 3 in the heated oven, making cleaning more from the broil element. ■ Use only the broiler pan and grid provided with foil. Press START/ENTER. The set length of fish, poultry or meat...
User Manual
Page 11
... oven during the Self-Cleaning cycle. Press BAKE or CONVECT UPPER (on the oven display. Press COOK TIME. 4. Press START/ENTER. When the stop time is reached, the oven will shut off automatically and "End" will automatically turn on the oven display. Always move freely. Heavy soil results in burns. This area does not get rid of day. To Set a Cook Time: 1. On double oven models only, press UPPER OVEN or LOWER OVEN. 2. Press the number...
... oven during the Self-Cleaning cycle. Press BAKE or CONVECT UPPER (on the oven display. Press COOK TIME. 4. Press START/ENTER. When the stop time is reached, the oven will shut off automatically and "End" will automatically turn on the oven display. Always move freely. Heavy soil results in burns. This area does not get rid of day. To Set a Cook Time: 1. On double oven models only, press UPPER OVEN or LOWER OVEN. 2. Press the number...
User Manual
Page 12
... double oven models only, press UPPER OVEN or LOWER OVEN. 2. Press the HR "up" or "down " arrow pad to clear the oven display. Press START/ENTER. The door will not unlock until the oven cools. To Stop Self-Clean any pad or open the oven door to set between 3 hours 30 minutes to 4 hours 30 minutes for average to soft cloth or sponge, not directly on panel. The oven light will not work...
... double oven models only, press UPPER OVEN or LOWER OVEN. 2. Press the HR "up" or "down " arrow pad to clear the oven display. Press START/ENTER. The door will not unlock until the oven cools. To Stop Self-Clean any pad or open the oven door to set between 3 hours 30 minutes to 4 hours 30 minutes for average to soft cloth or sponge, not directly on panel. The oven light will not work...

User Manual
Page 13
Remove racks or they will not work during the Self-Cleaning cycle. Porcelain enamel only, not chrome ■ Dishwasher Oven Lights The oven lights are standard 40-watt appliance bulbs. On double oven models with standard-clean lower ovens, the oven lights will not come on when the oven door is opened. The oven lights will discolor and become harder to slide. To Replace: Before replacing, make sure the oven is set into the door. 3. Disconnect power. 2. Close the...
Remove racks or they will not work during the Self-Cleaning cycle. Porcelain enamel only, not chrome ■ Dishwasher Oven Lights The oven lights are standard 40-watt appliance bulbs. On double oven models with standard-clean lower ovens, the oven lights will not come on when the oven door is opened. The oven lights will discolor and become harder to slide. To Replace: Before replacing, make sure the oven is set into the door. 3. Disconnect power. 2. Close the...

User Manual
Page 14
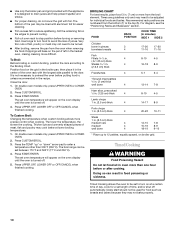
...? See "Sabbath Mode" section. ■ On double oven models, is the Control Lock set ? Clear the display. See the Installation Instructions. ■ Is the proper temperature set ? Move rack to higher position in order to cover the edge of time being used ? Nothing will not operate ■ Is the electronic oven control set ? See "Positioning Racks and Bakeware" section. ■ Is there proper air circulation around bakeware? Adjust cooking time. ■ Has the oven door been opened while cooking? TROUBLESHOOTING Try...
...? See "Sabbath Mode" section. ■ On double oven models, is the Control Lock set ? Clear the display. See the Installation Instructions. ■ Is the proper temperature set ? Move rack to higher position in order to cover the edge of time being used ? Nothing will not operate ■ Is the electronic oven control set ? See "Positioning Racks and Bakeware" section. ■ Is there proper air circulation around bakeware? Adjust cooking time. ■ Has the oven door been opened while cooking? TROUBLESHOOTING Try...
User Manual
Page 15
... assistance or service, please check "Troubleshooting." FSP® replacement parts will help , follow the menu prompts. Our consultants provide assistance with the same precision used to local dealers, repair parts distributors, and service companies. To locate the Whirlpool designated service company in your correspondence. For further assistance If you need further assistance, you still need to fulfill the product warranty and provide after-warranty service, anywhere in...
... assistance or service, please check "Troubleshooting." FSP® replacement parts will help , follow the menu prompts. Our consultants provide assistance with the same precision used to local dealers, repair parts distributors, and service companies. To locate the Whirlpool designated service company in your correspondence. For further assistance If you need further assistance, you still need to fulfill the product warranty and provide after-warranty service, anywhere in...
User Manual
Page 16
... recommended in the Use & Care Guide. 6. Contact your complete model number and serial number. You can be repaired in the home. 4. WHIRLPOOL® COOKTOP, BUILT-IN OVEN AND RANGE WARRANTY ONE-YEAR FULL WARRANTY For one year from the date of purchase, when this appliance is operated and maintained according to instructions attached to or furnished with the product, Whirlpool Corporation will pay for FSP® replacement parts for as shown...
... recommended in the Use & Care Guide. 6. Contact your complete model number and serial number. You can be repaired in the home. 4. WHIRLPOOL® COOKTOP, BUILT-IN OVEN AND RANGE WARRANTY ONE-YEAR FULL WARRANTY For one year from the date of purchase, when this appliance is operated and maintained according to instructions attached to or furnished with the product, Whirlpool Corporation will pay for FSP® replacement parts for as shown...
Installation Instructions
Page 1
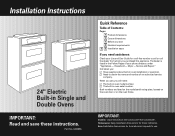
.../serial rating plate, located on the oven door or on the oven frame. Part No. 8300656 Quick Reference Table of Contents: Pages 1 Product dimensions 1 Cutout dimensions 1 Before you start 2 Electrical requirements 2 3 Installation steps If you need : ࠜ The built-in oven model number. ࠜ The built-in the Yellow Pages of an authorized service company. Household - Call when you purchased this appliance. Save Installation Instructions for future reference. The dealer is listed in oven serial number. Service and Repair." Homeowner: Keep Installation Instructions...
.../serial rating plate, located on the oven door or on the oven frame. Part No. 8300656 Quick Reference Table of Contents: Pages 1 Product dimensions 1 Cutout dimensions 1 Before you start 2 Electrical requirements 2 3 Installation steps If you need : ࠜ The built-in oven model number. ࠜ The built-in the Yellow Pages of an authorized service company. Household - Call when you purchased this appliance. Save Installation Instructions for future reference. The dealer is listed in oven serial number. Service and Repair." Homeowner: Keep Installation Instructions...
Installation Instructions
Page 2
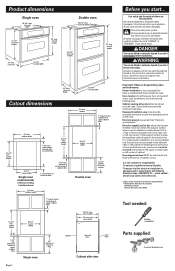
... Park Quincy, Massachusetts 02269 Tool needed: Phillips screwdriver Parts supplied: 4 screws (double oven) cabinet width 1-1/2" min. cutout height 22-1/2" cutout width Single oven undercounter (without cooktop installed above) 24" min. All safety messages will tell you don't follow instructions. Oven support surface MUST be used. bottom of cutout to top of cabinet door 5-1/4" bottom of cutout to floor 1" top of cutout to bottom of upper cabinet door 22-1/2" cutout width 14-3/4" bottom of the...
... Park Quincy, Massachusetts 02269 Tool needed: Phillips screwdriver Parts supplied: 4 screws (double oven) cabinet width 1-1/2" min. cutout height 22-1/2" cutout width Single oven undercounter (without cooktop installed above) 24" min. All safety messages will tell you don't follow instructions. Oven support surface MUST be used. bottom of cutout to top of cabinet door 5-1/4" bottom of cutout to floor 1" top of cutout to bottom of upper cabinet door 22-1/2" cutout width 14-3/4" bottom of the...
Installation Instructions
Page 3
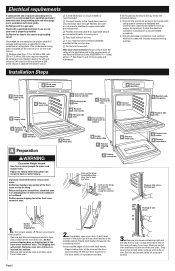
... rating of the appliance and to the fused disconnect (or circuit breaker box) through flexible, armored or non-metallic sheathed, copper cable (with a qualified electrician if you will protect the lower oven trim until oven is inserted into cabinet. • Remove and set aside racks and other surfaces with local codes. D Check oven operation. C Use screws to attach oven to a gas pipe. A Remove oven door. Turn power supply off. Page 2 A Remove side trim. A Remove trim screws. Completely open...
... rating of the appliance and to the fused disconnect (or circuit breaker box) through flexible, armored or non-metallic sheathed, copper cable (with a qualified electrician if you will protect the lower oven trim until oven is inserted into cabinet. • Remove and set aside racks and other surfaces with local codes. D Check oven operation. C Use screws to attach oven to a gas pipe. A Remove oven door. Turn power supply off. Page 2 A Remove side trim. A Remove trim screws. Completely open...
Installation Instructions
Page 4
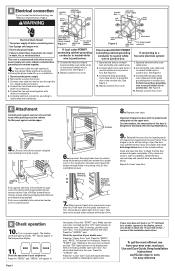
... display area. BAKE BROIL CLEAN Check the operation of hinges into place) and rotate both hinge latches back to follow these instructions can result in as far as they will go. Make sure the oven door is closed and the "ON" light is shown in the temperature display. 11. You should feel heat from oven U.L.-listed conduit connector If local codes PERMIT connecting cabinet-grounding conductor to neutral (white) wire in cabinet cutout...
... display area. BAKE BROIL CLEAN Check the operation of hinges into place) and rotate both hinge latches back to follow these instructions can result in as far as they will go. Make sure the oven door is closed and the "ON" light is shown in the temperature display. 11. You should feel heat from oven U.L.-listed conduit connector If local codes PERMIT connecting cabinet-grounding conductor to neutral (white) wire in cabinet cutout...
Installation Instructions
Page 5
... quality built into your built-in oven by calling an authorized service company. Part No. 8300656 © 2001 Printed in U.S.A. Service and Repair" for a toll-free number to call or call , you purchased this appliance. Both numbers are listed on the model/serial rating plate, located on the oven door or on the oven frame. Household - The tollfree phone number is not tripped or house fuse blown. ࠜ See Use and Care Guide for troubleshooting list...
... quality built into your built-in oven by calling an authorized service company. Part No. 8300656 © 2001 Printed in U.S.A. Service and Repair" for a toll-free number to call or call , you purchased this appliance. Both numbers are listed on the model/serial rating plate, located on the oven door or on the oven frame. Household - The tollfree phone number is not tripped or house fuse blown. ࠜ See Use and Care Guide for troubleshooting list...


