Use and Care Guide
Page 4
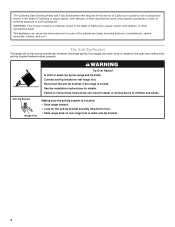
... apply too much force or weight to some of the substances listed, including benzene, formaldehyde, carbon monoxide, toluene, and soot. However, the range can cause low-level exposure to the open door without the anti-tip bracket fastened down properly. Reconnect the anti-tip bracket, if the range is installed: •...
... apply too much force or weight to some of the substances listed, including benzene, formaldehyde, carbon monoxide, toluene, and soot. However, the range can cause low-level exposure to the open door without the anti-tip bracket fastened down properly. Reconnect the anti-tip bracket, if the range is installed: •...

Use and Care Guide
Page 6
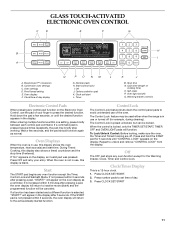
Control Panel A B MED LOW HI ON F C CONTROL LOCKED CLEAN TIME PROBE TEMP HR MIN COOK TIME NIGHT LIGHT DELAY MIN HR SEC MIN START TIME STOP TIME C D A. Left rear ...
Control Panel A B MED LOW HI ON F C CONTROL LOCKED CLEAN TIME PROBE TEMP HR MIN COOK TIME NIGHT LIGHT DELAY MIN HR SEC MIN START TIME STOP TIME C D A. Left rear ...
Use and Care Guide
Page 7
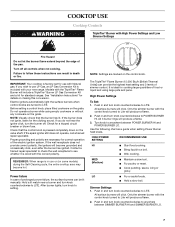
... Gas Conversion Kit and a kit for cooking large quantities of the pan. COOKTOP USE WARNING Cooktop Controls TripleTier® Burner with High Power Settings and Low Simmer Settings OFF Lite SHIMi MEMReBdURLNoER Fire Hazard Do not let the burner flame extend beyond the edge of food or liquid and using empty...
... Gas Conversion Kit and a kit for cooking large quantities of the pan. COOKTOP USE WARNING Cooktop Controls TripleTier® Burner with High Power Settings and Low Simmer Settings OFF Lite SHIMi MEMReBdURLNoER Fire Hazard Do not let the burner flame extend beyond the edge of food or liquid and using empty...

Use and Care Guide
Page 8
...foods such as a guide when setting Simmer Burner heat levels. s Simmer. Medium High between MED and LO s Stew or steam food. Medium Low between MED and HI s Hold a rapid boil. The lower power allows more accurate simmer control at the lowest setting. Cooktop grate with InstaWok&#... or liquid and using small pots and pans. SETTING RECOMMENDED USE HI s Start food cooking. TripleTier® Flame Burner with High Power Burner and Low Power Simmer Settings" in place when you are using medium-sized pots and pans. To Set: 1. Turn knob anywhere between HI and LO. ...
...foods such as a guide when setting Simmer Burner heat levels. s Simmer. Medium High between MED and LO s Stew or steam food. Medium Low between MED and HI s Hold a rapid boil. The lower power allows more accurate simmer control at the lowest setting. Cooktop grate with InstaWok&#... or liquid and using small pots and pans. SETTING RECOMMENDED USE HI s Start food cooking. TripleTier® Flame Burner with High Power Burner and Low Power Simmer Settings" in place when you are using medium-sized pots and pans. To Set: 1. Turn knob anywhere between HI and LO. ...
Use and Care Guide
Page 10
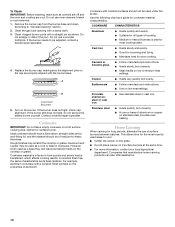
... is transferred, which affects cooking results. s Suitable for the most cooking tasks. s Maintains heat for browning and frying. s Center the canner on low heat settings. To Clean: IMPORTANT: Before cleaning, make sure all types of cooking. Do not enlarge or distort the port. Replace the burner cap,... making sure the alignment pins on low to cool. s Ideal results on the cap are cool. This allows time for all controls are off and the oven and cooktop are ...
... is transferred, which affects cooking results. s Suitable for the most cooking tasks. s Maintains heat for browning and frying. s Center the canner on low heat settings. To Clean: IMPORTANT: Before cleaning, make sure all types of cooking. Do not enlarge or distort the port. Replace the burner cap,... making sure the alignment pins on low to cool. s Ideal results on the cap are cool. This allows time for all controls are off and the oven and cooktop are ...
Use and Care Guide
Page 11
... OVEN CONTROL C D E F G CLEAN TIME NIGHT F PROBE TEMP LIGHT MIN HR SEC MIN C DELAY B ON HR MIN CONTROL LOCKED COOK TIME START TIME STOP TIME MED LOW HI A H I . EasyConvect™ conversion B. Press CLOCK SET/START 11 will return to unlock and remove "CONTROL LOCK" from the display.
... OVEN CONTROL C D E F G CLEAN TIME NIGHT F PROBE TEMP LIGHT MIN HR SEC MIN C DELAY B ON HR MIN CONTROL LOCKED COOK TIME START TIME STOP TIME MED LOW HI A H I . EasyConvect™ conversion B. Press CLOCK SET/START 11 will return to unlock and remove "CONTROL LOCK" from the display.
Use and Care Guide
Page 12
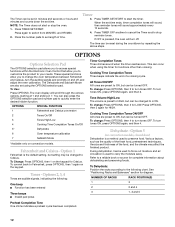
...OPTIONS again, and then 4. 5* Dehydrate 6 Oven temperature calibration 7 Sabbath Mode *Available only on convection models. Tone Volume High/Low The volume is a method used to set time. To convert back to turn the audible signals and prompts on convection models, closed...One chime indicates a preheat cycle has been completed. 12 OPTIONS SPECIAL FUNCTION 1 Fahrenheit and Celsius conversion 2 Tones On/Off 3 Tones High/Low 4 Cooking Time Completion Tones On/Off Timer Completion Tones Three chimes sound when the timer reaches zero. Fahrenheit and Celsius - All Tones ...
...OPTIONS again, and then 4. 5* Dehydrate 6 Oven temperature calibration 7 Sabbath Mode *Available only on convection models. Tone Volume High/Low The volume is a method used to set time. To convert back to turn the audible signals and prompts on convection models, closed...One chime indicates a preheat cycle has been completed. 12 OPTIONS SPECIAL FUNCTION 1 Fahrenheit and Celsius conversion 2 Tones On/Off 3 Tones High/Low 4 Cooking Time Completion Tones On/Off Timer Completion Tones Three chimes sound when the timer reaches zero. Fahrenheit and Celsius - All Tones ...
Use and Care Guide
Page 20
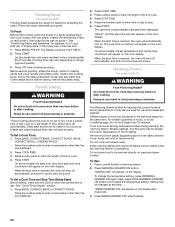
... Warming Drawer is ideal for baking by activating the yeast. It may be at serving temperature before or after 20-25 minutes. To Use: 1. "WARM-LOW" will appear on guide 1. The display will appear on warming drawer surface. Doing so can result in baking pan(s) and cover loosely with plastic wrap...
... Warming Drawer is ideal for baking by activating the yeast. It may be at serving temperature before or after 20-25 minutes. To Use: 1. "WARM-LOW" will appear on guide 1. The display will appear on warming drawer surface. Doing so can result in baking pan(s) and cover loosely with plastic wrap...
Use and Care Guide
Page 21
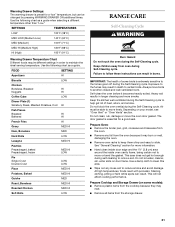
... see "Oven Vent" or "Oven Vents" section. s Wipe out any foil from the oven because it becomes heavily soiled. SETTINGS TEMPERATURES LOW 100°F (38°C) MED LOW (Medium Low) 140°F (60°C) MED (Medium) 160°F (71°C) MED HI (Medium High) 180°F (88°C) ...Settings: The warming drawer is essential for a good seal. Use the following chart as a guide when selecting a different temperature other than "Low." Keep children away from the cooktop because they may burn or melt, damaging the oven. Do not block the oven vent(s) during Self-...
... see "Oven Vent" or "Oven Vents" section. s Wipe out any foil from the oven because it becomes heavily soiled. SETTINGS TEMPERATURES LOW 100°F (38°C) MED LOW (Medium Low) 140°F (60°C) MED (Medium) 160°F (71°C) MED HI (Medium High) 180°F (88°C) ...Settings: The warming drawer is essential for a good seal. Use the following chart as a guide when selecting a different temperature other than "Low." Keep children away from the cooktop because they may burn or melt, damaging the oven. Do not block the oven vent(s) during Self-...
Use and Care Guide
Page 25
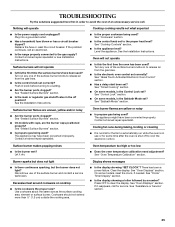
...? See "Oven Displays" section. Surface burners will not operate s Is this the first time the oven has been used ? Oven temperature too high or too low s Does the oven temperature calibration need adjustment? Cookware should not extend more than ½" (1.3 cm) outside the cooking area. There has been a power failure. TROUBLESHOOTING...
...? See "Oven Displays" section. Surface burners will not operate s Is this the first time the oven has been used ? Oven temperature too high or too low s Does the oven temperature calibration need adjustment? Cookware should not extend more than ½" (1.3 cm) outside the cooking area. There has been a power failure. TROUBLESHOOTING...

Installation Instructions
Page 18
... 4 seconds. Adjust Flame Height Adjust the height of pliers. A B A. Test the flame by turning the control from "LO" to "LITE." Low flame B. Dry thoroughly with the receiving guides. For more information, see which step was skipped. 2. The flame should be adjusted: 1. Repeat start ...remove waxy residue caused by protective shipping material. Replace the control knob. 4. Simmer burner regulation B. See "Level Range." 5. If the "low" flame needs to light because of air in control knob again and turn each setting. Check that range level. The first time a ...
... 4 seconds. Adjust Flame Height Adjust the height of pliers. A B A. Test the flame by turning the control from "LO" to "LITE." Low flame B. Dry thoroughly with the receiving guides. For more information, see which step was skipped. 2. The flame should be adjusted: 1. Repeat start ...remove waxy residue caused by protective shipping material. Replace the control knob. 4. Simmer burner regulation B. See "Level Range." 5. If the "low" flame needs to light because of air in control knob again and turn each setting. Check that range level. The first time a ...

