
Installation Guide
Page 2
TABLE OF CONTENTS RANGE HOOD SAFETY 2 INSTALLATION REQUIREMENTS 4 Tools and Parts 4 Location Requirements 4 Venting Requirements 5 Electrical Requirements 6 INSTALLATION INSTRUCTIONS 7 Prepare Location 7 Install Range Hood 8 Connect Vent System 8 Make Electrical Connection 9 Install Vent Covers 9 Complete Installation 9 RANGE HOOD USE 10 Range Hood Controls 10 RANGE HOOD CARE 10 Cleaning 10 WIRING DIAGRAM 12 ASSISTANCE OR SERVICE 13 In the U.S.A 13 In Canada 13 Accessories 13 WARRANTY 14 TABLE DES MATIÈRES SÉCURITÉ DE LA HOTTE DE CUISINIÈRE 15 ...
TABLE OF CONTENTS RANGE HOOD SAFETY 2 INSTALLATION REQUIREMENTS 4 Tools and Parts 4 Location Requirements 4 Venting Requirements 5 Electrical Requirements 6 INSTALLATION INSTRUCTIONS 7 Prepare Location 7 Install Range Hood 8 Connect Vent System 8 Make Electrical Connection 9 Install Vent Covers 9 Complete Installation 9 RANGE HOOD USE 10 Range Hood Controls 10 RANGE HOOD CARE 10 Cleaning 10 WIRING DIAGRAM 12 ASSISTANCE OR SERVICE 13 In the U.S.A 13 In Canada 13 Accessories 13 WARRANTY 14 TABLE DES MATIÈRES SÉCURITÉ DE LA HOTTE DE CUISINIÈRE 15 ...

Installation Guide
Page 3
... vented outdoors. Grease should not be done by qualified person(s) in the manner intended by the manufacturer. You know you have questions, contact the manufacturer. ■ Before servicing or cleaning the unit, switch power off the burner. aBased on fan or filter. ■ Use proper pan size. CAUTION: For general ventilating use this unit only in accordance with all applicable codes and standards, including fire-rated...
... vented outdoors. Grease should not be done by qualified person(s) in the manner intended by the manufacturer. You know you have questions, contact the manufacturer. ■ Before servicing or cleaning the unit, switch power off the burner. aBased on fan or filter. ■ Use proper pan size. CAUTION: For general ventilating use this unit only in accordance with all applicable codes and standards, including fire-rated...

Installation Guide
Page 4
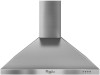
...the model/serial rating plate. Canopy hood location should be sealed. Recirculation Kit Part Number W10349327 is a registered trademark of the vent hood. INSTALLATION REQUIREMENTS Tools and Parts Gather the required tools and parts before starting installation. Tools needed ■ Home power supply cable ■ ½" (12.7 mm) UL listed or CSA approved strain relief ■ 3 UL listed wire connectors For vented installations, you will be used. For non-vented (recirculating) Installation see "For Nonvented (recirculating) Installations Only" in ceiling and wall where...
...the model/serial rating plate. Canopy hood location should be sealed. Recirculation Kit Part Number W10349327 is a registered trademark of the vent hood. INSTALLATION REQUIREMENTS Tools and Parts Gather the required tools and parts before starting installation. Tools needed ■ Home power supply cable ■ ½" (12.7 mm) UL listed or CSA approved strain relief ■ 3 UL listed wire connectors For vented installations, you will be used. For non-vented (recirculating) Installation see "For Nonvented (recirculating) Installations Only" in ceiling and wall where...

Installation Guide
Page 5
...) min.* 7³⁄₈" (18.8 cm) Vent and power supply cable entry location 15" (38.1 cm) Side cabinet 30" (76.2 cm) Side cabinet "X" bottom of canopy to meet varying ceiling or soffit heights depending on the cold air side of the thermal break. For higher ceilings, a Stainless Steel Chimney Extension Kit Part Number W10337357 is needed . The chimney extension replaces the chimney shipped with the range hood. ■ Use caulking to seal all joints in the...
...) min.* 7³⁄₈" (18.8 cm) Vent and power supply cable entry location 15" (38.1 cm) Side cabinet 30" (76.2 cm) Side cabinet "X" bottom of canopy to meet varying ceiling or soffit heights depending on the cold air side of the thermal break. For higher ceilings, a Stainless Steel Chimney Extension Kit Part Number W10337357 is needed . The chimney extension replaces the chimney shipped with the range hood. ■ Use caulking to seal all joints in the...

Installation Guide
Page 6
... (meters) for each vent piece used in the non-vented (recirculating) version, by fitting a charcoal filter and the deflector. wall cap = 5.0 ft (1.5 m) = 0.0 ft (0.0 m) 8 ft (2.4 m) straight = 8.0 ft (2.4 m) Length of the appliance as specified on the model/serial rating plate. Wall cap B. 6" (15.2 cm) round vent A. Connect the aluminum wiring to the added section of copper wire using special connectors and/or tools designed and UL listed for information on the rear wall of the National Electrical Code, ANSI/NFPA 70...
... (meters) for each vent piece used in the non-vented (recirculating) version, by fitting a charcoal filter and the deflector. wall cap = 5.0 ft (1.5 m) = 0.0 ft (0.0 m) 8 ft (2.4 m) straight = 8.0 ft (2.4 m) Length of the appliance as specified on the model/serial rating plate. Wall cap B. 6" (15.2 cm) round vent A. Connect the aluminum wiring to the added section of copper wire using special connectors and/or tools designed and UL listed for information on the rear wall of the National Electrical Code, ANSI/NFPA 70...

Installation Guide
Page 7
... and wires from the ceiling. 2. Vent cover support bracket D. 5 x 45 mm screws 4. Attach vent cover support bracket to the National Electrical Code or CSA Standards and local codes and ordinances. Use caulk to slide range hood into wood. ■ Before making cutouts, make sure there is complete. 4. Installations using telescoping upper and lower vent cover assembly 1. Failure to use: roof, wall, or nonvented. 3. Determine the required height for exhaust vent. ■ Check your ceiling height and the hood height maximum before you select your hood. 1. Place covering over...
... and wires from the ceiling. 2. Vent cover support bracket D. 5 x 45 mm screws 4. Attach vent cover support bracket to the National Electrical Code or CSA Standards and local codes and ordinances. Use caulk to slide range hood into wood. ■ Before making cutouts, make sure there is complete. 4. Installations using telescoping upper and lower vent cover assembly 1. Failure to use: roof, wall, or nonvented. 3. Determine the required height for exhaust vent. ■ Check your ceiling height and the hood height maximum before you select your hood. 1. Place covering over...

Installation Guide
Page 8
...the Recirculation Kit. Exhaust outlet 3. Using 2 or more people, hang range hood on 2 mounting screws through the mounting slots on top of the air deflector to cut vent duct D. Remove the grease filter. Deflector 2. A. Vent duct E. Slide the duct onto the bottom of hood. Place the assembled air deflector and duct over transition piece. 2. assembly screws provided with clamps. 3. A B X C D E B A. Check that back draft dampers work properly. Assemble the air deflector with the duct cover bracket with 2 - 3.5 x 9.5 mm sheet metal screws. Install transition...
...the Recirculation Kit. Exhaust outlet 3. Using 2 or more people, hang range hood on 2 mounting screws through the mounting slots on top of the air deflector to cut vent duct D. Remove the grease filter. Deflector 2. A. Vent duct E. Slide the duct onto the bottom of hood. Place the assembled air deflector and duct over transition piece. 2. assembly screws provided with clamps. 3. A B X C D E B A. Check that back draft dampers work properly. Assemble the air deflector with the duct cover bracket with 2 - 3.5 x 9.5 mm sheet metal screws. Install transition...
Installation Guide
Page 9
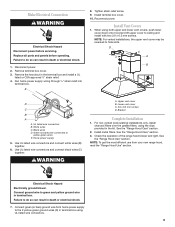
... wire connected to ceiling and install with two 2.9 x 6.5 mm screws. Use UL listed wire connectors and connect white wires (B) together. 6. For non-vented (recirculating) installations only, install charcoal filters over the grease filters, using UL listed wire connectors. 9 Check the operation of the range hood blower and light. Connect ground wire to green and yellow ground wire in the terminal box and install a UL listed or CSA approved ¹⁄₂" strain relief. 4. Install terminal box cover. 10. Black wires D. Home power supply 5. See the "Range Hood Care" section...
... wire connected to ceiling and install with two 2.9 x 6.5 mm screws. Use UL listed wire connectors and connect white wires (B) together. 6. For non-vented (recirculating) installations only, install charcoal filters over the grease filters, using UL listed wire connectors. 9 Check the operation of the range hood blower and light. Connect ground wire to green and yellow ground wire in the terminal box and install a UL listed or CSA approved ¹⁄₂" strain relief. 4. Install terminal box cover. 10. Black wires D. Home power supply 5. See the "Range Hood Care" section...
Installation Guide
Page 10
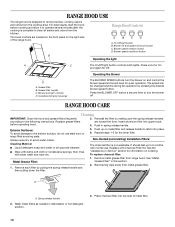
... operating hood. 3. Grease filter handle C. Repeat steps 1-5 for information on metal filter and release handle to 6 months with normal use steel wool or soap-filled scouring pads. Non-Vented (recirculating) Installation Filters: Cleaning Method: ■ Liquid detergent soap and water, or all smoke and odors from the cooktop area. To replace charcoal filter: Metal Grease Filter: 1. Place charcoal filter into top side of the range hood. Blower speed maximum button Operating the light A C The On/Off light button controls both lights. Operating...
... operating hood. 3. Grease filter handle C. Repeat steps 1-5 for information on metal filter and release handle to 6 months with normal use steel wool or soap-filled scouring pads. Non-Vented (recirculating) Installation Filters: Cleaning Method: ■ Liquid detergent soap and water, or all smoke and odors from the cooktop area. To replace charcoal filter: Metal Grease Filter: 1. Place charcoal filter into top side of the range hood. Blower speed maximum button Operating the light A C The On/Off light button controls both lights. Operating...
Installation Guide
Page 11
... bulb. 5. Replace lens cover and reinstall screw. 6. Repeat steps 2 - 5 for the other bulb. 7. Lens covers B. Bend spring clips back into place to secure the charcoal filter to cool. Remove lens cover and set lens cover and the screw aside. 5. To avoid damage or decreasing the life of the new bulb, do not operate, make sure the bulbs are inserted correctly before calling service. 1. Replace bulb, using tissue or wearing cotton gloves to remove screw...
... bulb. 5. Replace lens cover and reinstall screw. 6. Repeat steps 2 - 5 for the other bulb. 7. Lens covers B. Bend spring clips back into place to secure the charcoal filter to cool. Remove lens cover and set lens cover and the screw aside. 5. To avoid damage or decreasing the life of the new bulb, do not operate, make sure the bulbs are inserted correctly before calling service. 1. Replace bulb, using tissue or wearing cotton gloves to remove screw...
Installation Guide
Page 12
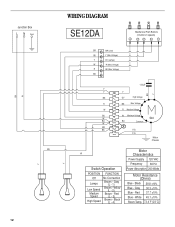
...W BR BK Y/G Y/G Motor Chassis W Switch Operation POSITION FUNCTION Off No Connection Lamps Brown - Gray (L - 1) Low Speed Brown - Black (L - 4) Motor Characteristics Power Supply 120 VAC Frequency 60 Hz Power Absorption 240 Watts Motor Resistance (Ohms) Blue ...Lamps) W R (Med. Black 28.8 ±10% Blue - Voltage) BK 12.5uF Y Y Y BK GY High Voltage R BK Max. Red 37.7 ±10% Blue - BK W Y Y BR Y Junction Box L N Gnd BU 12 WIRING DIAGRAM SE12DA Mechanical Push Buttons (4 buttons 3 speeds) BR BR (Line) BU Y (Min. Red Speed (L - 3) High Speed...
...W BR BK Y/G Y/G Motor Chassis W Switch Operation POSITION FUNCTION Off No Connection Lamps Brown - Gray (L - 1) Low Speed Brown - Black (L - 4) Motor Characteristics Power Supply 120 VAC Frequency 60 Hz Power Absorption 240 Watts Motor Resistance (Ohms) Blue ...Lamps) W R (Med. Black 28.8 ±10% Blue - Voltage) BK 12.5uF Y Y Y BK GY High Voltage R BK Max. Red 37.7 ±10% Blue - BK W Y Y BR Y Junction Box L N Gnd BU 12 WIRING DIAGRAM SE12DA Mechanical Push Buttons (4 buttons 3 speeds) BR BR (Line) BU Y (Min. Red Speed (L - 3) High Speed...

Installation Guide
Page 13
... your nearest designated service center. Accessories Recirculation Kit (for non-vented installations only) Order Part Number W10349327 Charcoal Filter Kit (for assistance or service, please know the purchase date and the complete model and serial number of appliances. ■ Use and maintenance procedures. ■ Accessory and repair parts sales. ■ Referrals to Whirlpool Corporation with : ■ Features and specifications on our full line of your request. If you need replacement parts If you need further assistance...
... your nearest designated service center. Accessories Recirculation Kit (for non-vented installations only) Order Part Number W10349327 Charcoal Filter Kit (for assistance or service, please know the purchase date and the complete model and serial number of appliances. ■ Use and maintenance procedures. ■ Accessory and repair parts sales. ■ Referrals to Whirlpool Corporation with : ■ Features and specifications on our full line of your request. If you need replacement parts If you need further assistance...

Installation Guide
Page 14
... Whirlpool servicer is located in accordance with published installation instructions. 11. Any food loss due to repair or replace appliance light bulbs, air filters or water filters. Costs associated with the removal from warranty coverage. 3. DISCLAIMER OF IMPLIED WARRANTIES; If outside the 50 United States and Canada, contact your major appliance if it is installed in an inaccessible location or is not installed in a remote area where service by a Whirlpool designated service company. In Canada...
... Whirlpool servicer is located in accordance with published installation instructions. 11. Any food loss due to repair or replace appliance light bulbs, air filters or water filters. Costs associated with the removal from warranty coverage. 3. DISCLAIMER OF IMPLIED WARRANTIES; If outside the 50 United States and Canada, contact your major appliance if it is installed in an inaccessible location or is not installed in a remote area where service by a Whirlpool designated service company. In Canada...

Warranty Information
Page 1
... for Factory Specified Parts and repair labor to correct defects in a remote area where service by a Whirlpool designated service company. Proof of original purchase date is required to obtain service under these excluded circumstances shall be repaired in the home and only in accordance with electrical or plumbing codes, or use your major appliance, to replace or repair house fuses, or to correct house wiring or plumbing...
... for Factory Specified Parts and repair labor to correct defects in a remote area where service by a Whirlpool designated service company. Proof of original purchase date is required to obtain service under these excluded circumstances shall be repaired in the home and only in accordance with electrical or plumbing codes, or use your major appliance, to replace or repair house fuses, or to correct house wiring or plumbing...


