
Installation Guide
Page 2
... Requirements 4 Venting Requirements 5 Electrical Requirements 6 INSTALLATION INSTRUCTIONS 7 Prepare Location 7 Install Range Hood 8 Connect Vent System 8 Make Electrical Connection 9 Install Vent Covers 9 Complete Installation 9 RANGE HOOD USE 10 Range Hood Controls 10 RANGE HOOD CARE 10 Cleaning 10 WIRING DIAGRAM 12 ASSISTANCE OR SERVICE 13 In the U.S.A 13 ... SCHÉMA DE CÂBLAGE 26 ASSISTANCE OU SERVICE 27 Au Canada 27 Accessoires 27 GARANTIE 27 RANGE HOOD SAFETY Your safety and the safety of injury, and tell you what the potential hazard is the safety alert...
... Requirements 4 Venting Requirements 5 Electrical Requirements 6 INSTALLATION INSTRUCTIONS 7 Prepare Location 7 Install Range Hood 8 Connect Vent System 8 Make Electrical Connection 9 Install Vent Covers 9 Complete Installation 9 RANGE HOOD USE 10 Range Hood Controls 10 RANGE HOOD CARE 10 Cleaning 10 WIRING DIAGRAM 12 ASSISTANCE OR SERVICE 13 In the U.S.A 13 ... SCHÉMA DE CÂBLAGE 26 ASSISTANCE OU SERVICE 27 Au Canada 27 Accessoires 27 GARANTIE 27 RANGE HOOD SAFETY Your safety and the safety of injury, and tell you what the potential hazard is the safety alert...

Installation Guide
Page 3
...OR INJURY TO PERSONS, OBSERVE THE FOLLOWING: ■ Use this fan with a close fitting lid, cookie sheet, or metal tray, then turn hood ON when cooking at high settings. do not use cookware appropriate for the size of fuel burning equipment to prevent power from being called. - ... control device. BE CAREFUL TO PREVENT BURNS. READ AND SAVE THESE INSTRUCTIONS 3 Do not use only. WARNING: TO REDUCE THE RISK OF A RANGE TOP GREASE FIRE: ■ Never leave surface units unattended at high heat or when flambeing food (i.e. Heat oils slowly on "Kitchen Fire Safety Tips...
...OR INJURY TO PERSONS, OBSERVE THE FOLLOWING: ■ Use this fan with a close fitting lid, cookie sheet, or metal tray, then turn hood ON when cooking at high settings. do not use cookware appropriate for the size of fuel burning equipment to prevent power from being called. - ... control device. BE CAREFUL TO PREVENT BURNS. READ AND SAVE THESE INSTRUCTIONS 3 Do not use only. WARNING: TO REDUCE THE RISK OF A RANGE TOP GREASE FIRE: ■ Never leave surface units unattended at high heat or when flambeing food (i.e. Heat oils slowly on "Kitchen Fire Safety Tips...

Installation Guide
Page 4
...that all governing codes and ordinances. Grounded electrical outlet is available from your dealer or an authorized parts distributor. The canopy hood is factory set for non-vented (recirculating) installations only. Product Dimensions 7¹⁄₄" (18.4 cm) 8¹⁄...heating vents. The model/serial rating plate is determined by ceiling height. Canopy hood location should be sealed. round metal vent duct - Have a qualified technician install the range hood. Given dimensions provide minimum clearance. Recirculation Kit Part Number W10349327 is required. ...
...that all governing codes and ordinances. Grounded electrical outlet is available from your dealer or an authorized parts distributor. The canopy hood is factory set for non-vented (recirculating) installations only. Product Dimensions 7¹⁄₄" (18.4 cm) 8¹⁄...heating vents. The model/serial rating plate is determined by ceiling height. Canopy hood location should be sealed. round metal vent duct - Have a qualified technician install the range hood. Given dimensions provide minimum clearance. Recirculation Kit Part Number W10349327 is required. ...

Installation Guide
Page 5
...The chimneys can terminate either through a wall, a 90° elbow is needed . The chimney extension replaces the chimney shipped with the range hood. ■ Use caulking to seal exterior wall or roof opening is used. ■ Do not install 2 elbows together. ■ ...surfaces. ceiling height Electric cooking surface Gas cooking surface 7' 5" (2.26 m) 7' 8" (2.34 m) 9' 6" (2.9 m) 9' 6" (2.9 m) *NOTE: The range hood chimneys are adjustable and designed to meet varying ceiling or soffit heights depending on the cold air side of canopy to provide efficient performance. Vent...
...The chimneys can terminate either through a wall, a 90° elbow is needed . The chimney extension replaces the chimney shipped with the range hood. ■ Use caulking to seal exterior wall or roof opening is used. ■ Do not install 2 elbows together. ■ ...surfaces. ceiling height Electric cooking surface Gas cooking surface 7' 5" (2.26 m) 7' 8" (2.34 m) 9' 6" (2.9 m) 9' 6" (2.9 m) *NOTE: The range hood chimneys are adjustable and designed to meet varying ceiling or soffit heights depending on the cold air side of canopy to provide efficient performance. Vent...

Installation Guide
Page 6
... Example vent system 90 elbow 6 ft (1.8 m) Wall cap 2 ft (0.6 m) The following example falls within the maximum recommended vent length of the range hood. ■ Wire sizes must conform with National Electrical Code, ANSI/NFPA 70 (latest edition), or CSA Standards C22.1-94, Canadian Electrical Code, Part ...1 and C22.2 No. 0-M91 (latest edition) and all governing codes and ordinances. Connect the aluminum wiring to the outside, the hood can be used in the non-vented (recirculating) version, by fitting a charcoal filter and the deflector. The model/serial plate is located ...
... Example vent system 90 elbow 6 ft (1.8 m) Wall cap 2 ft (0.6 m) The following example falls within the maximum recommended vent length of the range hood. ■ Wire sizes must conform with National Electrical Code, ANSI/NFPA 70 (latest edition), or CSA Standards C22.1-94, Canadian Electrical Code, Part ...1 and C22.2 No. 0-M91 (latest edition) and all governing codes and ordinances. Connect the aluminum wiring to the outside, the hood can be used in the non-vented (recirculating) version, by fitting a charcoal filter and the deflector. The model/serial plate is located ...

Installation Guide
Page 7
....6 cm) for the vent system. Vent Cover Support Bracket Installation WARNING Excessive Weight Hazard Use two or more people, lift range hood onto covered surface. Installations using telescoping upper and lower vent cover assembly 1. Position vent cover bracket on the wall. 7. ...installed into wood. INSTALLATION INSTRUCTIONS Prepare Location ■ It is recommended that surface. Using 2 or more people to move and install range hood. Tape template in back or other injury. 3. Complete Preparation A DRILL2 (TW O)3/16"PILOT HOLES THROUGH STUDS OR REAR W ...
....6 cm) for the vent system. Vent Cover Support Bracket Installation WARNING Excessive Weight Hazard Use two or more people, lift range hood onto covered surface. Installations using telescoping upper and lower vent cover assembly 1. Position vent cover bracket on the wall. 7. ...installed into wood. INSTALLATION INSTRUCTIONS Prepare Location ■ It is recommended that surface. Using 2 or more people to move and install range hood. Tape template in back or other injury. 3. Complete Preparation A DRILL2 (TW O)3/16"PILOT HOLES THROUGH STUDS OR REAR W ...

Installation Guide
Page 8
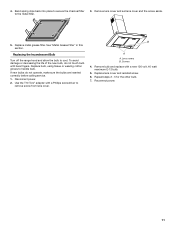
...back draft dampers work properly. A. Seal connections with 2 - Using 2 or more people, hang range hood on 2 mounting screws through the mounting slots on top of hood (if removed for shipping) with clamps. 3. Assemble the air deflector with the duct cover bracket ... transition on back of the air deflector. 6. Vent duct E. Reassemble the air deflector to the measured size (X). 4. B A B C C A. See "Range Hood Care" section. 3. Cut the duct to the duct cover bracket with the Recirculation Kit. Lower mounting screws 2. Fit vent system over the exhaust outlet from...
...back draft dampers work properly. A. Seal connections with 2 - Using 2 or more people, hang range hood on 2 mounting screws through the mounting slots on top of hood (if removed for shipping) with clamps. 3. Assemble the air deflector with the duct cover bracket ... transition on back of the air deflector. 6. Vent duct E. Reassemble the air deflector to the measured size (X). 4. B A B C C A. See "Range Hood Care" section. 3. Cut the duct to the duct cover bracket with the Recirculation Kit. Lower mounting screws 2. Fit vent system over the exhaust outlet from...
Installation Guide
Page 9
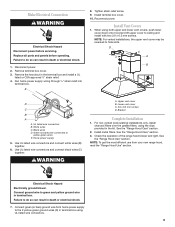
... box cover. 10. Upper vent cover B. Check the operation of the range hood blower and light. See the "Range Hood Use" section. Failure to yellow-green wires E. Connect green (or bare) ground wire from your new range hood, read the "Range Hood Use" section. Disconnect power. 2. Tighten strain relief screw. 9. D ... kit. Failure to ceiling and install with two 2.9 x 6.5 mm screws. Bracket Complete Installation 1. See the "Range Hood Care" section. 3. Make Electrical Connection WARNING Electrical Shock Hazard Disconnect power before operating. Run home power supply wiring ...
... box cover. 10. Upper vent cover B. Check the operation of the range hood blower and light. See the "Range Hood Use" section. Failure to yellow-green wires E. Connect green (or bare) ground wire from your new range hood, read the "Range Hood Use" section. Disconnect power. 2. Tighten strain relief screw. 9. D ... kit. Failure to ceiling and install with two 2.9 x 6.5 mm screws. Bracket Complete Installation 1. See the "Range Hood Care" section. 3. Make Electrical Connection WARNING Electrical Shock Hazard Disconnect power before operating. Run home power supply wiring ...
Installation Guide
Page 10
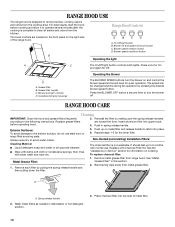
...following instructions. To replace charcoal filter: Metal Grease Filter: 1. Spring release handle 2. RANGE HOOD USE The range hood is designed to remove smoke, cooking vapors and odors from the kitchen. B Range Hood Controls A B C D A. Reinstall the filter by making sure the spring release handles...section. 2. Incandescent lamp housings The BLOWER SPEED buttons turn the blower off and speed minimum button C. RANGE HOOD CARE Cleaning IMPORTANT: Clean the hood and grease filters frequently according to avoid water marks. 5. See the "Assistance or Service" section for ...
...following instructions. To replace charcoal filter: Metal Grease Filter: 1. Spring release handle 2. RANGE HOOD USE The range hood is designed to remove smoke, cooking vapors and odors from the kitchen. B Range Hood Controls A B C D A. Reinstall the filter by making sure the spring release handles...section. 2. Incandescent lamp housings The BLOWER SPEED buttons turn the blower off and speed minimum button C. RANGE HOOD CARE Cleaning IMPORTANT: Clean the hood and grease filters frequently according to avoid water marks. 5. See the "Assistance or Service" section for ...
Installation Guide
Page 11
... to secure the charcoal filter to cool. Remove lens cover and set lens cover and the screw aside. 5. Replacing the Incandescent Bulb Turn off the range hood and allow the bulb to the metal filter. 3. If new bulbs do not touch bulb with a new 120 volt, 40 watt maximum E-12 bulb...
... to secure the charcoal filter to cool. Remove lens cover and set lens cover and the screw aside. 5. Replacing the Incandescent Bulb Turn off the range hood and allow the bulb to the metal filter. 3. If new bulbs do not touch bulb with a new 120 volt, 40 watt maximum E-12 bulb...


