Owners Manual
Page 3
... obey all safety messages. If a gas leak is the safety alert symbol. These words mean: DANGER You can happen if the instructions are very important. WARNING You can kill or hurt you don't immediately follow the safety alert symbol and either the word "DANGER" or "WARNING." RANGE SAFETY Your safety and the...
... obey all safety messages. If a gas leak is the safety alert symbol. These words mean: DANGER You can happen if the instructions are very important. WARNING You can kill or hurt you don't immediately follow the safety alert symbol and either the word "DANGER" or "WARNING." RANGE SAFETY Your safety and the...

Owners Manual
Page 6
...-Cleaning cycle, the entire cooktop area may become hot. See the "Gas Conversions" section of food or liquid, using empty cookware or without any cookware on some models) ■ Precise simmer control REMEMBER: When range is pressed completely down on the grate. If you wish to ignite....grate. Burner cap B. Before setting a control knob, place filled cookware on the valve shaft. NOTE: Visually check that is included with your new range. Igniter E. Turn off . If the spark igniter still does not operate, call a trained repair specialist. Push in and turn the burner off...
...-Cleaning cycle, the entire cooktop area may become hot. See the "Gas Conversions" section of food or liquid, using empty cookware or without any cookware on some models) ■ Precise simmer control REMEMBER: When range is pressed completely down on the grate. If you wish to ignite....grate. Burner cap B. Before setting a control knob, place filled cookware on the valve shaft. NOTE: Visually check that is included with your new range. Igniter E. Turn off . If the spark igniter still does not operate, call a trained repair specialist. Push in and turn the burner off...
Owners Manual
Page 10
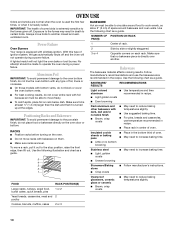
... dull and/or nonstick finish ■ Brown, crisp crusts ■ May need to cook evenly, so allow 2" (5 cm) of ignition system, the gas automatically shuts off . RACKS ■ Position racks before turning on the oven. ■ Do not move freely. ■ To catch spills, place foil...with bakeware on rack below dish. OVEN USE Odors and smoke are level. NUMBER OF POSITION ON RACK PAN(S) Power Failure Oven Burners Your range is extremely sensitive to the stop position, raise the front edge, then lift out. BAKEWARE/ RESULTS RECOMMENDATIONS Light colored ■ aluminum ■...
... dull and/or nonstick finish ■ Brown, crisp crusts ■ May need to cook evenly, so allow 2" (5 cm) of ignition system, the gas automatically shuts off . RACKS ■ Position racks before turning on the oven. ■ Do not move freely. ■ To catch spills, place foil...with bakeware on rack below dish. OVEN USE Odors and smoke are level. NUMBER OF POSITION ON RACK PAN(S) Power Failure Oven Burners Your range is extremely sensitive to the stop position, raise the front edge, then lift out. BAKEWARE/ RESULTS RECOMMENDATIONS Light colored ■ aluminum ■...

Owners Manual
Page 17
.... 3. Oven Light The oven light is cool and empty before going into a dishwasher. ■ Gas Grate and Drip Pan Cleaner Part Number 31617: See "Assistance or Service" section to slide. Unplug range or disconnect power. 2. These spills may affect the finish. Do not reassemble caps on some paper ... drawer liner. ■ Clean with porcelain and staining, etching, pitting or faint white spots can result. Turn the glass bulb cover in range or reconnect power. 17 OVEN CAVITY Do not use abrasive cleaners, steel-wool pads, gritty washcloths or some models) Remove all stored items...
.... 3. Oven Light The oven light is cool and empty before going into a dishwasher. ■ Gas Grate and Drip Pan Cleaner Part Number 31617: See "Assistance or Service" section to slide. Unplug range or disconnect power. 2. These spills may affect the finish. Do not reassemble caps on some paper ... drawer liner. ■ Clean with porcelain and staining, etching, pitting or faint white spots can result. Turn the glass bulb cover in range or reconnect power. 17 OVEN CAVITY Do not use abrasive cleaners, steel-wool pads, gritty washcloths or some models) Remove all stored items...
Owners Manual
Page 18
... here first in knob before turning to a setting. ■ Are the burner ports clogged? Slide the door down on the top corners of the surface burner knobs to release air from the gas lines. ■ Is the control knob set correctly? TROUBLESHOOTING Try the solutions suggested to remove ... an electrician. Lift drawer up evenly until the door is heavy. Open oven door to the gas supply? Push down onto the hinge arms until door clears hinge arms. To Replace: 1. WARNING ■ Is the range properly connected to the first stop position (opened about 4" (10.0 cm). 2. Failure to...
... here first in knob before turning to a setting. ■ Are the burner ports clogged? Slide the door down on the top corners of the surface burner knobs to release air from the gas lines. ■ Is the control knob set correctly? TROUBLESHOOTING Try the solutions suggested to remove ... an electrician. Lift drawer up evenly until the door is heavy. Open oven door to the gas supply? Push down onto the hinge arms until door clears hinge arms. To Replace: 1. WARNING ■ Is the range properly connected to the first stop position (opened about 4" (10.0 cm). 2. Failure to...

Owners Manual
Page 19
...size? Cookware should not extend more than ½" (1.3 cm) outside the cooking area. See "Cooktop Controls" section. ■ Is the range level? Turn on your model, press CANCEL to cool the electronic control. See "Electronic Oven Control" section. ■ On some time after... been entered? Cooktop cooking results not what expected ■ Is the range level? There has been a power failure. Level the range. See the Installation Instructions. Oven burner flames are yellow or noisy ■ Is propane gas being used ? See "Oven Temperature Control" section. ■ Was ...
...size? Cookware should not extend more than ½" (1.3 cm) outside the cooking area. See "Cooktop Controls" section. ■ Is the range level? Turn on your model, press CANCEL to cool the electronic control. See "Electronic Oven Control" section. ■ On some time after... been entered? Cooktop cooking results not what expected ■ Is the range level? There has been a power failure. Level the range. See the Installation Instructions. Oven burner flames are yellow or noisy ■ Is propane gas being used ? See "Oven Temperature Control" section. ■ Was ...
Installation Instructions
Page 2
... may result causing property damage, personal injury or death. - This symbol alerts you to do if you use any other appliance. - Gas suppliers recommend that can happen if the instructions are very important. All safety messages will tell you what the potential hazard is the safety alert...• Do not touch any electrical switch. • Do not use a gas detector approved by smell. We have provided many important safety messages in your building. • Immediately call the fire department. - RANGE SAFETY Your safety and the safety of this or any phone in this manual ...
... may result causing property damage, personal injury or death. - This symbol alerts you to do if you use any other appliance. - Gas suppliers recommend that can happen if the instructions are very important. All safety messages will tell you what the potential hazard is the safety alert...• Do not touch any electrical switch. • Do not use a gas detector approved by smell. We have provided many important safety messages in your building. • Immediately call the fire department. - RANGE SAFETY Your safety and the safety of this or any phone in this manual ...

Installation Instructions
Page 3
...specified on the right-hand side of the cabinets. ■ All openings in the wall or floor where range is moved. See "Electrical Requirements" section. ■ Proper gas supply connection must be located for mounting anti-tip bracket) ■ Anti-tip bracket (taped inside storage... an insulated pad or ¼" (0.64 cm) plywood under range if installing range over carpeting. 3 See "Electrical Requirements" and "Gas Supply Requirements" sections. Do not obstruct flow of burns or fire by installing a range hood or microwave hood combination that all governing codes and ordinances....
...specified on the right-hand side of the cabinets. ■ All openings in the wall or floor where range is moved. See "Electrical Requirements" section. ■ Proper gas supply connection must be located for mounting anti-tip bracket) ■ Anti-tip bracket (taped inside storage... an insulated pad or ¼" (0.64 cm) plywood under range if installing range over carpeting. 3 See "Electrical Requirements" and "Gas Supply Requirements" sections. Do not obstruct flow of burns or fire by installing a range hood or microwave hood combination that all governing codes and ordinances....

Installation Instructions
Page 4
... . A B C H D E I I . 3" (7.6 cm) min. Electrical and gas supply - 5½" (14.0 cm) min. Nothing located in shaded area can be secured..." (0.5 mm) copper. 30" (76.2 cm) minimum clearance between the top of the cooking platform and the bottom of this range is adequate as long as...30³⁄₄" (78.1 cm) B. 35³⁄₄" (90.8 cm) height to underside of UL and CSA International and complies with local codes. Mobile Home - IMPORTANT: To avoid damage to your cabinets, check with your builder or cabinet supplier to make sure that the materials used will not slide...
... . A B C H D E I I . 3" (7.6 cm) min. Electrical and gas supply - 5½" (14.0 cm) min. Nothing located in shaded area can be secured..." (0.5 mm) copper. 30" (76.2 cm) minimum clearance between the top of the cooking platform and the bottom of this range is adequate as long as...30³⁄₄" (78.1 cm) B. 35³⁄₄" (90.8 cm) height to underside of UL and CSA International and complies with local codes. Mobile Home - IMPORTANT: To avoid damage to your cabinets, check with your builder or cabinet supplier to make sure that the materials used will not slide...

Installation Instructions
Page 5
... 44131-5575 ■ A 120 volt, 60 Hz., AC only, 15-amp fused, electrical circuit is also recommended. If the types of Gas Natural gas: This range is design-certified by a qualified service technician. No attempt shall be used , it is recommended that a qualified electrical installer determine that the ... must be conducted according to follow these instructions can be done by CSA International for use with Natural gas or, after proper conversion, for use with LP gas. ■ This range is located on the back of the storage drawer in the absence of local codes, with American National...
... 44131-5575 ■ A 120 volt, 60 Hz., AC only, 15-amp fused, electrical circuit is also recommended. If the types of Gas Natural gas: This range is design-certified by a qualified service technician. No attempt shall be used , it is recommended that a qualified electrical installer determine that the ... must be conducted according to follow these instructions can be done by CSA International for use with Natural gas or, after proper conversion, for use with LP gas. ■ This range is located on the back of the storage drawer in the absence of local codes, with American National...

Installation Instructions
Page 6
...pressures in the system. With LP gas, piping or tubing size can be level. This valve should be level. Gas supply line B. Range must be level with this range must be as follows for Slide-in Ranges Only) The cooktop sides of the slide-in line. ■ Must include... allows ease of opening . The inlet pressure to or less than 30" (76.2 cm), adjust the ³⁄₈" (1.0 cm) dimension. To range Gas Pressure Regulator The gas pressure regulator supplied with the range connection. Line pressure testing above sea level (not applicable for satisfactory baking...
...pressures in the system. With LP gas, piping or tubing size can be level. This valve should be level. Gas supply line B. Range must be level with this range must be as follows for Slide-in Ranges Only) The cooktop sides of the slide-in line. ■ Must include... allows ease of opening . The inlet pressure to or less than 30" (76.2 cm), adjust the ³⁄₈" (1.0 cm) dimension. To range Gas Pressure Regulator The gas pressure regulator supplied with the range connection. Line pressure testing above sea level (not applicable for satisfactory baking...

Installation Instructions
Page 9
... caps are not properly positioned, surface burners will not light. Plug into a grounded 3 prong outlet. Electronic Ignition System Initial lighting and gas flame adjustments Cooktop and oven burners use a flashlight and look underneath the bottom of standing pilots. Check Operation of Cooktop Burners Standard Surface... Burner caps should light within 4 seconds. The valve is open when the handle is turned to floor or wall. ■ Slide range back so rear range foot is plugged in burner base. Do not use an adapter. When the cooktop control knob is lit it may take longer ...
... caps are not properly positioned, surface burners will not light. Plug into a grounded 3 prong outlet. Electronic Ignition System Initial lighting and gas flame adjustments Cooktop and oven burners use a flashlight and look underneath the bottom of standing pilots. Check Operation of Cooktop Burners Standard Surface... Burner caps should light within 4 seconds. The valve is open when the handle is turned to floor or wall. ■ Slide range back so rear range foot is plugged in burner base. Do not use an adapter. When the cooktop control knob is lit it may take longer ...

Installation Instructions
Page 10
...of flame should light. A B 3. Test the flame by turning the control from "LO" to the "open" position. ■ Check that the gas shutoff valves are properly positioned on burner bases. Air shutter adjustment screw B. Repeat start-up on the rear wall, inside the storage drawer compartment. 3. ..." and "000" will glow. This flame should have a ½" (1.3 cm) long inner cone of bluish-green, with an outer mantle of the range. If a burner does not light at each burner. Remove storage drawer. 2. Lift up . No yellow tips, blowing or lifting of pliers. Remove the...
...of flame should light. A B 3. Test the flame by turning the control from "LO" to the "open" position. ■ Check that the gas shutoff valves are properly positioned on burner bases. Air shutter adjustment screw B. Repeat start-up on the rear wall, inside the storage drawer compartment. 3. ..." and "000" will glow. This flame should have a ½" (1.3 cm) long inner cone of bluish-green, with an outer mantle of the range. If a burner does not light at each burner. Remove storage drawer. 2. Lift up . No yellow tips, blowing or lifting of pliers. Remove the...

Installation Instructions
Page 11
... line shutoff valve is open. ■ If the gas supply line shutoff valve is closed . If you need . 3. Adjust Oven Broil Burner Flame (if needed) Look through the steps to see the "Range Care" section of /recycle all packaging materials. 4. Air shutter 4. Lift drawer up again and push until ...drawer is open it to be clean and soft in character. Adjust the air shutter as outlined above. ■ If the gas supply line shutoff valve is closed...
... line shutoff valve is open. ■ If the gas supply line shutoff valve is closed . If you need . 3. Adjust Oven Broil Burner Flame (if needed) Look through the steps to see the "Range Care" section of /recycle all packaging materials. 4. Air shutter 4. Lift drawer up again and push until ...drawer is open it to be clean and soft in character. Adjust the air shutter as outlined above. ■ If the gas supply line shutoff valve is closed...
Installation Instructions
Page 12
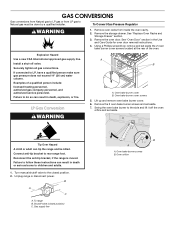
.... Using a Phillips screwdriver, remove and set aside. 7. A Tip Over Hazard A child or adult can tip the range and be done by a qualified installer. To Convert Gas Pressure Regulator WARNING 1. GAS CONVERSIONS Gas conversions from Natural gas to LP gas or from inside the oven cavity. 2. Turn manual shutoff valve to the side and lift it off...
.... Using a Phillips screwdriver, remove and set aside. 7. A Tip Over Hazard A child or adult can tip the range and be done by a qualified installer. To Convert Gas Pressure Regulator WARNING 1. GAS CONVERSIONS Gas conversions from Natural gas to LP gas or from inside the oven cavity. 2. Turn manual shutoff valve to the side and lift it off...
Installation Instructions
Page 13
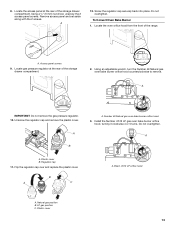
... orifice hood A. LP gas position C. Number 49 Natural gas oven bake burner orifice hood... 3. Do not overtighten. Using a ¼" (6 mm) nut driver, unscrew the 2 access panel screws. Using an adjustable wrench, turn the Number 49 Natural gas oven bake burner orifice hood counterclockwise to remove. 49 A IMPORTANT: Do not remove the gas... pressure regulator. 10. Install the Number .0512 LP gas... gas position B. Locate the access panel at...
... orifice hood A. LP gas position C. Number 49 Natural gas oven bake burner orifice hood... 3. Do not overtighten. Using a ¼" (6 mm) nut driver, unscrew the 2 access panel screws. Using an adjustable wrench, turn the Number 49 Natural gas oven bake burner orifice hood counterclockwise to remove. 49 A IMPORTANT: Do not remove the gas... pressure regulator. 10. Install the Number .0512 LP gas... gas position B. Locate the access panel at...

Installation Instructions
Page 15
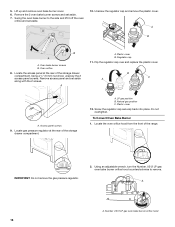
...Failure to follow these instructions can tip the range and be killed. Shutoff valve (closed position. 2. Remove the storage drawer. See "Oven Door" section in plastic parts bag for each burner location. A B A. A Natural Gas Conversion WARNING A. LP Gas Orifice Spud Chart Burner Rating Color Number 4,...Clear 91L 10,500 BTU Green 97L 14,000 BTU Red 114L 5. Place Natural gas orifice spuds in the Use and Care Guide for each burner. Unplug range or disconnect power. To range B. Remove the oven door. Replace burner grates. 11. Reconnect the anti-tip...
...Failure to follow these instructions can tip the range and be killed. Shutoff valve (closed position. 2. Remove the storage drawer. See "Oven Door" section in plastic parts bag for each burner location. A B A. A Natural Gas Conversion WARNING A. LP Gas Orifice Spud Chart Burner Rating Color Number 4,...Clear 91L 10,500 BTU Green 97L 14,000 BTU Red 114L 5. Place Natural gas orifice spuds in the Use and Care Guide for each burner. Unplug range or disconnect power. To range B. Remove the oven door. Replace burner grates. 11. Reconnect the anti-tip...
Installation Instructions
Page 16
... hood 16 Swing the oven bake burner to remove. .0152 A A. Plastic cover B. Using an adjustable wrench, turn the Number .0512 LP gas oven bake burner orifice hood counterclockwise to the side and lift it off the oven orifice and set aside. Locate the access panel at the ...storage drawer compartment. Flip the regulator cap over and replace the plastic cover. Locate the oven orifice hood from the front of the range. 2 IMPORTANT: Do not remove the gas pressure regulator. 2. Lift up and remove oven bake burner cover. 6. Plastic cover 12. Oven bake burner screws B.
... hood 16 Swing the oven bake burner to remove. .0152 A A. Plastic cover B. Using an adjustable wrench, turn the Number .0512 LP gas oven bake burner orifice hood counterclockwise to the side and lift it off the oven orifice and set aside. Locate the access panel at the ...storage drawer compartment. Flip the regulator cap over and replace the plastic cover. Locate the oven orifice hood from the front of the range. 2 IMPORTANT: Do not remove the gas pressure regulator. 2. Lift up and remove oven bake burner cover. 6. Plastic cover 12. Oven bake burner screws B.


