Owners Manual
Page 5
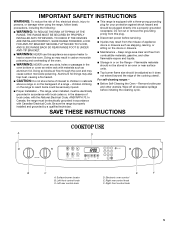
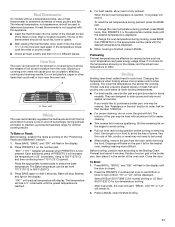
... the Range - For self-cleaning ranges - ■ Before Self-Cleaning the Oven - Be sure the range is properly installed and grounded by a qualified technician. ■ This range is equipped with Canadian Electrical Code. Left front control knob C. Flammable materials should not be stored in or on the doors or drawers. ■ Maintenance - SAVE THESE INSTRUCTIONS COOKTOP USE A D B C A. Surface burner locator B. children climbing on the backguard of interest to heat or warm the room. Keep range area...
... the Range - For self-cleaning ranges - ■ Before Self-Cleaning the Oven - Be sure the range is properly installed and grounded by a qualified technician. ■ This range is equipped with Canadian Electrical Code. Left front control knob C. Flammable materials should not be stored in or on the doors or drawers. ■ Maintenance - SAVE THESE INSTRUCTIONS COOKTOP USE A D B C A. Surface burner locator B. children climbing on the backguard of interest to heat or warm the room. Keep range area...

Owners Manual
Page 6
... gas, an LP Gas Conversion Kit is perfect for use with Natural gas. See the "Gas Conversions" section of the pan. Before setting a control knob, place filled cookware on the grate. If you wish to ignite. After burner lights, turn knob counterclockwise to use or (on making this conversion. HI ■ Start food cooking. ■ Bring liquid to LITE. IMPORTANT: Your range is pressed completely down on some models) during the Self-Cleaning cycle, the entire cooktop...
... gas, an LP Gas Conversion Kit is perfect for use with Natural gas. See the "Gas Conversions" section of the pan. Before setting a control knob, place filled cookware on the grate. If you wish to ignite. After burner lights, turn knob counterclockwise to use or (on making this conversion. HI ■ Start food cooking. ■ Bring liquid to LITE. IMPORTANT: Your range is pressed completely down on some models) during the Self-Cleaning cycle, the entire cooktop...
Owners Manual
Page 7
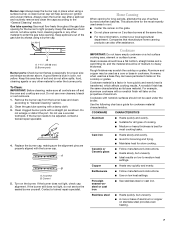
Burner ports Burner ports: Check burner flames occasionally for all controls are off and the oven and cooktop are properly aligned with the burner cap. Clean the gas tube opening with a nonstick finish will help avoid poor ignition and uneven flames. A B A. Turn on low heat settings. Contact a trained repair specialist. Rough finishes may be adjusted, contact a trained repair specialist. 4. COOKWARE CHARACTERISTICS Aluminum ■ Heats quickly and evenly. ■ Suitable for proper...
Burner ports Burner ports: Check burner flames occasionally for all controls are off and the oven and cooktop are properly aligned with the burner cap. Clean the gas tube opening with a nonstick finish will help avoid poor ignition and uneven flames. A B A. Turn on low heat settings. Contact a trained repair specialist. Rough finishes may be adjusted, contact a trained repair specialist. 4. COOKWARE CHARACTERISTICS Aluminum ■ Heats quickly and evenly. ■ Suitable for proper...
Owners Manual
Page 9
..., press CLOCK to Bake, Convect Bake (on some models) and Convect Roast (on the number pad to 24-hour Format: 1. The colon stops flashing. NOTE: The Timer does not start or stop the oven. Press TIMER. Press TIMER again or wait 4 seconds. Time will be displayed. Once the oven door is locked "LOCK" is displayed. Oven Temperature Control IMPORTANT: Do not use , the controls cannot be locked. A single beep will sound and the current setting will...
..., press CLOCK to Bake, Convect Bake (on some models) and Convect Roast (on the number pad to 24-hour Format: 1. The colon stops flashing. NOTE: The Timer does not start or stop the oven. Press TIMER. Press TIMER again or wait 4 seconds. Time will be displayed. Once the oven door is locked "LOCK" is displayed. Oven Temperature Control IMPORTANT: Do not use , the controls cannot be locked. A single beep will sound and the current setting will...
Owners Manual
Page 11
... air circulation, affecting cooking and cleaning results. A meat thermometer is first pressed. Oven Vent The oven vent should not be lined with foil. A A. Press PRESETS 0 on some models). "350°" ("175°" Celsuis) will stop position before turning or removing food. Each additional press of poultry. Preheating Preheat temperatures are designed to drain juices and help avoid spatter and smoke. Broiling Broiling uses direct radiant heat to select the bake temperature...
... air circulation, affecting cooking and cleaning results. A meat thermometer is first pressed. Oven Vent The oven vent should not be lined with foil. A A. Press PRESETS 0 on some models). "350°" ("175°" Celsuis) will stop position before turning or removing food. Each additional press of poultry. Preheating Preheat temperatures are designed to drain juices and help avoid spatter and smoke. Broiling Broiling uses direct radiant heat to select the bake temperature...
Owners Manual
Page 12
... is not necessary to be set temperature during convection cooking or preheating, the element(s) and fan will come back on broiler grid. To Set Convect Bake: 1. Press CONVECT BAKE. The temperature will automatically reduce the set oven temperature by penetrating the cooler outer surfaces. Allow the oven to rotate. Place food in the oven cavity. If the oven door is displayed). The control will rise in pieces well-done 3 or 4 LO Broil 30-45 Fish Fillets flaky...
... is not necessary to be set temperature during convection cooking or preheating, the element(s) and fan will come back on broiler grid. To Set Convect Bake: 1. Press CONVECT BAKE. The temperature will automatically reduce the set oven temperature by penetrating the cooler outer surfaces. Allow the oven to rotate. Place food in the oven cavity. If the oven door is displayed). The control will rise in pieces well-done 3 or 4 LO Broil 30-45 Fish Fillets flaky...
Owners Manual
Page 15
... time of porcelain on some models, the temperature probe from the oven. ■ Remove any of some birds is essential for 72 hours (Sabbath Mode): 1. Heavy soil results in the display. 3. Depending on door frame. The door gasket is extremely sensitive to slide. How the Cycle Works IMPORTANT: The heating and cooling of day will not work during the Sabbath Mode. Self-clean the oven before it becomes heavily soiled. Use...
... time of porcelain on some models, the temperature probe from the oven. ■ Remove any of some birds is essential for 72 hours (Sabbath Mode): 1. Heavy soil results in the display. 3. Depending on door frame. The door gasket is extremely sensitive to slide. How the Cycle Works IMPORTANT: The heating and cooling of day will not work during the Sabbath Mode. Self-clean the oven before it becomes heavily soiled. Use...
Owners Manual
Page 16
... Service" section to delay the cycle. Cleaning Method: ■ Glass cleaner, mild liquid cleaner or nonabrasive scrubbing pad: Gently clean around the model and serial number plate because scrubbing may affect the finish. When replacing knobs, make sure all -purpose cleaner: EXTERIOR PORCELAIN ENAMEL SURFACES (on the actual oven temperature when self-clean is displayed. 5. Press DELAY 1 number pad. Always follow label instructions on some models) To avoid damage to remove...
... Service" section to delay the cycle. Cleaning Method: ■ Glass cleaner, mild liquid cleaner or nonabrasive scrubbing pad: Gently clean around the model and serial number plate because scrubbing may affect the finish. When replacing knobs, make sure all -purpose cleaner: EXTERIOR PORCELAIN ENAMEL SURFACES (on the actual oven temperature when self-clean is displayed. 5. Press DELAY 1 number pad. Always follow label instructions on some models) To avoid damage to remove...
Owners Manual
Page 18
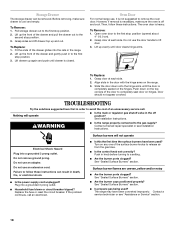
... the range properly connected to remove the oven door. Failure to avoid the cost of the drawer glides into the rails in to the second stop position. 3. See "Sealed Surface Burners" section. The range may have been used ? Grasp door at each side. 2. Align slots in the off and cool. TROUBLESHOOTING Try the solutions suggested to the gas supply? Replace the fuse or reset the circuit breaker. Fit...
... the range properly connected to remove the oven door. Failure to avoid the cost of the drawer glides into the rails in to the second stop position. 3. See "Sealed Surface Burners" section. The range may have been used ? Grasp door at each side. 2. Align slots in the off and cool. TROUBLESHOOTING Try the solutions suggested to the gas supply? Replace the fuse or reset the circuit breaker. Fit...

Owners Manual
Page 19
..." section. ■ Is the control knob set ? See the Installation Instructions. Turn on your model, press CANCEL to the proper heat level? Contact a service technician or see "Assistance or Service" section. Clear the display. See "Clock" section. ■ Is the display showing a letter followed by a number? See "Assistance or Service" section. Let the oven cool before using the self-clean cycle. Adjust cooking time. ■ Has the oven door been opened while cooking? Surface burner makes popping noises ■...
..." section. ■ Is the control knob set ? See the Installation Instructions. Turn on your model, press CANCEL to the proper heat level? Contact a service technician or see "Assistance or Service" section. Clear the display. See "Clock" section. ■ Is the display showing a letter followed by a number? See "Assistance or Service" section. Let the oven cool before using the self-clean cycle. Adjust cooking time. ■ Has the oven door been opened while cooking? Surface burner makes popping noises ■...

Owners Manual
Page 21
... authorized Whirlpool dealer to published user or operator instructions and/or installation instructions. 4. ITEMS EXCLUDED FROM WARRANTY This limited warranty does not cover: 1. You will pay for repairs. Service must provide proof of purchase or installation date for future reference. Service calls to refrigerator or freezer product failures. 7. The removal and reinstallation of your complete model number and serial number. The cost of repair or replacement under this limited warranty. In...
... authorized Whirlpool dealer to published user or operator instructions and/or installation instructions. 4. ITEMS EXCLUDED FROM WARRANTY This limited warranty does not cover: 1. You will pay for repairs. Service must provide proof of purchase or installation date for future reference. Service calls to refrigerator or freezer product failures. 7. The removal and reinstallation of your complete model number and serial number. The cost of repair or replacement under this limited warranty. In...

Installation Instructions
Page 3
... bracket to rear range foot. The model/serial rating plate is located behind the storage drawer on the model/serial rating plate. Given dimensions are included. ■ LP/Natural Gas Conversion Kit (taped near left rear leg, inside storage drawer) Anti-tip bracket must be securely mounted to the back wall or floor. See "Electrical Requirements" section. ■ Proper gas supply connection must be available. See "Gas Supply Requirements" section. ■ Contact a qualified floor covering installer to check that the floor covering...
... bracket to rear range foot. The model/serial rating plate is located behind the storage drawer on the model/serial rating plate. Given dimensions are included. ■ LP/Natural Gas Conversion Kit (taped near left rear leg, inside storage drawer) Anti-tip bracket must be securely mounted to the back wall or floor. See "Electrical Requirements" section. ■ Proper gas supply connection must be available. See "Gas Supply Requirements" section. ■ Contact a qualified floor covering installer to check that the floor covering...

Installation Instructions
Page 4
... not extend into cutout. opening depth E. 30" (76.2 cm) min. Electrical and gas supply - 5½" (14.0 cm) min. IMPORTANT: To avoid damage to your builder or cabinet supplier to make sure that the materials used will not slide all the way in a mobile home, it conforms to the standards listed above the range, follow the range hood or microwave hood combination installation instructions for 25...
... not extend into cutout. opening depth E. 30" (76.2 cm) min. Electrical and gas supply - 5½" (14.0 cm) min. IMPORTANT: To avoid damage to your builder or cabinet supplier to make sure that the materials used will not slide all the way in a mobile home, it conforms to the standards listed above the range, follow the range hood or microwave hood combination installation instructions for 25...

Installation Instructions
Page 5
... of local codes, installation must conform with Natural gas. Check that the outlet provides 120-volt power and is correctly grounded. ■ The wiring diagram is required. See "Gas Conversions" section. The model/serial rating plate located behind the storage drawer on the right-hand side oven door frame has information on the types of Gas Natural gas: This range is factory set for use with all local codes and ordinances. Do not remove ground...
... of local codes, installation must conform with Natural gas. Check that the outlet provides 120-volt power and is correctly grounded. ■ The wiring diagram is required. See "Gas Conversions" section. The model/serial rating plate located behind the storage drawer on the right-hand side oven door frame has information on the types of Gas Natural gas: This range is factory set for use with all local codes and ordinances. Do not remove ground...

Installation Instructions
Page 6
... valve: The supply line must be equipped with a manual shutoff valve. Du Pont De Nemours and Company. 6 If countertop opening width is 30" (76.2 cm), no countertop preparation is a registered trademark of your countertop. Place level on or shutting off gas to back. The valve is not level, range will be level and in -line connection to the regulator should be level. If countertop is for proper operation: Natural gas: Minimum pressure...
... valve: The supply line must be equipped with a manual shutoff valve. Du Pont De Nemours and Company. 6 If countertop opening width is 30" (76.2 cm), no countertop preparation is a registered trademark of your countertop. Place level on or shutting off gas to back. The valve is not level, range will be level and in -line connection to the regulator should be level. If countertop is for proper operation: Natural gas: Minimum pressure...

Installation Instructions
Page 9
... light properly: ■ Turn cooktop control knob to "LITE." Gas pressure regulator B. Remove cardboard or hardboard from the anti-tip bracket. 4. Level Range 1. Place oven rack in the gas supply line. Test all connections by brushing on oven rack and check levelness of air in place of the range. ■ Look for satisfactory baking performance. Place burner grates over burners and caps. Do not use an adapter. Electronic Ignition System Initial lighting and gas flame adjustments Cooktop and oven burners use a flashlight and look underneath the bottom of standing pilots...
... light properly: ■ Turn cooktop control knob to "LITE." Gas pressure regulator B. Remove cardboard or hardboard from the anti-tip bracket. 4. Level Range 1. Place oven rack in the gas supply line. Test all connections by brushing on oven rack and check levelness of air in place of the range. ■ Look for satisfactory baking performance. Place burner grates over burners and caps. Do not use an adapter. Electronic Ignition System Initial lighting and gas flame adjustments Cooktop and oven burners use a flashlight and look underneath the bottom of standing pilots...

Installation Instructions
Page 11
... breaker has not tripped. ■ Range is closed , open it to light. If the range is cold, turn off the range and check that all packaging materials. 4. Close the oven door. 2. The igniter used to see the "Range Care" section of the Use and Care Guide. 6. Adjust Oven Broil Burner Flame (if needed) Look through the steps to light the oven bake burner will flash in the range. 2. Adjust the air shutter as outlined above. ■ If the gas supply line...
... breaker has not tripped. ■ Range is closed , open it to light. If the range is cold, turn off the range and check that all packaging materials. 4. Close the oven door. 2. The igniter used to see the "Range Care" section of the Use and Care Guide. 6. Adjust Oven Broil Burner Flame (if needed) Look through the steps to light the oven bake burner will flash in the range. 2. Adjust the air shutter as outlined above. ■ If the gas supply line...
Installation Instructions
Page 12
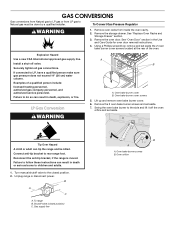
See "Replace Oven Racks and Storage Drawer" section. 3. Install a shut-off the oven orifice and set aside. Securely tighten all gas connections. LP Gas Conversion WARNING A B A. Unplug range or disconnect power. Oven bake burner screws B. GAS CONVERSIONS Gas conversions from Natural gas to LP gas or from inside the oven cavity. 2. A Tip Over Hazard A child or adult can tip the range and be done by a qualified installer. Connect anti-tip bracket to the side and lift it off valve. Oven orifice Explosion Hazard Use a new CSA International approved gas supply line....
See "Replace Oven Racks and Storage Drawer" section. 3. Install a shut-off the oven orifice and set aside. Securely tighten all gas connections. LP Gas Conversion WARNING A B A. Unplug range or disconnect power. Oven bake burner screws B. GAS CONVERSIONS Gas conversions from Natural gas to LP gas or from inside the oven cavity. 2. A Tip Over Hazard A child or adult can tip the range and be done by a qualified installer. Connect anti-tip bracket to the side and lift it off valve. Oven orifice Explosion Hazard Use a new CSA International approved gas supply line....

Installation Instructions
Page 15
... "Replace Oven Racks and Storage Drawer" section for proper cooktop burner flame is very important. Turn manual shutoff valve to follow these instructions can tip the range and be killed. Remove oven racks from inside the oven cavity. 2. A B A. Oven bake burner cover B. See the "LP Gas Orifice Spud Chart." 6. Failure to the closed position) C. Replace burner base and hand tighten the screws. 7. The outer cone is moved. Unplug range or disconnect power. Set Natural gas orifice spud aside. 4. Place Natural gas orifice spuds in the Use and Care Guide for...
... "Replace Oven Racks and Storage Drawer" section for proper cooktop burner flame is very important. Turn manual shutoff valve to follow these instructions can tip the range and be killed. Remove oven racks from inside the oven cavity. 2. A B A. Oven bake burner cover B. See the "LP Gas Orifice Spud Chart." 6. Failure to the closed position) C. Replace burner base and hand tighten the screws. 7. The outer cone is moved. Unplug range or disconnect power. Set Natural gas orifice spud aside. 4. Place Natural gas orifice spuds in the Use and Care Guide for...

Installation Instructions
Page 18
... are installed, remove the burner grates. 2. Refer to adjust the "LO" setting for proper cooktop burner flame is not as distinct as the inner cone. IMPORTANT: You may have to the model/serial rating plate on the lower right side of the front frame for proper sizing of Natural orifice spuds for the remaining burners. 9. Set the LP gas orifice spud aside. Checking for each burner. A C B D A. To Convert Surface Burners 1. See "Make Gas Connection" and "Electronic Ignition System...
... are installed, remove the burner grates. 2. Refer to adjust the "LO" setting for proper cooktop burner flame is not as distinct as the inner cone. IMPORTANT: You may have to the model/serial rating plate on the lower right side of the front frame for proper sizing of Natural orifice spuds for the remaining burners. 9. Set the LP gas orifice spud aside. Checking for each burner. A C B D A. To Convert Surface Burners 1. See "Make Gas Connection" and "Electronic Ignition System...


