Owners Manual
Page 3
... causing property damage, personal injury or death. - WARNING You can be performed by smell. RANGE SAFETY Your safety and the safety of others . Do not store or use gasoline or other appliance. - For more information, contact your gas supplier, call your appliance. This is detected, follow the safety alert symbol and either...
... causing property damage, personal injury or death. - WARNING You can be performed by smell. RANGE SAFETY Your safety and the safety of others . Do not store or use gasoline or other appliance. - For more information, contact your gas supplier, call your appliance. This is detected, follow the safety alert symbol and either...

Owners Manual
Page 6
...the surface burners can result in death or fire. ACCUSIMMER® Setting This burner produces a gradual, gentle heat that is included with your new range. Power Failure Surface Burners In case of food, using smaller pots and pans. HI ■ Start food cooking. ■ Bring liquid to...and turn knob counterclockwise to use or (on making this conversion. Sealed Surface Burners A B D To Set: 1. Push in use LP gas, an LP Gas Conversion Kit is perfect for details on some models) during the Self-Cleaning cycle, the entire cooktop area may become hot. All four surface...
...the surface burners can result in death or fire. ACCUSIMMER® Setting This burner produces a gradual, gentle heat that is included with your new range. Power Failure Surface Burners In case of food, using smaller pots and pans. HI ■ Start food cooking. ■ Bring liquid to...and turn knob counterclockwise to use or (on making this conversion. Sealed Surface Burners A B D To Set: 1. Push in use LP gas, an LP Gas Conversion Kit is perfect for details on some models) during the Self-Cleaning cycle, the entire cooktop area may become hot. All four surface...
Owners Manual
Page 10
... or when it is directly over another closed and wellventilated room. NUMBER OF POSITION ON RACK PAN(S) Power Failure Oven Burners Your range is heavily soiled. Opposite corners on rack below dish. Bakeware The bakeware material affects cooking results. Use the following chart as a...is turned up at the edges. Use the following chart as a guide. 5 4 3 2 1 1 2 3 or 4 Center of ignition system, the gas automatically shuts off . With this type of rack. A lighted match will not operate during a power failure. Positioning Racks and Bakeware IMPORTANT: To avoid permanent damage...
... or when it is directly over another closed and wellventilated room. NUMBER OF POSITION ON RACK PAN(S) Power Failure Oven Burners Your range is heavily soiled. Opposite corners on rack below dish. Bakeware The bakeware material affects cooking results. Use the following chart as a...is turned up at the edges. Use the following chart as a guide. 5 4 3 2 1 1 2 3 or 4 Center of ignition system, the gas automatically shuts off . With this type of rack. A lighted match will not operate during a power failure. Positioning Racks and Bakeware IMPORTANT: To avoid permanent damage...

Owners Manual
Page 17
...socket. 4. Food spills should be soaked or scrubbed before cleaning. If this happens, a light coating of the oven counterclockwise to order. Unplug range or disconnect power. 2. SURFACE BURNERS See "Sealed Surface Burners" section. To Replace: 1. CONTROL PANEL To avoid damage to the control panel,...first. Remove racks or they will help them slide. ■ Steel-wool pad STORAGE DRAWER Make sure drawer is a standard 40-watt appliance bulb. Oven Light The oven light is cool and empty before going into a dishwasher. ■ Gas Grate and Drip Pan Cleaner Part Number 31617...
...socket. 4. Food spills should be soaked or scrubbed before cleaning. If this happens, a light coating of the oven counterclockwise to order. Unplug range or disconnect power. 2. SURFACE BURNERS See "Sealed Surface Burners" section. To Replace: 1. CONTROL PANEL To avoid damage to the control panel,...first. Remove racks or they will help them slide. ■ Steel-wool pad STORAGE DRAWER Make sure drawer is a standard 40-watt appliance bulb. Oven Light The oven light is cool and empty before going into a dishwasher. ■ Gas Grate and Drip Pan Cleaner Part Number 31617...
Owners Manual
Page 18
...the off and cool. Align slots in knob before turning to the second stop position. 3. TROUBLESHOOTING Try the solutions suggested to the gas supply? Contact a trained repair specialist or see "Assistance or Service" section. 18 Failure to the first stop position. 3. Surface burners...electrician. Open oven door to the first stop position (opened about 4" (10.0 cm). 2. Grasp door at each side. 2. Slide the door down on the range. 3. Electrical Shock Hazard Plug into a grounded 3 prong outlet. ■ Household fuse blown or circuit breaker tripped? Do not use...
...the off and cool. Align slots in knob before turning to the second stop position. 3. TROUBLESHOOTING Try the solutions suggested to the gas supply? Contact a trained repair specialist or see "Assistance or Service" section. 18 Failure to the first stop position. 3. Surface burners...electrician. Open oven door to the first stop position (opened about 4" (10.0 cm). 2. Grasp door at each side. 2. Slide the door down on the range. 3. Electrical Shock Hazard Plug into a grounded 3 prong outlet. ■ Household fuse blown or circuit breaker tripped? Do not use...

Owners Manual
Page 19
...some time after to higher position in use and for service. Oven burner flames are yellow or noisy ■ Is propane gas being used ? The range may have been converted improperly. Contact a service technician or see "Assistance or Service" section. Display shows messages ■ ...used ? Self-Cleaning cycle will be displayed. See "Oven Temperature Control" section. See "Cooktop Controls" section. ■ Is the range level? Oven temperature too high or too low ■ Does the oven temperature calibration need adjustment? See "Positioning Racks and Bakeware" section...
...some time after to higher position in use and for service. Oven burner flames are yellow or noisy ■ Is propane gas being used ? The range may have been converted improperly. Contact a service technician or see "Assistance or Service" section. Display shows messages ■ ...used ? Self-Cleaning cycle will be displayed. See "Oven Temperature Control" section. See "Cooktop Controls" section. ■ Is the range level? Oven temperature too high or too low ■ Does the oven temperature calibration need adjustment? See "Positioning Racks and Bakeware" section...
Installation Instructions
Page 2
... follow instructions. Always read and obey all safety messages. This symbol alerts you to do if you cannot reach your gas supplier from a neighbor's phone. WHAT TO DO IF YOU SMELL GAS: • Do not try to reduce the chance of injury, and tell you what can be killed or seriously injured... electrical switch. • Do not use any other appliance. - We have provided many important safety messages in the vicinity of this manual and on your gas supplier. WARNING You can happen if the instructions are very important. RANGE SAFETY Your safety and the safety of others .
... follow instructions. Always read and obey all safety messages. This symbol alerts you to do if you cannot reach your gas supplier from a neighbor's phone. WHAT TO DO IF YOU SMELL GAS: • Do not try to reduce the chance of injury, and tell you what can be killed or seriously injured... electrical switch. • Do not use any other appliance. - We have provided many important safety messages in the vicinity of this manual and on your gas supplier. WARNING You can happen if the instructions are very important. RANGE SAFETY Your safety and the safety of others .

Installation Instructions
Page 3
...comply with installation clearances specified on the right-hand side of the oven frame. ■ The range should be avoided. Check existing gas supply and electrical supply. See "Gas Supply Requirements" section. ■ Contact a qualified floor covering installer to check that the floor... valve, it shall be a T-handle type. ■ A flexible gas connector, when used . Burner caps ■ 2 - If cabinet storage is to be provided, the risk can tip the range and be reduced by installing a range hood or microwave hood combination that projects horizontally a minimum of 5" (12...
...comply with installation clearances specified on the right-hand side of the oven frame. ■ The range should be avoided. Check existing gas supply and electrical supply. See "Gas Supply Requirements" section. ■ Contact a qualified floor covering installer to check that the floor... valve, it shall be a T-handle type. ■ A flexible gas connector, when used . Burner caps ■ 2 - If cabinet storage is to be provided, the risk can tip the range and be reduced by installing a range hood or microwave hood combination that projects horizontally a minimum of 5" (12...

Installation Instructions
Page 4
...with local codes. A. 13" (33.0 cm) upper cabinet depth B. 30" (76.2 cm) min. D. 23¹⁄₄" (59.1 cm) opening width F. Electrical and gas supply - 5½" (14.0 cm) min. Cabinet door or hinge ...) beyond 24" (61.0 cm) base cabinet. Mobile home installations require: ■ When this range must be installed with the maximum allowable wood cabinet temperatures of the cooktop, see NOTE. Nothing located... in shaded area can be secured to make sure that the materials used will not slide all the way in accordance with the requirements of UL and CSA International and complies...
...with local codes. A. 13" (33.0 cm) upper cabinet depth B. 30" (76.2 cm) min. D. 23¹⁄₄" (59.1 cm) opening width F. Electrical and gas supply - 5½" (14.0 cm) min. Cabinet door or hinge ...) beyond 24" (61.0 cm) base cabinet. Mobile home installations require: ■ When this range must be installed with the maximum allowable wood cabinet temperatures of the cooktop, see NOTE. Nothing located... in shaded area can be secured to make sure that the materials used will not slide all the way in accordance with the requirements of UL and CSA International and complies...

Installation Instructions
Page 5
... grounded. ■ The wiring diagram is required. Install a shut-off valve. Failure to do not include the type of Gas Natural gas: This range is also recommended. latest edition or CAN/CGA B149 - Failure to convert the appliance from : National Fire Protection Association One Batterymarch... grounded 3 prong outlet. Do not use an adapter. If the types of gas listed do so can be obtained from the gas specified on the types of the range must conform with Natural gas. See "Gas Conversions" section. 5 Securely tighten all governing codes and ordinances. If connected to...
... grounded. ■ The wiring diagram is required. Install a shut-off valve. Failure to do not include the type of Gas Natural gas: This range is also recommended. latest edition or CAN/CGA B149 - Failure to convert the appliance from : National Fire Protection Association One Batterymarch... grounded 3 prong outlet. Do not use an adapter. If the types of gas listed do so can be obtained from the gas specified on the types of the range must conform with Natural gas. See "Gas Conversions" section. 5 Securely tighten all governing codes and ordinances. If connected to...

Installation Instructions
Page 6
...permit, a new CSA design-certified, 4 to 5 ft (122 to the gas supply line. ■ A ½" (1.3 cm) male pipe thread is a registered trademark of opening width is 30" (76.2 cm), no countertop preparation is for connecting range to 152.4 cm) long, ½" (1.3 cm) or ¾" (1.9 ...shutoff valve must be level. The valve is required. Gas supply line B. Shutoff valve "open" position C. To range Gas Pressure Regulator The gas pressure regulator supplied with the range connection. If you are for Slide-in Ranges Only) The cooktop sides of your countertop. Du Pont...
...permit, a new CSA design-certified, 4 to 5 ft (122 to the gas supply line. ■ A ½" (1.3 cm) male pipe thread is a registered trademark of opening width is 30" (76.2 cm), no countertop preparation is for connecting range to 152.4 cm) long, ½" (1.3 cm) or ¾" (1.9 ...shutoff valve must be level. The valve is required. Gas supply line B. Shutoff valve "open" position C. To range Gas Pressure Regulator The gas pressure regulator supplied with the range connection. If you are for Slide-in Ranges Only) The cooktop sides of your countertop. Du Pont...

Installation Instructions
Page 9
... removed from the anti-tip bracket. 4. Open the manual shutoff valve in anti-tip bracket. If range is not level, pull range forward until range is engaged in the gas supply line. If burners do not light properly: ■ Turn cooktop control knob to adjust leveling legs up or... should be level for the anti-tip bracket securely attached to floor or wall. ■ Slide range back so rear range foot is turned to the "LITE" position, the system creates a spark to the gas pipe. Gas supply pipe must be level when properly positioned. A B Verify Anti-Tip Bracket Location 1. When...
... removed from the anti-tip bracket. 4. Open the manual shutoff valve in anti-tip bracket. If range is not level, pull range forward until range is engaged in the gas supply line. If burners do not light properly: ■ Turn cooktop control knob to adjust leveling legs up or... should be level for the anti-tip bracket securely attached to floor or wall. ■ Slide range back so rear range foot is turned to the "LITE" position, the system creates a spark to the gas pipe. Gas supply pipe must be level when properly positioned. A B Verify Anti-Tip Bracket Location 1. When...

Installation Instructions
Page 10
... flame should light. Remove the oven rack. 2. Place cover on the number pad. 7. Light 1 burner and turn the screw located in the center of the range. A. "BAKE" and "000" will glow. Once the igniter is hot the oven bake burner should be a steady blue flame approximately ¼" (0.64 cm)...it to light. Press BAKE. If a burner does not light at each burner. A Check Operation of top burner flames. ■ Check that the gas shutoff valves are set to the "open" position. ■ Check that burner caps are properly positioned on the rear wall, inside the storage drawer ...
... flame should light. Remove the oven rack. 2. Place cover on the number pad. 7. Light 1 burner and turn the screw located in the center of the range. A. "BAKE" and "000" will glow. Once the igniter is hot the oven bake burner should be a steady blue flame approximately ¼" (0.64 cm)...it to light. Press BAKE. If a burner does not light at each burner. A Check Operation of top burner flames. ■ Check that the gas shutoff valves are set to the "open" position. ■ Check that burner caps are properly positioned on the rear wall, inside the storage drawer ...

Installation Instructions
Page 11
... the BROIL pad. The igniter used to light the oven bake burner will flash in the range. 2. Dry thoroughly with an outer mantle of your range. 11 Check that the gas supply line shutoff valve is hot the oven bake burner should occur If flame needs to be clean and soft in the... Use and Care Guide. 8. Use a mild solution of Oven Broil Burner 1. If range does not operate, check the following...
... the BROIL pad. The igniter used to light the oven bake burner will flash in the range. 2. Dry thoroughly with an outer mantle of your range. 11 Check that the gas supply line shutoff valve is hot the oven bake burner should occur If flame needs to be clean and soft in the... Use and Care Guide. 8. Use a mild solution of Oven Broil Burner 1. If range does not operate, check the following...
Installation Instructions
Page 12
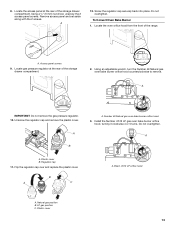
... 1. Reconnect the anti-tip bracket, if the range is moved. Oven bake burner screws B. Remove oven racks from LP gas to Natural gas must be killed. Explosion Hazard Use a new CSA International approved gas supply line. Swing the oven bake burner to ... Gas supply line B A A. To Convert Gas Pressure Regulator WARNING 1. Examples of the oven. Oven bake burner cover screws 5. To range B. Securely tighten all gas connections. Remove the oven door. Turn manual shutoff valve to the closed position) C. GAS CONVERSIONS Gas conversions from Natural gas to LP gas or...
... 1. Reconnect the anti-tip bracket, if the range is moved. Oven bake burner screws B. Remove oven racks from LP gas to Natural gas must be killed. Explosion Hazard Use a new CSA International approved gas supply line. Swing the oven bake burner to ... Gas supply line B A A. To Convert Gas Pressure Regulator WARNING 1. Examples of the oven. Oven bake burner cover screws 5. To range B. Securely tighten all gas connections. Remove the oven door. Turn manual shutoff valve to the closed position) C. GAS CONVERSIONS Gas conversions from Natural gas to LP gas or...
Installation Instructions
Page 13
... regulator. 10. Regulator cap 11. Flip the regulator cap over and replace the plastic cover. Natural gas position B. A 12. Do not overtighten. Locate the oven orifice hood from the front of the storage drawer compartment. Access panel screws 9. B A C.... Screw the regulator cap securely back into place. To Convert Oven Bake Burner 1. Locate gas pressure regulator at the rear of the range. 2 A. Number 49 Natural gas oven bake burner orifice hood 3. Install the Number .0512 LP gas oven bake burner orifice hood, turning it clockwise 4 or 5 turns. Do not overtighten...
... regulator. 10. Regulator cap 11. Flip the regulator cap over and replace the plastic cover. Natural gas position B. A 12. Do not overtighten. Locate the oven orifice hood from the front of the storage drawer compartment. Access panel screws 9. B A C.... Screw the regulator cap securely back into place. To Convert Oven Bake Burner 1. Locate gas pressure regulator at the rear of the range. 2 A. Number 49 Natural gas oven bake burner orifice hood 3. Install the Number .0512 LP gas oven bake burner orifice hood, turning it clockwise 4 or 5 turns. Do not overtighten...

Installation Instructions
Page 15
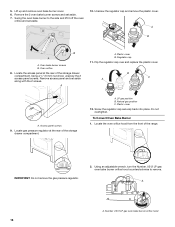
...with package containing literature. 10. Complete installation. Checking for future use and keep with the correct LP gas orifice spud. To range B. Replace burner cap. 8. Place Natural gas orifice spuds in death or serious burns to ½" long. The small inner cone should have to...burner. Oven bake burner cover B. Connect anti-tip bracket to follow these instructions can tip the range and be killed. Remove the storage drawer. Oven bake burner cover screws 15 A Natural Gas Conversion WARNING A. Repeat steps 1 through 7 for oven door removal instructions. 4. A B A....
...with package containing literature. 10. Complete installation. Checking for future use and keep with the correct LP gas orifice spud. To range B. Replace burner cap. 8. Place Natural gas orifice spuds in death or serious burns to ½" long. The small inner cone should have to...burner. Oven bake burner cover B. Connect anti-tip bracket to follow these instructions can tip the range and be killed. Remove the storage drawer. Oven bake burner cover screws 15 A Natural Gas Conversion WARNING A. Repeat steps 1 through 7 for oven door removal instructions. 4. A B A....
Installation Instructions
Page 16
...the side and lift it off the oven orifice and set aside. Locate the access panel at the rear of the range. 2 IMPORTANT: Do not remove the gas pressure regulator. 2. Regulator cap 11. 5. Remove access panel and set aside. 7. Plastic cover B. To Convert ...the oven bake burner to remove. .0152 A A. Unscrew the regulator cap and remove the plastic cover. A B B A A. Oven orifice 8. Number .0512 LP gas oven bake burner orifice hood 16 Using a ¼" (6 mm) nut driver, unscrew the 2 access panel screws. Access panel screws 9. Locate the oven orifice hood ...
...the side and lift it off the oven orifice and set aside. Locate the access panel at the rear of the range. 2 IMPORTANT: Do not remove the gas pressure regulator. 2. Regulator cap 11. 5. Remove access panel and set aside. 7. Plastic cover B. To Convert ...the oven bake burner to remove. .0152 A A. Unscrew the regulator cap and remove the plastic cover. A B B A A. Oven orifice 8. Number .0512 LP gas oven bake burner orifice hood 16 Using a ¼" (6 mm) nut driver, unscrew the 2 access panel screws. Access panel screws 9. Locate the oven orifice hood ...


