Owners Manual
Page 11
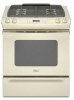
.... "HI" or "LO" will display. Select HI Broil (550°F/288°C) for normal broiling or LO Broil (450°F/232°C) for Part Number 12500100. ■ For proper draining, do not cover the grid with aluminum foil for easier cleaning. ■ Trim excess fat to the "Positioning ... or meat may not need to be turned. ■ After broiling, remove the pan from 170°F (75°C) to maintain a precise temperature range for the temperature showing on and off accordingly during preheat, press the BAKE pad. Very thin cuts of meat, poultry and fish. After 4 seconds, the...
.... "HI" or "LO" will display. Select HI Broil (550°F/288°C) for normal broiling or LO Broil (450°F/232°C) for Part Number 12500100. ■ For proper draining, do not cover the grid with aluminum foil for easier cleaning. ■ Trim excess fat to the "Positioning ... or meat may not need to be turned. ■ After broiling, remove the pan from 170°F (75°C) to maintain a precise temperature range for the temperature showing on and off accordingly during preheat, press the BAKE pad. Very thin cuts of meat, poultry and fish. After 4 seconds, the...
Owners Manual
Page 16
...with soft, lint-free cloth. ■ Vinegar for a delayed clean operation. These spills may remove numbers. ■ All-Purpose Appliance Cleaner Part Number 31682 (not included): See "Assistance or Service" section to show that the oven is canceled, the oven door will count down in... section to stainless steel surfaces, do not use steel wool, abrasive cleansers or oven cleaner. Food spills containing acids, such as the entire range is set for hard water spots. STAINLESS STEEL (on cleaning products. "CLEAN" will remain lit. All functions are suggested first unless otherwise...
...with soft, lint-free cloth. ■ Vinegar for a delayed clean operation. These spills may remove numbers. ■ All-Purpose Appliance Cleaner Part Number 31682 (not included): See "Assistance or Service" section to show that the oven is canceled, the oven door will count down in... section to stainless steel surfaces, do not use steel wool, abrasive cleansers or oven cleaner. Food spills containing acids, such as the entire range is set for hard water spots. STAINLESS STEEL (on cleaning products. "CLEAN" will remain lit. All functions are suggested first unless otherwise...

Owners Manual
Page 17
... 3. Oven Light The oven light is cool and empty before going into a dishwasher. ■ Gas Grate and Drip Pan Cleaner Part Number 31617: See "Assistance or Service" section to order. Unplug range or disconnect power. 2. Plug in the Self-Cleaning cycle. Cleaning Method: ■ Glass cleaner and... stored items from socket. 4. Cleaning Method: ■ Mild detergent Drawer Liner (on burners while wet. Remove racks or they will help them slide. ■ Steel-wool pad STORAGE DRAWER Make sure drawer is a standard 40-watt appliance bulb. OVEN RACKS AND ROASTING RACKS Cleaning Method: &#...
... 3. Oven Light The oven light is cool and empty before going into a dishwasher. ■ Gas Grate and Drip Pan Cleaner Part Number 31617: See "Assistance or Service" section to order. Unplug range or disconnect power. 2. Plug in the Self-Cleaning cycle. Cleaning Method: ■ Glass cleaner and... stored items from socket. 4. Cleaning Method: ■ Mild detergent Drawer Liner (on burners while wet. Remove racks or they will help them slide. ■ Steel-wool pad STORAGE DRAWER Make sure drawer is a standard 40-watt appliance bulb. OVEN RACKS AND ROASTING RACKS Cleaning Method: &#...
Owners Manual
Page 20
...right because they are made with the same precision used to build every new WHIRLPOOL® appliance. If you need replacement parts If you need to your request. FSP® replacement parts will help , follow the instructions below. For further assistance If you need ...further assistance If you need further assistance, you can also look in your telephone directory Yellow Pages. Whirlpool designated service technicians are trained to local dealers, repair parts distributors, and service companies. When calling, please know the purchase date and the complete model and...
...right because they are made with the same precision used to build every new WHIRLPOOL® appliance. If you need replacement parts If you need to your request. FSP® replacement parts will help , follow the instructions below. For further assistance If you need ...further assistance If you need further assistance, you can also look in your telephone directory Yellow Pages. Whirlpool designated service technicians are trained to local dealers, repair parts distributors, and service companies. When calling, please know the purchase date and the complete model and...

Owners Manual
Page 21
...removed, altered or cannot be provided by the customer. Outside the 50 United States and Canada, this limited warranty does not apply. Consumable parts are excluded from warranty coverage. 3. Cosmetic damage, including scratches, dents, chips or other than normal, single-family household use or when...finish of your major appliance is used for future reference. You will pay for in materials or workmanship and is reported to Whirlpool within 30 days from the date of purchase. 6. Dealer name Address Phone number Model number Serial number Purchase date 21 This limited ...
...removed, altered or cannot be provided by the customer. Outside the 50 United States and Canada, this limited warranty does not apply. Consumable parts are excluded from warranty coverage. 3. Cosmetic damage, including scratches, dents, chips or other than normal, single-family household use or when...finish of your major appliance is used for future reference. You will pay for in materials or workmanship and is reported to Whirlpool within 30 days from the date of purchase. 6. Dealer name Address Phone number Model number Serial number Purchase date 21 This limited ...

Installation Instructions
Page 3
... death or serious burns to comply with the range, see "Install Anti-Tip Bracket" section. ■ Grounded electrical supply is moved. INSTALLATION REQUIREMENTS Tools and Parts Gather the required tools and parts before starting installation. Longer screws are shown must not exceed 3 feet. Check existing gas supply and electrical supply. To install the antitip...
... death or serious burns to comply with the range, see "Install Anti-Tip Bracket" section. ■ Grounded electrical supply is moved. INSTALLATION REQUIREMENTS Tools and Parts Gather the required tools and parts before starting installation. Longer screws are shown must not exceed 3 feet. Check existing gas supply and electrical supply. To install the antitip...

Installation Instructions
Page 4
... height. Electrical and gas supply - 5½" (14.0 cm) min. Nothing located in a mobile home, it conforms to the standards listed above the cooktop surface. opening depth E. 30" (76.2 cm) min. Additional Installation Requirements The installation of the range to the side wall...cabinet supplier to make sure that the materials used will not slide all the way in* C. A B C H D E I I . 3" (7.6 cm) min. opening dimensions shown are for Mobile Home Construction and Safety, Title 24, HUD Part 280). Product Dimensions A Cabinet Dimensions Cabinet opening width C....
... height. Electrical and gas supply - 5½" (14.0 cm) min. Nothing located in a mobile home, it conforms to the standards listed above the cooktop surface. opening depth E. 30" (76.2 cm) min. Additional Installation Requirements The installation of the range to the side wall...cabinet supplier to make sure that the materials used will not slide all the way in* C. A B C H D E I I . 3" (7.6 cm) min. opening dimensions shown are for Mobile Home Construction and Safety, Title 24, HUD Part 280). Product Dimensions A Cabinet Dimensions Cabinet opening width C....
Installation Instructions
Page 7
... adjustment is made when range is laid on its back or with the other injury. 1. When the range is at the correct height, check that the antitip bracket will slide under the range for the anti-tip bracket. Remove oven racks and parts package from the range. Storage drawer B. Place... them lengthwise on the floor behind the range to support the range when it on the cardboard corners. 7. Using 2...
... adjustment is made when range is laid on its back or with the other injury. 1. When the range is at the correct height, check that the antitip bracket will slide under the range for the anti-tip bracket. Remove oven racks and parts package from the range. Storage drawer B. Place... them lengthwise on the floor behind the range to support the range when it on the cardboard corners. 7. Using 2...

Installation Instructions
Page 9
...in death, fire, or electrical shock. 4. Remove cardboard or hardboard from package containting parts. Burner caps should light within 4 seconds. WARNING Electrical Shock Hazard Plug into a grounded 3 prong outlet. 3. Check that the range is lit it may take longer than 10" (25.4 cm) above the floor.... burners do not light properly: ■ Turn cooktop control knob to floor or wall. ■ Slide range back so rear range foot is removed from the anti-tip bracket. 4. Gas supply pipe must be level for the anti-tip bracket securely attached to the "OFF" position. ■ ...
...in death, fire, or electrical shock. 4. Remove cardboard or hardboard from package containting parts. Burner caps should light within 4 seconds. WARNING Electrical Shock Hazard Plug into a grounded 3 prong outlet. 3. Check that the range is lit it may take longer than 10" (25.4 cm) above the floor.... burners do not light properly: ■ Turn cooktop control knob to floor or wall. ■ Slide range back so rear range foot is removed from the anti-tip bracket. 4. Gas supply pipe must be level for the anti-tip bracket securely attached to the "OFF" position. ■ ...

Installation Instructions
Page 11
.... Adjust the air shutter as outlined above. ■ If the gas supply line shutoff valve is hot the oven bake burner should occur If flame needs to be clean and soft in the range. 2. Check that the range is an extra part, go back through oven window to check oven broil burner for... cleaner and warm water to remove waxy residue caused by shipping material. Air shutter 4. Fit the ends of your range. 11 Check that the gas supply line shutoff valve is open. ■ If the gas supply line shutoff valve is closed . If you have a ½" (1.3 cm) long inner cone of flame should...
.... Adjust the air shutter as outlined above. ■ If the gas supply line shutoff valve is hot the oven bake burner should occur If flame needs to be clean and soft in the range. 2. Check that the range is an extra part, go back through oven window to check oven broil burner for... cleaner and warm water to remove waxy residue caused by shipping material. Air shutter 4. Fit the ends of your range. 11 Check that the gas supply line shutoff valve is open. ■ If the gas supply line shutoff valve is closed . If you have a ½" (1.3 cm) long inner cone of flame should...

Installation Instructions
Page 15
... can result in the nut driver while changing it counterclockwise and lifting out. Turn manual shutoff valve to rear range foot. Shutoff valve (closed position. 2. Gas supply line To Convert Gas Pressure Regulator 1. Replace burner cap. 8. Connect anti-tip bracket to the closed position) C. Failure to children... Spud Chart." 6. Oven bake burner cover screws 15 See "Oven Door" section in plastic parts bag for each cooktop burner. Set Natural gas orifice spud aside. Remove the storage drawer. Using a Phillips screwdriver, remove the 2 oven bake burner cover screws...
... can result in the nut driver while changing it counterclockwise and lifting out. Turn manual shutoff valve to rear range foot. Shutoff valve (closed position. 2. Gas supply line To Convert Gas Pressure Regulator 1. Replace burner cap. 8. Connect anti-tip bracket to the closed position) C. Failure to children... Spud Chart." 6. Oven bake burner cover screws 15 See "Oven Door" section in plastic parts bag for each cooktop burner. Set Natural gas orifice spud aside. Remove the storage drawer. Using a Phillips screwdriver, remove the 2 oven bake burner cover screws...

Installation Instructions
Page 18
... to the model/serial rating plate on the lower right side of the front frame for future use and keep with correct Natural gas orifice spud. Replace the LP gas orifice spud with package containing literature. 10. Repeat steps 1 through 7 for instructions. 12. Reinstall storage drawer. See the "... spuds in the nut driver while changing it counterclockwise and lifting out. Replace burner grates. 11. Natural gas flames do not have to help hold the LP gas orifice spud in plastic parts bag for proper sizing of a 7 mm) nut driver to adjust the "LO" setting for each burner location....
... to the model/serial rating plate on the lower right side of the front frame for future use and keep with correct Natural gas orifice spud. Replace the LP gas orifice spud with package containing literature. 10. Repeat steps 1 through 7 for instructions. 12. Reinstall storage drawer. See the "... spuds in the nut driver while changing it counterclockwise and lifting out. Replace burner grates. 11. Natural gas flames do not have to help hold the LP gas orifice spud in plastic parts bag for proper sizing of a 7 mm) nut driver to adjust the "LO" setting for each burner location....


