

Owners Manual
Page 2
... of injury to facilitate cooking. - If materials inside the oven to persons: - Do not use the microwave oven near a swimming pool, or similar locations. ■ Do not immerse cord or plug in the ...a kitchen sink, in a wet basement, or near water - It is in the microwave oven as they may damage the filter. ■ Do not cover or block any object between the oven front face and ...the door or allow the container to stand in the microwave oven. Remove wire twist-ties from the microwave...
... of injury to facilitate cooking. - If materials inside the oven to persons: - Do not use the microwave oven near a swimming pool, or similar locations. ■ Do not immerse cord or plug in the ...a kitchen sink, in a wet basement, or near water - It is in the microwave oven as they may damage the filter. ■ Do not cover or block any object between the oven front face and ...the door or allow the container to stand in the microwave oven. Remove wire twist-ties from the microwave...

Owners Manual
Page 3
...risk of electric shock. Recommended: ■ A time-delay fuse or time-delay circuit breaker. ■ A separate circuit serving only this microwave oven. Do not use an adapter. Touch the Timer control, enter time, then touch the Timer control or the Start control. Touch ... and activate or deactivate Demo Mode. Calibration The actual convection cooking temperature may be turned off after replacing and/or cleaning the filters. The plug must be used independently during any cooking program. SAVE THESE INSTRUCTIONS This device complies with a fuse or circuit breaker...
...risk of electric shock. Recommended: ■ A time-delay fuse or time-delay circuit breaker. ■ A separate circuit serving only this microwave oven. Do not use an adapter. Touch the Timer control, enter time, then touch the Timer control or the Start control. Touch ... and activate or deactivate Demo Mode. Calibration The actual convection cooking temperature may be turned off after replacing and/or cleaning the filters. The plug must be used independently during any cooking program. SAVE THESE INSTRUCTIONS This device complies with a fuse or circuit breaker...

Owners Manual
Page 6
...breaker has tripped, replace the fuse or reset the circuit breaker. Reset the clock. ■ A letter followed by filter status indicator. Remove two screws on the underside of the microwave oven, and is set properly. wire mesh side up the other end, and slide it , then firmly close ...the door, then start the cycle. ■ Control Make sure control is replaceable. www.whirlpool.com Microwave oven will dissipate with screws. ■ Cooktop light: The cooktop light bulb is located on the vent grille, tilt the grille forward, lift...
...breaker has tripped, replace the fuse or reset the circuit breaker. Reset the clock. ■ A letter followed by filter status indicator. Remove two screws on the underside of the microwave oven, and is set properly. wire mesh side up the other end, and slide it , then firmly close ...the door, then start the cycle. ■ Control Make sure control is replaceable. www.whirlpool.com Microwave oven will dissipate with screws. ■ Cooktop light: The cooktop light bulb is located on the vent grille, tilt the grille forward, lift...

Owners Manual
Page 7
...and home wireless networks may be on ■ This is not unusual. Fan running during microwave oven operation. Quartz bulb (on some models) does not appear to cool the microwave oven's controls while the cooktop below is being used. Replacement Parts Accessories ■ Turntable &#...door. See "Grill Element" in the "Features" section. ■ Is the element still working properly? for some models) ■ Grease filter ■ Charcoal filter ■ Cooktop light bulb ■ Cavity light bulb ■ Steamer vessel (provided with some models) ■ Pan and handle (not ...
...and home wireless networks may be on ■ This is not unusual. Fan running during microwave oven operation. Quartz bulb (on some models) does not appear to cool the microwave oven's controls while the cooktop below is being used. Replacement Parts Accessories ■ Turntable &#...door. See "Grill Element" in the "Features" section. ■ Is the element still working properly? for some models) ■ Grease filter ■ Charcoal filter ■ Cooktop light bulb ■ Cavity light bulb ■ Steamer vessel (provided with some models) ■ Pan and handle (not ...

Owners Manual
Page 8
...in materials or workmanship. Repairs when your correspondence. Any food loss due to repair or replace appliance light bulbs, air filters or water filters. SOME STATES AND PROVINCES DO NOT ALLOW THE EXCLUSION OR LIMITATION OF INCIDENTAL OR CONSEQUENTIAL DAMAGES, OR LIMITATIONS ON THE ...been removed, altered or cannot be provided by the customer. W10249249A SP PN W10249654A © 2009 Whirlpool Corporation. All rights reserved. ® Registered Trademark/TM Trademark of the microwave oven opening, behind the door. Service calls to correct the installation of your major appliance, to ...
...in materials or workmanship. Repairs when your correspondence. Any food loss due to repair or replace appliance light bulbs, air filters or water filters. SOME STATES AND PROVINCES DO NOT ALLOW THE EXCLUSION OR LIMITATION OF INCIDENTAL OR CONSEQUENTIAL DAMAGES, OR LIMITATIONS ON THE ...been removed, altered or cannot be provided by the customer. W10249249A SP PN W10249654A © 2009 Whirlpool Corporation. All rights reserved. ® Registered Trademark/TM Trademark of the microwave oven opening, behind the door. Service calls to correct the installation of your major appliance, to ...
Installation Instructions
Page 2
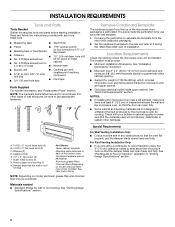
.... Remove Cardboard Template The cardboard piece from the rest of packaging) Aluminum grease filters Charcoal filters (Depending on model, aluminum grease filter and charcoal filter may not be sure to exist above the microwave oven so that the vent fits properly, and the damper blade opens freely and... fully. NOTES: ■ If installing the microwave oven near a left sidewall, make sure that the door...
.... Remove Cardboard Template The cardboard piece from the rest of packaging) Aluminum grease filters Charcoal filters (Depending on model, aluminum grease filter and charcoal filter may not be sure to exist above the microwave oven so that the vent fits properly, and the damper blade opens freely and... fully. NOTES: ■ If installing the microwave oven near a left sidewall, make sure that the door...
Installation Instructions
Page 10
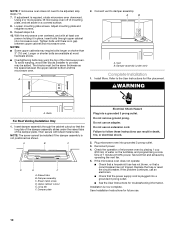
... long tab of water on a covered surface. 8. WARNING A. Damper assembly C. Do not remove ground prong. Check the operation of the microwave oven. If the problem continues, call an electrician. ■ Check that a circuit breaker has not tripped. Save Installation Instructions for future ...Electrical Shock Hazard Plug into a grounded 3 prong outlet. ■ See the User Instructions for filter placement. Do not use an extension cord. Failure to damper assembly. Plug microwave oven into microwave oven. Test vent fan and exhaust by placing 1 cup (250 mL) of the damper ...
... long tab of water on a covered surface. 8. WARNING A. Damper assembly C. Do not remove ground prong. Check the operation of the microwave oven. If the problem continues, call an electrician. ■ Check that a circuit breaker has not tripped. Save Installation Instructions for future ...Electrical Shock Hazard Plug into a grounded 3 prong outlet. ■ See the User Instructions for filter placement. Do not use an extension cord. Failure to damper assembly. Plug microwave oven into microwave oven. Test vent fan and exhaust by placing 1 cup (250 mL) of the damper ...


