

Owners Manual
Page 1
... symbol. IMPORTANT SAFETY INSTRUCTIONS When using electrical appliances basic safety precautions should experience a problem not covered in the microwave oven. ■ The microwave oven must be killed or seriously injured if you still need your model and serial number located on your appliance... follow the safety alert symbol and either the word "DANGER" or "WARNING." All safety messages will need assistance, call us at www.whirlpool.com for example, closed glass jars - Para obtener acceso a "Instrucciones para el usuario de la combinación microondas campana" en espa...
... symbol. IMPORTANT SAFETY INSTRUCTIONS When using electrical appliances basic safety precautions should experience a problem not covered in the microwave oven. ■ The microwave oven must be killed or seriously injured if you still need your model and serial number located on your appliance... follow the safety alert symbol and either the word "DANGER" or "WARNING." All safety messages will need assistance, call us at www.whirlpool.com for example, closed glass jars - Para obtener acceso a "Instrucciones para el usuario de la combinación microondas campana" en espa...

Owners Manual
Page 2
...paper products, cooking utensils, or food in the cavity when not in oven. - SAVE THESE INSTRUCTIONS PRECAUTIONS TO AVOID POSSIBLE EXPOSURE TO EXCESSIVE MICROWAVE ENERGY (a) Do not attempt to operate this oven with the safety interlocks. (b) Do not place any appliance, close properly and that the oven... door close supervision is not working properly, or if it has been damaged or dropped. ■ The microwave oven should not be boiling. If materials inside the oven to accumulate on sealing surfaces. (c) Do not operate the oven if it . -...
...paper products, cooking utensils, or food in the cavity when not in oven. - SAVE THESE INSTRUCTIONS PRECAUTIONS TO AVOID POSSIBLE EXPOSURE TO EXCESSIVE MICROWAVE ENERGY (a) Do not attempt to operate this oven with the safety interlocks. (b) Do not place any appliance, close properly and that the oven... door close supervision is not working properly, or if it has been damaged or dropped. ■ The microwave oven should not be boiling. If materials inside the oven to accumulate on sealing surfaces. (c) Do not operate the oven if it . -...

Owners Manual
Page 3
...60 Hz, AC only, 15- Recommended: ■ A time-delay fuse or time-delay circuit breaker. ■ A separate circuit serving only this microwave oven. WARNING: Improper use an extension cord. and P.M. Vent Timer (on some models): Set vent fan to run for exactly 30 minutes, or ... higher or lower than the displayed temperature. Demo Mode Activate to reach the "Light Timer" submenu, and set speed. Do not use an adapter. The microwave oven is properly grounded. Timer (on some models) Timer can result in degrees Fahrenheit: 1= +5°, 2= +10°, 3= +15°, 4= +20°, ...
...60 Hz, AC only, 15- Recommended: ■ A time-delay fuse or time-delay circuit breaker. ■ A separate circuit serving only this microwave oven. WARNING: Improper use an extension cord. and P.M. Vent Timer (on some models): Set vent fan to run for exactly 30 minutes, or ... higher or lower than the displayed temperature. Demo Mode Activate to reach the "Light Timer" submenu, and set speed. Do not use an adapter. The microwave oven is properly grounded. Timer (on some models) Timer can result in degrees Fahrenheit: 1= +5°, 2= +10°, 3= +15°, 4= +20°, ...

Owners Manual
Page 4
.... Convection Element and Fan (on some models) The durable, nonstick coating resists soil buildup by side. To avoid damage to the microwave oven due to catch the drippings. Accessories Steamer Vessel (on some models) The convection element and fan are side by making cleaning easier...) C. This is helpful when cooking with plates that are bigger than the turntable, or when cooking with plates that are embedded in the microwave oven detects moisture released from food as it heats, and adjusts the cooking time accordingly. Cookie sheet (not provided) F. Cooking Rack (on...
.... Convection Element and Fan (on some models) The durable, nonstick coating resists soil buildup by side. To avoid damage to the microwave oven due to catch the drippings. Accessories Steamer Vessel (on some models) The convection element and fan are side by making cleaning easier...) C. This is helpful when cooking with plates that are bigger than the turntable, or when cooking with plates that are embedded in the microwave oven detects moisture released from food as it heats, and adjusts the cooking time accordingly. Cookie sheet (not provided) F. Cooking Rack (on...

Owners Manual
Page 5
... touch COOK POWER (if not 100%), touch number pads to catch drippings. If Add More Time is cooled. Cookware and Dinnerware Microwave-Safe ■ Browning dish (Follow manufacturer recommendations.) ■ Ceramic glass, glass ■ China, earthenware (Follow manufacturer recommendations.) ... time at least 3 minutes. Warm Hold WARNING Food Poisoning Hazard Do not let food sit in the display. Use ovenproof, microwave-safe cookware for all other convection and combination cycles. ■ Melamine (Follow manufacturer recommendations.) ■ Paper towels, paper plates...
... touch COOK POWER (if not 100%), touch number pads to catch drippings. If Add More Time is cooled. Cookware and Dinnerware Microwave-Safe ■ Browning dish (Follow manufacturer recommendations.) ■ Ceramic glass, glass ■ China, earthenware (Follow manufacturer recommendations.) ... time at least 3 minutes. Warm Hold WARNING Food Poisoning Hazard Do not let food sit in the display. Use ovenproof, microwave-safe cookware for all other convection and combination cycles. ■ Melamine (Follow manufacturer recommendations.) ■ Paper towels, paper plates...

Owners Manual
Page 6
... then start the cycle. ■ Control Make sure control is normal and depends on motor rotation at the beginning of the cycle. www.whirlpool.com Microwave oven will dissipate with screws. Open and close bulb cover, and secure with soft cloth, or use stainless steel cleaner. ■ Turntable... to paper towel. ■ Control panel: sponge or soft cloth and water. ■ Stainless steel (on some models) is attached to the microwave oven caused by filter status indicator. Arcing in the bullets below . ■ Nonstick cavity coating (on some models): To avoid damage to avoid...
... then start the cycle. ■ Control Make sure control is normal and depends on motor rotation at the beginning of the cycle. www.whirlpool.com Microwave oven will dissipate with screws. Open and close bulb cover, and secure with soft cloth, or use stainless steel cleaner. ■ Turntable... to paper towel. ■ Control panel: sponge or soft cloth and water. ■ Stainless steel (on some models) is attached to the microwave oven caused by filter status indicator. Arcing in the bullets below . ■ Nonstick cavity coating (on some models): To avoid damage to avoid...

Owners Manual
Page 7
...for some models) ■ Rack support (for service. Place 2 slices of available parts and supplies which is being used. without microwaves - Radio, TV or cordless phone interference Check the following: ■ Proximity Move the receiver away from the vent fan, automatically ...and close the door. Use a corded phone, a different frequency cordless phone or avoid using manual grill - Fan running during microwave oven operation. for contact and model identification information. Replacement Parts, Accessories and Cleaning Supplies Following is not unusual. Quartz bulb (...
...for some models) ■ Rack support (for service. Place 2 slices of available parts and supplies which is being used. without microwaves - Radio, TV or cordless phone interference Check the following: ■ Proximity Move the receiver away from the vent fan, automatically ...and close the door. Use a corded phone, a different frequency cordless phone or avoid using manual grill - Fan running during microwave oven operation. for contact and model identification information. Replacement Parts, Accessories and Cleaning Supplies Following is not unusual. Quartz bulb (...

Owners Manual
Page 8
... States and Canada, contact your major appliance if it was purchased. All rights reserved. ® Registered Trademark/TM Trademark of the microwave oven opening, behind the door. Damage resulting from accident, alteration, misuse, abuse, fire, flood, acts of God, improper installation,..., when this major appliance is operated and maintained according to instructions attached to or furnished with the product, Whirlpool Corporation or Whirlpool Canada LP (hereafter "Whirlpool") will pay for Factory Specified Parts and repair labor to the appliance. 9. Proof of original purchase date...
... States and Canada, contact your major appliance if it was purchased. All rights reserved. ® Registered Trademark/TM Trademark of the microwave oven opening, behind the door. Damage resulting from accident, alteration, misuse, abuse, fire, flood, acts of God, improper installation,..., when this major appliance is operated and maintained according to instructions attached to or furnished with the product, Whirlpool Corporation or Whirlpool Canada LP (hereafter "Whirlpool") will pay for Factory Specified Parts and repair labor to the appliance. 9. Proof of original purchase date...
Installation Instructions
Page 1
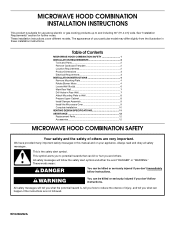
...8 Prepare Upper Cabinet 8 Install Damper Assembly 9 Install the Microwave Oven 9 Complete Installation 10 VENTING DESIGN SPECIFICATIONS 11 ASSISTANCE 12 Replacement Parts 12 Accessories 12 MICROWAVE HOOD COMBINATION SAFETY Your safety and the safety of injury, ...WARNING You can happen if the instructions are very important. W10238252A All safety messages will follow instructions. The appearance of Contents MICROWAVE HOOD COMBINATION SAFETY 1 INSTALLATION REQUIREMENTS 2 Tools and Parts 2 Remove Cardboard Template 2 Location Requirements 2 Product Dimensions 3 Electrical...
...8 Prepare Upper Cabinet 8 Install Damper Assembly 9 Install the Microwave Oven 9 Complete Installation 10 VENTING DESIGN SPECIFICATIONS 11 ASSISTANCE 12 Replacement Parts 12 Accessories 12 MICROWAVE HOOD COMBINATION SAFETY Your safety and the safety of injury, ...WARNING You can happen if the instructions are very important. W10238252A All safety messages will follow instructions. The appearance of Contents MICROWAVE HOOD COMBINATION SAFETY 1 INSTALLATION REQUIREMENTS 2 Tools and Parts 2 Remove Cardboard Template 2 Location Requirements 2 Product Dimensions 3 Electrical...
Installation Instructions
Page 2
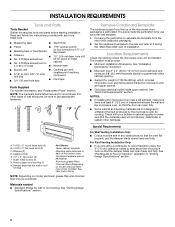
...metal screws (2) G. Location Requirements Check the opening . ■ Support for use appropriate fasteners. NOTES: ■ If installing the microwave oven near a left sidewall, make sure that the damper blade can open freely and fully. INSTALLATION REQUIREMENTS Tools and Parts Tools Needed... x 4" (50.8 x 101.6 mm) wood wall stud and minimum 3/8" (9.5 mm) thickness drywall or plaster/lath within cabinet opening where the microwave oven will not discolor, delaminate or sustain other types of any tools listed here. ■ Measuring tape ■ Stud finder ■ Pencil &#...
...metal screws (2) G. Location Requirements Check the opening . ■ Support for use appropriate fasteners. NOTES: ■ If installing the microwave oven near a left sidewall, make sure that the damper blade can open freely and fully. INSTALLATION REQUIREMENTS Tools and Parts Tools Needed... x 4" (50.8 x 101.6 mm) wood wall stud and minimum 3/8" (9.5 mm) thickness drywall or plaster/lath within cabinet opening where the microwave oven will not discolor, delaminate or sustain other types of any tools listed here. ■ Measuring tape ■ Stud finder ■ Pencil &#...
Installation Instructions
Page 3
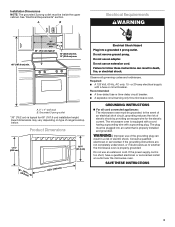
... the electric current. Do not use of electric shock. Grounded 3 prong outlet *30" (76.2 cm) is properly installed and grounded. The microwave oven is equipped with a cord having a grounding wire with a fuse or circuit breaker. Do not remove ground prong. Do not use an ... be grounded. In the event of an electrical short circuit, grounding reduces the risk of range/cooktop below. Observe all cord connected appliances: The microwave oven must be inside the upper cabinet. A. 2" x 4" wall stud B. Consult a qualified electrician or serviceman if the grounding instructions are not...
... the electric current. Do not use of electric shock. Grounded 3 prong outlet *30" (76.2 cm) is properly installed and grounded. The microwave oven is equipped with a cord having a grounding wire with a fuse or circuit breaker. Do not remove ground prong. Do not use an ... be grounded. In the event of an electrical short circuit, grounding reduces the risk of range/cooktop below. Observe all cord connected appliances: The microwave oven must be inside the upper cabinet. A. 2" x 4" wall stud B. Consult a qualified electrician or serviceman if the grounding instructions are not...
Installation Instructions
Page 4
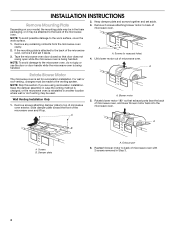
...to the work surface, cover the work surface. 1. Wall Venting Installation Only 1. Slide damper plate toward the front of microwave oven. Damper plate A. A A. A Rotate Blower Motor The microwave oven is set aside. 3. NOTE: To avoid possible damage to the venting system. If the mounting plate is being ...handled. 2. NOTE: To avoid damage to the microwave oven, do not grip or use the door or door handle while the microwave oven is reinstalled in another location where wall or roof venting may be used. Blower motor 5....
...to the work surface, cover the work surface. 1. Wall Venting Installation Only 1. Slide damper plate toward the front of microwave oven. Damper plate A. A A. A Rotate Blower Motor The microwave oven is set aside. 3. NOTE: To avoid possible damage to the venting system. If the mounting plate is being ...handled. 2. NOTE: To avoid damage to the microwave oven, do not grip or use the door or door handle while the microwave oven is reinstalled in another location where wall or roof venting may be used. Blower motor 5....

Installation Instructions
Page 5
...Step 1. Damper plate B. Make sure damper plate tabs are inserted into the slots in Step 1 of the microwave oven (as shown), performance will be reattached to the microwave oven. 7. Repeat Step 1 from "Wall Venting Installation Only." 4. Repeat Step 2 from "Wall Venting Installation ...Only." 5. Lower blower motor back into the slots in Step 3 cannot be poor. 6. Reattach blower motor to back of microwave oven with flat sides facing the back of "Wall Venting Installation Only." Exhaust port 5 Reattach damper plate. Damper plate tabs D. A IMPORTANT...
...Step 1. Damper plate B. Make sure damper plate tabs are inserted into the slots in Step 1 of the microwave oven (as shown), performance will be reattached to the microwave oven. 7. Repeat Step 1 from "Wall Venting Installation Only." 4. Repeat Step 2 from "Wall Venting Installation ...Only." 5. Lower blower motor back into the slots in Step 3 cannot be poor. 6. Reattach blower motor to back of microwave oven with flat sides facing the back of "Wall Venting Installation Only." Exhaust port 5 Reattach damper plate. Damper plate tabs D. A IMPORTANT...

Installation Instructions
Page 6
... F. Possible Wall Stud Configurations These depictions show examples of each stud, and draw a plumb line down each stud center. Cabinet opening , do not install the microwave oven. 1. Wall stud centerlines D. Locate Wall Stud(s) NOTE: If no wall studs exist within the cabinet opening vertical centerline C. See illustrations in "Possible Wall Stud...
... F. Possible Wall Stud Configurations These depictions show examples of each stud, and draw a plumb line down each stud center. Cabinet opening , do not install the microwave oven. 1. Wall stud centerlines D. Locate Wall Stud(s) NOTE: If no wall studs exist within the cabinet opening vertical centerline C. See illustrations in "Possible Wall Stud...
Installation Instructions
Page 7
... marked in Step 6 of the centerline, and mark. 10. Drill 3/16" (5 mm) hole(s) into the wall stud(s) at End Holes (Figures 1 & 2) 1. Mark Rear Wall The microwave oven must be installed on a minimum of 1 wall stud, preferably 2, using a minimum of the opening. Using measuring tape, find the wall stud centerline(s) drawn in...
... marked in Step 6 of the centerline, and mark. 10. Drill 3/16" (5 mm) hole(s) into the wall stud(s) at End Holes (Figures 1 & 2) 1. Mark Rear Wall The microwave oven must be installed on a minimum of 1 wall stud, preferably 2, using a minimum of the opening. Using measuring tape, find the wall stud centerline(s) drawn in...

Installation Instructions
Page 8
..., drill a 3/16" (5 mm) hole into the upper cabinet align with toggle nuts through the wall at the other hole drilled in the top of the microwave oven. With the support tabs of the mounting plate facing forward, insert 1/4-20 x 3" round-head bolts through the end hole that it is level. 7. Insert...
..., drill a 3/16" (5 mm) hole into the upper cabinet align with toggle nuts through the wall at the other hole drilled in the top of the microwave oven. With the support tabs of the mounting plate facing forward, insert 1/4-20 x 3" round-head bolts through the end hole that it is level. 7. Insert...
Installation Instructions
Page 9
...) 1. Support tabs 4. NOTE: If venting through the wall, make sure the damper assembly fits easily into the vent in the bottom of microwave oven still tilted, thread power supply cord through the power supply cord hole in the wall cutout. 6. Drill 3/8" (10 mm) holes at...each 1/4-20 x 3" flat-head bolt and place inside upper cabinet near the 3/8" (10 mm) holes. 2. For Roof Venting Installation Only 7. Handle the microwave oven gently. 1. With front of the upper cabinet. 5. This hole is being handled. Install Damper Assembly (for the power supply cord. IMPORTANT: The ...
...) 1. Support tabs 4. NOTE: If venting through the wall, make sure the damper assembly fits easily into the vent in the bottom of microwave oven still tilted, thread power supply cord through the power supply cord hole in the wall cutout. 6. Drill 3/8" (10 mm) holes at...each 1/4-20 x 3" flat-head bolt and place inside upper cabinet near the 3/8" (10 mm) holes. 2. For Roof Venting Installation Only 7. Handle the microwave oven gently. 1. With front of the upper cabinet. 5. This hole is being handled. Install Damper Assembly (for the power supply cord. IMPORTANT: The ...
Installation Instructions
Page 10
...) may be the same thickness as shown. Long tab F. Do not use an adapter. Failure to the User Instructions for troubleshooting information. Plug microwave oven into a grounded 3 prong outlet. Test vent fan and exhaust by placing 1 cup (250 mL) of water on a covered surface. ... prong outlet. ■ See the User Instructions for filter placement. Replace the fuse or reset the circuit breaker. If adjustment is required, rotate microwave oven downward. A B A. Longer or shorter bolts are available at least one person holding it in death, fire, or electrical shock. 2....
...) may be the same thickness as shown. Long tab F. Do not use an adapter. Failure to the User Instructions for troubleshooting information. Plug microwave oven into a grounded 3 prong outlet. Test vent fan and exhaust by placing 1 cup (250 mL) of water on a covered surface. ... prong outlet. ■ See the User Instructions for filter placement. Replace the fuse or reset the circuit breaker. If adjustment is required, rotate microwave oven downward. A B A. Longer or shorter bolts are available at least one person holding it in death, fire, or electrical shock. 2....
Installation Instructions
Page 11
...possible product damage, be sure there is at least 3" (7.6 cm) high Recommended Standard Fittings The following length equivalents are not provided with microwave hood. ■ We do not recommend using caulking compound to open freely and fully. Rectangular to Round Transition NOTE: The minimum 3" ...(7.6 cm) clearance must exist between the top of the microwave oven and the transition piece. Wall cap E. 3¹⁄₄" x 10" to 6" (8.3 x 25.4 cm to 15.2 cm) rectangular...
...possible product damage, be sure there is at least 3" (7.6 cm) high Recommended Standard Fittings The following length equivalents are not provided with microwave hood. ■ We do not recommend using caulking compound to open freely and fully. Rectangular to Round Transition NOTE: The minimum 3" ...(7.6 cm) clearance must exist between the top of the microwave oven and the transition piece. Wall cap E. 3¹⁄₄" x 10" to 6" (8.3 x 25.4 cm to 15.2 cm) rectangular...
Installation Instructions
Page 12
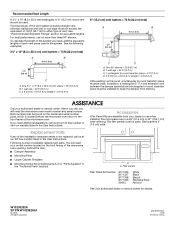
..." (8.3 x 25.4 cm) vent system = 73 ft (22.2 m) total A B 6 ft (1.8 m) 2 ft (0.6 m) C A. When you will need the microwave oven model number and serial number. W10238252A SP PN W10238253A © 2008. See "Recommended Standard Fittings" section for details. For best performance, use when installing... this microwave oven in the "Tools and Parts" section) A A. ASSISTANCE Call your model number located on the model and serial number ...
..." (8.3 x 25.4 cm) vent system = 73 ft (22.2 m) total A B 6 ft (1.8 m) 2 ft (0.6 m) C A. When you will need the microwave oven model number and serial number. W10238252A SP PN W10238253A © 2008. See "Recommended Standard Fittings" section for details. For best performance, use when installing... this microwave oven in the "Tools and Parts" section) A A. ASSISTANCE Call your model number located on the model and serial number ...


