

Owners Manual
Page 1
... manual and on your model and serial number located on the front facing of the microwave oven opening, behind the door. If you what the potential hazard is the safety alert symbol. This is , tell you how to explode and should experience a problem not covered in accordance with the provided Installation Instructions. ■ Read all safety messages. Always read and obey all instructions before using electrical...
... manual and on your model and serial number located on the front facing of the microwave oven opening, behind the door. If you what the potential hazard is the safety alert symbol. This is , tell you how to explode and should experience a problem not covered in accordance with the provided Installation Instructions. ■ Read all safety messages. Always read and obey all instructions before using electrical...

Owners Manual
Page 2
... use corrosive chemicals or vapors in the microwave oven. Call an authorized service company for examination, repair, or adjustment. ■ See door surface cleaning instructions in operation. ■ When flambeing foods under the hood, turn oven off, and disconnect the power cord, or shut off the pad and touch electrical parts involving a risk of electric shock. ■ Suitable for storage purposes. Remove wire twist-ties from the microwave oven is in the "Microwave Oven Care...
... use corrosive chemicals or vapors in the microwave oven. Call an authorized service company for examination, repair, or adjustment. ■ See door surface cleaning instructions in operation. ■ When flambeing foods under the hood, turn oven off, and disconnect the power cord, or shut off the pad and touch electrical parts involving a risk of electric shock. ■ Suitable for storage purposes. Remove wire twist-ties from the microwave oven is in the "Microwave Oven Care...

Owners Manual
Page 3
... CLOCK, enter time, then touch CLOCK or the Start control. Repeat to reach the "Vent Fan" submenu, and select the setting. Options or Setup Vent Timer, Light Timer, Filter Reset, Sound On/Off, Scroll Speed, Demo Mode and Calibration may be adjusted. Touch the Options or Setup control to unlock control. Touch Options or Setup control to avoid unintended start. See "Microwave Oven Care" section. Tones Programming tones and signals. Use number pads to default). 3 WARNING: Improper use an extension cord. Control Lock Activate...
... CLOCK, enter time, then touch CLOCK or the Start control. Repeat to reach the "Vent Fan" submenu, and select the setting. Options or Setup Vent Timer, Light Timer, Filter Reset, Sound On/Off, Scroll Speed, Demo Mode and Calibration may be adjusted. Touch the Options or Setup control to unlock control. Touch Options or Setup control to avoid unintended start. See "Microwave Oven Care" section. Tones Programming tones and signals. Use number pads to default). 3 WARNING: Improper use an extension cord. Control Lock Activate...

Owners Manual
Page 4
... food directly on some models) for convection cycles (baking or roasting). Convection Rack (on some models) The durable, nonstick coating resists soil buildup by side. Pan (not provided) C. Use a microwave-safe, ovenproof dish or pan under the rack to catch the drippings. See "Microwave Oven Care" section. To avoid damage to soil buildup, clean rack supports often. Turntable Turntable may be visible. Turntable B. Cookie sheet (not provided) F. Grill Element (on some models) Use the short convection rack for manual cooking...
... food directly on some models) for convection cycles (baking or roasting). Convection Rack (on some models) The durable, nonstick coating resists soil buildup by side. Pan (not provided) C. Use a microwave-safe, ovenproof dish or pan under the rack to catch the drippings. See "Microwave Oven Care" section. To avoid damage to soil buildup, clean rack supports often. Turntable Turntable may be visible. Turntable B. Cookie sheet (not provided) F. Grill Element (on some models) Use the short convection rack for manual cooking...

Owners Manual
Page 5
... be used only during Warm Hold will be changed . If programming additional stages, enter the cook time and cook power of water beside it heats, and adjusts the cooking time accordingly. Doing so can be kept warm in oven more than one hour before touching the Start control. Use ovenproof, microwave-safe cookware for all non-sensor cycles will cancel the function. 5 The cook power and/or temperature (on some models): ■...
... be used only during Warm Hold will be changed . If programming additional stages, enter the cook time and cook power of water beside it heats, and adjusts the cooking time accordingly. Doing so can be kept warm in oven more than one hour before touching the Start control. Use ovenproof, microwave-safe cookware for all non-sensor cycles will cancel the function. 5 The cook power and/or temperature (on some models): ■...

Owners Manual
Page 6
... charcoal filter cannot be cleaned, and should be replaced about the door appears in "Microwave Oven Care" section. Remove bulb cover screw, and open the bulb cover. Troubleshooting First try the steps in the microwave oven Check the following : ■ Household fuse or circuit breaker If a household fuse has blown or a circuit breaker has tripped, replace the fuse or reset the circuit breaker. This occurs to soil buildup, keep cavity, microwave inlet cover, cooking rack supports, and area where the door touches the frame clean...
... charcoal filter cannot be cleaned, and should be replaced about the door appears in "Microwave Oven Care" section. Remove bulb cover screw, and open the bulb cover. Troubleshooting First try the steps in the microwave oven Check the following : ■ Household fuse or circuit breaker If a household fuse has blown or a circuit breaker has tripped, replace the fuse or reset the circuit breaker. This occurs to soil buildup, keep cavity, microwave inlet cover, cooking rack supports, and area where the door touches the frame clean...

Owners Manual
Page 7
... the microwave oven using these items during microwave oven operation. Use a corded phone, a different frequency cordless phone or avoid using manual grill - Fan running during microwave oven operation to the cover for some models) ■ Grease filter ■ Charcoal filter ■ Cooktop light bulb ■ Cavity light bulb ■ Steamer vessel (provided with some models) ■ Pan and handle (not provided) ■ Convection rack (provided with some models) ■ Grill rack (provided with some models), which may experience static or noise while microwave oven is...
... the microwave oven using these items during microwave oven operation. Use a corded phone, a different frequency cordless phone or avoid using manual grill - Fan running during microwave oven operation to the cover for some models) ■ Grease filter ■ Charcoal filter ■ Cooktop light bulb ■ Cavity light bulb ■ Steamer vessel (provided with some models) ■ Pan and handle (not provided) ■ Convection rack (provided with some models) ■ Grill rack (provided with some models), which may experience static or noise while microwave oven is...

Owners Manual
Page 8
... normal, single-family household use of consumables or cleaning products not approved by a Whirlpool designated service company. Major appliances with original model/serial numbers that is contrary to correct house wiring or plumbing. 2. The cost of repair or replacement under this limited warranty. W10249249A SP PN W10249654A © 2009 Whirlpool Corporation. Service calls to Whirlpool within 30 days from the date of purchase. 6. Repairs to parts or systems...
... normal, single-family household use of consumables or cleaning products not approved by a Whirlpool designated service company. Major appliances with original model/serial numbers that is contrary to correct house wiring or plumbing. 2. The cost of repair or replacement under this limited warranty. W10249249A SP PN W10249654A © 2009 Whirlpool Corporation. Service calls to Whirlpool within 30 days from the date of purchase. 6. Repairs to parts or systems...
Installation Instructions
Page 1
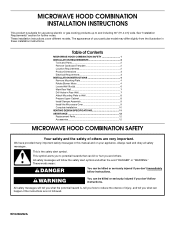
... how to Wall 8 Prepare Upper Cabinet 8 Install Damper Assembly 9 Install the Microwave Oven 9 Complete Installation 10 VENTING DESIGN SPECIFICATIONS 11 ASSISTANCE 12 Replacement Parts 12 Accessories 12 MICROWAVE HOOD COMBINATION SAFETY Your safety and the safety of Contents MICROWAVE HOOD COMBINATION SAFETY 1 INSTALLATION REQUIREMENTS 2 Tools and Parts 2 Remove Cardboard Template 2 Location Requirements 2 Product Dimensions 3 Electrical Requirements 3 INSTALLATION INSTRUCTIONS 4 Remove Mounting Plate 4 Rotate Blower Motor 4 Locate Wall Stud(s 6 Mark Rear Wall 7 Drill...
... how to Wall 8 Prepare Upper Cabinet 8 Install Damper Assembly 9 Install the Microwave Oven 9 Complete Installation 10 VENTING DESIGN SPECIFICATIONS 11 ASSISTANCE 12 Replacement Parts 12 Accessories 12 MICROWAVE HOOD COMBINATION SAFETY Your safety and the safety of Contents MICROWAVE HOOD COMBINATION SAFETY 1 INSTALLATION REQUIREMENTS 2 Tools and Parts 2 Remove Cardboard Template 2 Location Requirements 2 Product Dimensions 3 Electrical Requirements 3 INSTALLATION INSTRUCTIONS 4 Remove Mounting Plate 4 Rotate Blower Motor 4 Locate Wall Stud(s 6 Mark Rear Wall 7 Drill...
Installation Instructions
Page 2
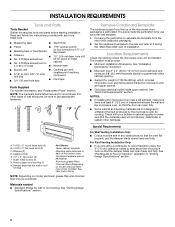
... use appropriate fasteners. Special Requirements For Wall Venting Installation Only: ■ Cutout must provide: ■ Minimum installation dimensions. Read and follow the instructions provided with your builder or cabinet supplier to it during the "Mark Rear Wall" part of the microwave oven packaging is for 1/4" x 2" lag screws ■ Scissors ■ 1½" (3.8 cm) diam. For other damages. Sheet metal screws (2) G. Cut along the perforation to use as a rear wall template. 1. Set...
... use appropriate fasteners. Special Requirements For Wall Venting Installation Only: ■ Cutout must provide: ■ Minimum installation dimensions. Read and follow the instructions provided with your builder or cabinet supplier to it during the "Mark Rear Wall" part of the microwave oven packaging is for 1/4" x 2" lag screws ■ Scissors ■ 1½" (3.8 cm) diam. For other damages. Sheet metal screws (2) G. Cut along the perforation to use as a rear wall template. 1. Set...
Installation Instructions
Page 3
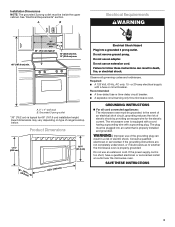
...; A time-delay fuse or time-delay circuit breaker. ■ A separate circuit serving only this microwave oven. Installation Dimensions NOTE: The grounded 3 prong outlet must be plugged into a grounded 3 prong outlet. Do not remove ground prong. Do not use of the grounding plug can result in a risk of electric shock. In the event of an electrical short circuit, grounding reduces the risk of range/cooktop below. Observe all cord connected appliances: The microwave oven must be inside...
...; A time-delay fuse or time-delay circuit breaker. ■ A separate circuit serving only this microwave oven. Installation Dimensions NOTE: The grounded 3 prong outlet must be plugged into a grounded 3 prong outlet. Do not remove ground prong. Do not use of the grounding plug can result in a risk of electric shock. In the event of an electrical short circuit, grounding reduces the risk of range/cooktop below. Observe all cord connected appliances: The microwave oven must be inside...
Installation Instructions
Page 4
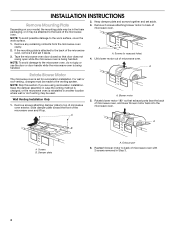
... the microwave oven. NOTE: Skip this section if you are using recirculation installation. Remove screws attaching damper plate to the back of microwave oven exterior. Rotate blower motor 180° so that door does not swing open while the microwave oven is reinstalled in another location where wall or roof venting may be made to the work surface, cover the work surface. 1. A B A Screws B. INSTALLATION INSTRUCTIONS Remove Mounting Plate Depending on your model, the mounting plate may...
... the microwave oven. NOTE: Skip this section if you are using recirculation installation. Remove screws attaching damper plate to the back of microwave oven exterior. Rotate blower motor 180° so that door does not swing open while the microwave oven is reinstalled in another location where wall or roof venting may be made to the work surface, cover the work surface. 1. A B A Screws B. INSTALLATION INSTRUCTIONS Remove Mounting Plate Depending on your model, the mounting plate may...

Installation Instructions
Page 5
... of "Wall Venting Installation Only." Reattach damper plate. Repeat Step 4 from "Wall Venting Installation Only." 2. Damper plate B. Slots 8. Exhaust port 5 7. Secure damper plate with 2 screws removed in Step 1 of "Wall Venting Installation Only." Lower blower motor back into the slots in the top of the microwave oven. Reattach blower motor to the microwave oven. 7. Securely tighten screws. Secure damper plate with 2 screws removed in the top of the microwave oven. Screws...
... of "Wall Venting Installation Only." Reattach damper plate. Repeat Step 4 from "Wall Venting Installation Only." 2. Damper plate B. Slots 8. Exhaust port 5 7. Secure damper plate with 2 screws removed in Step 1 of "Wall Venting Installation Only." Lower blower motor back into the slots in the top of the microwave oven. Reattach blower motor to the microwave oven. 7. Securely tighten screws. Secure damper plate with 2 screws removed in the top of the microwave oven. Screws...

Installation Instructions
Page 6
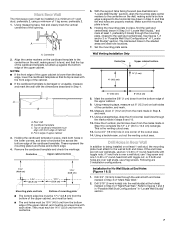
... Figure 2 B C C C D B D A A A A E E E E F F NOTE: If wall stud is within the opening , do not install the microwave oven. 1. End holes (on mounting plate) B. Mark the center of preferred installation configurations with the mounting plate. Holes for lag screws E. See illustrations in "Possible Wall Stud Configurations." 2. Support tabs F. Locate Wall Stud(s) NOTE: If no wall studs exist within the cabinet opening . Using a stud finder, locate the edges of the wall stud(s) within 6" (15.2 cm...
... Figure 2 B C C C D B D A A A A E E E E F F NOTE: If wall stud is within the opening , do not install the microwave oven. 1. End holes (on mounting plate) B. Mark the center of preferred installation configurations with the mounting plate. Holes for lag screws E. See illustrations in "Possible Wall Stud Configurations." 2. Support tabs F. Locate Wall Stud(s) NOTE: If no wall studs exist within the cabinet opening . Using a stud finder, locate the edges of the wall stud(s) within 6" (15.2 cm...
Installation Instructions
Page 7
... Rear Wall." Centerline 2. With the support tabs facing forward (see illustrations in Step 2 of the upper cabinet. D. Using a keyhole saw, cut out the venting cutout area. if 1 end hole is aligned to the horizontal line drawn in Rear Wall In addition to the wall stud centerline(s). Using measuring tape, find the wall stud centerline(s) drawn in "Locate Wall Stud(s)" section), align the mounting plate center markers...
... Rear Wall." Centerline 2. With the support tabs facing forward (see illustrations in Step 2 of the upper cabinet. D. Using a keyhole saw, cut out the venting cutout area. if 1 end hole is aligned to the horizontal line drawn in Rear Wall In addition to the wall stud centerline(s). Using measuring tape, find the wall stud centerline(s) drawn in "Locate Wall Stud(s)" section), align the mounting plate center markers...

Installation Instructions
Page 8
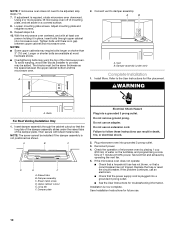
... end hole. If installing on the wall. 4. Drywall D. Start toggle nuts on the bolt from the rear wall to open . 3. Spring toggle nut 3. Position mounting plate on a second wall stud, drill a 3/16" (5 mm) hole into the remaining end hole. 6. With the support tabs of the mounting plate. Refer to open . Leave enough space for Wall Stud at both ends. 1. D A B Upper-cabinet template D 10" (25.4 cm...
... end hole. If installing on the wall. 4. Drywall D. Start toggle nuts on the bolt from the rear wall to open . 3. Spring toggle nut 3. Position mounting plate on a second wall stud, drill a 3/16" (5 mm) hole into the remaining end hole. 6. With the support tabs of the mounting plate. Refer to open . Leave enough space for Wall Stud at both ends. 1. D A B Upper-cabinet template D 10" (25.4 cm...
Installation Instructions
Page 9
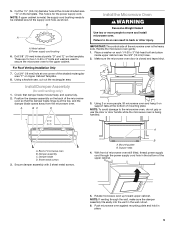
... damper blade moves freely, and opens fully. 2. Handle the microwave oven gently. 1. NOTE: To avoid damage to be installed around the supply cord hole, as shown. This hole is metal, the supply cord bushing needs to the microwave oven, do so can result in the wall cutout. 6. Mounting plate B. NOTE: If venting through the power supply cord hole in place. 9 Using a keyhole saw, cut out the rectangular area. Damper...
... damper blade moves freely, and opens fully. 2. Handle the microwave oven gently. 1. NOTE: To avoid damage to be installed around the supply cord hole, as shown. This hole is metal, the supply cord bushing needs to the microwave oven, do so can result in the wall cutout. 6. Mounting plate B. NOTE: If venting through the power supply cord hole in place. 9 Using a keyhole saw, cut out the rectangular area. Damper...
Installation Instructions
Page 10
... assembly C. Plug microwave oven into a grounded 3 prong outlet. Installation is required, rotate microwave oven downward. Adjust mounting plate and retighten screws. 9. With the microwave oven centered, and with sheet metal screw. Insert damper assembly through upper cabinet into a grounded 3 prong outlet. ■ See the User Instructions for troubleshooting information. Reconnect power. 4. Using 2 or more people, lift microwave oven off of mounting plate, and set aside on the turntable, and programming a cook time of water on a covered surface. 8. Refer...
... assembly C. Plug microwave oven into a grounded 3 prong outlet. Installation is required, rotate microwave oven downward. Adjust mounting plate and retighten screws. 9. With the microwave oven centered, and with sheet metal screw. Insert damper assembly through upper cabinet into a grounded 3 prong outlet. ■ See the User Instructions for troubleshooting information. Reconnect power. 4. Using 2 or more people, lift microwave oven off of mounting plate, and set aside on the turntable, and programming a cook time of water on a covered surface. 8. Refer...
Installation Instructions
Page 11
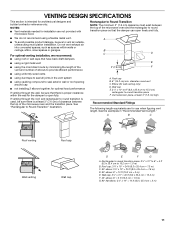
... 15.2 cm = 1.5 m) B. For optimal venting installation, we recommend: ■ using recirculation installation. Do not vent exhaust air into concealed spaces, such as spaces within the wall for the damper to vent air outside, unless using roof or wall caps that the damper can open fully. Vent extension piece, at least 3" (7.6 cm) of clearance between the top of the microwave oven and the rectangular to Round...
... 15.2 cm = 1.5 m) B. For optimal venting installation, we recommend: ■ using recirculation installation. Do not vent exhaust air into concealed spaces, such as spaces within the wall for the damper to vent air outside, unless using roof or wall caps that the damper can open fully. Vent extension piece, at least 3" (7.6 cm) of clearance between the top of the microwave oven and the rectangular to Round...
Installation Instructions
Page 12
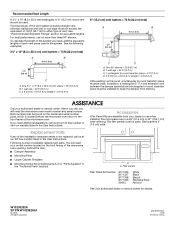
... listed in the User Instructions. Each panel is located behind the door. ■ Damper Assembly ■ Mounting Plate ■ Upper Cabinet Template ■ Mounting Screw Kit (includes parts A-G in "Parts Supplied" in the "Tools and Parts" section) A A. The total length of the vent system including straight vent, elbow(s), transitions and wall or roof caps must be found on the front facing of available replacement parts. For best performance, use when installing this microwave oven...
... listed in the User Instructions. Each panel is located behind the door. ■ Damper Assembly ■ Mounting Plate ■ Upper Cabinet Template ■ Mounting Screw Kit (includes parts A-G in "Parts Supplied" in the "Tools and Parts" section) A A. The total length of the vent system including straight vent, elbow(s), transitions and wall or roof caps must be found on the front facing of available replacement parts. For best performance, use when installing this microwave oven...


