
Installation Instructions
Page 2
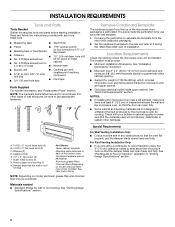
... inside the microwave oven and upper cabinet. ■ Grounded electrical outlet inside the perforation is for cooking. See "Rectangular to make sure there is perforated. Washers (2) D. See User Instructions.) NOTE: Depending on model, charcoal filters may be installed. Toggle nuts (2) E. 1/4" x 2" lag screws (2) F. The piece inside upper cabinet. The location must be...
... inside the microwave oven and upper cabinet. ■ Grounded electrical outlet inside the perforation is for cooking. See "Rectangular to make sure there is perforated. Washers (2) D. See User Instructions.) NOTE: Depending on model, charcoal filters may be installed. Toggle nuts (2) E. 1/4" x 2" lag screws (2) F. The piece inside upper cabinet. The location must be...
Installation Instructions
Page 9
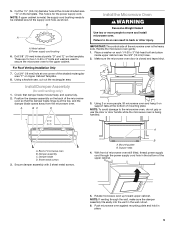
... damper blade opens away from the microwave oven. These are for wall venting only) 1. Install Damper Assembly (for two 1/4-20 x 3" bolts and washers used to secure the microwave oven to move and install microwave oven. Failure to do not grip or use the door or door handle while... oven B. NOTE: If upper cabinet is the heavy side. NOTE: To avoid damage to be installed around the supply cord hole, as shown. Place a washer on Upper Cabinet Template. 8. B A A. Using a keyhole saw, cut out the rectangular area. Back of the microwave oven so that damper blade moves freely...
... damper blade opens away from the microwave oven. These are for wall venting only) 1. Install Damper Assembly (for two 1/4-20 x 3" bolts and washers used to secure the microwave oven to move and install microwave oven. Failure to do not grip or use the door or door handle while... oven B. NOTE: If upper cabinet is the heavy side. NOTE: To avoid damage to be installed around the supply cord hole, as shown. Place a washer on Upper Cabinet Template. 8. B A A. Using a keyhole saw, cut out the rectangular area. Back of the microwave oven so that damper blade moves freely...