
Installation Instructions
Page 1
... kill or hurt you don't follow instructions. Table of Contents MICROWAVE HOOD COMBINATION SAFETY 1 INSTALLATION REQUIREMENTS 2 Tools and Parts 2 Remove Cardboard Template 2 Location Requirements 2 Product Dimensions 3 Electrical Requirements 3 INSTALLATION INSTRUCTIONS 4 Remove Mounting Plate 4 Rotate Blower Motor 4 Locate Wall Stud(s 6 Mark Rear Wall 7 Drill Holes in Rear Wall 7 Attach Mounting Plate to...
... kill or hurt you don't follow instructions. Table of Contents MICROWAVE HOOD COMBINATION SAFETY 1 INSTALLATION REQUIREMENTS 2 Tools and Parts 2 Remove Cardboard Template 2 Location Requirements 2 Product Dimensions 3 Electrical Requirements 3 INSTALLATION INSTRUCTIONS 4 Remove Mounting Plate 4 Rotate Blower Motor 4 Locate Wall Stud(s 6 Mark Rear Wall 7 Drill Holes in Rear Wall 7 Attach Mounting Plate to...
Installation Instructions
Page 2
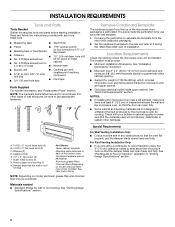
...be included. The piece inside upper cabinet. Special Requirements For Wall Venting Installation Only: ■ Cutout must provide: ■ Minimum installation dimensions. Materials needed ■ Standard fittings for cabinet 1/4-20 x 3" bolts ■ Keyhole saw ■ Electric drill ■ 3/16" ...9632; Caulking gun and weatherproof caulking compound ■ Duct tape Parts Supplied For reorder information, see "Replacement Parts" section. See "Installation Dimensions" illustration. ■ Minimum one 2" x 4" (50.8 x 101.6 mm) wood wall stud and minimum 3/8" (9.5 mm) thickness...
...be included. The piece inside upper cabinet. Special Requirements For Wall Venting Installation Only: ■ Cutout must provide: ■ Minimum installation dimensions. Materials needed ■ Standard fittings for cabinet 1/4-20 x 3" bolts ■ Keyhole saw ■ Electric drill ■ 3/16" ...9632; Caulking gun and weatherproof caulking compound ■ Duct tape Parts Supplied For reorder information, see "Replacement Parts" section. See "Installation Dimensions" illustration. ■ Minimum one 2" x 4" (50.8 x 101.6 mm) wood wall stud and minimum 3/8" (9.5 mm) thickness...
Installation Instructions
Page 3
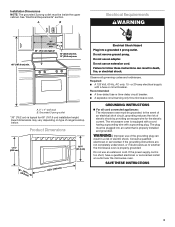
... Plug into an outlet that is equipped with a cord having a grounding wire with a fuse or circuit breaker. Do not remove ground prong. Product Dimensions 17¹⁄₄" (43.8 cm) 16¹⁄₄" (41.3 cm) (401.05³c⁄₄m") 29⁷⁄₈" (76...* 12" (30.5 cm) min. 14" (35.6 cm) max. 66" (167.6 cm) min. If the power supply cord is properly grounded. Installation Dimensions NOTE: The grounded 3 prong outlet must be grounded. Do not use an adapter. Failure to whether the microwave oven is too short, have a qualified electrician...
... Plug into an outlet that is equipped with a cord having a grounding wire with a fuse or circuit breaker. Do not remove ground prong. Product Dimensions 17¹⁄₄" (43.8 cm) 16¹⁄₄" (41.3 cm) (401.05³c⁄₄m") 29⁷⁄₈" (76...* 12" (30.5 cm) min. 14" (35.6 cm) max. 66" (167.6 cm) min. If the power supply cord is properly grounded. Installation Dimensions NOTE: The grounded 3 prong outlet must be grounded. Do not use an adapter. Failure to whether the microwave oven is too short, have a qualified electrician...
Installation Instructions
Page 7
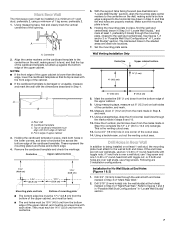
..." in Step 6 of "Mark Rear Wall." Set the mounting plate aside. if 1 end hole is damaged or unusable, measure and mark the wall with the dimensions described in the shaded areas are over wall studs, use two 1/4-20 x 3" round-head bolts with toggle nuts; Refer to the wall at both sides...
..." in Step 6 of "Mark Rear Wall." Set the mounting plate aside. if 1 end hole is damaged or unusable, measure and mark the wall with the dimensions described in the shaded areas are over wall studs, use two 1/4-20 x 3" round-head bolts with toggle nuts; Refer to the wall at both sides...

Installation Instructions
Page 8
... of "Installation for No Wall Studs at One End Hole" in the "Drill Holes in "Locate Wall Stud(s)" section. Make sure the 10" (25.4 cm) dimension from upper cabinet. 3. Drill a 3/16" (5 mm) hole into the wall stud at both end holes drilled into the wall stud at both end holes. 3. Remove...
... of "Installation for No Wall Studs at One End Hole" in the "Drill Holes in "Locate Wall Stud(s)" section. Make sure the 10" (25.4 cm) dimension from upper cabinet. 3. Drill a 3/16" (5 mm) hole into the wall stud at both end holes drilled into the wall stud at both end holes. 3. Remove...

