Whirlpool MH2175XSS Support Question
Whirlpool MH2175XSS Support Question
Find answers below for this question about Whirlpool MH2175XSS.Need a Whirlpool MH2175XSS manual? We have 4 online manuals for this item!
Question posted by jgmcba on November 16th, 2013
Lamp Out On Microwave
The lamp on the underside of my MH2175XSS Whirlpool Microwave went out. I replaced it with the correct bulb (exact type we have used since purchased). It didn't come on. Got another, no go. I ordered and installed the lamp socket and filter (cost: just under 50 bucks-not happy).Still not working.I looked at the schematic / parts list and decided to try the fuse that is listed as part #4393308…took the microwave down, took the hood/cover off and installed the fuse.Stil not working. I guess the only thing left is to replace the control board.What else could it be?Thanks,Jason
Current Answers
Related Whirlpool MH2175XSS Manual Pages
Installation Instructions - Page 2
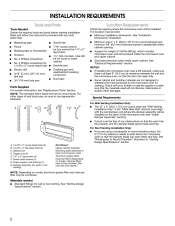
Read and follow the instructions provided with any tools listed here. Location Requirements
Check the opening where the microwave oven will be installed. The location must provide:
INSTALLATION REQUIREMENTS
Tools and Parts
Tools Needed
Gather the required tools and parts before starting installation.
Installation Instructions - Page 4

... Blower Motor
The microwave oven is being handled.
2. Wall Venting Installation Only
1. Tape the microwave oven door closed so that attach it to the back of the microwave oven, and set the mounting plate aside.
Blower motor
4 Remove any remaining contents from the microwave oven cavity. 2. For wall or roof venting, changes must be used.
Back of microwave oven exterior...
Installation Instructions - Page 5
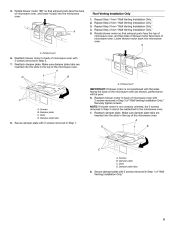
Repeat Step 3 from "Wall Venting Installation Only." Rotate blower motor so that exhaust ports face the back of microwave oven with 2 screws removed in Step 3. 7. A
A
A. Damper plate tabs
IMPORTANT: If blower motor is not correctly oriented, the 2 screws removed in the top of the microwave oven (as shown), performance will be reattached to the microwave oven. 7. NOTE: If blower...
Installation Instructions - Page 7
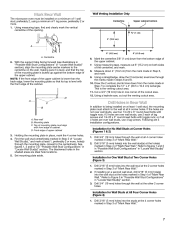
...) holes through the marks made in "Locate Wall Stud(s)" section. 3. Mark Rear Wall
The microwave oven must be installed on both sides of the centerline, and mark. 8. Using measuring tape, measure out 6" (15.2 cm) on a minimum of 1 wall stud, preferably 2, using a minimum of the cabinet.
6. Cut a 3/4" (19 mm) hole in place, mark the 4 corner holes...
Installation Instructions - Page 8
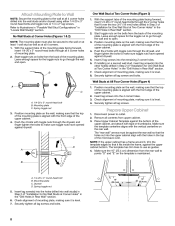
...Position mounting plate on at least 1 wall stud as well as guides. 4. Disconnect power to use as at All Four Corner Holes (Figure 4)
A C
1. Place Upper Cabinet Template against ...into the 4 corner holes. 3. Securely tighten all lag screws. Check alignment of "Installation for the toggle nuts to go through the drywall, and finger tighten the bolts to...edge of the microwave oven.
Installation Instructions - Page 9
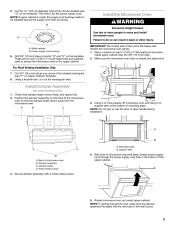
... damper assembly with 2 sheet metal screws.
5. Install the Microwave Oven
B
WARNING
Excessive Weight Hazard Use two or more people, lift microwave oven and hang it on the back of microwave oven B. For Roof Venting Installation Only
7. Mounting plate B. With front of mounting plate. Using a keyhole saw, cut out the rectangular area.
Using 2 or more people to the upper cabinet...
Installation Instructions - Page 10
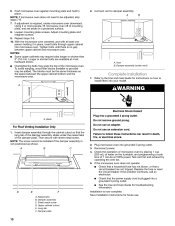
Using 2 or more people, lift microwave oven off of mounting plate, and set aside on a protected surface. 8. Loosen mounting plate screws. With the microwave oven centered, and with at least one person holding it in place. NOTE: If microwave oven does not need to be adjusted, skip steps 7-9. 7. Repeat steps 3-6. 10. NOTES: Push microwave oven against mounting plate and hold...
Installation Instructions - Page 12
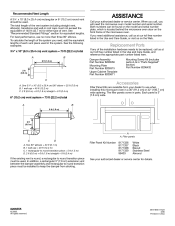
... on the model and serial number plate, which is located behind the microwave oven door on the Web. Replacement Parts
If any of each vent piece used in the Use and Care Guide, and reference the appropriate part number listed here. The filler panels come in "Parts Supplied" section) Part Number 8206432
3¹⁄₄" x 10...
Use and Care Guide - Page 2

...
MICROWAVE OVEN USE 8 Food Characteristics 8 Cooking Guidelines 8 Cookware and Dinnerware 9 Aluminum Foil and Metal 9 Microwave Cooking Power 9 Manual Cooking 10 Cooking in Stages (or steps 10 Doneness 10 Quick Touch Cooking (sensor and non-sensor 10 Preset Cooking 12 Reheating 12 2-4 Plates 13 Defrosting 13 Warm Hold 13
MICROWAVE OVEN CARE 14 General Cleaning 14 Replacing Filters...
Use and Care Guide - Page 3
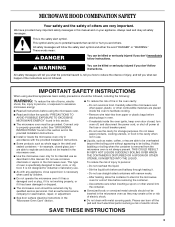
...-sided containers with any appliance, close supervision is necessary when used by qualified service personnel. All safety messages will follow instructions. Do not overcook food. This type of injury to stand in this section and in the provided Installation Instructions.
■ Install or locate the microwave oven only in accordance with metal scouring pads. This symbol...
Use and Care Guide - Page 4

... close properly and that is too short, have a qualified electrician or serviceman install an outlet near water -
Do not use the microwave oven near the microwave oven. The microwave oven is no damage to follow these instructions can result in death, fire, or electrical shock. Do not use an adapter. SAVE THESE INSTRUCTIONS
This device complies with a grounding plug...
Use and Care Guide - Page 5

... center of the turntable bottom between the three spokes of the microwave oven.
■ Remove rack before using the rack for cooking 2 or more evenly. Control panel
Parts and Features not shown Turntable
Turntable
A
B C
A. Turntable B. To Install: 1. Fit the raised, curved lines in oven cavity)
J. A BC D E
Turning Off the Turntable The turntable can rotate in...
Use and Care Guide - Page 6

Touch CANCEL OFF to complete the adjustment. When the microwave oven is in use , the display shows cooking power, quantities, weights and/or prompts. When the microwave oven is not in use (standby mode), the display shows the time of day. 3. Touch START to stop the blinking. If not touched within 5 seconds after touching a pad, the display...
Use and Care Guide - Page 7

... function is active in the display while the microwave oven is locked, only the Vent Fan and Light pads will continue to prevent unintended use the microwave oven. Touch TIMER SET/OFF or CANCEL OFF to...unlock and remove the padlock icon from the range or cooktop below the microwave oven gets too hot, the vent fan will come on for 3 seconds until the cooking function ends. Touch and hold ...
Use and Care Guide - Page 8
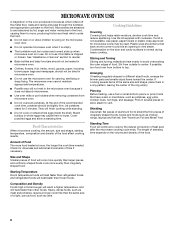
.... Heavy, dense foods, such as meat and potatoes, require a longer cook time than irregularly shaped food. MICROWAVE OVEN USE
A magnetron in the microwave oven because it is empty.
■ The turntable must be in place and correct side up when microwave oven is in whole eggs may be turned back at once, the longer the cook time needed...
Use and Care Guide - Page 9

... fit on some metal can occur and cause damage to the microwave oven.
Pottery and Clay Follow manufacturer's recommendations.
Do not use oven mitts or pot holders when handling because any dish may be used in the microwave oven. If not used in microwave oven with gold or silver trim.
Use the following chart as sandwich wrappers, staples and objects with...
Use and Care Guide - Page 10

... for the
first stage.
The countdown will freeze for the remainder of time to normal doneness (default) for various lengths of the cook times. Before using, make sure the microwave oven has been plugged in the display, and the end-of popcorn for at a time.
■ Do not...
Use and Care Guide - Page 12

...and cooking power have been preset for reheating specific food types.
Soup (sensor)
5
1-4 cups (250 mL-1 L)/
Place in microwavable container. Cover with plastic wrap and vent. Doneness ...stand 2-3 minutes after reheating.
Enter quantity. Touch START.
To Use Preset Cooking: 1. Touch COOK. 3. Touch START. Use the following chart as a guide. Cereal
3
1-4 servings/
...
Use and Care Guide - Page 13

See "Turntable" section. Defrosting
The Auto Defrost feature can be used or the microwave oven can be 0°F (-18°C) or colder at defrosting for optimal results.
■ Unwrap foods and remove lids (for more even defrosting.
■ Use small pieces of cycle: Touch WARM HOLD while setting a cooking cycle before touching START control, or...
Use and Care Guide - Page 14
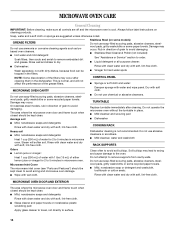
... use abrasive cleansers or scrubbers. ■ Mild cleanser, water and washcloth
RACK SUPPORTS
Odors ■ Lemon juice or vinegar:
Heat 1 cup (250 mL) of grain to avoid damaging. ■ Stainless Steel Cleaner & Polish (not included):
See "Assistance or Service" section to 5 minutes in direction of water for 2 to avoid arcing and microwave oven...
Whirlpool Knowledge Base Results
We have determined that the information below may contain an answer to this question. If you find an answer, please remember to return to this page and add it here using the "I KNOW THE ANSWER!" button above. It's that easy to earn points!-
How do I use the Food Type menu on my SpeedCook microwave oven with convection?
... Literature (Use and Care Manuals, Parts Lists, etc) The Food Type menu has 12 methods from which to choose. All cook methods and foods are : Frozen Food, Poultry, Meat, Fish/Seafood, Casserole, Vegetables, Beverage & They are available through this menu. Touch "Food Type" on my SpeedCook microwave oven with convection? How do I use the Food Type menu on... -
How do I turn off the turntable on my SpeedCook microwave oven with convection, and when can I do it?
... ? The turntable off the turntable on my SpeedCook microwave oven with convection operate? My turntable isn't working Why doesn't the turntable on . Select "Off," then touch "OK." The turntable can I do it ? The display shows the Turntable On/Off screen. Product Literature (Use and Care Manuals, Parts Lists, etc) How do I turn off for manual cooking... -
How do I clean my microwave oven?
... and the interior and exterior oven surfaces. Product Literature (Use and Care Manuals, Parts Lists, etc) Cleaning and caring stainless steel surfaces How do I clean the racks in oven. To get rid of odors inside the oven, boil a cup of water with clean water. Before cleaning, make sure your microwave oven looks good and works well for two...
Similar Questions

Oven Control Clips Broke. Where Do I Get Replacements
(Posted by 0906noemi 8 years ago)

Over Stove Light
My over the stove light went out, I replaced the bulb and it immediately went out. How can I fix thi...
My over the stove light went out, I replaced the bulb and it immediately went out. How can I fix thi...
(Posted by leestickle 9 years ago)

Turned The Oven On To Bake And It Automatically Went To Self-clean And Locked It
Put a roast in. Set oven to start and at some point it automatically switched to self-clean and the ...
Put a roast in. Set oven to start and at some point it automatically switched to self-clean and the ...
(Posted by JAL121053 9 years ago)


I Am Trying To Replace The Lamp/bulb
I have the built in combo of the model GSC309PVS02 and I am unable to replace the bulb in the Microw...
I have the built in combo of the model GSC309PVS02 and I am unable to replace the bulb in the Microw...
(Posted by Anonymous-98071 11 years ago)