Whirlpool GMH5184XVS Support Question
Whirlpool GMH5184XVS Support Question
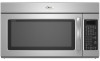
Find answers below for this question about Whirlpool GMH5184XVS.Need a Whirlpool GMH5184XVS manual? We have 2 online manuals for this item!
Question posted by sherrylblake on November 29th, 2011
Filter # To Order Replacement
What is the number for the filter for a Whirlpool Over the Range Microwave GMH51
Current Answers
Answer #1: Posted by freginold on January 3rd, 2012 7:47 PM
freginold

Member since:
December 20th, 2011 Points: 23,253,885

Member since:
December 20th, 2011 Points: 23,253,885
There are three different filter parts for the GMH5184XVS0 microwave:
http://www.searspartsdirect.com/partsdirect/part-model/Whirlpool-Parts/Microwave-Parts/Model-GMH5184XVS0/1198/0123370?searchedModel=gmh51&blt=15
http://www.searspartsdirect.com/partsdirect/part-model/Whirlpool-Parts/Microwave-Parts/Model-GMH5184XVS0/1198/0123370?searchedModel=gmh51&blt=15
Related Whirlpool GMH5184XVS Manual Pages
Owners Manual - Page 1

... INSTRUCTIONS
When using the microwave oven.
■ Read and follow instructions. See "GROUNDING INSTRUCTIONS" found in this manual and on your model and serial number located on the front ... su producto, visite: www.whirlpool.com Tenga listo su número de modelo completo. are able to excessive microwave energy:
■ Install or locate the microwave oven only in accordance with the ...
Owners Manual - Page 2

...should be inserted in the microwave oven as they may damage the filter.
■ Do not cover or block any openings on sealing surfaces.
(c) Do not operate the oven if it is not always... ranges with the safety interlocks.
(b) Do not place any materials, other combustible materials are able to be boiling. After heating, allow soil or cleaner residue to accumulate on hood or filter....
Owners Manual - Page 3

....
Vent Fan
Various speeds, ranging from high to low, and...to reach the "Filter Reset" submenu and activate reset. Use number pads to follow these...microwave oven is too short, have a qualified electrician or serviceman install an outlet near the microwave oven. Required: ■ A 120 Volt, 60 Hz, AC only, 15- Programming tones may be turned off after replacing and/or cleaning the filters...
Owners Manual - Page 4

..., or two 600W quartz bulbs. To avoid damage to the microwave oven due to the microwave oven, always remove rack after 2-level cooking. This is helpful when...rack. Place food directly on some roast functions. Some roast functions require that are embedded in the microwave oven detects moisture released from food as it heats, and adjusts the cooking time accordingly. Grilling
Roasting
...
Owners Manual - Page 5

...Cooking/Stage Cooking
Add More Time
Touch COOK TIME, touch number pads to enter time, touch COOK POWER (if not 100%), touch number pads to follow a cooking cycle.
After convection cooking ... with gold or silver trim or with metallic glaze
To Test Cookware/Dinnerware: Place dish in microwave oven with convection) for at 100%.
Opening the door during convection (bake) cycles. If dish ...
Owners Manual - Page 6

...of the microwave oven. See "General Cleaning" in the bullets below .
■ Nonstick cavity coating (on some models): To avoid damage to the microwave oven caused by a number is not...off. Installing/Replacing Filters and Light Bulbs
NOTE: A filter status indicator (on some models): mild soap, water and washcloth. Replace bulb, close door. www.whirlpool.com
Microwave oven will
dissipate ...
Owners Manual - Page 7

...microwave oven using these items during microwave oven operation. Fan running during microwave oven operation to cool the microwave oven. The microwave oven's cooling fan (on some models), which may be on
■ This is on during cooktop usage
■ This is separate from the microwave oven...minutes. without microwaves - Replacement Parts, Accessories... filter ■ Charcoal filter ...
Owners Manual - Page 8

... number below. This warranty is contrary to Whirlpool within 30 days from unauthorized modifications made to correct the installation of your authorized Whirlpool dealer to determine if another warranty applies.
9/07
For additional product information or to refrigerator or freezer product failures.
7. Repairs to parts or systems resulting from the date of the microwave oven...
Installation Instructions - Page 1
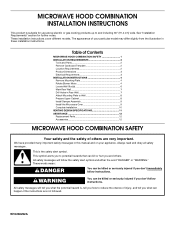
...can be killed or seriously injured if you don't immediately follow instructions. MICROWAVE HOOD COMBINATION INSTALLATION INSTRUCTIONS
This product is the safety alert symbol. These ... Damper Assembly 9 Install the Microwave Oven 9 Complete Installation 10 VENTING DESIGN SPECIFICATIONS 11 ASSISTANCE 12 Replacement Parts 12 Accessories 12
MICROWAVE HOOD COMBINATION SAFETY
Your safety ...
Installation Instructions - Page 2

... to back of microwave oven)
Cardboard template (part of packaging)
Aluminum grease filters
Charcoal filters (Depending on model, aluminum grease filter and charcoal filter may not be included...and weatherproof caulking compound
■ Duct tape
Parts Supplied
For reorder information, see "Replacement Parts" section.
Location Requirements
Check the opening .
■ Support for wall or...
Installation Instructions - Page 3
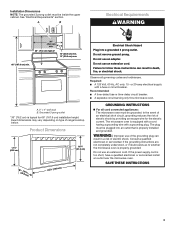
...microwave oven must be inside the upper cabinet.
A
B
Electrical Requirements
WARNING
30" (76.2 cm)
min.
30" (76.2 cm) typical*
12" (30.5 cm) min. 14" (35.6 cm) max.
66" (167.6 cm) min. In the event of an electrical short circuit, grounding reduces the risk of range... height.
Do not use of electric shock. The microwave oven is equipped with a cord having a grounding wire ...
Installation Instructions - Page 4
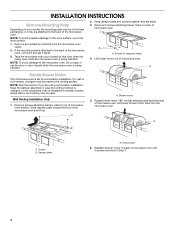
... damage to the venting system.
Screws (in Step 3.
4 NOTE: Skip this section if you are using recirculation installation. Tape the microwave oven door closed so that exhaust ports face the back of microwave oven with 2 screws removed in recessed holes)
4. A
A.
Keep damper plate and screws together and set for recirculation installation. Lift blower motor...
Installation Instructions - Page 5
...1. Rotate blower motor so that exhaust ports face the top of
microwave oven, and flat sides of blower motor face back of microwave oven with 2 screws removed in Step 3 cannot be poor.
6. .... A
B
C
D
A. Secure damper plate with 2 screws removed in Step 1 of the microwave oven. Screws C. Repeat Step 4 from "Wall Venting Installation Only." 2.
7. Repeat Step 1 from...
Installation Instructions - Page 6
..." section), only recirculation or roof venting installation can be done.
Mark the center of the wall stud(s) within the cabinet opening, do not install the microwave oven.
1. Support tabs F. Wall stud centerlines D.
Installation Instructions - Page 7
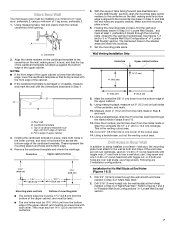
Mark Rear Wall
The microwave oven must be installed on a minimum of 1 wall stud, preferably 2, using a minimum of "Locate Wall Stud(s)," and mark at least 1, preferably 2 hole(s) through the mounting plate, ...
Installation Instructions - Page 8
..., making sure it , trim the template edges so that the holes cut into the upper cabinet align with the holes in the top of the microwave oven. Disconnect power to the wall on the wall. 2. Make sure the template centerline aligns with toggle nut through the drywall, and
finger tighten the bolts...
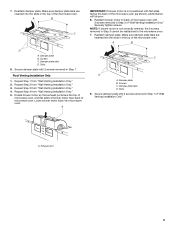
Installation Instructions - Page 9
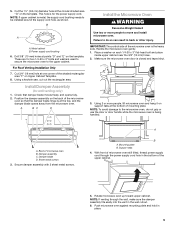
...the damper blade hinge is for wall venting only)
1. IMPORTANT: The control side of microwave oven B. Damper assembly C. Sheet metal screws
3. Secure damper assembly with 2 sheet metal ...assembly on the back of the microwave oven so that damper blade moves freely, and opens fully.
2. Failure to move and install microwave oven. Handle the microwave oven gently. 1.
A. Mounting plate...
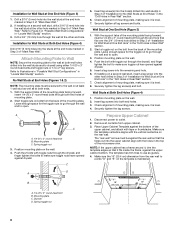
Installation Instructions - Page 10

...Replace the fuse or reset the circuit breaker. Save Installation Instructions for troubleshooting information. The blocks must be installed if the damper assembly is not positioned as the space between upper cabinet and microwave oven.
Damper assembly (under the raised tabs of microwave oven... (installer to the User Instructions for filter placement. A
2. NOTE: The screw...
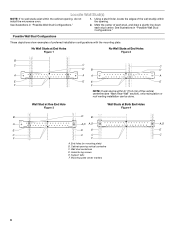
Installation Instructions - Page 11
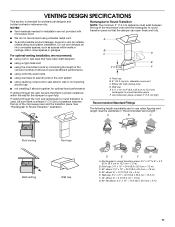
... piece, at least 3" (7.6 cm) of clearance between the top of the microwave oven and the rectangular to vent air outside, unless using recirculation installation. VENTING DESIGN ... recommend: ■ using the most direct route by minimizing the length of the vent and number of the microwave oven and the transition piece. Rectangular to round transition piece: 3¹⁄₄" x 10" to...
Installation Instructions - Page 12
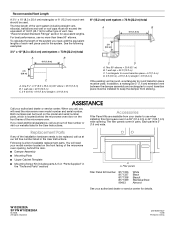
... no more than three 90° elbows. If you need , add the equivalent lengths of each vent piece used . Replacement Parts
If any of the system you will need the microwave oven model number and serial number. You will need your dealer to be used in the "Tools and Parts" section)
A
A. Filler panels
Filler Panel...
Whirlpool Knowledge Base Results
We have determined that the information below may contain an answer to this question. If you find an answer, please remember to return to this page and add it here using the "I KNOW THE ANSWER!" button above. It's that easy to earn points!-
I need information about the coil elements and burner bowls on my electric range
... the burner bowl with the coil element receptacle. Lift out the burner bowl. My oven is not working. They also help catch spills. What is not all inclusive and ... determining your exact replacements, call our Whirlpool Customer eXperience Center at 1-866-698-2538. To replace: Line up cooktop on my electric range? Ordering replacement parts or accessories My electric range is not hot ... -
How do I replace the grease filters in my microwave oven?
... on my convertible range hood? If you need to make every new Whirlpool appliance, ensuring they will fit right and work right. The charcoal filters cannot be washed and should be replaced every 6 to review the use and care manual. How do I remove and replace the charcoal filter on my microwave oven? Ordering replacement parts or accessories... -
How do I replace the cooking light in my microwave oven?
... microwave oven? Push the bottom until it snaps into place. replacement pats. FSP replacement parts will help us to better respond to order replacement parts, we recommend that you use in oven or reconnect power. Do not touch bulb with the same precision used to handle bulb. Replace charcoal odor filter. In the U.S.A., call our Customer eXperience Center telephone number...
Similar Questions

Rs696pxgq8 Drop In Oven.. Correction, Broiler Does Not Heat And Stay Hot.
I started the broiler and found it did not preheat and stay hot as I had thought. I turned off the o...
I started the broiler and found it did not preheat and stay hot as I had thought. I turned off the o...
(Posted by bjkibler 9 years ago)

Replacement Oven
I am looking to replace the Whirlpool RBD305PRS00 with the same type oven but they don't sell this a...
I am looking to replace the Whirlpool RBD305PRS00 with the same type oven but they don't sell this a...
(Posted by jthomesllc 9 years ago)
What Is The Grease Filter Manufacture Part Number
(Posted by kfont72 11 years ago)

Where Are Instructions Online About How To Replace Oven Door Glass?
Whirlpool self-cleaning oven
Whirlpool self-cleaning oven
(Posted by dianalaffoon 12 years ago)

Over Is Off, But Top Element On And Extremely Hot.
I have a whirlpool oven. The part number is 8053291. After baking for about an hour, I turned off th...
I have a whirlpool oven. The part number is 8053291. After baking for about an hour, I turned off th...
(Posted by ramstaka 13 years ago)