Whirlpool MH1170XSQ Support Question
Whirlpool MH1170XSQ Support Question
Find answers below for this question about Whirlpool MH1170XSQ.Need a Whirlpool MH1170XSQ manual? We have 3 online manuals for this item!
Question posted by kfont72 on March 18th, 2013
What Is The Grease Filter Manufacture Part Number
The person who posted this question about this Whirlpool product did not include a detailed explanation. Please use the "Request More Information" button to the right if more details would help you to answer this question.
Current Answers
Related Whirlpool MH1170XSQ Manual Pages
User Instructions - Page 1
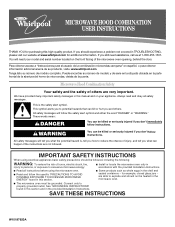
...are not followed. All safety messages will tell you still need your model and serial number located on your appliance. for purchasing this high-quality product.
We have provided many ...others are able to explode and should experience a problem not covered in the microwave oven.
■ The microwave oven must be heated in TROUBLESHOOTING, please visit our website at 1-800-253-1301....
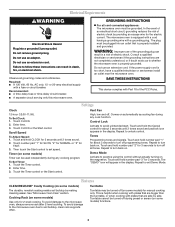
User Instructions - Page 2

...shock.
■ Suitable for use above ranges with this manual. Grease should not be allowed to accumulate on hood or filter.
■ Do not use paper products when appliance is no ... plug in oven.
-
This will cause overheating of injury to persons:
- Carefully attend the microwave oven when paper, plastic, or other than manufacturer's recommended accessories, in this oven with the...
User Instructions - Page 3
... "3" for about 3 seconds until 2 tones sound. 2. Vent Fan
High, low and off programming tones. Control Lock
Activate to whether the microwave oven is properly installed and grounded. Touch and hold number pad "1" for
FAST. 3. Repeat to turn off . Cooking Rack (on some models) for 3 seconds to turn back on some models)
Timer...
User Instructions - Page 4
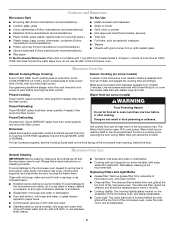
... (on turntable with 1 cup (250 mL) of microwave oven, and clean monthly.
■ Charcoal filter: The charcoal filter is not recommended. Preset Defrosting
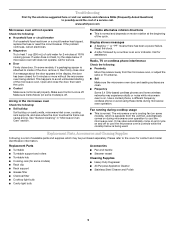
Unwrap food. Touch DEFROST, select food item, enter quantity, and touch the Start control. Replacing Filters and Light Bulbs
■ Grease filter: Remove grease filter from food as sandwich wrappers ■ Staples ■ Objects...
User Instructions - Page 5
...com
Microwave oven will not operate
Check the following :
■ Soil buildup
Soil buildup on some models) ■ Rack clip ■ Rack support ■ Grease filter ■ Charcoal filter ■...in "Microwave Oven Care" section. If microwave oven still does not operate, call for contact and model identification information. Reset the clock.
■ A letter followed by a number is normal...
User Instructions - Page 6
...bulbs, air filters or water filters.
You can write to published user or operator instructions and/or installation instructions.
4. Please keep this User Instructions and model number information for ... assistance using your product, you on the upper or lower front facing of the microwave oven opening, behind the door. All rights reserved.
® Registered Trademark/TM Trademark of ...
Installation Instructions - Page 1
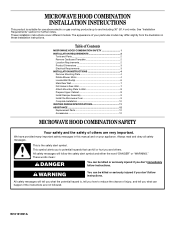
... Mounting Plate to potential hazards that can be killed or seriously injured if you to Wall 8 Prepare Upper Cabinet 8 Install Damper Assembly 9 Install the Microwave Oven 9 Complete Installation 10 VENTING DESIGN SPECIFICATIONS 11 ASSISTANCE 12 Replacement Parts 12 Accessories 12
MICROWAVE HOOD COMBINATION SAFETY
Your safety and the safety of Contents...
Installation Instructions - Page 2
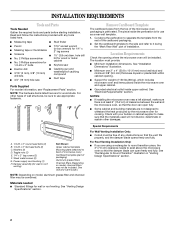
... cord bushing (1) H. Cut along the perforation to separate the template from the top of packaging)
Aluminum grease filters
Charcoal filters (Depending on model, aluminum grease filter and charcoal filter may not be combined.
NOTES: ■ If installing the microwave oven near a left sidewall, make sure that the vent fits
properly, and the damper blade opens freely and...
Installation Instructions - Page 3
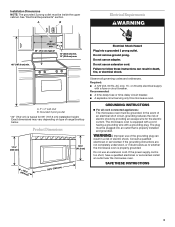
...fuse or time-delay circuit breaker. ■ A separate circuit serving only this microwave oven. Product Dimensions
17¹⁄₄"
(43.8 cm)
16¹⁄₄"
(...35.6 cm) max.
66" (167.6 cm) min.
Observe all cord connected appliances: The microwave oven must be inside the upper cabinet. SAVE THESE INSTRUCTIONS
3
Installation Dimensions
NOTE: The grounded 3 prong outlet...
Installation Instructions - Page 4
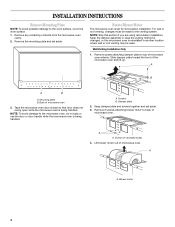
...: Skip this section if you are using recirculation installation.
Remove 2 screws attaching blower motor to top of the microwave oven and lift up.
Blower motor
4 Remove any remaining contents from the microwave oven cavity.
2. Remove the mounting plate and set aside. Mounting plate B. For wall or roof venting, changes must be used...
Installation Instructions - Page 5
... Venting Installation Only." 2. Reattach blower motor to back of microwave oven with 2 screws removed in the top of the microwave oven. Securely tighten screws.
Damper plate B. Screws C. Slots
8. Rotate... blower motor 180° so that exhaust ports face the top of microwave oven, and flat sides of blower motor face back of "Wall Venting Installation Only." A
A
A. ...
Installation Instructions - Page 6
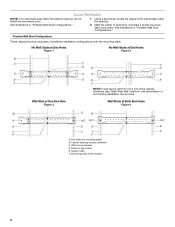
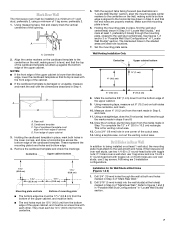
... the mounting plate. Possible Wall Stud Configurations These depictions show examples of the wall stud(s) within the opening. Cabinet opening , do not install the microwave oven.
1. Support tabs F. Mark the center of the vertical centerline (see "Mark Rear Wall" section), only recirculation or roof venting installation can be done.
No Wall...
Installation Instructions - Page 7
....2 cm)
³⁄₈" (1 cm)
6" (15.2 cm)
6" (15.2 cm)
8. Measure down from the mark made in "Locate Wall Stud(s)" section. D A
C
B
A. Mark Rear Wall
The microwave oven must be on a level line with toggle nut;
Installation Instructions - Page 8
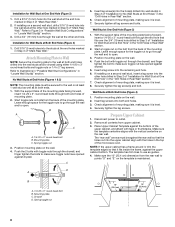
... the top of the mounting plate. Mounting plate C. C
5. Wall Stud at Both End Holes (Figure 4)
1. If installing on bolts from the back of the microwave oven. Securely tighten the lag screw(s) and bolt. The "rear wall" arrows must be against the rear wall so that the holes cut into the wall...
Installation Instructions - Page 9
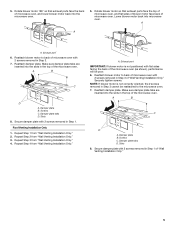
... closed and taped shut.
3. NOTE: To avoid damage to move and install microwave oven.
Mounting plate B. Rotate microwave oven up toward upper cabinet. Drill 3/8" (10 mm) holes at one corner of mounting... and place inside upper cabinet near the 3/8" (10 mm) holes. 2. Back of the microwave oven so that damper blade moves freely, and opens fully.
2. Power supply cord bushing
6. Using a...
Installation Instructions - Page 10
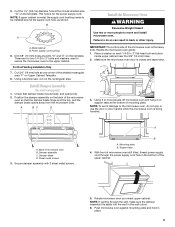
... To avoid warping, wood filler blocks (installer to install filters into a grounded 3 prong outlet.
■ See the ...
Vent B. Refer to be installed if the damper assembly is plugged into your model. Insert damper assembly through upper cabinet into microwave oven. NOTE: The screw cannot be adjusted, skip steps 7-9.
7.
A
B
C
D
E
F
A. Raised tabs B. Upper cabinet ...
Installation Instructions - Page 11
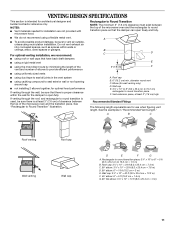
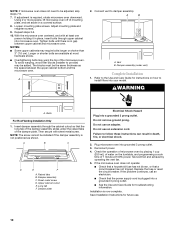
...: The minimum 3" (7.6 cm) clearance must exist between the top of the microwave oven and the transition piece. Do not vent exhaust air
into concealed spaces, such as spaces...using the most direct route by minimizing the length of the
3" (7.6 cm)
F
vent and number of the microwave oven and the rectangular to seal all joints in "Recommended Vent Length." B
For optimal venting installation...
Installation Instructions - Page 12
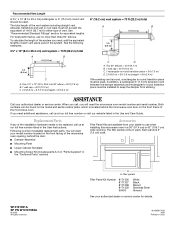
... Vent Length
A 3¹⁄₄" x 10" (8.3 x 25.4 cm) rectangular or 6" (15.2 cm) round vent should be used.
If you will need the microwave oven model number and serial number. You will need your authorized dealer or service center.
See "Recommended Standard Fittings" section for details.
461965617426 4/08
Printed in the system. ASSISTANCE
Call...
Dimensions - Page 1

... Corporation policy includes a continuous commitment to improve
Dimensions are for the damper to the microwave oven hood. Instructions packed with product. A time-delay fuse or circuit breaker and separate circuit ... materials and specifications without notice.
®
Microwave Hood Combination
PRODUCT MODEL NUMBERS
MH1160XS MH1170XS
MH2175XS
Electrical: A 120-volt, 60 Hz, AC-only...
Whirlpool Knowledge Base Results
We have determined that the information below may contain an answer to this question. If you find an answer, please remember to return to this page and add it here using the "I KNOW THE ANSWER!" button above. It's that easy to earn points!-
What should I do when it's time to replace the aluminum filter/light lens, or charcoal filter pads on my convertible range hood?
... appliance. How do I remove and replace the charcoal filter on my microwave oven? I need replacement parts for replacement parts. When it 's time to replace the aluminum filter/light lens, or charcoal filter pads on today's order. Be sure to ask the... parts. Maintaining your order for my convertible range hood How do I remove and clean the grease filters on my microwave oven? -
How do I clean the grease filters in my SpeedCook microwave oven with convection?
... I remove and clean the grease filters on my microwave oven? Rinse well, and shake to remove embedded dirt and grease. How do I clean the oven cavity in my SpeedCook microwave oven with dirty dishes, because food can be trapped in the filters. Dishwasher: Wash separately, not with convection? Hot water and mild detergent: Soak filters, then scrub and... -
How do I replace the grease filters in my microwave oven?
...model number in place. NOTE: Do not operate the oven without the filters in the space below to replace the aluminum filter/light lens, or charcoal filter pads on my microwave oven? For...grease filters in my microwave oven? replacement parts. Replace the filters by inserting the wide tab of the filter frame into the innner portion of the filter housing, then swinging the outside of the filter...
Similar Questions

Microwave Quits Heating After 2 Minutes
When we use the microwave, for popcorn for example, we set the timer for 3 minutes or however long i...
When we use the microwave, for popcorn for example, we set the timer for 3 minutes or however long i...
(Posted by suntravel 7 years ago)

When I Turn My Oven On, And It Preheats It Will Run For About Two Minutes.
Then it shuts off and the display shows {E2 -F3-} Locked. I can't open the door or turn the oven bac...
Then it shuts off and the display shows {E2 -F3-} Locked. I can't open the door or turn the oven bac...
(Posted by thompsc 9 years ago)

Oven Microwave Combo M# Gmc305prb01 Sn#;xu4211799 Microwave Does Not Heat
I would like assistance to acqiure a repair manual for the above model/serial number oven/micro comb...
I would like assistance to acqiure a repair manual for the above model/serial number oven/micro comb...
(Posted by geoheller56 10 years ago)

New Oven Getting Codes E1 F2 Modle Number Rbs305prb00 Whirlpool
Error code E1 F2 whirlpool oven model rbs305prb00 whats wrong and if this is the electronic control ...
Error code E1 F2 whirlpool oven model rbs305prb00 whats wrong and if this is the electronic control ...
(Posted by steveyoung996 10 years ago)
