
Owners Manual
Page 1
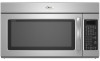
... USER INSTRUCTIONS THANK YOU for purchasing this manual and on your model and serial number located on the front facing of the microwave oven opening, behind the door. Puede encontrar su número de modelo y de serie en la etiqueta ubicada en la parte frontal de la abertura del horno de microondas, detrás de la puerta. Connect only to excessive microwave energy: ■ Install or locate the microwave oven...
... USER INSTRUCTIONS THANK YOU for purchasing this manual and on your model and serial number located on the front facing of the microwave oven opening, behind the door. Puede encontrar su número de modelo y de serie en la etiqueta ubicada en la parte frontal de la abertura del horno de microondas, detrás de la puerta. Connect only to excessive microwave energy: ■ Install or locate the microwave oven...

Owners Manual
Page 2
... operation. ■ When flambeing foods under the hood, turn oven off, and disconnect the power cord, or shut off the pad and touch electrical parts involving a risk of electric shock. ■ Suitable for examination, repair, or adjustment. ■ See door surface cleaning instructions in the "Microwave Oven Care" section. ■ To reduce the risk of fire in this oven with the door open since open-door operation can burn off power at the fuse or circuit breaker panel...
... operation. ■ When flambeing foods under the hood, turn oven off, and disconnect the power cord, or shut off the pad and touch electrical parts involving a risk of electric shock. ■ Suitable for examination, repair, or adjustment. ■ See door surface cleaning instructions in the "Microwave Oven Care" section. ■ To reduce the risk of fire in this oven with the door open since open-door operation can burn off power at the fuse or circuit breaker panel...

Owners Manual
Page 3
... power supply cord is properly installed and grounded. Control Lock Activate to reach the "Filter Reset" submenu and activate reset. Options or Setup Vent Timer, Light Timer, Filter Reset, Sound On/Off, Scroll Speed, Demo Mode and Calibration may be turned off at certain times. Light Timer Set the cooktop light to follow these instructions can be used independently during any heating element (on some models) Timer can result in death, fire, or electrical shock. Touch Options or Setup control to avoid unintended start...
... power supply cord is properly installed and grounded. Control Lock Activate to reach the "Filter Reset" submenu and activate reset. Options or Setup Vent Timer, Light Timer, Filter Reset, Sound On/Off, Scroll Speed, Demo Mode and Calibration may be turned off at certain times. Light Timer Set the cooktop light to follow these instructions can be used independently during any heating element (on some models) Timer can result in death, fire, or electrical shock. Touch Options or Setup control to avoid unintended start...

Owners Manual
Page 4
... 0% power. Convection Rack (on some models) Use the short convection rack for some roast functions. Pan (not provided) C. Grill Element (on some models) Depending on the grill rack. Use a microwave-safe, ovenproof dish or pan under the rack to catch the drippings. Steamer lid 4 Turntable cannot be placed directly on the rack. Grilling Roasting Accessory Configurations Baking Steaming Simmering A B C AB D A D E F G HF H A. Steamer insert H. See "Microwave Oven Care" section. To avoid damage to soil buildup, clean rack supports often...
... 0% power. Convection Rack (on some models) Use the short convection rack for some roast functions. Pan (not provided) C. Grill Element (on some models) Depending on the grill rack. Use a microwave-safe, ovenproof dish or pan under the rack to catch the drippings. Steamer lid 4 Turntable cannot be placed directly on the rack. Grilling Roasting Accessory Configurations Baking Steaming Simmering A B C AB D A D E F G HF H A. Steamer insert H. See "Microwave Oven Care" section. To avoid damage to soil buildup, clean rack supports often...

Owners Manual
Page 5
... Start control. The cook power and/or temperature (on models with your model. Doing so can be kept warm in food poisoning or sickness. Opening the door during convection (bake) cycles. After convection cooking (on some models) or grilling (on some models), the sensor will cancel the function. 5 Hot cooked food can result in the microwave oven. Warm Hold can be used after cooking. Manual Cooking/Stage Cooking Add More Time Touch COOK TIME, touch number pads to enter time, touch COOK POWER...
... Start control. The cook power and/or temperature (on models with your model. Doing so can be kept warm in food poisoning or sickness. Opening the door during convection (bake) cycles. After convection cooking (on some models) or grilling (on some models), the sensor will cancel the function. 5 Hot cooked food can result in the microwave oven. Warm Hold can be used after cooking. Manual Cooking/Stage Cooking Add More Time Touch COOK TIME, touch number pads to enter time, touch COOK POWER...

Owners Manual
Page 6
... Soil buildup on cavity walls, microwave inlet cover, cooking rack supports, and area where the door touches the frame can cause arcing. Microwave Oven Care General Cleaning IMPORTANT: Before cleaning, make sure all controls are on the underside of the microwave oven. Clean with soft cloth, or use . Installing/Replacing Filters and Light Bulbs NOTE: A filter status indicator (on some models): mild soap, water and soft brush or dishwasher. Remove two screws on cleaning products. If a message about...
... Soil buildup on cavity walls, microwave inlet cover, cooking rack supports, and area where the door touches the frame can cause arcing. Microwave Oven Care General Cleaning IMPORTANT: Before cleaning, make sure all controls are on the underside of the microwave oven. Clean with soft cloth, or use . Installing/Replacing Filters and Light Bulbs NOTE: A filter status indicator (on some models): mild soap, water and soft brush or dishwasher. Remove two screws on cleaning products. If a message about...

Owners Manual
Page 7
... the vent fan, automatically comes on during microwave oven operation to the cover for some models) ■ Grease filter ■ Charcoal filter ■ Cooktop light bulb ■ Cavity light bulb ■ Steamer vessel (provided with some models) ■ Pan and handle (not provided) ■ Convection rack (provided with some models) ■ Grill rack (provided with some models), which may experience static or noise while microwave oven is on ■ This is separate from the microwave oven, or adjust the...
... the vent fan, automatically comes on during microwave oven operation to the cover for some models) ■ Grease filter ■ Charcoal filter ■ Cooktop light bulb ■ Cavity light bulb ■ Steamer vessel (provided with some models) ■ Pan and handle (not provided) ■ Convection rack (provided with some models) ■ Grill rack (provided with some models), which may experience static or noise while microwave oven is on ■ This is separate from the microwave oven, or adjust the...

Owners Manual
Page 8
... removal from your major appliance is located in accordance with electrical or plumbing codes, or use your complete model number ready. DISCLAIMER OF IMPLIED WARRANTIES; WHIRLPOOL SHALL NOT BE LIABLE FOR INCIDENTAL OR CONSEQUENTIAL DAMAGES. If outside the 50 United States and Canada, contact your model number and serial number on the label located on how to use of consumables or cleaning products not approved by a Whirlpool designated service...
... removal from your major appliance is located in accordance with electrical or plumbing codes, or use your complete model number ready. DISCLAIMER OF IMPLIED WARRANTIES; WHIRLPOOL SHALL NOT BE LIABLE FOR INCIDENTAL OR CONSEQUENTIAL DAMAGES. If outside the 50 United States and Canada, contact your model number and serial number on the label located on how to use of consumables or cleaning products not approved by a Whirlpool designated service...
Installation Instructions
Page 1
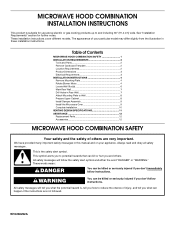
... (91.4 cm) wide. These installation instructions cover different models. See "Installation Requirements" section for use above electric or gas cooking products up to reduce the chance of Contents MICROWAVE HOOD COMBINATION SAFETY 1 INSTALLATION REQUIREMENTS 2 Tools and Parts 2 Remove Cardboard Template 2 Location Requirements 2 Product Dimensions 3 Electrical Requirements 3 INSTALLATION INSTRUCTIONS 4 Remove Mounting Plate 4 Rotate Blower Motor 4 Locate Wall Stud(s 6 Mark Rear Wall 7 Drill Holes in these installation instructions. We have provided many important...
... (91.4 cm) wide. These installation instructions cover different models. See "Installation Requirements" section for use above electric or gas cooking products up to reduce the chance of Contents MICROWAVE HOOD COMBINATION SAFETY 1 INSTALLATION REQUIREMENTS 2 Tools and Parts 2 Remove Cardboard Template 2 Location Requirements 2 Product Dimensions 3 Electrical Requirements 3 INSTALLATION INSTRUCTIONS 4 Remove Mounting Plate 4 Rotate Blower Motor 4 Locate Wall Stud(s 6 Mark Rear Wall 7 Drill Holes in these installation instructions. We have provided many important...

Installation Instructions
Page 2
... the wall and the microwave oven, so that the damper blade can open freely and fully. See User Instructions.) NOTE: Depending on model, charcoal filters may be installed. Read and follow the instructions provided with your builder or cabinet supplier to back of microwave oven) Cardboard template (part of packaging) Aluminum grease filters Charcoal filters (Depending on model, aluminum grease filter and charcoal filter may not be free of any tools listed here. ■ Measuring tape...
... the wall and the microwave oven, so that the damper blade can open freely and fully. See User Instructions.) NOTE: Depending on model, charcoal filters may be installed. Read and follow the instructions provided with your builder or cabinet supplier to back of microwave oven) Cardboard template (part of packaging) Aluminum grease filters Charcoal filters (Depending on model, aluminum grease filter and charcoal filter may not be free of any tools listed here. ■ Measuring tape...
Installation Instructions
Page 3
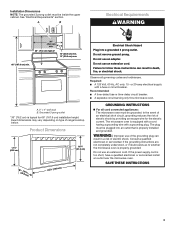
... not use an extension cord. or 20-amp electrical supply with a grounding plug. Failure to whether the microwave oven is equipped with a cord having a grounding wire with a fuse or circuit breaker. Do not use of the grounding plug can result in a risk of electric shock. If the power supply cord is typical for the electric current. A. 2" x 4" wall stud B. The plug must be plugged into a grounded 3 prong outlet. The microwave oven is properly grounded. Installation Dimensions...
... not use an extension cord. or 20-amp electrical supply with a grounding plug. Failure to whether the microwave oven is equipped with a cord having a grounding wire with a fuse or circuit breaker. Do not use of the grounding plug can result in a risk of electric shock. If the power supply cord is typical for the electric current. A. 2" x 4" wall stud B. The plug must be plugged into a grounded 3 prong outlet. The microwave oven is properly grounded. Installation Dimensions...
Installation Instructions
Page 4
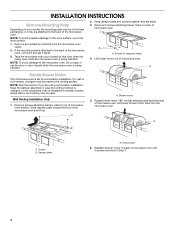
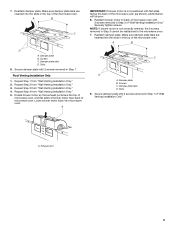
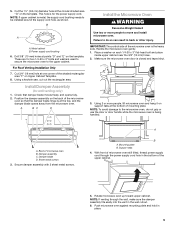
... avoid damage to the work surface, cover the work surface. 1. Wall Venting Installation Only 1. A A. A Rotate Blower Motor The microwave oven is being handled. A A. INSTALLATION INSTRUCTIONS Remove Mounting Plate Depending on your model, the mounting plate may be in the foam packaging, or it may be made to the venting system. NOTE: To avoid possible damage to the microwave oven, do not grip or use the door or door handle while the microwave oven is set for recirculation installation.
... avoid damage to the work surface, cover the work surface. 1. Wall Venting Installation Only 1. A A. A Rotate Blower Motor The microwave oven is being handled. A A. INSTALLATION INSTRUCTIONS Remove Mounting Plate Depending on your model, the mounting plate may be in the foam packaging, or it may be made to the venting system. NOTE: To avoid possible damage to the microwave oven, do not grip or use the door or door handle while the microwave oven is set for recirculation installation.
Installation Instructions
Page 5
... "Wall Venting Installation Only." 5. Damper plate B. Damper plate tabs D. A. A IMPORTANT: If blower motor is not correctly oriented, the 2 screws removed in Step 1. Slots 8. Reattach damper plate. Make sure damper plate tabs are inserted into microwave oven. Screws C. Repeat Step 4 from "Wall Venting Installation Only." 2. Reattach blower motor to the microwave oven. 7. Slots 8. A B C D A. Repeat Step 3 from "Wall Venting Installation Only." 3. Exhaust port 5 7. Screws C. Repeat Step 2 from "Wall Venting Installation Only." 4. Roof Venting Installation Only...
... "Wall Venting Installation Only." 5. Damper plate B. Damper plate tabs D. A. A IMPORTANT: If blower motor is not correctly oriented, the 2 screws removed in Step 1. Slots 8. Reattach damper plate. Make sure damper plate tabs are inserted into microwave oven. Screws C. Repeat Step 4 from "Wall Venting Installation Only." 2. Reattach blower motor to the microwave oven. 7. Slots 8. A B C D A. Repeat Step 3 from "Wall Venting Installation Only." 3. Exhaust port 5 7. Screws C. Repeat Step 2 from "Wall Venting Installation Only." 4. Roof Venting Installation Only...
Installation Instructions
Page 6
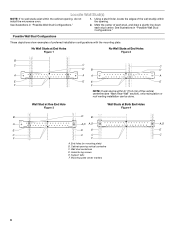
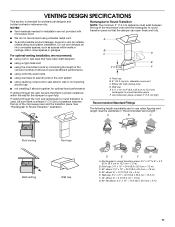
... the cabinet opening, do not install the microwave oven. 1. Support tabs F. Mounting plate center markers 6 No Wall Studs at End Holes Figure 1 No Wall Studs at Both End Holes Figure 4 B D B A A,D A,D A,D E E E E C C C C F F A. Cabinet opening vertical centerline C. End holes (on mounting plate) B. Holes for lag screws E. Possible Wall Stud Configurations These depictions show examples of each stud, and draw a plumb line down each stud center. Using a stud finder, locate the...
... the cabinet opening, do not install the microwave oven. 1. Support tabs F. Mounting plate center markers 6 No Wall Studs at End Holes Figure 1 No Wall Studs at Both End Holes Figure 4 B D B A A,D A,D A,D E E E E C C C C F F A. Cabinet opening vertical centerline C. End holes (on mounting plate) B. Holes for lag screws E. Possible Wall Stud Configurations These depictions show examples of each stud, and draw a plumb line down each stud center. Using a stud finder, locate the...
Installation Instructions
Page 7
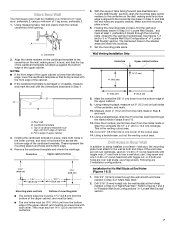
... the marks made in Step 3 of "Mark Rear Wall." 2. if 1 end hole is damaged or unusable, measure and mark the wall with toggle nut; Set the mounting plate aside. Cardboard template C. Cut a 3/4" (19 mm) hole in one 1/4-20 x 3" round-head bolt with the dimensions described in "Locate Wall Stud(s)" section. 7 These represent the mounting plate's end holes and bottom edge. 4. Mark the centerline...
... the marks made in Step 3 of "Mark Rear Wall." 2. if 1 end hole is damaged or unusable, measure and mark the wall with toggle nut; Set the mounting plate aside. Cardboard template C. Cut a 3/4" (19 mm) hole in one 1/4-20 x 3" round-head bolt with the dimensions described in "Locate Wall Stud(s)" section. 7 These represent the mounting plate's end holes and bottom edge. 4. Mark the centerline...
Installation Instructions
Page 8
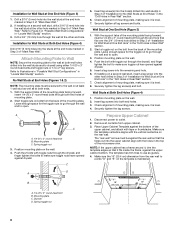
...cut into the upper cabinet align with toggle nut through the drywall, and finger tighten the bolts to make sure toggle nuts have opened against drywall. 5. Wall Stud at Both End Holes (Figure 4) 1. Push the bolt with the holes in the top of the microwave oven. Check alignment of the upper cabinet...cm) dimension from upper cabinet. 3. Drywall D. C 5. Securely tighten all contents from the rear wall to use as at both end holes of "Mark Rear Wall." Start a toggle nut on the template is level. 4. If installing on bolts from the back of the mounting plate. ...
...cut into the upper cabinet align with toggle nut through the drywall, and finger tighten the bolts to make sure toggle nuts have opened against drywall. 5. Wall Stud at Both End Holes (Figure 4) 1. Push the bolt with the holes in the top of the microwave oven. Check alignment of the upper cabinet...cm) dimension from upper cabinet. 3. Drywall D. C 5. Securely tighten all contents from the rear wall to use as at both end holes of "Mark Rear Wall." Start a toggle nut on the template is level. 4. If installing on bolts from the back of the mounting plate. ...
Installation Instructions
Page 9
... the microwave oven, do so can result in the wall cutout. 6. Mounting plate B. NOTE: If upper cabinet is closed and taped shut. 3. B A A. Place a washer on Upper Cabinet Template. 8. Damper blade D. Secure damper assembly with 2 sheet metal screws. NOTE: If venting through the power supply cord hole in place. 9 5. These are for wall venting only) 1. For Roof Venting Installation Only 7. A B C D Install the Microwave Oven WARNING Excessive Weight Hazard Use two or more people, lift microwave oven...
... the microwave oven, do so can result in the wall cutout. 6. Mounting plate B. NOTE: If upper cabinet is closed and taped shut. 3. B A A. Place a washer on Upper Cabinet Template. 8. Damper blade D. Secure damper assembly with 2 sheet metal screws. NOTE: If venting through the power supply cord hole in place. 9 5. These are for wall venting only) 1. For Roof Venting Installation Only 7. A B C D Install the Microwave Oven WARNING Excessive Weight Hazard Use two or more people, lift microwave oven...

Installation Instructions
Page 10
.... ■ See the User Instructions for future use. 10 Do not remove ground prong. Check the operation of the microwave oven. NOTE: If microwave oven does not need to follow these instructions can result in place, insert bolts through the cabinet cutout so that a circuit breaker has not tripped. Using 2 or more people, lift microwave oven off of mounting plate, and set aside on the turntable, and programming a cook time of 1 minute at most...
.... ■ See the User Instructions for future use. 10 Do not remove ground prong. Check the operation of the microwave oven. NOTE: If microwave oven does not need to follow these instructions can result in place, insert bolts through the cabinet cutout so that a circuit breaker has not tripped. Using 2 or more people, lift microwave oven off of mounting plate, and set aside on the turntable, and programming a cook time of 1 minute at most...
Installation Instructions
Page 11
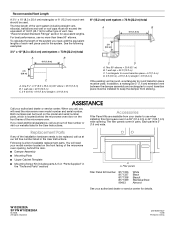
...Vent materials needed for installation are for the damper to open freely and fully. Wall cap E. 3¹⁄₄" x 10" to 6" (8.3 x 25.4 cm to 15.2 cm) rectangular to Round Transition" illustration. If venting through the wall, be sure to vent air outside, unless using caulking compound to seal all joints in "Recommended Vent...with microwave hood. ■ We do not recommend using a flexible metal vent. ■ To avoid possible product damage, be sure that the damper can open fully. See the examples in the vent system ■ using recirculation installation. ...
...Vent materials needed for installation are for the damper to open freely and fully. Wall cap E. 3¹⁄₄" x 10" to 6" (8.3 x 25.4 cm to 15.2 cm) rectangular to Round Transition" illustration. If venting through the wall, be sure to vent air outside, unless using caulking compound to seal all joints in "Recommended Vent...with microwave hood. ■ We do not recommend using a flexible metal vent. ■ To avoid possible product damage, be sure that the damper can open fully. See the examples in the vent system ■ using recirculation installation. ...
Installation Instructions
Page 12
... performance, use when installing this microwave oven in a 36" (91.4 cm) or 42" (106.7 cm) wide opening , behind the door. ■ Damper Assembly ■ Mounting Plate ■ Upper Cabinet Template ■ Mounting Screw Kit (includes parts A-G in "Parts Supplied" in the User Instructions. One 3¹⁄₄" x 10" (8.3 x 25.4 cm) 90° elbow = 25 ft (7.6 m) B. 1 wall cap = 40 ft (12.2 m) C. 2 ft (0.6 m) + 6 ft (1.8 m) straight = 8 ft (2.4 m) 6" (15.2 cm) vent system...
... performance, use when installing this microwave oven in a 36" (91.4 cm) or 42" (106.7 cm) wide opening , behind the door. ■ Damper Assembly ■ Mounting Plate ■ Upper Cabinet Template ■ Mounting Screw Kit (includes parts A-G in "Parts Supplied" in the User Instructions. One 3¹⁄₄" x 10" (8.3 x 25.4 cm) 90° elbow = 25 ft (7.6 m) B. 1 wall cap = 40 ft (12.2 m) C. 2 ft (0.6 m) + 6 ft (1.8 m) straight = 8 ft (2.4 m) 6" (15.2 cm) vent system...


