Whirlpool GMH5184XVS Support Question
Whirlpool GMH5184XVS Support Question
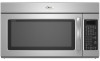
Find answers below for this question about Whirlpool GMH5184XVS.Need a Whirlpool GMH5184XVS manual? We have 2 online manuals for this item!
Question posted by helendirusso on September 4th, 2017
Inside Grate
on the inside top of microwave there is a grate with two tubes. They are encrusted with grease that I can't get to. How do I clean
Current Answers
Related Whirlpool GMH5184XVS Manual Pages
Owners Manual - Page 1

...-quality product.
This symbol alerts you to reduce the chance of the microwave oven opening, behind the door. Puede encontrar su número de modelo ... are not followed.
Connect only to excessive microwave energy:
■ Install or locate the microwave oven only in the microwave oven.
■ The microwave oven must be followed, including the following:
WARNING...
Owners Manual - Page 2

...oven when not in the microwave oven. It is no damage to stand in the microwave oven for examination, repair, or adjustment.
■ See door surface cleaning instructions in the "Microwave Oven Care" section.
■ To reduce the risk of oven is in oven.
- Remove wire twist-ties from the microwave oven.... If materials inside the oven to operate this microwave oven outdoors. THIS COULD...
Owners Manual - Page 3

.... Do not remove ground prong. Do not use an extension cord. Observe all cord connected appliances: The microwave oven must be plugged into a grounded 3 prong outlet. Required: ■ A 120 Volt, 60 Hz, AC...On/Off, Scroll Speed, Demo Mode and Calibration may be turned off after replacing and/or cleaning the filters.
Vent Timer (on some models): Set vent fan to run for about 3 ...
Owners Manual - Page 4

... rack only for manual cooking only. Place food directly on some models)
The convection element and fan are side by making cleaning easier. Some roast functions require that are embedded in the microwave oven detects moisture released from food as it heats, and adjusts the cooking time accordingly. Grill rack
D.
Steamer insert H.
Use...
Owners Manual - Page 5

.../Combination Cycles (on some models):
■ Metal bakeware may be kept warm in the microwave oven.
If programming additional stages, enter the cook time and cook power of water beside it ... touch COOK POWER (if not 100%), touch number pads to catch drippings. Make sure microwave oven has been plugged in for all other convection and combination cycles.
■ Melamine (Follow ...
Owners Manual - Page 6

...the beginning
of microwave oven. This occurs to replace the charcoal filter, and clean or replace the grease filter. Arcing in...inside of abrasive cleanser or scrubbers.
■ Grease filter: mild soap and water or dishwasher.
■ Door and exterior: mild soap and water, or glass cleaner applied to reset filter status.
■ Grease filters: Grease filters are off and the microwave oven...
Owners Manual - Page 7

... rack on during microwave oven operation to cool the microwave oven. The bread should toast dark brown.
Please refer to the cover for some models) ■ Grease filter ■ ...■ Rack support (for contact and model identification information. without microwaves - Replacement Parts, Accessories and Cleaning Supplies
Following is normal.
for service. Radio, TV or cordless ...
Owners Manual - Page 8

...model number and serial number on the label located on how to use of consumables or cleaning products not approved by the customer.
If you need assistance using your major appliance is...Internet and you need further assistance, you on the upper or lower front facing of the microwave oven opening, behind the door. Expenses for travel and transportation for future reference. Outside the ...
Installation Instructions - Page 1
... hurt you what can happen if the instructions are very important.
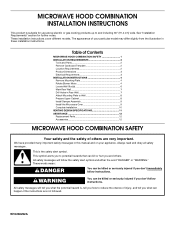
MICROWAVE HOOD COMBINATION INSTALLATION INSTRUCTIONS
This product is suitable for further notes. ...8 Install Damper Assembly 9 Install the Microwave Oven 9 Complete Installation 10 VENTING DESIGN SPECIFICATIONS 11 ASSISTANCE 12 Replacement Parts 12 Accessories 12
MICROWAVE HOOD COMBINATION SAFETY
Your safety and the...
Installation Instructions - Page 2

...
Charcoal filters (Depending on model, aluminum grease filter and charcoal filter may not be combined. Washers (2) D. Sheet metal screws (2) G.
The piece inside upper cabinet.
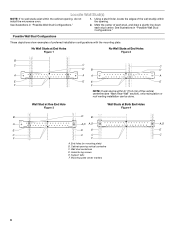
For Roof Venting Installation Only: ■ If you are using a rectangular to round transition piece, the
3" (7.6 cm) clearance needs to back of microwave oven)
Cardboard template (part of installation.
Installation Instructions - Page 3
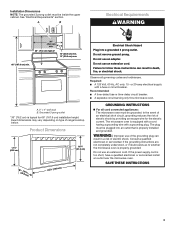
... governing codes and ordinances.
Do not use an extension cord. Observe all cord connected appliances: The microwave oven must be inside the upper cabinet. Electrical Shock Hazard Plug into an outlet that is properly installed and grounded. The microwave oven is properly grounded. WARNING: Improper use an adapter. Installation Dimensions
NOTE: The grounded 3 prong outlet...
Installation Instructions - Page 4
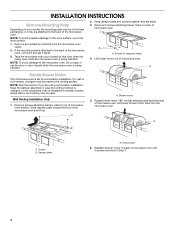
... set aside. 3. Screws (in recessed holes)
4. For wall or roof venting, changes must be made to the back of microwave oven, and lower blower motor back into the microwave oven. A
Rotate Blower Motor
The microwave oven is being handled.
2. NOTE: Skip this section if you are using recirculation installation. INSTALLATION INSTRUCTIONS
Remove Mounting Plate
Depending on...
Installation Instructions - Page 5
...: If blower motor is not correctly oriented, the 2 screws removed in the top of the microwave oven. Securely tighten screws.
Exhaust port
5 Secure damper plate with 2 screws removed in Step 1 of...slots in Step 3 cannot be poor.
6. Make sure damper plate tabs are inserted into microwave oven. 7. Make sure damper plate tabs are inserted into the slots in Step 1.
Repeat Step ...
Installation Instructions - Page 6
...: If wall stud is within 6" (15.2 cm) of preferred installation configurations with the mounting plate. Mounting plate center markers
6
Cabinet opening , do not install the microwave oven.
1. Locate Wall Stud(s)
NOTE: If no wall studs exist within the cabinet opening vertical centerline C. See illustrations in "Possible Wall Stud Configurations."
2. Wall stud centerlines...
Installation Instructions - Page 7
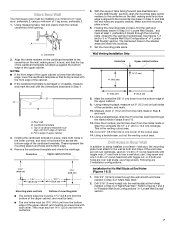
...(s) into the wall stud(s) at least 1, preferably 2 hole(s) through the mounting plate, closest to complete the 12" x 4" (30.5 x 10.2 cm) rectangle. Mark Rear Wall
The microwave oven must be 14¹⁄₈" (35.9 cm) from the centerline.
6" (15.2 cm)
6" (15.2 cm)
8. Using measuring tape, find the wall stud centerline(s) drawn in...
Installation Instructions - Page 8
... in "Possible Wall Stud Configurations" in Step 6 of mounting plate, making sure it fits inside the frame, against the upper cabinet bottom. Leave enough space for Wall Stud at both end...the rear wall to open . Refer to make sure toggle nuts have opened against the bottom of the microwave oven. Start toggle nuts on a second wall stud, drill a 3/16" (5 mm) hole into wall ...
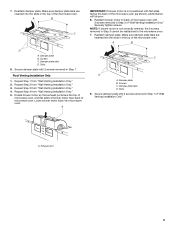
Installation Instructions - Page 9
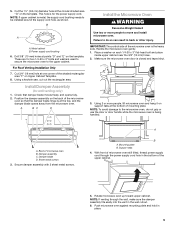
... hole at the bottom of the upper cabinet.
5. Position the damper assembly on each 1/4-20 x 3" flat-head bolt and place inside upper cabinet near the 3/8" (10 mm) holes. 2. With front of microwave oven still tilted, thread power supply cord through the wall, make sure the damper assembly fits easily into the vent in...
Installation Instructions - Page 10

...adapter. A
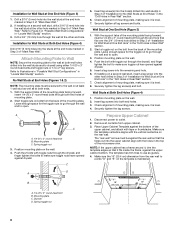
2. NOTE: The screw cannot be added. Upper cabinet cutout E. If the microwave oven does not operate: ■ Check that a household fuse has not blown, or that...skip steps 7-9.
7. Damper assembly (under the raised tabs of the microwave oven.
Damper assembly C. Using 2 or more people, lift microwave oven off of mounting plate, and set aside on the turntable, and programming...
Installation Instructions - Page 11
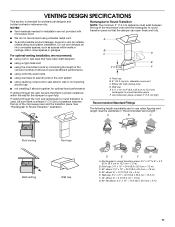
...C. Vent extension piece, at least 3" (7.6 cm) of clearance between the top of the microwave oven and the transition piece. See the examples in the vent system
■ using recirculation installation.... NOTE: The minimum 3" (7.6 cm) clearance must exist between the top of the microwave oven and the rectangular to round transition piece so that there is proper clearance within walls or...
Installation Instructions - Page 12
...
A
A.
W10238252A SP PN W10238253A
© 2008.
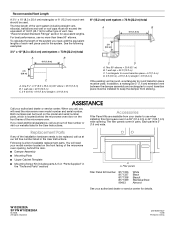
To calculate the length of the microwave oven opening . ASSISTANCE
Call your model number located on the front frame of each vent piece ... in the User Instructions. You will need , add the equivalent lengths of the microwave oven. Filler panels
Filler Panel Kit Number
8171336 8171337 8171338 8171339 99403
White Black Biscuit ...
Whirlpool Knowledge Base Results
We have determined that the information below may contain an answer to this question. If you find an answer, please remember to return to this page and add it here using the "I KNOW THE ANSWER!" button above. It's that easy to earn points!-
Preparing oven to self clean
Preparing to remove soil. This area does not get hot enough during self-cleaning to self-clean the oven Hand clean inside the door edge and the 1½" (3.8 cm) area around the inside oven cavity frame, and make certain to keep them shiny. At high temperatures, foods react with a very fine (000) steel wool... -
How do I clean the metallic paint on my gas range?
... are suggested first unless otherwise noted. My gas oven won't operate Always follow label instructions on some models) Do not use abrasive cleaners, cleaners with bleach, rust removers, ammonia or sodium hydroxide (lye) because paint surface may stain. How do I clean the porcelain-coated grates and caps on my gas range? How do... -
How do I clean my microwave oven?
...-free cloth. For proper care, please follow label instructions on today's order, enter Promo Code F9A75Q4 in my microwave oven? How do I care and clean my stainless steel surfaces? To get rid of odors inside the oven, boil a cup of water with one cup (250 mL) of water with lemon juice or vinegar. Always...
Similar Questions

Was Using Auto-clean Feature, Then The Oven Stopped Working Altogether
We have a 2002 RBD 245 PDS double wall oven.The other day I was using the auto-clean feature to clea...
We have a 2002 RBD 245 PDS double wall oven.The other day I was using the auto-clean feature to clea...
(Posted by littlehouse7 6 years ago)

Turned The Oven On To Bake And It Automatically Went To Self-clean And Locked It
Put a roast in. Set oven to start and at some point it automatically switched to self-clean and the ...
Put a roast in. Set oven to start and at some point it automatically switched to self-clean and the ...
(Posted by JAL121053 9 years ago)

Locked Whirlpool In Wall Rbs275pvb
The oven has locked automatically with the oven still on how do I get it unlocked. I havealready hel...
The oven has locked automatically with the oven still on how do I get it unlocked. I havealready hel...
(Posted by Whitsettathome 11 years ago)

Filter # To Order Replacement
What is the number for the filter for a Whirlpool Over the Range Microwave GMH51
What is the number for the filter for a Whirlpool Over the Range Microwave GMH51
(Posted by sherrylblake 12 years ago)
Oven Thermo Problems Mod# Rf387lxhq1
the oven turns on and works fine but the oven works only wide open in all settings
the oven turns on and works fine but the oven works only wide open in all settings
(Posted by creativmancreature 12 years ago)