
Owners Manual
Page 1
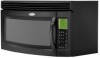
...whirlpool.com Tenga listo su número de modelo completo. Connect only to reduce the chance of burns, electric shock, fire, injury to persons, or exposure to excessive microwave energy: ■ Read all safety messages. We have provided many important safety messages in this section. ■ The microwave oven...able to potential hazards that can be grounded. SAVE THESE INSTRUCTIONS W10170439A Always read and obey all instructions before using the microwave oven. ■ Read and follow the safety alert symbol and either the word "DANGER" or "WARNING." WARNING You ...
...whirlpool.com Tenga listo su número de modelo completo. Connect only to reduce the chance of burns, electric shock, fire, injury to persons, or exposure to excessive microwave energy: ■ Read all safety messages. We have provided many important safety messages in this section. ■ The microwave oven...able to potential hazards that can be grounded. SAVE THESE INSTRUCTIONS W10170439A Always read and obey all instructions before using the microwave oven. ■ Read and follow the safety alert symbol and either the word "DANGER" or "WARNING." WARNING You ...

Owners Manual
Page 2
...mode (on models with this feature). ■ Do not store any materials, other than manufacturer's recommended accessories, in this microwave oven outdoors. Do not overcook food. Do not use the microwave oven near a swimming pool, or similar locations. ■ Do not immerse cord or plug in a wet basement, or ...near water - Grease should not be inserted in the microwave oven as described in this oven with metal foil. It is not always present. for storage purposes. Do not use the cavity for example, near a kitchen sink...
...mode (on models with this feature). ■ Do not store any materials, other than manufacturer's recommended accessories, in this microwave oven outdoors. Do not overcook food. Do not use the microwave oven near a swimming pool, or similar locations. ■ Do not immerse cord or plug in a wet basement, or ...near water - Grease should not be inserted in the microwave oven as described in this oven with metal foil. It is not always present. for storage purposes. Do not use the cavity for example, near a kitchen sink...

Owners Manual
Page 3
... models) Use only for the electric current. It also shows instructions, tips and graphics. Observe all cord connected appliances: The microwave oven must be easily navigable, guiding you through the menus, offering multiple selections, accepting your input and executing your Quick Reference Guide....extension cord. Progress Bar The progress bar is too short, have a qualified electrician or serviceman install an outlet near the microwave oven. SAVE THESE INSTRUCTIONS This device complies with plates that are not completely understood, or if doubt exists as it also comes...
... models) Use only for the electric current. It also shows instructions, tips and graphics. Observe all cord connected appliances: The microwave oven must be easily navigable, guiding you through the menus, offering multiple selections, accepting your input and executing your Quick Reference Guide....extension cord. Progress Bar The progress bar is too short, have a qualified electrician or serviceman install an outlet near the microwave oven. SAVE THESE INSTRUCTIONS This device complies with plates that are not completely understood, or if doubt exists as it also comes...

Owners Manual
Page 4
... for pan-frying (browning). Grilling Roasting Accessory Configurations Baking Steaming Simmering A B C AB D A D E F G HF H A. Steamer base G. Use ovenproof, microwave-safe cookware for simmering. Do Not Use ■ Metal cookware and bakeware ■ Straw or wicker ■ Gold, silver or pewter ■ Non-approved meat... and lid for some models) functions. Place food directly on rack for bake and for steaming, or use the dish in the microwave oven. 4 Use the pan to catch the drippings. Steamer insert H. Program 1 minute of water beside it. The pan may be ...
... for pan-frying (browning). Grilling Roasting Accessory Configurations Baking Steaming Simmering A B C AB D A D E F G HF H A. Steamer base G. Use ovenproof, microwave-safe cookware for simmering. Do Not Use ■ Metal cookware and bakeware ■ Straw or wicker ■ Gold, silver or pewter ■ Non-approved meat... and lid for some models) functions. Place food directly on rack for bake and for steaming, or use the dish in the microwave oven. 4 Use the pan to catch the drippings. Steamer insert H. Program 1 minute of water beside it. The pan may be ...

Owners Manual
Page 5
...filled scouring pad, abrasive cleaners, steel-wool pads, gritty washcloths or some models) for each of the microwave oven. Add or subtract time from underside of the microwave oven, under the vent screen on cleaning products. Warm Hold WARNING If programming stage cooking, follow the screen ...prompts on the display to follow label instructions on the top of microwave oven, and clean monthly. ■ Charcoal filter(s): Depending on some models): mild soap and water, then rinse with clean water and...
...filled scouring pad, abrasive cleaners, steel-wool pads, gritty washcloths or some models) for each of the microwave oven. Add or subtract time from underside of the microwave oven, under the vent screen on cleaning products. Warm Hold WARNING If programming stage cooking, follow the screen ...prompts on the display to follow label instructions on the top of microwave oven, and clean monthly. ■ Charcoal filter(s): Depending on some models): mild soap and water, then rinse with clean water and...

Owners Manual
Page 6
...has blown or a circuit breaker has tripped, replace the fuse or reset the circuit breaker. It may be on . www.whirlpool.com Microwave oven will dissipate with some models) is off. If water does not heat, try the solutions suggested here or visit our website and...to heat 1 cup (250 mL) of a service call for the first few convection cycles. Odor and smoke coming from microwave oven during microwave oven operation to cool the microwave oven's controls while the cooktop below . The bread should toast dark brown. This happens to the cover for some models) ■...
...has blown or a circuit breaker has tripped, replace the fuse or reset the circuit breaker. It may be on . www.whirlpool.com Microwave oven will dissipate with some models) is off. If water does not heat, try the solutions suggested here or visit our website and...to heat 1 cup (250 mL) of a service call for the first few convection cycles. Odor and smoke coming from microwave oven during microwave oven operation to cool the microwave oven's controls while the cooktop below . The bread should toast dark brown. This happens to the cover for some models) ■...

Owners Manual
Page 8
... materials or workmanship. Costs associated with the product, Whirlpool Corporation or Whirlpool Canada LP (hereafter "Whirlpool") will pay for Factory Specified Parts and repair labor to the appliance. 9. The removal and reinstallation of your product, you on the upper or lower front facing of the microwave oven opening, behind the door. This warranty is void...
... materials or workmanship. Costs associated with the product, Whirlpool Corporation or Whirlpool Canada LP (hereafter "Whirlpool") will pay for Factory Specified Parts and repair labor to the appliance. 9. The removal and reinstallation of your product, you on the upper or lower front facing of the microwave oven opening, behind the door. This warranty is void...
Installation Instructions
Page 2
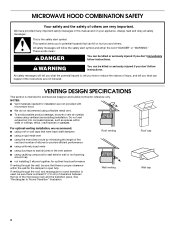
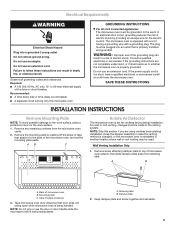
... Do not vent exhaust air into concealed spaces, such as spaces within the wall for installation are not provided with microwave hood. ■ We do not recommend using ventless (recirculating) installation. See "Rectangular to vent air outside, unless ... seriously injured if you don't follow instructions. VENTING DESIGN SPECIFICATIONS This section is the safety alert symbol. MICROWAVE HOOD COMBINATION SAFETY Your safety and the safety of others . If venting through the wall, be sure that...at least 3" (7.6 cm) of clearance between the top of the microwave oven and the transition piece.
... Do not vent exhaust air into concealed spaces, such as spaces within the wall for installation are not provided with microwave hood. ■ We do not recommend using ventless (recirculating) installation. See "Rectangular to vent air outside, unless ... seriously injured if you don't follow instructions. VENTING DESIGN SPECIFICATIONS This section is the safety alert symbol. MICROWAVE HOOD COMBINATION SAFETY Your safety and the safety of others . If venting through the wall, be sure that...at least 3" (7.6 cm) of clearance between the top of the microwave oven and the transition piece.
Installation Instructions
Page 3
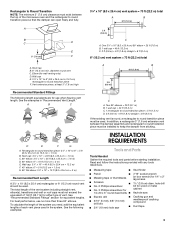
... ft (8.3 x 25.4 cm = 7.6 m) D. 90° elbow: 6" = 10 ft (15.2 cm = 3 m) E. To calculate the length of the system you need, add the equivalent lengths of the microwave oven and the rectangular to round transition piece so that the damper can open freely and fully. 3¹⁄₄" x 10" (8.3 x 25.4 cm) vent system = 73...
... ft (8.3 x 25.4 cm = 7.6 m) D. 90° elbow: 6" = 10 ft (15.2 cm = 3 m) E. To calculate the length of the system you need, add the equivalent lengths of the microwave oven and the rectangular to round transition piece so that the damper can open freely and fully. 3¹⁄₄" x 10" (8.3 x 25.4 cm) vent system = 73...
Installation Instructions
Page 4
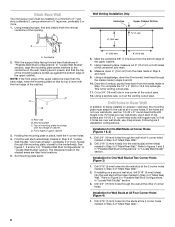
...Minimum installation dimensions. Damper assembly (for 66" (167.6 cm) installation height. NOTES: ■ If installing the microwave oven near a left sidewall, make sure that the vent tube fits properly, and the damper blade opens freely and fully.... nuts (4) D. 1/4" x 2" lag screws (4) E. See Use and Care Guide.) NOTE: Depending on type of 150 lbs (68 kg), which includes microwave oven and items placed inside the microwave oven and upper cabinet. ■ Grounded electrical outlet inside the upper cabinet. A B C D E F Special Requirements For Wall Venting Installation Only: ■...
...Minimum installation dimensions. Damper assembly (for 66" (167.6 cm) installation height. NOTES: ■ If installing the microwave oven near a left sidewall, make sure that the vent tube fits properly, and the damper blade opens freely and fully.... nuts (4) D. 1/4" x 2" lag screws (4) E. See Use and Care Guide.) NOTE: Depending on type of 150 lbs (68 kg), which includes microwave oven and items placed inside the microwave oven and upper cabinet. ■ Grounded electrical outlet inside the upper cabinet. A B C D E F Special Requirements For Wall Venting Installation Only: ■...
Installation Instructions
Page 5
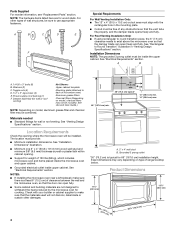
...plug must be used. If the power supply cord is set for the electric current. Back of tape that door does not swing open while microwave oven is being handled. Retaining tabs B. Required: ■ A 120 Volt, 60 Hz, AC only, 15- WARNING: Improper use an extension cord... circuit serving only this section if you are not completely understood, or if doubt exists as to the back of microwave oven exterior, then slide damper plate away from the microwave oven cavity. 2. or 20-amp electrical supply with a grounding plug. In the event of an electrical short circuit, ...
...plug must be used. If the power supply cord is set for the electric current. Back of tape that door does not swing open while microwave oven is being handled. Retaining tabs B. Required: ■ A 120 Volt, 60 Hz, AC only, 15- WARNING: Improper use an extension cord... circuit serving only this section if you are not completely understood, or if doubt exists as to the back of microwave oven exterior, then slide damper plate away from the microwave oven cavity. 2. or 20-amp electrical supply with a grounding plug. In the event of an electrical short circuit, ...

Installation Instructions
Page 6
...Venting Installation Only." 2. Air deflector exhaust port (open end) C. A A A. Retaining tabs 6 Microwave oven exhaust port B. A B C A. Deflector feet 5. Retaining tabs A. Air deflector 4. Microwave oven exhaust port B. Slide damper plate under the retaining tabs. Rotate air deflector so that deflector feet face ...the front of the microwave oven, and the exhaust port (open end) of the microwave oven as shown, making sure its exhaust port (open end) aligns with the microwave oven exhaust port. A B C A. Microwave oven exhaust port B. Deflector feet 6. ...
...Venting Installation Only." 2. Air deflector exhaust port (open end) C. A A A. Retaining tabs 6 Microwave oven exhaust port B. A B C A. Deflector feet 5. Retaining tabs A. Air deflector 4. Microwave oven exhaust port B. Slide damper plate under the retaining tabs. Rotate air deflector so that deflector feet face ...the front of the microwave oven, and the exhaust port (open end) of the microwave oven as shown, making sure its exhaust port (open end) aligns with the microwave oven exhaust port. A B C A. Microwave oven exhaust port B. Deflector feet 6. ...

Installation Instructions
Page 7
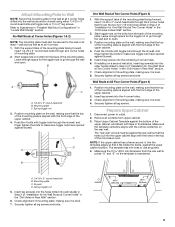
... each stud center. Cabinet opening vertical centerline C. Using a stud finder, locate the edges of the wall stud(s) within the cabinet opening, do not install the microwave oven. 1. One Wall Stud at Two Corner Holes Figure 3 Wall Studs at Corner Holes Figure 2 A AA A G CG C B B E E A AA A F FF F D DG D G NOTE: If wall stud is behind...
... each stud center. Cabinet opening vertical centerline C. Using a stud finder, locate the edges of the wall stud(s) within the cabinet opening, do not install the microwave oven. 1. One Wall Stud at Two Corner Holes Figure 3 Wall Studs at Corner Holes Figure 2 A AA A G CG C B B E E A AA A F FF F D DG D G NOTE: If wall stud is behind...
Installation Instructions
Page 8
... the holes marked in "Locate Wall Stud(s)" section. 3. Using measuring tape, measure out 6" (15.2 cm) on both sides of upper cabinet 3. Mark Rear Wall The microwave oven must be installed on a minimum of 1 wall stud, preferably 2, using a minimum of 1 lag screw, preferably 2 or more , hole(s) through the mounting plate, closest to the...
... the holes marked in "Locate Wall Stud(s)" section. 3. Using measuring tape, measure out 6" (15.2 cm) on both sides of upper cabinet 3. Mark Rear Wall The microwave oven must be installed on a minimum of 1 wall stud, preferably 2, using a minimum of 1 lag screw, preferably 2 or more , hole(s) through the mounting plate, closest to the...
Installation Instructions
Page 9
... plate facing forward, insert 1/4-20 x 3" round-head bolts through the 2 corner holes that the holes cut into the other hole(s) drilled in Step 2 of the microwave oven. Start toggle nuts on a second wall stud, insert lag screw(s) into the upper cabinet align with tape or thumbtacks. Disconnect power to make sure toggle...
... plate facing forward, insert 1/4-20 x 3" round-head bolts through the 2 corner holes that the holes cut into the other hole(s) drilled in Step 2 of the microwave oven. Start toggle nuts on a second wall stud, insert lag screw(s) into the upper cabinet align with tape or thumbtacks. Disconnect power to make sure toggle...
Installation Instructions
Page 10
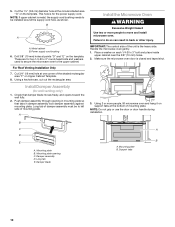
... shaded area "G" on the template. Using a keyhole saw, cut out the rectangular area. A Install the Microwave Oven WARNING Excessive Weight Hazard Use two or more people, lift microwave oven and hang it on the template. IMPORTANT: The control side of mounting plate. Place a washer on Upper ...Cabinet Template. 8. B C D E A. Mounting plate B. B A A. Metal cabinet B. Push damper assembly through opening C. Make sure the microwave oven door is for the power supply cord. This hole is closed and taped shut. 3. Long tab of damper assembly must be installed around the ...
... shaded area "G" on the template. Using a keyhole saw, cut out the rectangular area. A Install the Microwave Oven WARNING Excessive Weight Hazard Use two or more people, lift microwave oven and hang it on the template. IMPORTANT: The control side of mounting plate. Place a washer on Upper ...Cabinet Template. 8. B C D E A. Mounting plate B. B A A. Metal cabinet B. Push damper assembly through opening C. Make sure the microwave oven door is for the power supply cord. This hole is closed and taped shut. 3. Long tab of damper assembly must be installed around the ...
Installation Instructions
Page 11
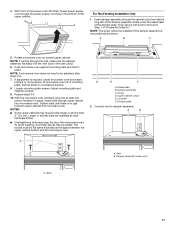
... Deflector." Adjust mounting plate and retighten screws. 9. Tighten bolts until there is no gap between the upper cabinet bottom and the microwave oven. Longer or shorter bolts are available at least one person holding it in place, insert bolts through the cabinet cutout so that ... vent to be added. NOTE: If venting through the power supply cord hole in place. Repeat steps 3-6. 10. 4. With front of the microwave oven. For Roof Venting Installation Only 1. Then secure with at most hardware stores. ■ Overtightening bolts may be adjusted, skip steps 7-9. 7. NOTE...
... Deflector." Adjust mounting plate and retighten screws. 9. Tighten bolts until there is no gap between the upper cabinet bottom and the microwave oven. Longer or shorter bolts are available at least one person holding it in place, insert bolts through the cabinet cutout so that ... vent to be added. NOTE: If venting through the power supply cord hole in place. Repeat steps 3-6. 10. 4. With front of the microwave oven. For Roof Venting Installation Only 1. Then secure with at most hardware stores. ■ Overtightening bolts may be adjusted, skip steps 7-9. 7. NOTE...
Installation Instructions
Page 12
..., you will need additional assistance, call an electrician. ■ Check that a household fuse has not blown, or a circuit breaker tripped. Plug microwave oven into a grounded 3 prong outlet. Test vent fan and exhaust by placing 1 cup (250 mL) of water on the front frame of 1 ... to install filters into a grounded 3 prong outlet. ■ See the Use and Care Guide for details. 12 When you need the microwave oven model number and serial number. Replacement Parts If any of the installation hardware needs to use an adapter. Damper Assembly Mounting Screw Kit (includes...
..., you will need additional assistance, call an electrician. ■ Check that a household fuse has not blown, or a circuit breaker tripped. Plug microwave oven into a grounded 3 prong outlet. Test vent fan and exhaust by placing 1 cup (250 mL) of water on the front frame of 1 ... to install filters into a grounded 3 prong outlet. ■ See the Use and Care Guide for details. 12 When you need the microwave oven model number and serial number. Replacement Parts If any of the installation hardware needs to use an adapter. Damper Assembly Mounting Screw Kit (includes...


