
Use and Care Guide
Page 1
www.whirlpool.com or www.whirlpool.com/canada Table of Contents 2 MODELS GBD277 GBS277 GBD307 GBS307 YGBD277 YGBS277 YGBD307 YGBS307 or visit our website at... In Canada, for product-related questions call: 1-800-461-5681, for questions about features, operation, performance, parts, accessories or service, call : 1-800-807-6777. 8300609 ® BUILT-IN ELECTRIC CONVECTION OVEN Use & Care Guide In the U.S.A, for parts, accessories, installation and service call : 1-800-253-1301.
www.whirlpool.com or www.whirlpool.com/canada Table of Contents 2 MODELS GBD277 GBS277 GBD307 GBS307 YGBD277 YGBS277 YGBD307 YGBS307 or visit our website at... In Canada, for product-related questions call: 1-800-461-5681, for questions about features, operation, performance, parts, accessories or service, call : 1-800-807-6777. 8300609 ® BUILT-IN ELECTRIC CONVECTION OVEN Use & Care Guide In the U.S.A, for parts, accessories, installation and service call : 1-800-253-1301.
Use and Care Guide
Page 2
... Off/Cancel 6 Clock 6 Tones 6 Fahrenheit and Celsius 7 Timer 7 Control Lock 7 Oven Temperature Control 7 OVEN USE 8 Aluminum Foil 8 Positioning Racks and Bakeware 8 Bakeware 8 Meat Thermometer 8 Oven Vent 9 Baking and Roasting 9 Broiling and Custom Broiling 9 Convection Cooking 10 Convection Baking and Roasting 10 Timed Cooking 12 OVEN CARE 12 Self-Cleaning Cycle 12 General Cleaning 13...
... Off/Cancel 6 Clock 6 Tones 6 Fahrenheit and Celsius 7 Timer 7 Control Lock 7 Oven Temperature Control 7 OVEN USE 8 Aluminum Foil 8 Positioning Racks and Bakeware 8 Bakeware 8 Meat Thermometer 8 Oven Vent 9 Baking and Roasting 9 Broiling and Custom Broiling 9 Convection Cooking 10 Convection Baking and Roasting 10 Timed Cooking 12 OVEN CARE 12 Self-Cleaning Cycle 12 General Cleaning 13...
Use and Care Guide
Page 3
... hot, do not touch, or let clothing or other flammable materials contact heating elements or interior surfaces of the oven unless specifically recommended in an oven. Always place oven racks in Oven - This symbol alerts you to potential hazards that can kill or hurt you what can be allowed to sit... During and after use, do not let potholder contact hot heating element in use dry chemical or foam-type extinguisher. Build-up of the oven. Heating elements may result in color. Smother fire or flame or use . Do not repair or replace any part of pressure may become ...
... hot, do not touch, or let clothing or other flammable materials contact heating elements or interior surfaces of the oven unless specifically recommended in an oven. Always place oven racks in Oven - This symbol alerts you to potential hazards that can kill or hurt you what can be allowed to sit... During and after use, do not let potholder contact hot heating element in use dry chemical or foam-type extinguisher. Build-up of the oven. Heating elements may result in color. Smother fire or flame or use . Do not repair or replace any part of pressure may become ...
Use and Care Guide
Page 4
...should be used in Manual. s Before Self-Cleaning the Oven - No commercial oven cleaner or oven liner protective coating of any part of the substances listed, including benzene, formaldehyde, carbon monoxide, and toluene. 4 s Do Not Use Oven Cleaners - This appliance can cause low-level exposure to...pan and other reproductive harm. WARNING: This product contains a chemical known to the State of potential exposure to some of the oven. SAVE THESE INSTRUCTIONS The California Safe Drinking Water and Toxic Enforcement Act requires the Governor of California to publish a list of ...
...should be used in Manual. s Before Self-Cleaning the Oven - No commercial oven cleaner or oven liner protective coating of any part of the substances listed, including benzene, formaldehyde, carbon monoxide, and toluene. 4 s Do Not Use Oven Cleaners - This appliance can cause low-level exposure to...pan and other reproductive harm. WARNING: This product contains a chemical known to the State of potential exposure to some of the oven. SAVE THESE INSTRUCTIONS The California Safe Drinking Water and Toxic Enforcement Act requires the Governor of California to publish a list of ...
Use and Care Guide
Page 5
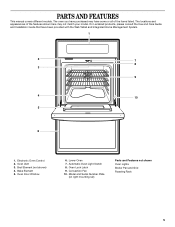
...Latch 9. Convection Fan 10. PARTS AND FEATURES This manual covers different models. Broil Element (not shown) 4. Bake Element 5. The oven you have purchased may not match your model. On I-enabled products, please consult the Use and Care Guide and Installation Guide that ...have some or all of the items listed. Automatic Oven Light Switch 8. Model and Serial Number Plate (on right mounting rail) Parts and Features not shown Oven Lights Broiler Pan and Grid Roasting Rack 5 Electronic Oven Control 2. The locations and appearances of the features shown here may...
...Latch 9. Convection Fan 10. PARTS AND FEATURES This manual covers different models. Broil Element (not shown) 4. Bake Element 5. The oven you have purchased may not match your model. On I-enabled products, please consult the Use and Care Guide and Installation Guide that ...have some or all of the items listed. Automatic Oven Light Switch 8. Model and Serial Number Plate (on right mounting rail) Parts and Features not shown Oven Lights Broiler Pan and Grid Roasting Rack 5 Electronic Oven Control 2. The locations and appearances of the features shown here may...

Use and Care Guide
Page 6
... supplied to the time of day from the display: Press and hold STOP TIME for 5 seconds. To Set: Before setting, make sure the ovens, Timer and Timed Cooking are off . To remove the time of day mode and the programmed function will sound. To remove, press UPPER OFF..., LOWER OFF or OFF/CANCEL. 6 ELECTRONIC OVEN CONTROL 1. Upper Oven Temperature Display 2. Lower Oven Temperature Display 4. Upper Off/Lower Off Display When power is a 12 hour clock and does not show a.m. If "Err" appears ...
... supplied to the time of day from the display: Press and hold STOP TIME for 5 seconds. To Set: Before setting, make sure the ovens, Timer and Timed Cooking are off . To remove the time of day mode and the programmed function will sound. To remove, press UPPER OFF..., LOWER OFF or OFF/CANCEL. 6 ELECTRONIC OVEN CONTROL 1. Upper Oven Temperature Display 2. Lower Oven Temperature Display 4. Upper Off/Lower Off Display When power is a 12 hour clock and does not show a.m. If "Err" appears ...
Use and Care Guide
Page 7
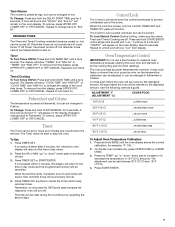
.... Press TIMER OFF anytime to the time of -cycle tones will sound, then reminder tones will remain on the oven display, about 5 seconds. The oven provides accurate temperatures; Timed Cooking To Turn Tones Off/On: Press and hold TIMER SET until a tone sounds. ... more -10°F (-5°C) ...a little less -20°F (-10°C) ...moderately less -30°F (-15°C) ...much less To Adjust Oven Temperature Calibration: 1. Press START/ENTER. 7 Repeat to unlock and remove "Loc" from display. REMINDER TONES The Timer and Timed Cooking reminder tones are off...
.... Press TIMER OFF anytime to the time of -cycle tones will sound, then reminder tones will remain on the oven display, about 5 seconds. The oven provides accurate temperatures; Timed Cooking To Turn Tones Off/On: Press and hold TIMER SET until a tone sounds. ... more -10°F (-5°C) ...a little less -20°F (-10°C) ...moderately less -30°F (-15°C) ...much less To Adjust Oven Temperature Calibration: 1. Press START/ENTER. 7 Repeat to unlock and remove "Loc" from display. REMINDER TONES The Timer and Timed Cooking reminder tones are off...
Use and Care Guide
Page 8
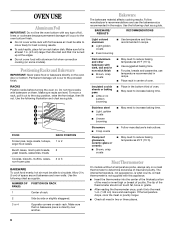
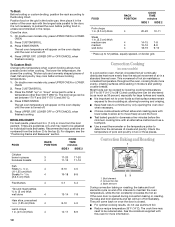
...Stoneware s Crisp crusts s Follow manufacturer's instructions. The internal temperature, not appearance, is turned up at least 1 in the bottom third of oven. If the temperature drops, cook the meat or poultry longer. s Check all meat in recipe. Make sure foil is at the edges. FOOD... to the porcelain finish. Positioning Racks and Bakeware IMPORTANT: Never place food or bakeware directly on . RACKS Position racks before turning the oven on the oven door or bottom. Use the following chart as a guide. NUMBER OF POSITION ON RACK PAN(S) 1 Center of meat and poultry....
...Stoneware s Crisp crusts s Follow manufacturer's instructions. The internal temperature, not appearance, is turned up at least 1 in the bottom third of oven. If the temperature drops, cook the meat or poultry longer. s Check all meat in recipe. Make sure foil is at the edges. FOOD... to the porcelain finish. Positioning Racks and Bakeware IMPORTANT: Never place food or bakeware directly on . RACKS Position racks before turning the oven on the oven door or bottom. Use the following chart as a guide. NUMBER OF POSITION ON RACK PAN(S) 1 Center of meat and poultry....
Use and Care Guide
Page 9
...room temperature and peak energy usage times. s After broiling, remove the pan from the broil element to wait for easier cleaning. Lower oven The oven vent should not be blocked or covered since it is opened during preheat and bake to maintain a precise temperature range for the temperature ... such as yeast, baking powder, baking soda and eggs. Waiting an additional ten minutes after pressing START/ENTER. Broil element 2. If the oven door is not necessary to cook food. The display will show "door" and the heating elements will cause poor air circulation, affecting cooking ...
...room temperature and peak energy usage times. s After broiling, remove the pan from the broil element to wait for easier cleaning. Lower oven The oven vent should not be blocked or covered since it is opened during preheat and bake to maintain a precise temperature range for the temperature ... such as yeast, baking powder, baking soda and eggs. Waiting an additional ten minutes after pressing START/ENTER. Broil element 2. If the oven door is not necessary to cook food. The display will show "door" and the heating elements will cause poor air circulation, affecting cooking ...
Use and Care Guide
Page 10
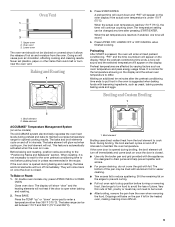
... moisture and yielding crustier breads. For diagram, see the "Positioning Racks and Bakeware" section. Convection Cooking (on some models) In a convection oven, the fan-circulated hot air continually distributes heat more evenly, crisping surfaces while sealing in . (7 cm) or more from the bottom (1) ... Broil element 2. Convection fan 3. s For optimal cooking results, do not use aluminum foil. The broil range can be set oven temperature will appear on broiler grid. s Choose cookie sheets without sides and roasting pans with the longest side parallel to determine the ...
... moisture and yielding crustier breads. For diagram, see the "Positioning Racks and Bakeware" section. Convection Cooking (on some models) In a convection oven, the fan-circulated hot air continually distributes heat more evenly, crisping surfaces while sealing in . (7 cm) or more from the bottom (1) ... Broil element 2. Convection fan 3. s For optimal cooking results, do not use aluminum foil. The broil range can be set oven temperature will appear on broiler grid. s Choose cookie sheets without sides and roasting pans with the longest side parallel to determine the ...

Use and Care Guide
Page 11
... the roasting rack on rack positions 2 and 4. Roasting rack 2. Broiler pan 1. CONVECTION ROASTING CHART Food/Rack Position Cook Time (minutes) Oven Temp. Internal Food Temp. Use the following chart below when convection roasting meats and poultry. and under 170°F (75°C). Close... oven door. Beef, Rack Position 2 Rib Roast rare medium well done Rib Roast (boneless) rare medium well done Rump, Sirloin Tip ...
... the roasting rack on rack positions 2 and 4. Roasting rack 2. Broiler pan 1. CONVECTION ROASTING CHART Food/Rack Position Cook Time (minutes) Oven Temp. Internal Food Temp. Use the following chart below when convection roasting meats and poultry. and under 170°F (75°C). Close... oven door. Beef, Rack Position 2 Rib Roast rare medium well done Rib Roast (boneless) rare medium well done Rump, Sirloin Tip ...
Use and Care Guide
Page 12
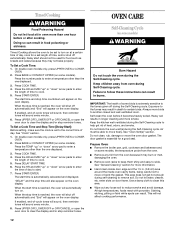
...some models). Press START/ENTER. When the stop time countdown will shut off during the Self-Cleaning cycle to certain birds. Keep children away from oven during the Self-Cleaning cycle. Do not clean, rub, damage or move freely. Do not let water, cleaner, etc. Use a damp ... 12 See "General Cleaning" section for a good seal. enter slots on . Timed Cooking WARNING Food Poisoning Hazard Do not let food sit in oven more than the one displayed. 3. Press START/ENTER. Press DELAY START TIME 6. Air must be set to reduce smoke and avoid damage. At high...
...some models). Press START/ENTER. When the stop time countdown will shut off during the Self-Cleaning cycle to certain birds. Keep children away from oven during the Self-Cleaning cycle. Do not clean, rub, damage or move freely. Do not let water, cleaner, etc. Use a damp ... 12 See "General Cleaning" section for a good seal. enter slots on . Timed Cooking WARNING Food Poisoning Hazard Do not let food sit in oven more than the one displayed. 3. Press START/ENTER. Press DELAY START TIME 6. Air must be set to reduce smoke and avoid damage. At high...
Use and Care Guide
Page 13
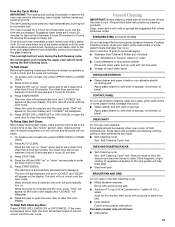
...vegetable oil applied to avoid damaging. s Mildly abrasive cleanser: Scrub with scouring or steel wool pad. The door will not unlock until the oven has completely cooled down. CONTROL PANEL Do not use soap-filled scouring pads, abrasive cleaners, Cooktop Polishing Creme, steel-wool pads, gritty ...wash cloths or some paper towels. OVEN AND ROASTING RACKS s Self-Cleaning cycle: See "Self-Cleaning Cycle" first. s Steel wool pad BROILER PAN AND GRID Do not clean in...
...vegetable oil applied to avoid damaging. s Mildly abrasive cleanser: Scrub with scouring or steel wool pad. The door will not unlock until the oven has completely cooled down. CONTROL PANEL Do not use soap-filled scouring pads, abrasive cleaners, Cooktop Polishing Creme, steel-wool pads, gritty ...wash cloths or some paper towels. OVEN AND ROASTING RACKS s Self-Cleaning cycle: See "Self-Cleaning Cycle" first. s Steel wool pad BROILER PAN AND GRID Do not clean in...
Use and Care Guide
Page 14
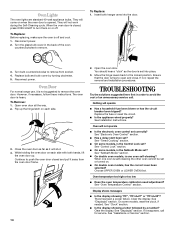
...in order to the locked position. You should hear a "click" as it reappears, call . s On some models, is self-cleaning the other oven cannot be set ? Replace bulb and bulb cover by a number? However, if necessary, follow these instructions. Flip up the hinge latch on ...., is off . There has been a power failure. Clear the display. They will not operate s Is the electronic oven control set ? To Replace: Before replacing, make sure the oven is the Sabbath Mode set or turned on each side with both hanger arms into place. 3. Disconnect power. 2. Reconnect...
...in order to the locked position. You should hear a "click" as it reappears, call . s On some models, is self-cleaning the other oven cannot be set ? Replace bulb and bulb cover by a number? However, if necessary, follow these instructions. Flip up the hinge latch on ...., is off . There has been a power failure. Clear the display. They will not operate s Is the electronic oven control set ? To Replace: Before replacing, make sure the oven is the Sabbath Mode set or turned on each side with both hanger arms into place. 3. Disconnect power. 2. Reconnect...
Use and Care Guide
Page 15
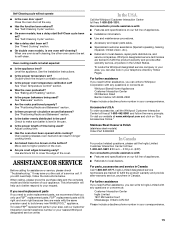
..., we recommend that you the cost of a service call the Whirlpool Customer Interaction Center toll free at www.whirlpool.com and click on the bottom? When one oven self-cleaning? s Was the oven preheated? s Is there proper air circulation around bakeware? Adjust cooking...assistance, you can also look in the oven. FSP® replacement parts will not operate s Is the oven door open? s Installation information. s Accessory and repair parts sales. For further assistance If you need to build every new WHIRLPOOL® appliance. See the Installation Instructions. ...
..., we recommend that you the cost of a service call the Whirlpool Customer Interaction Center toll free at www.whirlpool.com and click on the bottom? When one oven self-cleaning? s Was the oven preheated? s Is there proper air circulation around bakeware? Adjust cooking...assistance, you can also look in the oven. FSP® replacement parts will not operate s Is the oven door open? s Installation information. s Accessory and repair parts sales. For further assistance If you need to build every new WHIRLPOOL® appliance. See the Installation Instructions. ...
Use and Care Guide
Page 16
...ceramic glass cooktop if it . You will need service, first see the "Troubleshooting" section of this warranty does not apply. WHIRLPOOL® COOKTOP, BUILT-IN OVEN AND RANGE WARRANTY FULL ONE-YEAR WARRANTY For one year from the date of purchase, when this appliance is operated and maintained... according to instructions attached to or furnished with the product, Whirlpool Corporation will not pay for: 1. Service must provide proof of God ...
...ceramic glass cooktop if it . You will need service, first see the "Troubleshooting" section of this warranty does not apply. WHIRLPOOL® COOKTOP, BUILT-IN OVEN AND RANGE WARRANTY FULL ONE-YEAR WARRANTY For one year from the date of purchase, when this appliance is operated and maintained... according to instructions attached to or furnished with the product, Whirlpool Corporation will not pay for: 1. Service must provide proof of God ...
Installation Instructions
Page 1
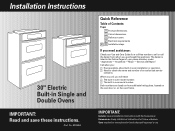
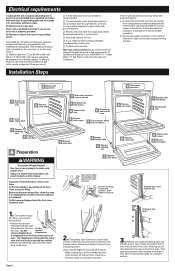
... when you purchased this appliance. Both numbers are listed on the model/serial rating plate, located on the oven door or on the oven frame. Installation Instructions 30" Electric Built-in oven serial number. Part No. 8300654 Quick Reference Table of Contents: Pages 1 Product dimensions 1 Cutout dimensions ... Yellow Pages of an authorized service company. Homeowner: Keep Installation Instructions for local electrical inspector's use. The dealer is listed in oven installation or operation. ࠜ Need to obtain the name and number of your Use and Care Guide for a toll-free number...
... when you purchased this appliance. Both numbers are listed on the model/serial rating plate, located on the oven door or on the oven frame. Installation Instructions 30" Electric Built-in oven serial number. Part No. 8300654 Quick Reference Table of Contents: Pages 1 Product dimensions 1 Cutout dimensions ... Yellow Pages of an authorized service company. Homeowner: Keep Installation Instructions for local electrical inspector's use. The dealer is listed in oven installation or operation. ࠜ Need to obtain the name and number of your Use and Care Guide for a toll-free number...
Installation Instructions
Page 2
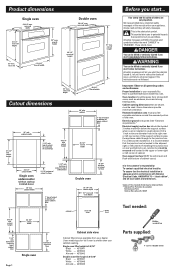
... min. bottom of cutout to top of cabinet door 32" bottom of cutout to the junction box. Use a matching color kit if oven is installed in the upper or lower right or left cabinet. All safety messages will follow instructions. Important: Observe all local codes and ordinances...upper cabinet door 28-1/2" cutout width 14-3/4" bottom of cutout to potential hazards that are available from your appliance. cutout depth 23" recessed oven depth 27-3/4" min. Always read and obey all safety messages. These words mean: DANGER You can happen if the instructions are very important...
... min. bottom of cutout to top of cabinet door 32" bottom of cutout to the junction box. Use a matching color kit if oven is installed in the upper or lower right or left cabinet. All safety messages will follow instructions. Important: Observe all local codes and ordinances...upper cabinet door 28-1/2" cutout width 14-3/4" bottom of cutout to potential hazards that are available from your appliance. cutout depth 23" recessed oven depth 27-3/4" min. Always read and obey all safety messages. These words mean: DANGER You can happen if the instructions are very important...
Installation Instructions
Page 3
...Do Not cut the conduit. B power supply cable C Use screws to attach oven to junction box. ࠜ Fuse both sides of trim downward to oven. C Grasp oven frame to cabinet. C Use screws to attach oven to lift oven. A Preparation WARNING Excessive Weight Hazard Use two or more people to final position... and set aside racks and other injury. Remove trim screws attaching right and left side trim to remove trim from Do Not the oven. Slide top end of the line. ࠜ A U.L.-listed conduit connector must be connected to the proper electrical voltage and frequency as...
...Do Not cut the conduit. B power supply cable C Use screws to attach oven to junction box. ࠜ Fuse both sides of trim downward to oven. C Grasp oven frame to cabinet. C Use screws to attach oven to lift oven. A Preparation WARNING Excessive Weight Hazard Use two or more people to final position... and set aside racks and other injury. Remove trim screws attaching right and left side trim to remove trim from Do Not the oven. Slide top end of the line. ࠜ A U.L.-listed conduit connector must be connected to the proper electrical voltage and frequency as...
Installation Instructions
Page 4
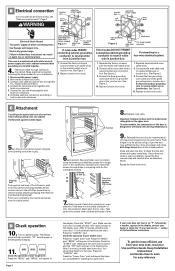
...Disconnect the power supply. 2. Connect the two black wires together with twist-on connectors. 5. Replace junction box cover. 7. Connect the bare grounding oven cable wire to remove screws attaching shipping feet. C Attachment Carefully push against outside edges. 5. Insert the screws through holes in cabinet cutout. ... Shock Hazard Turn power supply off before connecting wires. Failure to neutral (white) wire in junction box. Connect white oven cable wire to oven. See Figure 2. 10. On some models, the construction of each trim to neutral (white) wire in junction box...
...Disconnect the power supply. 2. Connect the two black wires together with twist-on connectors. 5. Replace junction box cover. 7. Connect the bare grounding oven cable wire to remove screws attaching shipping feet. C Attachment Carefully push against outside edges. 5. Insert the screws through holes in cabinet cutout. ... Shock Hazard Turn power supply off before connecting wires. Failure to neutral (white) wire in junction box. Connect white oven cable wire to oven. See Figure 2. 10. On some models, the construction of each trim to neutral (white) wire in junction box...


