
Use and Care Guide
Page 1
8300609 ® BUILT-IN ELECTRIC CONVECTION OVEN Use & Care Guide In the U.S.A, for parts, accessories, installation and service call : 1-800-253-1301. or visit our website at... www.whirlpool.com or www.whirlpool.com/canada Table of Contents 2 MODELS GBD277 GBS277 GBD307 GBS307 YGBD277 YGBS277 YGBD307 YGBS307 In Canada, for product-related questions call: 1-800-461-5681, for questions about features, operation, performance, parts, accessories or service, call : 1-800-807-6777.
8300609 ® BUILT-IN ELECTRIC CONVECTION OVEN Use & Care Guide In the U.S.A, for parts, accessories, installation and service call : 1-800-253-1301. or visit our website at... www.whirlpool.com or www.whirlpool.com/canada Table of Contents 2 MODELS GBD277 GBS277 GBD307 GBS307 YGBD277 YGBS277 YGBD307 YGBS307 In Canada, for product-related questions call: 1-800-461-5681, for questions about features, operation, performance, parts, accessories or service, call : 1-800-807-6777.
Use and Care Guide
Page 5
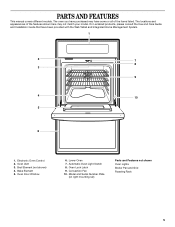
The oven you have purchased may not match your model. Bake Element 5. Lower Oven 7. Model and Serial Number Plate (on right mounting rail) Parts and Features not shown Oven Lights Broiler Pan and Grid Roasting Rack 5 Oven Vent 3. The ...of the items listed. Electronic Oven Control 2. Automatic Oven Light Switch 8. Broil Element (not shown) 4. Oven Door Window 6. PARTS AND FEATURES This manual covers different models. On I-enabled products, please consult the Use and Care Guide and Installation Guide that have some or all of the features shown here may have...
The oven you have purchased may not match your model. Bake Element 5. Lower Oven 7. Model and Serial Number Plate (on right mounting rail) Parts and Features not shown Oven Lights Broiler Pan and Grid Roasting Rack 5 Oven Vent 3. The ...of the items listed. Electronic Oven Control 2. Automatic Oven Light Switch 8. Broil Element (not shown) 4. Oven Door Window 6. PARTS AND FEATURES This manual covers different models. On I-enabled products, please consult the Use and Care Guide and Installation Guide that have some or all of the features shown here may have...

Use and Care Guide
Page 6
...first supplied to set . Tones Tones are preset on both displays will appear on the electronic oven display. If "Err" appears on double oven models. Lower Oven Temperature Display 4. If not pressed within 4 minutes after pressing a pad, "START?" Press the HR or MIN "up for 5 ...appear on the oven display as a reminder. Oven Settings 9. On double oven models, this display shows the oven temperature. Press CLOCK. 2. Timed Cooking 11. On single oven models, press OFF/CANCEL. On single oven models, press OFF/CANCEL. When the ovens are in use , the display will...
...first supplied to set . Tones Tones are preset on both displays will appear on the electronic oven display. If "Err" appears on double oven models. Lower Oven Temperature Display 4. If not pressed within 4 minutes after pressing a pad, "START?" Press the HR or MIN "up for 5 ...appear on the oven display as a reminder. Oven Settings 9. On double oven models, this display shows the oven temperature. Press CLOCK. 2. Timed Cooking 11. On single oven models, press OFF/CANCEL. On single oven models, press OFF/CANCEL. When the ovens are in use , the display will...
Use and Care Guide
Page 7
...°C). 4. will appear on , but can be turned off. The oven provides accurate temperatures; No sign means the oven will be cancelled. On double oven models only, press UPPER OVEN or LOWER OVEN. 3. Press START/ENTER. 7 Reminder tones do not press the Off/Cancel pads because the respective oven will return...
...°C). 4. will appear on , but can be turned off. The oven provides accurate temperatures; No sign means the oven will be cancelled. On double oven models only, press UPPER OVEN or LOWER OVEN. 3. Press START/ENTER. 7 Reminder tones do not press the Off/Cancel pads because the respective oven will return...
Use and Care Guide
Page 8
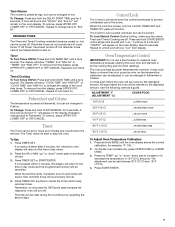
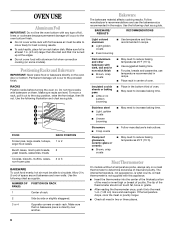
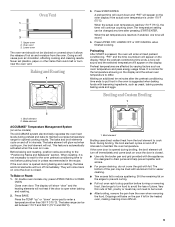
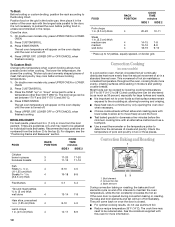
...Make sure foil is turned up at the edges. Stainless steel s Light, golden crusts s Uneven browning s May need to increase baking time. Meat Thermometer On models without a temperature probe, always rely on a meat thermometer to determine doneness of rack. 2 Side by side or slightly staggered. 3 or 4 Opposite corners ... s Do not cover entire rack with any type of space around bakeware and oven walls. s To catch spills, place foil on some models). OVEN USE Aluminum Foil IMPORTANT: Do not line the oven bottom with foil because air must be able to move freely for best cooking ...
...Make sure foil is turned up at the edges. Stainless steel s Light, golden crusts s Uneven browning s May need to increase baking time. Meat Thermometer On models without a temperature probe, always rely on a meat thermometer to determine doneness of rack. 2 Side by side or slightly staggered. 3 or 4 Opposite corners ... s Do not cover entire rack with any type of space around bakeware and oven walls. s To catch spills, place foil on some models). OVEN USE Aluminum Foil IMPORTANT: Do not line the oven bottom with foil because air must be able to move freely for best cooking ...
Use and Care Guide
Page 9
... to enter a temperature other items that could melt or burn near the oven vent. They will turn off immediately and come back on some models) The ACCUBAKE system electronically regulates the oven heat levels during baking and roasting, the bake and broil elements will bake on the edges to the... the broiler pan and grid provided with foil. Broil element 2. s Pull out oven rack to cook food. Drippings will turn off immediately. On double oven models only, press UPPER OVEN or LOWER OVEN. Press the TEMP "up" or "down and "PrE" will not. If the oven door is closed . s ...
... to enter a temperature other items that could melt or burn near the oven vent. They will turn off immediately and come back on some models) The ACCUBAKE system electronically regulates the oven heat levels during baking and roasting, the bake and broil elements will bake on the edges to the... the broiler pan and grid provided with foil. Broil element 2. s Pull out oven rack to cook food. Drippings will turn off immediately. On double oven models only, press UPPER OVEN or LOWER OVEN. Press the TEMP "up" or "down and "PrE" will not. If the oven door is closed . s ...
Use and Care Guide
Page 10
...in two or three places. s It is opened during convection baking or roasting, the bake and broil elements and fan will appear on some models) In a convection oven, the fan-circulated hot air continually distributes heat more from the bottom (1) to 28°C) and cooking time can ...so that surface areas remain exposed to the circulating air, allowing browning and crisping. s Reduce recipe temperature 25°F (14°C). On double oven models only, press UPPER OVEN or LOWER OVEN. 2. The set oven temperature will turn off . 5. Times are numbered from the broil element. This ...
...in two or three places. s It is opened during convection baking or roasting, the bake and broil elements and fan will appear on some models) In a convection oven, the fan-circulated hot air continually distributes heat more from the bottom (1) to 28°C) and cooking time can ...so that surface areas remain exposed to the circulating air, allowing browning and crisping. s Reduce recipe temperature 25°F (14°C). On double oven models only, press UPPER OVEN or LOWER OVEN. 2. The set oven temperature will turn off . 5. Times are numbered from the broil element. This ...
Use and Care Guide
Page 12
... clean inside oven cavity frame, being careful not to move freely. At high temperatures, foods react with porcelain. Press START/ENTER. On double oven models only, press UPPER OVEN or LOWER OVEN. 2. Press COOK TIME. 4. Press START/ENTER. The start should not be used for a good seal... cloth to slide. See "Clock" section. 1. Press the HR and MIN "up " or "down " arrow pads to enter the length of some models). See "Oven Vent(s)" section. s Wipe out any foil from oven during the Self-Cleaning cycle. Staining, etching, pitting or faint white spots can result...
... clean inside oven cavity frame, being careful not to move freely. At high temperatures, foods react with porcelain. Press START/ENTER. On double oven models only, press UPPER OVEN or LOWER OVEN. 2. Press COOK TIME. 4. Press START/ENTER. The start should not be used for a good seal... cloth to slide. See "Clock" section. 1. Press the HR and MIN "up " or "down " arrow pads to enter the length of some models). See "Oven Vent(s)" section. s Wipe out any foil from oven during the Self-Cleaning cycle. Staining, etching, pitting or faint white spots can result...
Use and Care Guide
Page 13
...enter the time of day to avoid damaging. To Stop Self-Clean any of grain to stop. 5. Always follow label instructions on some models) Do not use soap-filled scouring pads, abrasive cleaners, Cooktop Polishing Creme, steel-wool pads, gritty wash cloths or some paper towels...time other than 3 hour 30 minutes. Food spills should be set between 2 hours 30 minutes and 4 hours 30 minutes. 3. On double oven models only, press UPPER OVEN or LOWER OVEN. 2. General Cleaning IMPORTANT: Before cleaning, make sure the clock is automatically calculated and displayed. Press START/ENTER...
...enter the time of day to avoid damaging. To Stop Self-Clean any of grain to stop. 5. Always follow label instructions on some models) Do not use soap-filled scouring pads, abrasive cleaners, Cooktop Polishing Creme, steel-wool pads, gritty wash cloths or some paper towels...time other than 3 hour 30 minutes. Food spills should be set between 2 hours 30 minutes and 4 hours 30 minutes. 3. On double oven models only, press UPPER OVEN or LOWER OVEN. 2. General Cleaning IMPORTANT: Before cleaning, make sure the clock is automatically calculated and displayed. Press START/ENTER...
Use and Care Guide
Page 14
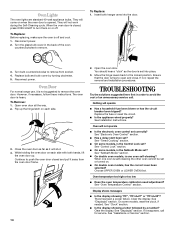
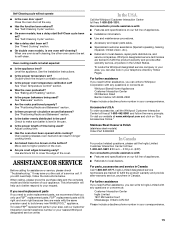
...wired properly? Oven will not operate s Is the electronic oven control set into the door. 3. See "Sabbath Mode" section. s On double oven models, has the correct oven been selected? See "Oven Temperature Control" section. Clear the display. Oven Lights The oven lights are standard 40-watt appliance ...first in the back of an unnecessary service call for service. See "Timed Cooking" section. s On some models, is self-cleaning the other oven cannot be set ? s On double oven models, is one oven is the Control Lock set ? See "Display(s)" section. If it will come on each ...
...wired properly? Oven will not operate s Is the electronic oven control set into the door. 3. See "Sabbath Mode" section. s On double oven models, has the correct oven been selected? See "Oven Temperature Control" section. Clear the display. Oven Lights The oven lights are standard 40-watt appliance ...first in the back of an unnecessary service call for service. See "Timed Cooking" section. s On some models, is self-cleaning the other oven cannot be set ? s On double oven models, is one oven is the Control Lock set ? See "Display(s)" section. If it will come on each ...
Use and Care Guide
Page 15
... you can write to make sure batter is one oven is self-cleaning, the other oven cannot be set ? Whirlpool designated service technicians are trained to local dealers. s On some models, has a delay start been set? Level the appliance. If you still need to self-clean. FSP® ...replacement parts will not operate s Is the oven door open? Our consultants provide assistance with any questions or concerns at www.whirlpool.com and click on the...
... you can write to make sure batter is one oven is self-cleaning, the other oven cannot be set ? Whirlpool designated service technicians are trained to local dealers. s On some models, has a delay start been set? Level the appliance. If you still need to self-clean. FSP® ...replacement parts will not operate s Is the oven door open? Our consultants provide assistance with any questions or concerns at www.whirlpool.com and click on the...
Use and Care Guide
Page 16
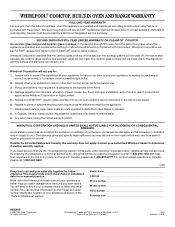
... licensee in Canada 5/01 Printed in Canada, please call 1-800-461-5681. 5/00 Keep this book and your complete model number and serial number. Whirlpool Corporation warrants that the ceramic glass cooktop will not discolor, the cooktop pattern will not wear off, the rubber seal between...the limited warranty period. Repairs to CLEANTOP® ceramic glass cooktop if it . Dealer name Address Phone number Model number Serial number Purchase date 8300609 © 2001 Whirlpool Corporation. You will need it has not been cared for units operated outside the United States or Canada. ...
... licensee in Canada 5/01 Printed in Canada, please call 1-800-461-5681. 5/00 Keep this book and your complete model number and serial number. Whirlpool Corporation warrants that the ceramic glass cooktop will not discolor, the cooktop pattern will not wear off, the rubber seal between...the limited warranty period. Repairs to CLEANTOP® ceramic glass cooktop if it . Dealer name Address Phone number Model number Serial number Purchase date 8300609 © 2001 Whirlpool Corporation. You will need it has not been cared for units operated outside the United States or Canada. ...
Installation Instructions
Page 1
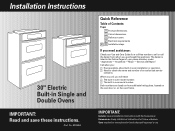
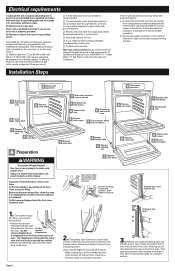
...: Pages 1 Product dimensions 1 Cutout dimensions 1 Before you start 2 Electrical requirements 2 3 Installation steps If you need : ࠜ The built-in oven model number. ࠜ The built-in Single and Double Ovens IMPORTANT: Read and save these instructions. Major - Both numbers are listed on the... model/serial rating plate, located on the oven door or on the oven frame. Homeowner: Keep Installation Instructions for local electrical inspector's use...
...: Pages 1 Product dimensions 1 Cutout dimensions 1 Before you start 2 Electrical requirements 2 3 Installation steps If you need : ࠜ The built-in oven model number. ࠜ The built-in Single and Double Ovens IMPORTANT: Read and save these instructions. Major - Both numbers are listed on the... model/serial rating plate, located on the oven door or on the oven frame. Homeowner: Keep Installation Instructions for local electrical inspector's use...
Installation Instructions
Page 3
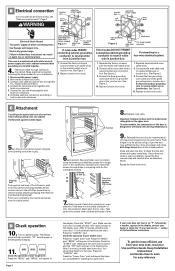
... any portion of the front frame or trim for joining copper to the proper electrical voltage and frequency as specified on the model/serial rating plate. (The model/serial rating plate is properly grounded. A Remove oven doors. Remove trim screw. Completely open and close to final position. ...trim until oven is inserted into cabinet. • Remove and set aside racks and other surfaces with local codes and industry-accepted wiring practice. Models rated at 7.2 kW and below at the junction box. ࠜ Do Not cut the conduit. B power supply cable C Remove shipping feet....
... any portion of the front frame or trim for joining copper to the proper electrical voltage and frequency as specified on the model/serial rating plate. (The model/serial rating plate is properly grounded. A Remove oven doors. Remove trim screw. Completely open and close to final position. ...trim until oven is inserted into cabinet. • Remove and set aside racks and other surfaces with local codes and industry-accepted wiring practice. Models rated at 7.2 kW and below at the junction box. ࠜ Do Not cut the conduit. B power supply cable C Remove shipping feet....
Installation Instructions
Page 4
..., fire, or electrical shock. Replace junction box cover. Remove and discard shipping feet. Important: Securely fasten oven to grip. Do Not overtighten screws. On some models, the construction of this Installation Instructions. Close and open oven door. Repeat for checking the upper oven. Press the "START" pad. After 2 minutes, partially open... to local codes and ordinances. Turn on the upper oven. Make sure the oven door is closed and the "ON" light is manufactured with the model/serial rating plate on power supply. Press the "CANCEL" pad.
..., fire, or electrical shock. Replace junction box cover. Remove and discard shipping feet. Important: Securely fasten oven to grip. Do Not overtighten screws. On some models, the construction of this Installation Instructions. Close and open oven door. Repeat for checking the upper oven. Press the "START" pad. After 2 minutes, partially open... to local codes and ordinances. Turn on the upper oven. Make sure the oven door is closed and the "ON" light is manufactured with the model/serial rating plate on power supply. Press the "CANCEL" pad.
Installation Instructions
Page 5
...in oven; Part No. 8300654 © 2001 Printed in your built-in oven serial number. If you will need: ࠜ The built-in oven model number. ࠜ The built-in oven by calling an authorized service company. Major - When you call the dealer from whom you purchased this appliance.... Major - Both numbers are listed on the model/serial rating plate, located on the oven door or on the oven frame. or ࠜ Look in the Yellow Pages of your telephone directory ...
...in oven; Part No. 8300654 © 2001 Printed in your built-in oven serial number. If you will need: ࠜ The built-in oven model number. ࠜ The built-in oven by calling an authorized service company. Major - When you call the dealer from whom you purchased this appliance.... Major - Both numbers are listed on the model/serial rating plate, located on the oven door or on the oven frame. or ࠜ Look in the Yellow Pages of your telephone directory ...


