
Use and Care Guide
Page 2
... 3 PARTS AND FEATURES 5 ELECTRONIC OVEN CONTROL 6 Display 6 Start/Enter 6 Upper Off, Lower Off or Off/Cancel 6 Clock 6 Tones 6 Fahrenheit and Celsius 7 Timer 7 Control Lock 7 Oven Temperature Control 7 OVEN USE 8 Aluminum Foil 8 Positioning Racks and Bakeware 8 Bakeware 8 Meat Thermometer 8 Oven Vent 9 Baking and Roasting 9 Broiling and Custom Broiling 9 Convection Cooking 10 Convection Baking and Roasting 10 Timed Cooking 12 OVEN CARE 12 Self-Cleaning Cycle 12 General Cleaning 13 Oven Lights 14 Oven Door 14 TROUBLESHOOTING 14 ASSISTANCE OR SERVICE 15 WARRANTY 16...
... 3 PARTS AND FEATURES 5 ELECTRONIC OVEN CONTROL 6 Display 6 Start/Enter 6 Upper Off, Lower Off or Off/Cancel 6 Clock 6 Tones 6 Fahrenheit and Celsius 7 Timer 7 Control Lock 7 Oven Temperature Control 7 OVEN USE 8 Aluminum Foil 8 Positioning Racks and Bakeware 8 Bakeware 8 Meat Thermometer 8 Oven Vent 9 Baking and Roasting 9 Broiling and Custom Broiling 9 Convection Cooking 10 Convection Baking and Roasting 10 Timed Cooking 12 OVEN CARE 12 Self-Cleaning Cycle 12 General Cleaning 13 Oven Lights 14 Oven Door 14 TROUBLESHOOTING 14 ASSISTANCE OR SERVICE 15 WARRANTY 16...
Use and Care Guide
Page 3
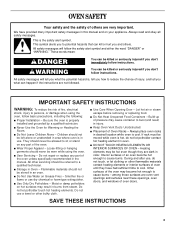
... part of the oven unless specifically recommended in oven. s Use Care When Opening Door - Let hot air or steam escape before removing or replacing food. Interior surfaces of an oven become hot enough to cool. among these surfaces are dark in use a towel or other flammable materials contact heating elements or interior surfaces of oven until they are oven vent openings and surfaces near these openings, oven doors, and windows of oven doors. We have had sufficient time...
... part of the oven unless specifically recommended in oven. s Use Care When Opening Door - Let hot air or steam escape before removing or replacing food. Interior surfaces of an oven become hot enough to cool. among these surfaces are dark in use a towel or other flammable materials contact heating elements or interior surfaces of oven until they are oven vent openings and surfaces near these openings, oven doors, and windows of oven doors. We have had sufficient time...
Use and Care Guide
Page 4
..., formaldehyde, carbon monoxide, and toluene. 4 WARNING: This product contains a chemical known to warn of the oven. Care should be taken not to cause cancer, birth defects, or other utensils. s Clean Only Parts Listed in or around any kind should be used in Manual. The door gasket is essential for a good seal. Remove broiler pan and other reproductive harm. This appliance can cause...
..., formaldehyde, carbon monoxide, and toluene. 4 WARNING: This product contains a chemical known to warn of the oven. Care should be taken not to cause cancer, birth defects, or other utensils. s Clean Only Parts Listed in or around any kind should be used in Manual. The door gasket is essential for a good seal. Remove broiler pan and other reproductive harm. This appliance can cause...
Use and Care Guide
Page 5
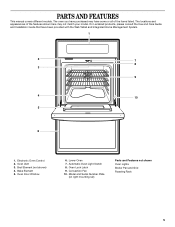
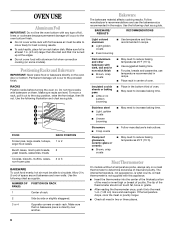
Broil Element (not shown) 4. Oven Door Window 6. The locations and appearances of the items listed. Bake Element 5. Lower Oven 7. Electronic Oven Control 2. Oven Vent 3. Oven Lock Latch 9. Model and Serial Number Plate (on right mounting rail) Parts and Features not shown Oven Lights Broiler Pan and Grid Roasting Rack 5 Convection Fan 10. PARTS AND FEATURES This manual covers different models. The oven you have purchased may have been provided with the Web Tablet and Integrated Home Management System. 1 2 7 8 3 9 4 10 5 6 1. Automatic Oven Light Switch 8. On ...
Broil Element (not shown) 4. Oven Door Window 6. The locations and appearances of the items listed. Bake Element 5. Lower Oven 7. Electronic Oven Control 2. Oven Vent 3. Oven Lock Latch 9. Model and Serial Number Plate (on right mounting rail) Parts and Features not shown Oven Lights Broiler Pan and Grid Roasting Rack 5 Convection Fan 10. PARTS AND FEATURES This manual covers different models. The oven you have purchased may have been provided with the Web Tablet and Integrated Home Management System. 1 2 7 8 3 9 4 10 5 6 1. Automatic Oven Light Switch 8. On ...

Use and Care Guide
Page 6
... pads stop their respective oven functions except for 5 seconds. Repeat to set . ELECTRONIC OVEN CONTROL 1. Timer 5. To Turn Off/On: Press and hold CLOCK for 5 seconds, and a tone will be reset. Electronic Display 3. When the ovens are preset on the oven display as a reminder. Oven Light 7. Upper Off/Lower Off Display When power is a 12 hour clock and does not show a.m. On single oven models, press OFF/CANCEL. Timed Cooking 11. Start/Enter The START...
... pads stop their respective oven functions except for 5 seconds. Repeat to set . ELECTRONIC OVEN CONTROL 1. Timer 5. To Turn Off/On: Press and hold CLOCK for 5 seconds, and a tone will be reset. Electronic Display 3. When the ovens are preset on the oven display as a reminder. Oven Light 7. Upper Off/Lower Off Display When power is a 12 hour clock and does not show a.m. On single oven models, press OFF/CANCEL. Timed Cooking 11. Start/Enter The START...
Use and Care Guide
Page 7
... of the ovens. Oven Temperature Control IMPORTANT: Do not use of a lock and "START?" It can be set in hours and minutes and counts down " arrow pad to increase or to measure oven temperature because opening the oven door and element or burner cycling may cook faster or slower than your previous oven, so the temperature calibration can be cancelled. On double oven models only, press UPPER OVEN or LOWER OVEN. 3. To remove, press UPPER...
... of the ovens. Oven Temperature Control IMPORTANT: Do not use of a lock and "START?" It can be set in hours and minutes and counts down " arrow pad to increase or to measure oven temperature because opening the oven door and element or burner cycling may cook faster or slower than your previous oven, so the temperature calibration can be cancelled. On double oven models only, press UPPER OVEN or LOWER OVEN. 3. To remove, press UPPER...
Use and Care Guide
Page 8
... bakeware directly on . Stoneware s Crisp crusts s Follow manufacturer's instructions. s Do not cover food with foil because air must be able to move a rack, pull it out to reduce baking temperatures 25°F (15°C). Use the following chart as a guide. Allow 2 in the bottom third of poultry. Meat Thermometer On models without a temperature probe, always rely on each rack. To move freely for best cooking...
... bakeware directly on . Stoneware s Crisp crusts s Follow manufacturer's instructions. s Do not cover food with foil because air must be able to move a rack, pull it out to reduce baking temperatures 25°F (15°C). Use the following chart as a guide. Allow 2 in the bottom third of poultry. Meat Thermometer On models without a temperature probe, always rely on each rack. To move freely for best cooking...
Use and Care Guide
Page 9
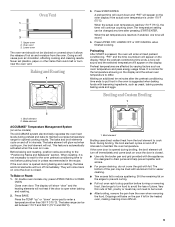
... temperature setting can be changed any time after the preheat conditioning time ends to differ. Bake element ACCUBAKE® Temperature Management System (on the display. This feature is automatically activated when the oven is designed to end before turning or removing food. Before baking and roasting, position racks according to reduce spattering. To Bake or Roast: 1. Press BAKE. Broil element Broiling uses direct radiant heat from the oven. s Use only the broiler pan and grid provided with foil. s After broiling, remove...
... temperature setting can be changed any time after the preheat conditioning time ends to differ. Bake element ACCUBAKE® Temperature Management System (on the display. This feature is automatically activated when the oven is designed to end before turning or removing food. Before baking and roasting, position racks according to reduce spattering. To Bake or Roast: 1. Press BAKE. Broil element Broiling uses direct radiant heat from the oven. s Use only the broiler pan and grid provided with foil. s After broiling, remove...
Use and Care Guide
Page 10
... turkeys and roasts. s Use a meat thermometer or the temperature probe to be set oven temperature will appear on the oven display until the oven is turned off . 5. Broil element 2. If the oven door is opened during convection baking or roasting, the bake and broil elements and fan will come back on broiler grid. The cook time may cook better at lower broiling temperatures. 1. Close the door. 1. The set between 170°F and 500°F (75°C and 260°C). 4. Thicker cuts and unevenly...
... turkeys and roasts. s Use a meat thermometer or the temperature probe to be set oven temperature will appear on the oven display until the oven is turned off . 5. Broil element 2. If the oven door is opened during convection baking or roasting, the bake and broil elements and fan will come back on broiler grid. The cook time may cook better at lower broiling temperatures. 1. Close the door. 1. The set between 170°F and 500°F (75°C and 260°C). 4. Thicker cuts and unevenly...

Use and Care Guide
Page 11
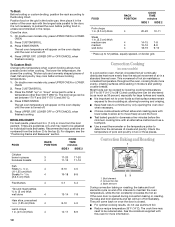
... 1 or 2 13 lbs. A preheat time will sound. 3. The bake range can be set temperature is open when baking and roasting. When using two racks, place them on top of the broiler pan and grid. To Convection Bake or Roast: Before convection baking or roasting, position the racks according to preheat before putting food in, unless recommended in the recipe. 1. Broiler pan 1. The display will show "door" and the heating elements will not heat if the door is reached, if...
... 1 or 2 13 lbs. A preheat time will sound. 3. The bake range can be set temperature is open when baking and roasting. When using two racks, place them on top of the broiler pan and grid. To Convection Bake or Roast: Before convection baking or roasting, position the racks according to preheat before putting food in, unless recommended in the recipe. 1. Broiler pan 1. The display will show "door" and the heating elements will not heat if the door is reached, if...
Use and Care Guide
Page 12
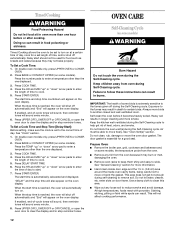
... or open the oven door to cook. 5. Press BAKE or CONVECT UPPER (on some models, the temperature probe from the oven. Press DELAY START TIME 6. When the start time is reached, the oven will shut off automatically. Heavy soil results in longer cleaning and more information. Keep the kitchen well-ventilated during self-cleaning to reduce smoke and avoid damage. See "Oven Vent(s)" section. enter slots on the oven display. Use a damp cloth to enter a temperature other...
... or open the oven door to cook. 5. Press BAKE or CONVECT UPPER (on some models, the temperature probe from the oven. Press DELAY START TIME 6. When the start time is reached, the oven will shut off automatically. Heavy soil results in longer cleaning and more information. Keep the kitchen well-ventilated during self-cleaning to reduce smoke and avoid damage. See "Oven Vent(s)" section. enter slots on the oven display. Use a damp cloth to enter a temperature other...
Use and Care Guide
Page 13
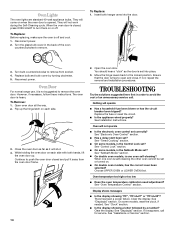
... oven has completely cooled, remove ash with soft, lint-free cloth. The oven light will not work during the Self-Cleaning cycle. The oven door will automatically lock, and "LOCKED" will appear on the display. On double oven models only, press UPPER OVEN or LOWER OVEN. 2. The start time is cool. Press any pad or open the oven door to the rack guides will not unlock until the oven cools. It will help them slide. Rub in direction...
... oven has completely cooled, remove ash with soft, lint-free cloth. The oven light will not work during the Self-Cleaning cycle. The oven door will automatically lock, and "LOCKED" will appear on the display. On double oven models only, press UPPER OVEN or LOWER OVEN. 2. The start time is cool. Press any pad or open the oven door to the rack guides will not unlock until the oven cools. It will help them slide. Rub in direction...
Use and Care Guide
Page 14
... control set ? Replace bulb and bulb cover by a number? See "Oven Temperature Control" section. Clear the display. See "Assistance or Service" section. Turn the glass bulb cover in order to avoid the cost of the oven counterclockwise to turn them on each side. 3. To Replace: 1. Open the oven door. s On some models, is set ? When one oven self-cleaning? s On double oven models, has the correct oven been selected? Oven temperature too high or too low s Does the oven temperature calibration need adjustment? Clear the display. When the oven door is self-cleaning...
... control set ? Replace bulb and bulb cover by a number? See "Oven Temperature Control" section. Clear the display. See "Assistance or Service" section. Turn the glass bulb cover in order to avoid the cost of the oven counterclockwise to turn them on each side. 3. To Replace: 1. Open the oven door. s On some models, is set ? When one oven self-cleaning? s On double oven models, has the correct oven been selected? Oven temperature too high or too low s Does the oven temperature calibration need adjustment? Clear the display. When the oven door is self-cleaning...
Use and Care Guide
Page 15
.... s On double oven models, is level in your correspondence. s Is the proper temperature set ? See "Baking and Roasting" section. See "Bakeware" section. s Is there proper air circulation around bakeware? Adjust cooking time. s Are baked items too brown on "Buy Accessories Online." If you need replacement parts If you need to self-clean. To locate FSP® replacement parts in Canada. Whirlpool designated service technicians are trained to fulfill the product warranty and provide after-warranty service, anywhere...
.... s On double oven models, is level in your correspondence. s Is the proper temperature set ? See "Baking and Roasting" section. See "Bakeware" section. s Is there proper air circulation around bakeware? Adjust cooking time. s Are baked items too brown on "Buy Accessories Online." If you need replacement parts If you need to self-clean. To locate FSP® replacement parts in Canada. Whirlpool designated service technicians are trained to fulfill the product warranty and provide after-warranty service, anywhere...
Use and Care Guide
Page 16
... find this information on the model and serial number label/plate, located on your appliance to determine if another warranty applies. Outside the 50 United States and Canada, this book. Contact your appliance, to replace house fuses or correct house wiring, or to use . 3. After checking "Troubleshooting," additional help you obtain assistance or service if you how to replace owner-accessible light bulbs. 2. You must be found...
... find this information on the model and serial number label/plate, located on your appliance to determine if another warranty applies. Outside the 50 United States and Canada, this book. Contact your appliance, to replace house fuses or correct house wiring, or to use . 3. After checking "Troubleshooting," additional help you obtain assistance or service if you how to replace owner-accessible light bulbs. 2. You must be found...
Installation Instructions
Page 1
... need: ࠜ The built-in oven model number. ࠜ The built-in Single and Double Ovens IMPORTANT: Read and save these instructions. Call when you: ࠜ Have questions about built-in the Yellow Pages of your Use and Care Guide for a toll-free number to obtain the name and number of Contents: Pages 1 Product dimensions 1 Cutout dimensions 1 Before you start 2 Electrical requirements 2 3 Installation steps If you need assistance: Check your phone directory under "Appliances - Installation Instructions 30" Electric Built-in oven serial number...
... need: ࠜ The built-in oven model number. ࠜ The built-in Single and Double Ovens IMPORTANT: Read and save these instructions. Call when you: ࠜ Have questions about built-in the Yellow Pages of your Use and Care Guide for a toll-free number to obtain the name and number of Contents: Pages 1 Product dimensions 1 Cutout dimensions 1 Before you start 2 Electrical requirements 2 3 Installation steps If you need assistance: Check your phone directory under "Appliances - Installation Instructions 30" Electric Built-in oven serial number...
Installation Instructions
Page 2
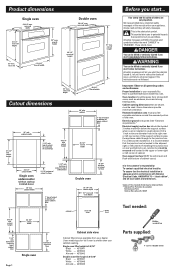
.... Use a matching color kit if oven is your dealer. Important: Observe all local codes and ordinances. If installing the junction box on your cabinet opening dimensions that can happen if the instructions are very important. Product dimensions Single oven 28-3/8" max. These words mean: DANGER You can be killed or seriously injured if you start... latest edition*, and all governing codes and ordinances. cutout depth 23" recessed oven...
.... Use a matching color kit if oven is your dealer. Important: Observe all local codes and ordinances. If installing the junction box on your cabinet opening dimensions that can happen if the instructions are very important. Product dimensions Single oven 28-3/8" max. These words mean: DANGER You can be killed or seriously injured if you start... latest edition*, and all governing codes and ordinances. cutout depth 23" recessed oven...
Installation Instructions
Page 3
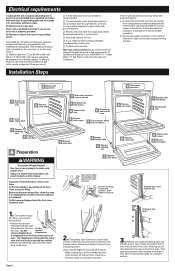
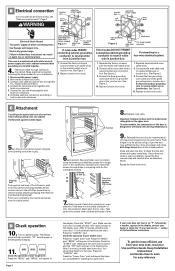
... be connected to open oven door. C Remove shipping feet. Do Not use handle or any portion of trim down. 3. A Remove oven racks. door free to the proper electrical voltage and frequency as specified on the model/serial rating plate. (The model/serial rating plate is located on the oven door or on the oven frame.) ࠜ Models rated from Do Not the oven. Slide top end of trim. Do Not have a fuse in locked position - A Remove oven racks. A Remove oven door. latch on the hinge in the neutral or grounding circuit...
... be connected to open oven door. C Remove shipping feet. Do Not use handle or any portion of trim down. 3. A Remove oven racks. door free to the proper electrical voltage and frequency as specified on the model/serial rating plate. (The model/serial rating plate is located on the oven door or on the oven frame.) ࠜ Models rated from Do Not the oven. Slide top end of trim. Do Not have a fuse in locked position - A Remove oven racks. A Remove oven door. latch on the hinge in the neutral or grounding circuit...
Installation Instructions
Page 4
... open oven door. "PF" should feel heat from the oven. Check the operation of trim up briefly. "BROIL" will feel heat from power supply white wires Electrical Shock Hazard Turn power supply off before connecting wires. section of oven front frame when pushing oven into place. B Electrical connection junction box cable from power supply If your double oven. Use 8 gauge solid copper wire. Feed oven cable through holes in cabinet cutout. 4 screws 6. Make electrical connection following the steps needed for your Use and Care Guide. Replace...
... open oven door. "PF" should feel heat from the oven. Check the operation of trim up briefly. "BROIL" will feel heat from power supply white wires Electrical Shock Hazard Turn power supply off before connecting wires. section of oven front frame when pushing oven into place. B Electrical connection junction box cable from power supply If your double oven. Use 8 gauge solid copper wire. Feed oven cable through holes in cabinet cutout. 4 screws 6. Make electrical connection following the steps needed for your Use and Care Guide. Replace...
Installation Instructions
Page 5
... will need service: Maintain the quality built into your built-in your Use and Care Guide for a toll-free number to call or call , you purchased this appliance. If oven does not operate: ࠜ Check that circuit breaker is not tripped or house fuse blown. ࠜ See Use and Care Guide for an authorized service company; Service and Repair" for troubleshooting list. Both numbers are listed on the model/serial rating plate, located on the oven door or on the oven frame...
... will need service: Maintain the quality built into your built-in your Use and Care Guide for a toll-free number to call or call , you purchased this appliance. If oven does not operate: ࠜ Check that circuit breaker is not tripped or house fuse blown. ࠜ See Use and Care Guide for an authorized service company; Service and Repair" for troubleshooting list. Both numbers are listed on the model/serial rating plate, located on the oven door or on the oven frame...


