
User Manual
Page 5
...: HDTV Connections Inserting Remote Control Batteries -Precautions Remote Control Features 3. PRODUCT SAFETY Important Notice Concerning Power Cord Selection FCC Compliance Statement Product Safety Instructions -Other Notices Antenna Installation Safety -Outdoor Antenna Grounding -Lightning -Power Lines 2. English CONTENTS WELCOME Package Contents Contacting Westinghouse Digital 1. HDTV/ACCESSORY SETUP Connecting Your HDTV -Power -Choose Your TV Source -Determining Available...
...: HDTV Connections Inserting Remote Control Batteries -Precautions Remote Control Features 3. PRODUCT SAFETY Important Notice Concerning Power Cord Selection FCC Compliance Statement Product Safety Instructions -Other Notices Antenna Installation Safety -Outdoor Antenna Grounding -Lightning -Power Lines 2. English CONTENTS WELCOME Package Contents Contacting Westinghouse Digital 1. HDTV/ACCESSORY SETUP Connecting Your HDTV -Power -Choose Your TV Source -Determining Available...
User Manual
Page 7
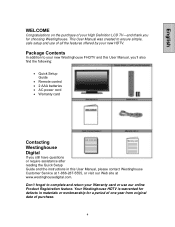
... Guide • Remote control • 2 AAA batteries • AC power cord • Warranty card Contacting Westinghouse Digital If you for a period of one year from original date of all the features offered by your new Westinghouse FHDTV and this User Manual, please contact Westinghouse Customer Service at ...your Warranty card or use of purchase. 4 Don't forget to complete and return your High Definition LCD TV-and thank you still have questions or require assistance after reading the Quick Setup Guide and the instructions in materials or workmanship for choosing Westinghouse.
... Guide • Remote control • 2 AAA batteries • AC power cord • Warranty card Contacting Westinghouse Digital If you for a period of one year from original date of all the features offered by your new Westinghouse FHDTV and this User Manual, please contact Westinghouse Customer Service at ...your Warranty card or use of purchase. 4 Don't forget to complete and return your High Definition LCD TV-and thank you still have questions or require assistance after reading the Quick Setup Guide and the instructions in materials or workmanship for choosing Westinghouse.

User Manual
Page 11
... SAFETY Follow and obey all servicing to rain or moisture and does not operate normally, or it off and contact the Westinghouse Service Center. 8 Never use attachments/accessories specified by the manufacturer. • Avoid touching the screen. consult an electrician for...• If the High Definition LCD TV emits smoke, abnormal noise, or a strange odor, immediately turn it has been dropped. Refer all warnings and instructions marked on or pinched, particularly at plugs, convenience receptacles and the point where they exit from the remote control. • Only use your ...
... SAFETY Follow and obey all servicing to rain or moisture and does not operate normally, or it off and contact the Westinghouse Service Center. 8 Never use attachments/accessories specified by the manufacturer. • Avoid touching the screen. consult an electrician for...• If the High Definition LCD TV emits smoke, abnormal noise, or a strange odor, immediately turn it has been dropped. Refer all warnings and instructions marked on or pinched, particularly at plugs, convenience receptacles and the point where they exit from the remote control. • Only use your ...
User Manual
Page 16
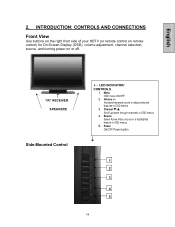
... up/down through channels or OSD menus 4. Volume +/- Power ON/OFF Power button ↓ 1 2 3 4 5 14 English 2. INTRODUCTION: CONTROLS AND CONNECTIONS Front View Use buttons on the right front side of your HDTV (or remote control on remote control) for On Screen Display (OSD), volume adjustment, channel selection, source, and turning power on or off. ↑...
... up/down through channels or OSD menus 4. Volume +/- Power ON/OFF Power button ↓ 1 2 3 4 5 14 English 2. INTRODUCTION: CONTROLS AND CONNECTIONS Front View Use buttons on the right front side of your HDTV (or remote control on remote control) for On Screen Display (OSD), volume adjustment, channel selection, source, and turning power on or off. ↑...

User Manual
Page 17
..., cable/satellite receiver or personal computer; 10 for analog Audio use, select Audio menu in On Screen Display (OSD) and use remote's left/right arrows to change HDMI to power source via supplied power cord See pages19 for FW updated and Maintenance 6. AC-IN ... 7. AV Video/Audio (Right/Left) Connect an external video device like a VCR (Audio 5 Right/Left supports S-Video or AV input) 4. INTRODUCTION: CONTROLS AND CONNECTIONS Rear Right/Left Spine-Mounted Connectors RIGHT SIDE CONNECTORS 1 2 1. Audio Out (Right/Left) 13 Connect an external audio amplifier 13. S-Video ...
..., cable/satellite receiver or personal computer; 10 for analog Audio use, select Audio menu in On Screen Display (OSD) and use remote's left/right arrows to change HDMI to power source via supplied power cord See pages19 for FW updated and Maintenance 6. AC-IN ... 7. AV Video/Audio (Right/Left) Connect an external video device like a VCR (Audio 5 Right/Left supports S-Video or AV input) 4. INTRODUCTION: CONTROLS AND CONNECTIONS Rear Right/Left Spine-Mounted Connectors RIGHT SIDE CONNECTORS 1 2 1. Audio Out (Right/Left) 13 Connect an external audio amplifier 13. S-Video ...
User Manual
Page 19
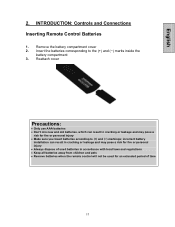
...; Always dispose of used batteries in cracking or leakage and may pose a risk for an extended period of time 17 INTRODUCTION: Controls and Connections Inserting Remote Control Batteries 1. Reattach cover Precautions: • Only use AAA batteries • Don't mix new and old batteries, which can result... in accordance with local laws and regulations • Keep all batteries away from children and pets • Remove batteries when the remote control will not be used for fire or personal injury • Make sure you Insert batteries according to the (+) and (−) marks ...
...; Always dispose of used batteries in cracking or leakage and may pose a risk for an extended period of time 17 INTRODUCTION: Controls and Connections Inserting Remote Control Batteries 1. Reattach cover Precautions: • Only use AAA batteries • Don't mix new and old batteries, which can result... in accordance with local laws and regulations • Keep all batteries away from children and pets • Remove batteries when the remote control will not be used for fire or personal injury • Make sure you Insert batteries according to the (+) and (−) marks ...
User Manual
Page 20
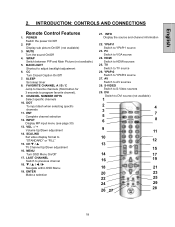
... source 23. YPbPr1 Switch to "STANDARD" or "FILL" 15. LAST CHANNEL Switch to TV source 26. TV Switch to previous channel 18. YPbPr2 Switch to VGA source 24. INTRODUCTION: CONTROLS AND CONNECTIONS Remote Control Features 1. POWER Switch the power On/Off 2. MUTE Turn the sound On/Off 4. ...CH T / S TV Channel Up/Down adjustment 16. PC Switch to YPbPr2 source 27. BACKLIGHT Shortcut to HDMI ...
... source 23. YPbPr1 Switch to "STANDARD" or "FILL" 15. LAST CHANNEL Switch to TV source 26. TV Switch to previous channel 18. YPbPr2 Switch to VGA source 24. INTRODUCTION: CONTROLS AND CONNECTIONS Remote Control Features 1. POWER Switch the power On/Off 2. MUTE Turn the sound On/Off 4. ...CH T / S TV Channel Up/Down adjustment 16. PC Switch to YPbPr2 source 27. BACKLIGHT Shortcut to HDMI ...
User Manual
Page 21
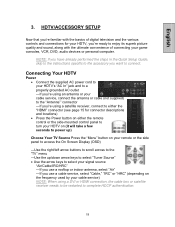
... descriptions and locations) • Press the Power button on either the remote control or the side-mounted control panel to turn your HDTV on (it will take a few seconds to power up) Choose Your TV Source Press the "Menu" button on your remote or the side panel to access the On Screen Display (OSD) -Use... the right/left arrow buttons to scroll across to the "TV" menu -Use...
... descriptions and locations) • Press the Power button on either the remote control or the side-mounted control panel to turn your HDTV on (it will take a few seconds to power up) Choose Your TV Source Press the "Menu" button on your remote or the side panel to access the On Screen Display (OSD) -Use... the right/left arrow buttons to scroll across to the "TV" menu -Use...
User Manual
Page 25
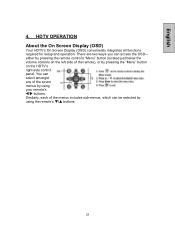
... remote control's "Menu" button (located just below the volume controls on the HDTV's right-side control panel. You can select amongst any of the menus includes sub-menus, which can access the OSD- Similarly, each of the seven menus by pressing the "Menu" button on the left side of the remote), or by using the remote...
... remote control's "Menu" button (located just below the volume controls on the HDTV's right-side control panel. You can select amongst any of the menus includes sub-menus, which can access the OSD- Similarly, each of the seven menus by pressing the "Menu" button on the left side of the remote), or by using the remote...

User Manual
Page 35
... Equalizer Adjustment Descriptions Enables to listen to Audio only, the picture (Backlight) will be turned off and can be reactivate with any button of the Remote Control Choose from three different MTS (Multi-Channel Television Sound) settings: • Mono • Stereo • SAP Enables language selection for digital channels Turn audio on...
... Equalizer Adjustment Descriptions Enables to listen to Audio only, the picture (Backlight) will be turned off and can be reactivate with any button of the Remote Control Choose from three different MTS (Multi-Channel Television Sound) settings: • Mono • Stereo • SAP Enables language selection for digital channels Turn audio on...
User Manual
Page 43
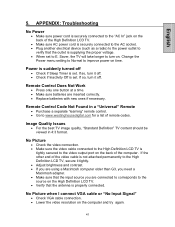
... • For the best TV image quality, "Standard Definition" TV content should be viewed in a "Universal" Remote • Purchase a separate "learning" remote control. • Go to the video output port on . Power is suddenly turned off • Check if Sleep Timer is set. If the other end of the High Definition LCD TV. • Make sure AC...
... • For the best TV image quality, "Standard Definition" TV content should be viewed in a "Universal" Remote • Purchase a separate "learning" remote control. • Go to the video output port on . Power is suddenly turned off • Check if Sleep Timer is set. If the other end of the High Definition LCD TV. • Make sure AC...
User Manual
Page 44
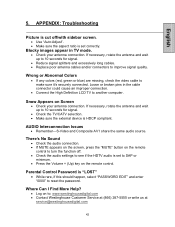
...the password. Snow Appears on to SAP or minimum. • Press the Volume + (Up) key on the remote control. Parental Control Password is set correctly. Where Can I Find More Help? • Log on Screen • Check your ... to 10 seconds for signal. • Check the TV/CATV selection. • Make sure the external device is set to : www.westinghousedigital.com • Contact Westinghouse Customer Service at (866) 287-5555 or write us... cause an improper connection. • Connect the High Definition LCD TV to make sure it's securely connected. Loose or broken pins in...
...the password. Snow Appears on to SAP or minimum. • Press the Volume + (Up) key on the remote control. Parental Control Password is set correctly. Where Can I Find More Help? • Log on Screen • Check your ... to 10 seconds for signal. • Check the TV/CATV selection. • Make sure the external device is set to : www.westinghousedigital.com • Contact Westinghouse Customer Service at (866) 287-5555 or write us... cause an improper connection. • Connect the High Definition LCD TV to make sure it's securely connected. Loose or broken pins in...


