
User Manual
Page 3
... and objects filled with care when moving it. • Place your LCD TV away from direct sunlight to protect it off and contact the Westinghouse Service Center. • WARNING - Your LCD TV contains high-voltage parts. To Reduce The Risk Of Fire Or Electric Shock..., Do Not Expose The LCD TV To Rain Or Moisture! English PRODUCT SAFETY INSTRUCTIONS Follow and obey all the safety and operating instructions before you touch them . Power Cord Protection Power...
... and objects filled with care when moving it. • Place your LCD TV away from direct sunlight to protect it off and contact the Westinghouse Service Center. • WARNING - Your LCD TV contains high-voltage parts. To Reduce The Risk Of Fire Or Electric Shock..., Do Not Expose The LCD TV To Rain Or Moisture! English PRODUCT SAFETY INSTRUCTIONS Follow and obey all the safety and operating instructions before you touch them . Power Cord Protection Power...

User Manual
Page 4
...unplug it from being used for replacement of the obsolete outlet. 10) Protect the power cord from the wall outlet and disconnect the antenna or cable system. This will prevent damage to the LCD TV due to prevent voltage surges and built-up static charges. lightning may strike while ...English Antenna Installation Safety Outdoor Antenna Grounding If an outside antenna or cable system is connected to the LCD TV, be sure the antenna or cable system is grounded to lightning and power-line surges. Article 810 of the National Electrical Code, ANS/NFPA 70, provides information on or pinched...
...unplug it from being used for replacement of the obsolete outlet. 10) Protect the power cord from the wall outlet and disconnect the antenna or cable system. This will prevent damage to the LCD TV due to prevent voltage surges and built-up static charges. lightning may strike while ...English Antenna Installation Safety Outdoor Antenna Grounding If an outside antenna or cable system is connected to the LCD TV, be sure the antenna or cable system is grounded to lightning and power-line surges. Article 810 of the National Electrical Code, ANS/NFPA 70, provides information on or pinched...

User Manual
Page 5
... Japan Electric Appliance Control Act IMPORTANT NOTICE CONCERNING POWER CORD SELECTION The specific power cord for assistance. For LCD TVs that to radio or television reception, which the receiver is not enclosed. The cord set is connected. • Consult the Westinghouse Service Center or an experienced radio/TV technician for this device. 3 This equipment generates, uses...
... Japan Electric Appliance Control Act IMPORTANT NOTICE CONCERNING POWER CORD SELECTION The specific power cord for assistance. For LCD TVs that to radio or television reception, which the receiver is not enclosed. The cord set is connected. • Consult the Westinghouse Service Center or an experienced radio/TV technician for this device. 3 This equipment generates, uses...
User Manual
Page 7
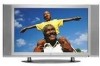
Headphone Jack. 5 AV Video Input Connect the Composite Video to this jack (Audio (R/L). D. English INSTALLATION Package Content Your product package includes: • 30" LCD TV • Remote Control (with batteries) • Power Cord • Quick Connect Guide • User's Manual • Component Video Cable (Green, Red, Blue) • Audio Cable (Red, White) Side View of the LCD TV A. B/C. Inputs support either S-Video or AV input). Audio Input (Left / Right) Connect an external audio to an external video device such as VCR, DVD or Video Game.
Headphone Jack. 5 AV Video Input Connect the Composite Video to this jack (Audio (R/L). D. English INSTALLATION Package Content Your product package includes: • 30" LCD TV • Remote Control (with batteries) • Power Cord • Quick Connect Guide • User's Manual • Component Video Cable (Green, Red, Blue) • Audio Cable (Red, White) Side View of the LCD TV A. B/C. Inputs support either S-Video or AV input). Audio Input (Left / Right) Connect an external audio to an external video device such as VCR, DVD or Video Game.
User Manual
Page 8
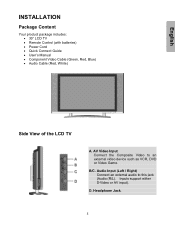
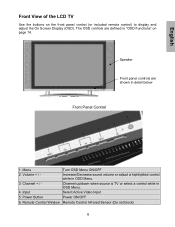
...sound volume or adjust a highlighted control while in OSD Menu. 4. Channel up/down when source is TV or select a control while in OSD Menu. 3. Power Button Power ON/OFF 6. Remote Control Window Remote Control Infrared Sensor (Do not block) 6 Speaker Front panel ...controls are defined in detail below Front Panel Control 1. Volume + / - Input Select Active Video Input 5. Channel + / - Menu Turn OSD Menu ON/OFF 2. English Front View of the LCD TV...
...sound volume or adjust a highlighted control while in OSD Menu. 4. Channel up/down when source is TV or select a control while in OSD Menu. 3. Power Button Power ON/OFF 6. Remote Control Window Remote Control Infrared Sensor (Do not block) 6 Speaker Front panel ...controls are defined in detail below Front Panel Control 1. Volume + / - Input Select Active Video Input 5. Channel + / - Menu Turn OSD Menu ON/OFF 2. English Front View of the LCD TV...

User Manual
Page 9
English Rear View of the LCD TV A. G. K. Audio Output (Right / Left) Connect an external audio source to this jack. Inputs support either S-Video or AV input. H. J. M. F. TV Input (RF-input) Connect to an external video device such as VCR, DVD and video game system. E. YPbPr1 Audio 1 Input (Right ... AV Audio Input (Right / Left) Connect an external audio source to the Audio out (Green) on your PC. N. AC IN (Power) Connect the power cord from AC IN to an external video device such as VCR, DVD or video game system D. AV Video Input Connect the Composite Video...
English Rear View of the LCD TV A. G. K. Audio Output (Right / Left) Connect an external audio source to this jack. Inputs support either S-Video or AV input. H. J. M. F. TV Input (RF-input) Connect to an external video device such as VCR, DVD and video game system. E. YPbPr1 Audio 1 Input (Right ... AV Audio Input (Right / Left) Connect an external audio source to the Audio out (Green) on your PC. N. AC IN (Power) Connect the power cord from AC IN to an external video device such as VCR, DVD or video game system D. AV Video Input Connect the Composite Video...

User Manual
Page 10
...8. INFO Display the source and channel information 11. S-Video Select S-Video source input 19. CH -/+ TV Channel Up/Down adjustment 15. PC Select VGA / DVI source input 17. LAST CH Switch to 23.... AV Select AV1 / AV2 source input 8 English Remote Control The Remote Control will transmit to the LCD TV up to previous channel 5. VOL -/+ Volume Up/Down adjustment 14. YPbPr Select YPbPr1 / YPbPr2 source ...INPUT Select input source 3. FREEZE Freeze main screen 13. TV Select TV source input 18. CHANNEL NUMBER KEYS Select specific channels 4. SCALING Select Video Display format "STANDARD", ...
...8. INFO Display the source and channel information 11. S-Video Select S-Video source input 19. CH -/+ TV Channel Up/Down adjustment 15. PC Select VGA / DVI source input 17. LAST CH Switch to 23.... AV Select AV1 / AV2 source input 8 English Remote Control The Remote Control will transmit to the LCD TV up to previous channel 5. VOL -/+ Volume Up/Down adjustment 14. YPbPr Select YPbPr1 / YPbPr2 source ...INPUT Select input source 3. FREEZE Freeze main screen 13. TV Select TV source input 18. CHANNEL NUMBER KEYS Select specific channels 4. SCALING Select Video Display format "STANDARD", ...

User Manual
Page 13
...source for questions on how to a properly grounded AC outlet. 5. Turn Power On Press the Power ON button on the front of the LCD TV, or press the Power ON (Red) button on TV Inputs: See page 17 to configure and allow the LCD TV to Antenna, Cable or other RF source on the remote control. 6.... If connecting to a PC (RGB/DVI): For the best picture quality, set this timing mode). 11 English 4. Connect power cables Connect the power cord to the LCD TV then to set LCD TV timing mode to VESA 1280x768 at 60Hz (refer to the graphic card's user guide for...
...source for questions on how to a properly grounded AC outlet. 5. Turn Power On Press the Power ON button on the front of the LCD TV, or press the Power ON (Red) button on TV Inputs: See page 17 to configure and allow the LCD TV to Antenna, Cable or other RF source on the remote control. 6.... If connecting to a PC (RGB/DVI): For the best picture quality, set this timing mode). 11 English 4. Connect power cables Connect the power cord to the LCD TV then to set LCD TV timing mode to VESA 1280x768 at 60Hz (refer to the graphic card's user guide for...

User Manual
Page 22
... WXGA LCD, 1280*768 vertical stripe Anti-reflective coating + Anti-glare coating Viewing Angles 170° (H) / 170° (V) Input Signal Video/Audio RGB Analog * 1 (75 ohms, 0.7 Vp-p)/Mini-Stereo *1 H/V separated (TTL) for PC DVI-D * 1 (HDCP support) / RCA (L/R) * 1 fh: 30-80 kHz, fv: 50-75 Hz TV system antenna...x 600 @ 60, 75 Hz 640 x 480 @ 60, 75 Hz 720 x 400 @ 70 Hz Recommended 1280 x 768 @ 60Hz Speaker Output 9W (x2 Channels) Power Voltage 100-240 VAC, 50/60 Hz (auto switch), 0.8A/1.8A Operating Conditions Temperature 0° C to + 35° C (32° F to + 95°...
... WXGA LCD, 1280*768 vertical stripe Anti-reflective coating + Anti-glare coating Viewing Angles 170° (H) / 170° (V) Input Signal Video/Audio RGB Analog * 1 (75 ohms, 0.7 Vp-p)/Mini-Stereo *1 H/V separated (TTL) for PC DVI-D * 1 (HDCP support) / RCA (L/R) * 1 fh: 30-80 kHz, fv: 50-75 Hz TV system antenna...x 600 @ 60, 75 Hz 640 x 480 @ 60, 75 Hz 720 x 400 @ 70 Hz Recommended 1280 x 768 @ 60Hz Speaker Output 9W (x2 Channels) Power Voltage 100-240 VAC, 50/60 Hz (auto switch), 0.8A/1.8A Operating Conditions Temperature 0° C to + 35° C (32° F to + 95°...

User Manual
Page 23
... on the back of the video cable is not attached permanently to the LCD TV, secure it is connected securely. Power is ON but No Screen Image • Make sure the video cable connected to the LCD TV is tightly secured to the video output port on Screen • Check your... antenna connection. • Check the TV / CATV selection. English Troubleshooting No Power • Make sure power button is ON (Blue LED). • Make sure...
... on the back of the video cable is not attached permanently to the LCD TV, secure it is connected securely. Power is ON but No Screen Image • Make sure the video cable connected to the LCD TV is tightly secured to the video output port on Screen • Check your... antenna connection. • Check the TV / CATV selection. English Troubleshooting No Power • Make sure power button is ON (Blue LED). • Make sure...

