User Manual
Page 2
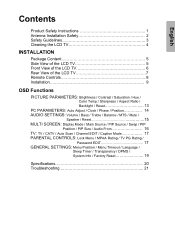
... the LCD TV 5 Front View of the LCD TV 6 Rear View of the LCD TV 7 Remote Controls 8 Installation 9 OSD Functions PICTURE PARAMETERS: Brightness / Contrast / Saturation / Hue / Color Temp / Sharpness / Aspect Ratio / Backlight / Reset 13 PC PARAMETERS: Auto Adjust / Clock / Phase / Position 14 AUDIO SETTINGS: Volume / Bass / Treble / Balance / MTS / Mute / Speaker / Reset 15 MULTI SCREEN: Display Mode / Main Source / PIP Source / Swap / PIP Position / PIP Size / Audio From 16 TV: TV / CATV / Auto Scan / Channel EDIT / Caption Mode 17 PARENTAL CONTROLS: Lock Menu / MPAA Rating / TV PG...
... the LCD TV 5 Front View of the LCD TV 6 Rear View of the LCD TV 7 Remote Controls 8 Installation 9 OSD Functions PICTURE PARAMETERS: Brightness / Contrast / Saturation / Hue / Color Temp / Sharpness / Aspect Ratio / Backlight / Reset 13 PC PARAMETERS: Auto Adjust / Clock / Phase / Position 14 AUDIO SETTINGS: Volume / Bass / Treble / Balance / MTS / Mute / Speaker / Reset 15 MULTI SCREEN: Display Mode / Main Source / PIP Source / Swap / PIP Position / PIP Size / Audio From 16 TV: TV / CATV / Auto Scan / Channel EDIT / Caption Mode 17 PARENTAL CONTROLS: Lock Menu / MPAA Rating / TV PG...

User Manual
Page 3
... remove the rear cover. The LCD TV shall not be exposed to direct sunlight or another heat source. Orient your LCD TV away from the remote control Precautions • Avoid touching the screen. For your safety, please read all warnings and instructions marked on the LCD TV. This can result in airtight compartments. The LCD TV shall be readily accessible. Your LCD TV contains high-voltage parts. Power Cord Protection Power supply cords should...
... remove the rear cover. The LCD TV shall not be exposed to direct sunlight or another heat source. Orient your LCD TV away from the remote control Precautions • Avoid touching the screen. For your safety, please read all warnings and instructions marked on the LCD TV. This can result in airtight compartments. The LCD TV shall be readily accessible. Your LCD TV contains high-voltage parts. Power Cord Protection Power supply cords should...

User Manual
Page 4
..., stand, tripod, bracket, or table specified by the manufacturer, or sold with the manufacturer's instructions. 8) Do not install near water. 6) Clean only with one wider than the other electric light or power circuits. Lightning For added protection for the LCD TV during a heavy storm - Turn off your wall outlet, consult an electrician for replacement of the obsolete outlet. 10) Protect the power cord from...
..., stand, tripod, bracket, or table specified by the manufacturer, or sold with the manufacturer's instructions. 8) Do not install near water. 6) Clean only with one wider than the other electric light or power circuits. Lightning For added protection for the LCD TV during a heavy storm - Turn off your wall outlet, consult an electrician for replacement of the obsolete outlet. 10) Protect the power cord from...

User Manual
Page 5
... the receiving antenna. • Increase the separation between the LCD TV and receiver. • Connect the equipment into an outlet on the floor, only SJT type cord sets may be used to part 15 of destination and must be selected according to radio communications if not installed and used . The cord set is connected. • Consult the Westinghouse Service Center or an experienced radio/TV technician for your specific country...
... the receiving antenna. • Increase the separation between the LCD TV and receiver. • Connect the equipment into an outlet on the floor, only SJT type cord sets may be used to part 15 of destination and must be selected according to radio communications if not installed and used . The cord set is connected. • Consult the Westinghouse Service Center or an experienced radio/TV technician for your specific country...

User Manual
Page 6
..., lint-free cloth, then wipe the surface. Manufacturer will not be liable for damage resulting from use of any ammonia or alcohol-based cleaners on the LCD TV screen or case. Use a soft, dry cloth. 2. Some chemical cleaners have been reported to damage the screen and or LCD TV case. English Cleaning the LCD TV • MAKE SURE THE LCD TV IS TURNED OFF •...
..., lint-free cloth, then wipe the surface. Manufacturer will not be liable for damage resulting from use of any ammonia or alcohol-based cleaners on the LCD TV screen or case. Use a soft, dry cloth. 2. Some chemical cleaners have been reported to damage the screen and or LCD TV case. English Cleaning the LCD TV • MAKE SURE THE LCD TV IS TURNED OFF •...
User Manual
Page 7
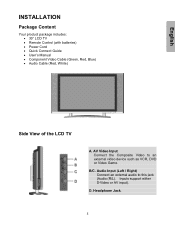
English INSTALLATION Package Content Your product package includes: • 30" LCD TV • Remote Control (with batteries) • Power Cord • Quick Connect Guide • User's Manual • Component Video Cable (Green, Red, Blue) • Audio Cable (Red, White) Side View of the LCD TV A. D. Headphone Jack. 5 Inputs support either S-Video or AV input). Audio Input (Left / Right) Connect an external audio to an external video device such as VCR, DVD or Video Game. AV Video Input Connect the Composite Video to this jack (Audio (R/L). B/C.
English INSTALLATION Package Content Your product package includes: • 30" LCD TV • Remote Control (with batteries) • Power Cord • Quick Connect Guide • User's Manual • Component Video Cable (Green, Red, Blue) • Audio Cable (Red, White) Side View of the LCD TV A. D. Headphone Jack. 5 Inputs support either S-Video or AV input). Audio Input (Left / Right) Connect an external audio to an external video device such as VCR, DVD or Video Game. AV Video Input Connect the Composite Video to this jack (Audio (R/L). B/C.
User Manual
Page 8
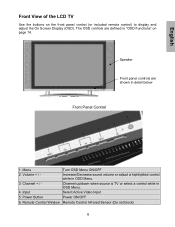
Volume + / - Channel up/down when source is TV or select a control while in OSD Menu. 3. Remote Control Window Remote Control Infrared Sensor (Do not block) 6 Increase/Decrease sound volume or adjust a highlighted control while in OSD Menu. 4. Power Button Power ON/OFF 6. The OSD controls are shown in "OSD Functions" on the front panel control (or included remote control) to display and adjust the On Screen Display (OSD). Channel + / - Input Select Active Video Input 5. Menu Turn OSD Menu ON/OFF 2. English Front View of the LCD TV Use the buttons on...
Volume + / - Channel up/down when source is TV or select a control while in OSD Menu. 3. Remote Control Window Remote Control Infrared Sensor (Do not block) 6 Increase/Decrease sound volume or adjust a highlighted control while in OSD Menu. 4. Power Button Power ON/OFF 6. The OSD controls are shown in "OSD Functions" on the front panel control (or included remote control) to display and adjust the On Screen Display (OSD). Channel + / - Input Select Active Video Input 5. Menu Turn OSD Menu ON/OFF 2. English Front View of the LCD TV Use the buttons on...

User Manual
Page 9
... to the Audio out (Green) on your PC. H. K. RGB IN Using a 15-pin VGA cable, connect to the other devices with component output to an external video device such as VCR, DVD or video game system D. English Rear View of the LCD TV A. F. J. G. RGB Audio IN Using the cable provided, connect to a power source B. YPbPr1 Audio 1 Input (Right / Left) Connect an external audio to this jack. I. N. Audio Output (Right / Left) Connect an external audio source to this output. 7 Inputs support either S-Video or AV input. YPbPr1 Input Connect an external video devices...
... to the Audio out (Green) on your PC. H. K. RGB IN Using a 15-pin VGA cable, connect to the other devices with component output to an external video device such as VCR, DVD or video game system D. English Rear View of the LCD TV A. F. J. G. RGB Audio IN Using the cable provided, connect to a power source B. YPbPr1 Audio 1 Input (Right / Left) Connect an external audio to this jack. I. N. Audio Output (Right / Left) Connect an external audio source to this output. 7 Inputs support either S-Video or AV input. YPbPr1 Input Connect an external video devices...

User Manual
Page 10
... source input 17. TV Select TV source input 18. T / S / W / X OSD MENU control 8. FREEZE Freeze main screen 13. YPbPr Select YPbPr1 / YPbPr2 source input 16. S-Video Select S-Video source input 19. MUTE/EXIT Turn the Sound On/Off 10. AV Select AV1 / AV2 source input 8 CHANNEL NUMBER KEYS Select specific channels 4. POWER: Switch the power On/Off 2. SCALING Select Video Display format "STANDARD", "FILL", or "ZOOM". 7. PIP Display Sub picture On/Off 12. CH -/+ TV Channel Up/Down adjustment 15. English Remote Control The Remote Control will transmit to the LCD TV...
... source input 17. TV Select TV source input 18. T / S / W / X OSD MENU control 8. FREEZE Freeze main screen 13. YPbPr Select YPbPr1 / YPbPr2 source input 16. S-Video Select S-Video source input 19. MUTE/EXIT Turn the Sound On/Off 10. AV Select AV1 / AV2 source input 8 CHANNEL NUMBER KEYS Select specific channels 4. POWER: Switch the power On/Off 2. SCALING Select Video Display format "STANDARD", "FILL", or "ZOOM". 7. PIP Display Sub picture On/Off 12. CH -/+ TV Channel Up/Down adjustment 15. English Remote Control The Remote Control will transmit to the LCD TV...

User Manual
Page 11
... batteries. 9 CAUTION: • Only use AAA batteries. • Do not mix new and old batteries. Inserting the batteries incorrectly may result in accordance with local laws and regulations. • Keep batteries away from children and pets. • When the remote control will not to (+) and (−) markings. Insert Remote Control Batteries 1) Remove the battery cover. 2) Insert...
... batteries. 9 CAUTION: • Only use AAA batteries. • Do not mix new and old batteries. Inserting the batteries incorrectly may result in accordance with local laws and regulations. • Keep batteries away from children and pets. • When the remote control will not to (+) and (−) markings. Insert Remote Control Batteries 1) Remove the battery cover. 2) Insert...

User Manual
Page 12
DVI CONNECTION: Connect a Digital DVI cable from compatible devices to the LCD TV DVI HDCP port. English 2. Connect AV, Component, S-Video, Antenna/Cable to Video Devices Connect Video/Audio cables from your PC VGA OUT port to the LCD TV RGB IN port. AUDIO CONNECTION: Connect a stereo mini cable from your PC or DVD DVI OUT port to the back panel of the LCD TV IMPORTANT: Before beginning, make sure all devices are turned off. RGB CONNECTION: Connect an analog VGA cable from the PC's AUDIO OUT port to...
DVI CONNECTION: Connect a Digital DVI cable from compatible devices to the LCD TV DVI HDCP port. English 2. Connect AV, Component, S-Video, Antenna/Cable to Video Devices Connect Video/Audio cables from your PC VGA OUT port to the LCD TV RGB IN port. AUDIO CONNECTION: Connect a stereo mini cable from your PC or DVD DVI OUT port to the back panel of the LCD TV IMPORTANT: Before beginning, make sure all devices are turned off. RGB CONNECTION: Connect an analog VGA cable from the PC's AUDIO OUT port to...

User Manual
Page 13
... the best picture quality, set LCD TV timing mode to VESA 1280x768 at 60Hz (refer to the graphic card's user guide for LCD TV using the OSD menu or remote control 7. Turn Power On Press the Power ON button on the front of the LCD TV, or press the Power ON (Red) button on TV Inputs: See page 17 to configure and allow the LCD TV to set this timing mode). 11 Select input source for questions on how to receive all available channels. 8. English 4. Connect power cables Connect the power cord...
... the best picture quality, set LCD TV timing mode to VESA 1280x768 at 60Hz (refer to the graphic card's user guide for LCD TV using the OSD menu or remote control 7. Turn Power On Press the Power ON button on the front of the LCD TV, or press the Power ON (Red) button on TV Inputs: See page 17 to configure and allow the LCD TV to set this timing mode). 11 Select input source for questions on how to receive all available channels. 8. English 4. Connect power cables Connect the power cord...

User Manual
Page 14
Use 3/4 arrow keys to highlight the desired OSD sub-menu. Main Menu To select a sub-menu, press ▲/▼ on the front control keys or the ▲/▼ key on the remote control. To display the OSD main menu, press the Menu button on the front control keys of the LCD TV or the MENU key on the remote control. 12 English OSD Function All the function settings for the LCD TV are controlled either by the remote control or using the bottom control keys on the front panel.
Use 3/4 arrow keys to highlight the desired OSD sub-menu. Main Menu To select a sub-menu, press ▲/▼ on the front control keys or the ▲/▼ key on the remote control. To display the OSD main menu, press the Menu button on the front control keys of the LCD TV or the MENU key on the remote control. 12 English OSD Function All the function settings for the LCD TV are controlled either by the remote control or using the bottom control keys on the front panel.

User Manual
Page 15
PICTURE PARAMETERS: English Function Name Function Brightness Brightness adjustment Contrast Contrast adjustment Saturation Saturation adjustment Hue Hue adjustment Color Temp Sharpness Color temperature adjustment (Color 1, Color 2, Color 3) Sharpness adjustment (Sharpness cannot be adjusted in PC mode) Aspect Ratio Set Display to "STANDARD" / "FILL" / "ZOOM" Backlight Backlight adjustment Reset Reset video settings 13
PICTURE PARAMETERS: English Function Name Function Brightness Brightness adjustment Contrast Contrast adjustment Saturation Saturation adjustment Hue Hue adjustment Color Temp Sharpness Color temperature adjustment (Color 1, Color 2, Color 3) Sharpness adjustment (Sharpness cannot be adjusted in PC mode) Aspect Ratio Set Display to "STANDARD" / "FILL" / "ZOOM" Backlight Backlight adjustment Reset Reset video settings 13

User Manual
Page 17
Mute Select Audio OFF or ON Speaker Select internal or external speaker Reset Reset Audio settings 15 AUDIO SETTINGS: English Function Name Function Volume Volume adjustment Bass Bass adjustment Treble Treble adjustment Balance MTS Balance adjustment MTS Selection NOTE: This function depends on the type of broadcast being received.
Mute Select Audio OFF or ON Speaker Select internal or external speaker Reset Reset Audio settings 15 AUDIO SETTINGS: English Function Name Function Volume Volume adjustment Bass Bass adjustment Treble Treble adjustment Balance MTS Balance adjustment MTS Selection NOTE: This function depends on the type of broadcast being received.

User Manual
Page 19
English TV: Function Name TV / CATV Auto Scan Channel EDIT Caption Mode Function Select TV Source Type (AIR => Cable STD => Cable HRC => Cable IRC) Automatically detect available TV channels Add / Delete the selected TV channel Turn the Close Caption OFF or CC1, CC2, CC3, CC4, TT1, TT2, TT3, TT4 PARENTAL CONTROLS: Function Name Lock Menu MPAA Rating TV PG Rating Password EDIT Function Parental control OFF or ON See page 18 See page 18 Change Password (see page 18) 17
English TV: Function Name TV / CATV Auto Scan Channel EDIT Caption Mode Function Select TV Source Type (AIR => Cable STD => Cable HRC => Cable IRC) Automatically detect available TV channels Add / Delete the selected TV channel Turn the Close Caption OFF or CC1, CC2, CC3, CC4, TT1, TT2, TT3, TT4 PARENTAL CONTROLS: Function Name Lock Menu MPAA Rating TV PG Rating Password EDIT Function Parental control OFF or ON See page 18 See page 18 Change Password (see page 18) 17

User Manual
Page 21
GENERAL SETTINGS: English Function Name Function Menu Position OSD horizontal/vertical position adjustment Menu Timeout Set time to turn OFF the OSD Language OSD language Sleep Timer Set sleep timer Transparency Set OSD transparency level DPMS Select DPMS On/Off System Info Display Input source, type and signal Factory Reset Restore factory default settings 19
GENERAL SETTINGS: English Function Name Function Menu Position OSD horizontal/vertical position adjustment Menu Timeout Set time to turn OFF the OSD Language OSD language Sleep Timer Set sleep timer Transparency Set OSD transparency level DPMS Select DPMS On/Off System Info Display Input source, type and signal Factory Reset Restore factory default settings 19

User Manual
Page 22
... Viewing Angles 170° (H) / 170° (V) Input Signal Video/Audio RGB Analog * 1 (75 ohms, 0.7 Vp-p)/Mini-Stereo *1 H/V separated (TTL) for PC DVI-D * 1 (HDCP support) / RCA (L/R) * 1 fh: 30-80 kHz, fv: 50-75 Hz TV system antenna / NSTC *1 in US and TW Component Video * 2 / RCA (L/R) Stereo * 2 Composite * 1 / S-Video * 1 / RCA (L/R) stereo * 1 Composite * 1 / RCA (L/R) Stereo * 1, Headphone Mini-Stereo *1(side I/P) Output Signal RCA (L/R) Stereo * 1 HDTV Compatibility 480i, 480P, 720P, 1080i PC Compatible Supported...
... Viewing Angles 170° (H) / 170° (V) Input Signal Video/Audio RGB Analog * 1 (75 ohms, 0.7 Vp-p)/Mini-Stereo *1 H/V separated (TTL) for PC DVI-D * 1 (HDCP support) / RCA (L/R) * 1 fh: 30-80 kHz, fv: 50-75 Hz TV system antenna / NSTC *1 in US and TW Component Video * 2 / RCA (L/R) Stereo * 2 Composite * 1 / S-Video * 1 / RCA (L/R) stereo * 1 Composite * 1 / RCA (L/R) Stereo * 1, Headphone Mini-Stereo *1(side I/P) Output Signal RCA (L/R) Stereo * 1 HDTV Compatibility 480i, 480P, 720P, 1080i PC Compatible Supported...

User Manual
Page 23
... colors (red, green, or blue) are using a Macintosh computer older than G3, you are missing, check the video cable to make sure it is tightly secured to the video output port on Screen • Check your antenna connection. • Check the TV / CATV selection. Remote Control Buttons Do Not Work • Press only one button at a time. Power is ON but No Screen Image • Make sure the video cable connected to the LCD TV is connected...
... colors (red, green, or blue) are using a Macintosh computer older than G3, you are missing, check the video cable to make sure it is tightly secured to the video output port on Screen • Check your antenna connection. • Check the TV / CATV selection. Remote Control Buttons Do Not Work • Press only one button at a time. Power is ON but No Screen Image • Make sure the video cable connected to the LCD TV is connected...

User Manual
Page 24
English Remote Control Does Not Work • Make sure batteries are inserted correctly. • Replace batteries with new ones if necessary. How Can I Find More Help? • Log on to: www.westinghousedigital.com • Contact Westinghouse Customer Service at (866) 287-5555 or write us at service@westinghousedigital.com 22 Image Quality Issues • For the best TV image quality, "Standard Definition" TV should be viewed in a "Universal" Remote • Purchase a separate "learning" remote control. Remote Control Code Not Found in 4:3 format.
English Remote Control Does Not Work • Make sure batteries are inserted correctly. • Replace batteries with new ones if necessary. How Can I Find More Help? • Log on to: www.westinghousedigital.com • Contact Westinghouse Customer Service at (866) 287-5555 or write us at service@westinghousedigital.com 22 Image Quality Issues • For the best TV image quality, "Standard Definition" TV should be viewed in a "Universal" Remote • Purchase a separate "learning" remote control. Remote Control Code Not Found in 4:3 format.


